codeium 教程(中文)
原文官方中文教程 Codeium · Free AI Code Completion & ChatCodeium offers best in class AI code completion, search, and chat — all for free. It supports over 70+ languages and integrates with your favorite IDEs
codeium 官方教程(中文)
2024-11 codeium Vscode plugin
原文官方链接如下,因为没有中文教程,重点概念增加了翻译和我的理解
1 概述
Welcome to Codeium University–your one stop shop to learn everything Codeium!
Codeium is an AI toolkit designed to empower developers with best in class autocomplete, chat, in-line commands, and more. Codeium helps hundreds of thousands of developers around the world write millions of lines of code every month.
Codeium is powered by LLMs trained by the Codeium team specifically for writing code. Our models support 70+ languages and deeply understand your codebase to provide faster and better suggestions than any other AI coding tool on the market.
In these tutorials, we will walk you through Codeium's features and give you some tips and tricks to get the most out of the tool.

Here is a quick preview of some of the things we will walk through:
Accelerate your development with Codeium Autocomplete
Edit large chunks of code with Codeium Command
Talk to your codebase with Codeium Chat
You can return to Codeium University at any time by clicking Start Codeium University on the new chat page.
If the images above are not loading, you likely will not be able to download Codeium’s software. Please check your network settings to ensure you have access to our releases.
2 Installation 安装
After installing the extension, there’s just a few steps left to get Codeium up and running.
Follow along with the steps below and let us know on Discord if you have any questions!
2.1 Authorize 授权
After installation is complete, you should be prompted by Visual Studio Code with a pop-up on the bottom right to authorize Codeium. If not, you should see an option to sign in to your Codeium account in the bottom left Accounts tab of your Visual Studio Code window.
Click the Sign in with Auth to use Codeium option. Either method (popup or Accounts tab) should redirect you to the Codeium website.
Tip: If you get an error message saying that the browser cannot open a link from Visual Studio Code, you may need to update your browser and restart the authorization flow.
2.2: Create Account/Sign In 创建账户
If you do not have an account or otherwise are not already logged in online, you will be prompted to create an account or login.
If you get an error message indicating that the browser cannot open a link from Visual Studio Code, you may need to update your browser and restart the authorization flow.
2.3: Wait for language server 选择语言
Once you are signed in, Codeium will start downloading a language server. This is the program that communicates with our APIs to let you use Codeium’s AI features. The download usually takes ten to twenty seconds, but the download speed may depend on your internet connection. In the meantime, you are free to use VS Code as usual.
You should see a notification on the bottom right to indicate the progress of the download.
3 Acceleration 加速
One of Codeium's core features is autocomplete. Powered by our best-in-class proprietary model, Codeium suggests what you might want next after each keystroke.
The most immediate use case of Autocomplete is accelerating your development. Codeium can save you a lot of keystrokes and time especially when writing easy, repetitive, or boilerplate code.
In the following example, we make some additions to a Pet class.
Accept Completion: TAB
Accept Word: ⌘+►
Trigger Completion: ⌥+\
Next Completion: ⌥+]
Previous Completion: ⌥+[
3.1 Writing an enum 枚举
Make sure to test out all the features and shortcuts by opening the sandbox and following along with the tutorial in the sandbox.
We are given a Pet class, but right now, there is no indication of what species the pet is. Let us us start off by writing an enum to indicate the possible pet species. Just start typing enum and hit tab when Codeium gives you a suggestion to accept it.
Note that Codeium will only suggest when Intellisense is not active. If Intellisense is being displayed, you can simply clickESCto close it and show Codeium again.
Also note that this tutorial uses the production version of Codeium which is not deterministic. You likely will not get the same exact completions as displayed in the GIFs and you may need to type more or less characters than we did before you get a valid completion.

3.2 Add species to the Pet class
Now that we have defined the enum, we can add a new variable to the class. There are three places where we must do this, so follow along the GIF to add some new lines and watch Codeium autocomplete them.
You may need to start typing code like species: Species before the correct completion shows up.

3.3 Assign each pet a species
Now that we have added a new variable to the Pet constructor, we must update the our current initializations to specify the species. Follow along with the GIF to bring your cursor to the corresponding locations, and let Codeium autocomplete the species!

3.4 Print each pet
Finally, let’s print each pet! Start writing a for loop to print each pet and see how many characters of typing Codeium saves you. You’ve now made a handful of changes with only a few keystrokes and bunch of tabs!

4 Exploration 探索
Especially when using unfamiliar libraries or languages, Codeium autocomplete can be a huge help in generating ideas to unblock your coding. By looking through surrounding content or relevant context from your codebase, and understanding general software patterns, our models provide possible completions to your code which often assist in moving forward.
Codeium is the fastest way to try an idea out. Although Codeium's is really good and really fast, autocomplete tools are never perfect all the time. However, even just seeing the suggestion can spark an idea in your mind.
Let’s try this out by seeing what we can do with long PetHotel class.
4.1 Checking ratings
Let’s start off with a simple use case: we want to start off by checking the rating of the PetHotel is above 4 stars, but its not exactly clear how to do so. Is it petHotel.rating > 4, or petHotel.getRating() > 4, or even something like petHotel.info.rating > 4? Instead of looking through the code to find out, just let Codeium read through it and find out for you.
Remember that Codeium only suggests code when you type. To use Codeium within the parentheses, start typing petHotel and escape if any Intellisense shows up.

4.2 Registration
Now let’s register our pet, Fluffy, to the hotel for a week. Once again Codeium automatically reads through the implementation to figure out the parameters required to do so. Unfortunately, there is no code for it to reference to know how many days you want to register for, so it takes a random guess for that parameter. While it’s not perfect, it provides a good starting point that you can edit to reach the code you want.

4.3 Finding Area
In addition to helping you look through the code, Codeium is also getting smarter by the day and can perform some basic reasoning to help you out. While there is no function that returns the area of the room, Codeium can figure out that there is a length and width which can be used to calculate it.

5 Context Awareness 上下文感知
One of the most difficult parts of coding is understanding how different parts of your codebase work and how to put them together. Codeium's industry leading context awareness engine powers all of our models to find and use the most relevant snippets of code to enhance the quality of its suggestions.
One of the core features of this context awareness engine that can improve output quality is Context Pinning. As the developer, you often know your codebase the best, so you can tell our context engine what parts of the codebase it should prioritize when generating suggestions.
Just above the Chat input text box, you should see a Advanced button. Click on this, and then click the + Add context button to add context that will persist throughout Codeium's models when generating suggestions.
For the following example, we’re going to be modifying the Pet class which is stored in the same folder as the Vet class that contains this code:
class Vet {
  constructor(
    public name: string,
    public treatmentTypes: Treatment[],
    public yearsOfExperience: number
  ) { }

  /**
   * A function that treats a pet.
   *
   * @param {Pet} pet - The pet to be treated.
   * @return {number} The calculated treatment cost.
   */
  treatPet(pet: Pet, treatments: Treatment[]): number {
    console.log("Treating:", pet.name, "with:", treatments);
    let cost = 0;
    treatments.forEach((treatment) => {
      if (treatment === Treatment.ANNUAL_CHECKUP) {
        cost += 100;
      } else if (treatment === Treatment.SURGERY) {
        cost += 500;
      }
    });
    return cost;
  }

  displayVetInfo(): void {
    console.log(`Vet: ${this.name}`);
    console.log(`Specialties: ${this.specialties.join(", ")}`);
    console.log(`Years of Experience: ${this.yearsOfExperience}`);
  }
}
5.1 Using Constructors from Another File
Let’s take a look at how Codeium can grab the constructor from the Vet class. Start typing out the code to initialize a new Vet and watch how Codeium can grab the constructor and the related types needed to initialize it.

5.2 External Exploration
Just like we saw when looking at Autocomplete: Exploration, sometimes we don’t even know what function we want to use. Codeium can automatically look through the Vet file to find out what function prints the Vet’s information to save us the effort of having to go search for that ourselves.

5.3 Mixing Context
Finally, let’s take a quick look at Codeium mixing context from the Vet file and the current file. When you need to send fluffy for an annual checkup, Codeium needs to know the name of the variables in the current file as well as how to use the Vet’s treatPet function. It’s able to grab all of these and combine them together to get Fluffy his annual checkup.

6 Tips & Myths 提示与误解
When trying autocomplete for the first time, some people immediately love it while others are displeased by incorrect suggestions, security concerns, or a variety of other very justified reasons. We know that Codeium Autocomplete is not a perfect tool and it’s definitely not meant to replace any jobs, but one thing is clear: Codeium Autocomplete is a productivity boost for all engineers that use it.
It takes some time to get used to, but everyone we’ve seen can’t get enough of it after using it for just a few weeks. That being said, there are some common tips and misconceptions that we wanted to clarify:
-
Codeium Autocomplete is not for large code changes or answering questions:
Autocomplete optimizes for speed and efficiency, not large-scale, multi-level thinking. The same model that provides suggestions in less than a quarter of a second will not be able to do harder, multi-level reasoning tasks well. For these, Codeium Command and Codeium Chat will be your best bet, as they are powered by larger models and designed to handle additional complexity.
-
Sometimes we complete too much, sometimes we complete too little.
We attempt to make a completion on every keystroke, however there are also many reasons why you may not get a suggestion (low confidence in suggestion, latency, etc). Codeium should be treated like a Passive AI where you can accept the completions when they are helpful, ignore them when they are bad, and not waste time waiting for them when they might not show up. This may seem distracting at first, but give it some time and we guarantee it will become more and more natural.
-
Context matters.
Just like if you’re collaborating with another engineer, good code helps a lot. Use clear codes and documentations, comments, and naming to help the AI help you.
Generation
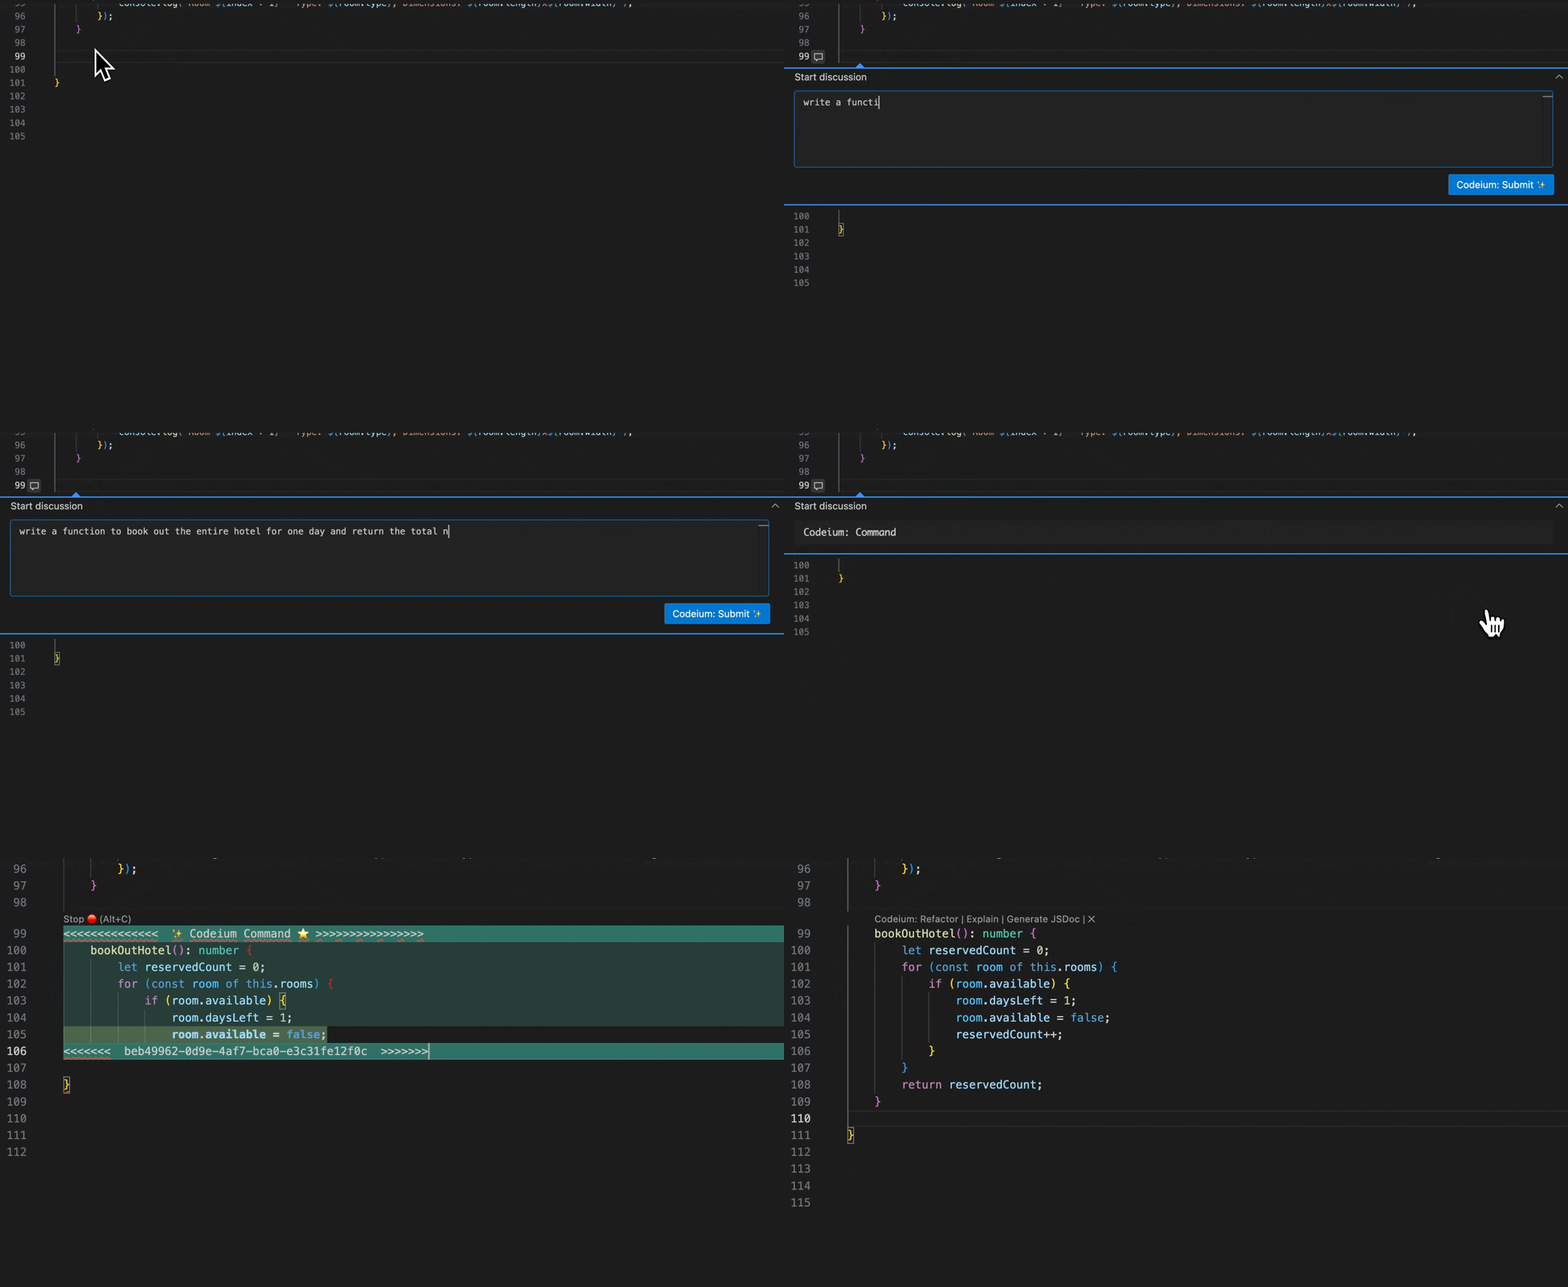
Oftentimes when we’re writing a simple code block, it’s much easier and faster to describe what we want through natural language. For all the cases where you want to instruct the model to write some code in a file, use Codeium Command.
Let’s return to the PetHotel class with an example:
Writing a New Function
Let’s try adding a new function to the PetHotel class to book out all the rooms. Press ⌘+I, type in the command, and let Codeium do the rest. You can quickly accept it by clicking ⌥+A.
Here is the command we used:
Feel free to try out adding any other function you want as well, just try to be as clear and precise in your instructions as possible.
7 Edits 编辑
Codeium Command can also be used to edit existing blocks of code. All you have to do is highlight what you would like to modify and give it instructions on what you want to change.
This can be exceptionally useful when you need to make many small changes throughout a larger chunk of code, but there are also various other use cases people have found, so try it out and let us know what works for you!
Let’s give it a shot by editing our PetHotel code:
Edit New Function
Let’s use Codeium Command to edit our registerPet function to enable people to specify their minimum size requirement. Select the function, press ⌘+I, and tell Codeium to add the parameter and watch as it updates all the necessary parts of the code.
Here is the command we used:
As a heads up, the generated code is not always perfect, so make sure to double check the code before accepting it.


Chat Overview
Codeium brings the AI chatbot experience right into your IDE by providing the best models and tools to answer your coding-related questions.
-
Context Awareness: Just like autocomplete, Codeium Chat grabs snippets from relevant parts of your codebase to provide more accurate, grounded answers.
-
IDE Integration: Codeium Chat can also use information from the files you’re currently editing and the changes you’ve made to guide you in the right direction.
-
Code-first Tooling: Finally, Codeium Chat provides various shortcuts to easily access its AI for various common use cases like unit tests or library usage questions.
Don’t just take our word for it, open Codeium Chat from the Codeium side panel or using the shortcut above, and ask it some questions! Once you’ve played around with it, proceed to the next tutorials to learn how to level up your chat experience.
Code Lenses
To make some of the most common patterns for chat easier to use, Codeium offers code lenses on top of functions and classes in supported languages.
The three supported functionalities are:
-
Documentation: Generates a docstring for the function based on documentation practices for the used language.
-
Explanation: Summarizes and explains the code of the selected code snippet.
-
Refactoring: Refactors your code based on the instructions given. This will pop up in the Command input panel.
Note that this function can be disabled if you toggle the Codeium: Enable Code Lens setting in VS Code.
Let’s quickly try it out:
Class Explanation
The PetHotel class has a variety of functions that might take a while to read through so let’s use Codeium to generate an summary instead. Click the Codeium: Explain button, and Codeium Chat should pop up with a brief explanation of all the class methods.
Auto-Docstring
The bookOutHotel class we wrote earlier did not contain a docstring, so let’s make sure the code remains readable by auto generating a docstring. Click the Generate JSDoc button and then apply and accept the diff to add the docstring to the code.
@ Mentions
When chatting about your codebase, it’s helpful to refer to specific snippets and and functions. That’s why Codeium Chat provides the easiest way to refer to whatever you are working on: @ Mentions
There are currently three kinds:
-
Chat with Code: Directly mention functions and classes in your code to understand the runtime of functions, check for styling issues, and much much more.
-
Chat with Libraries: Refer to a set of popular repositories and libraries to get more accurate and up-to-date answers by telling Codeium Chat to auto-grab relevant context directly from the library’s code.
-
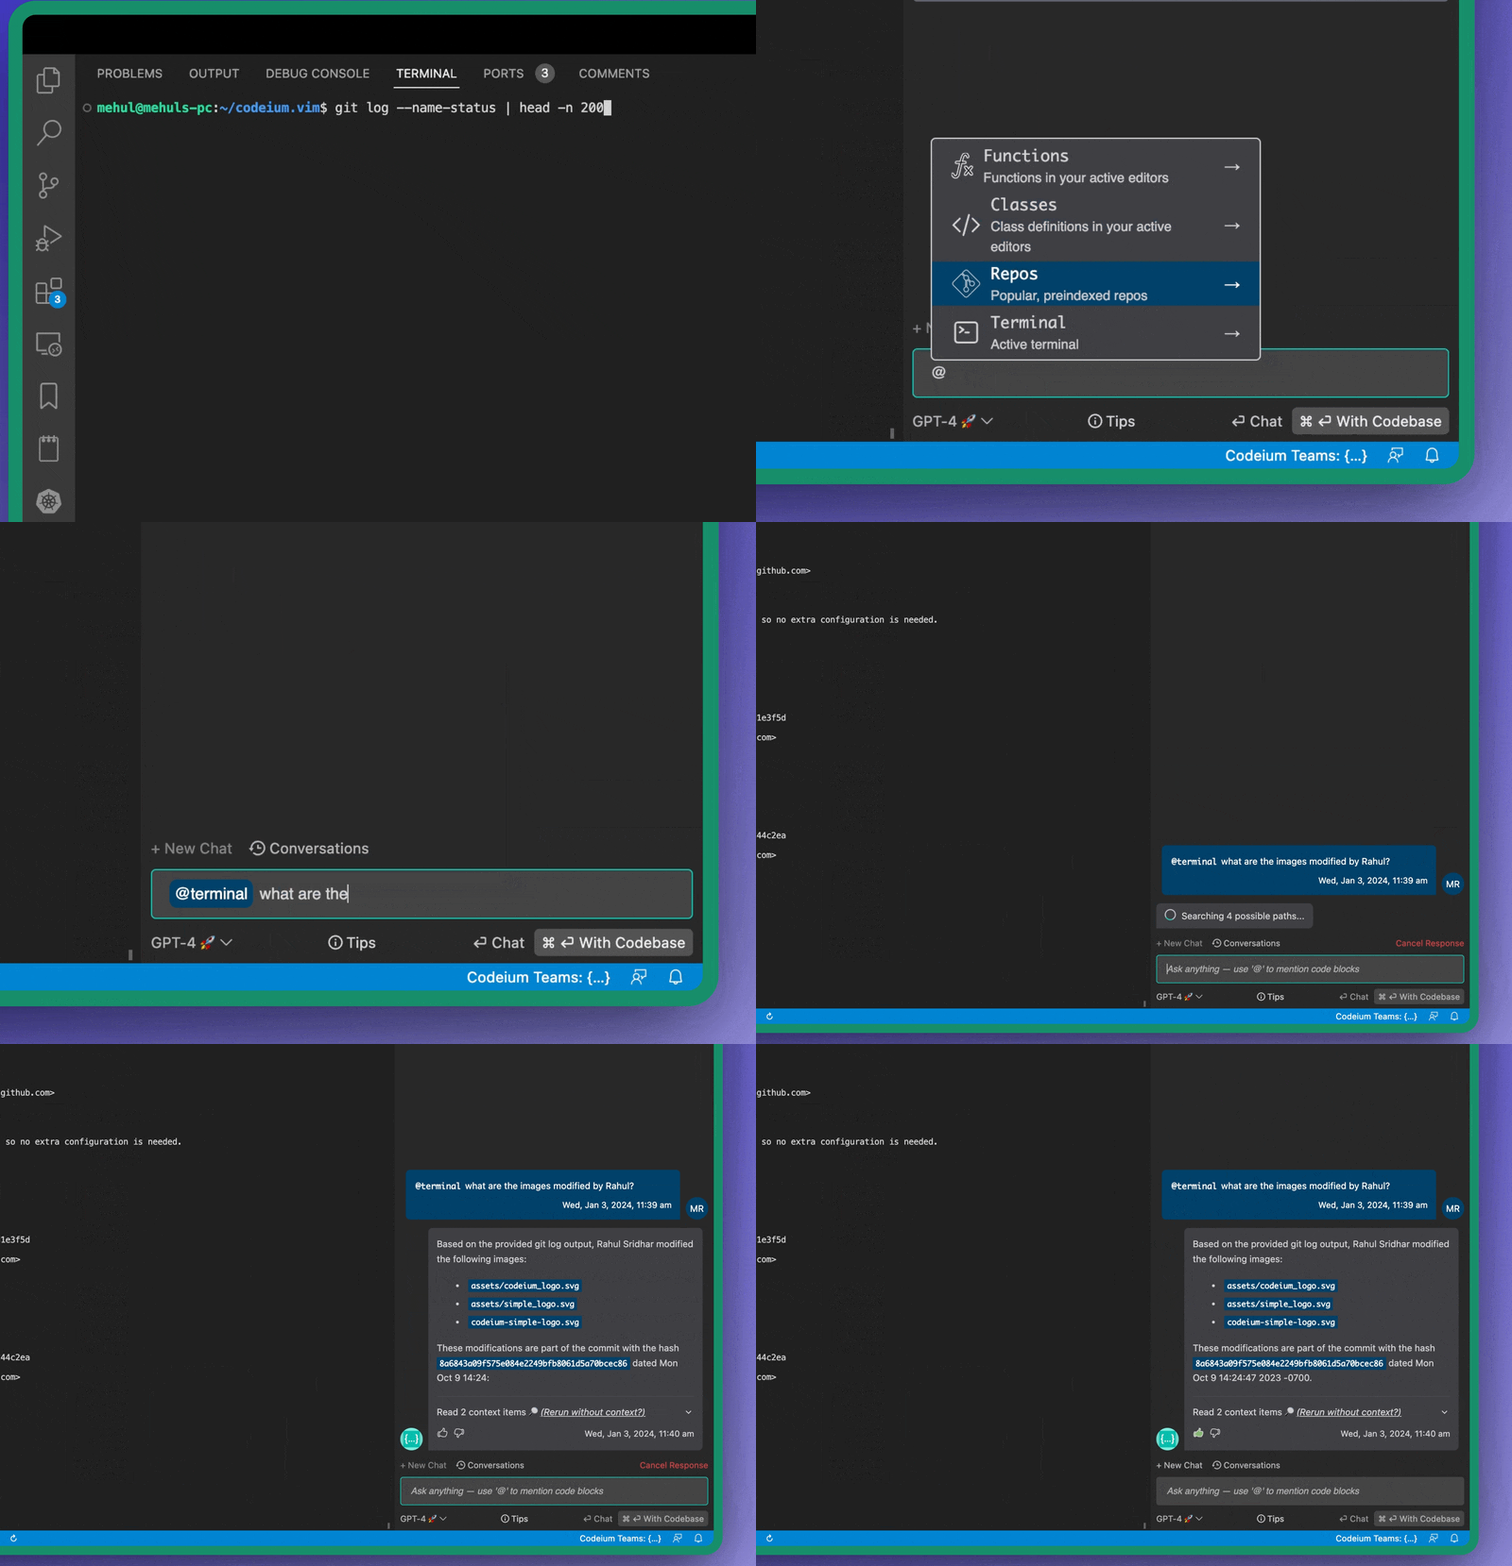
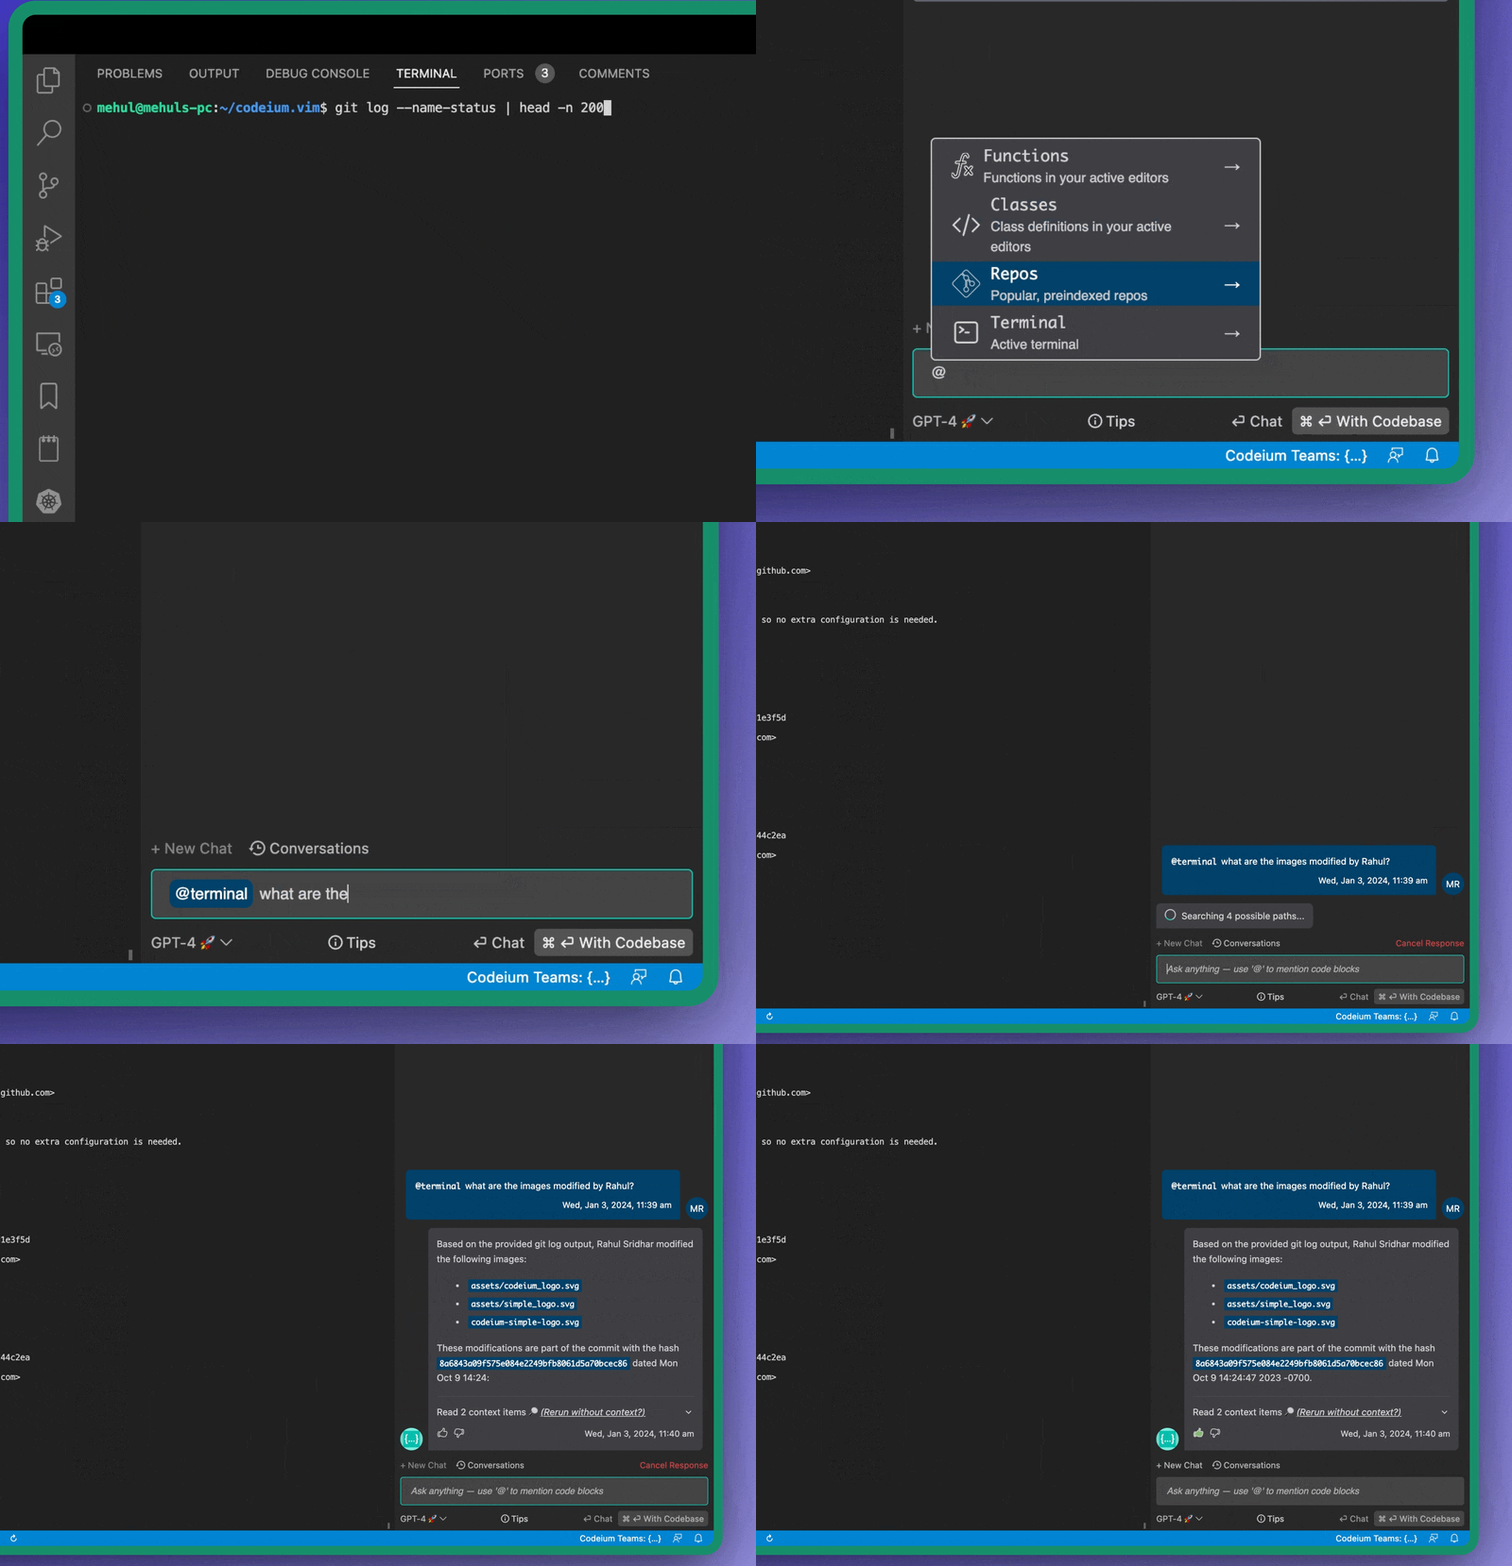
Chat with Terminal: Explore your in-IDE terminal output to parse through large logs, understand complex results, and debug failed tests.
Let’s try each of them out:
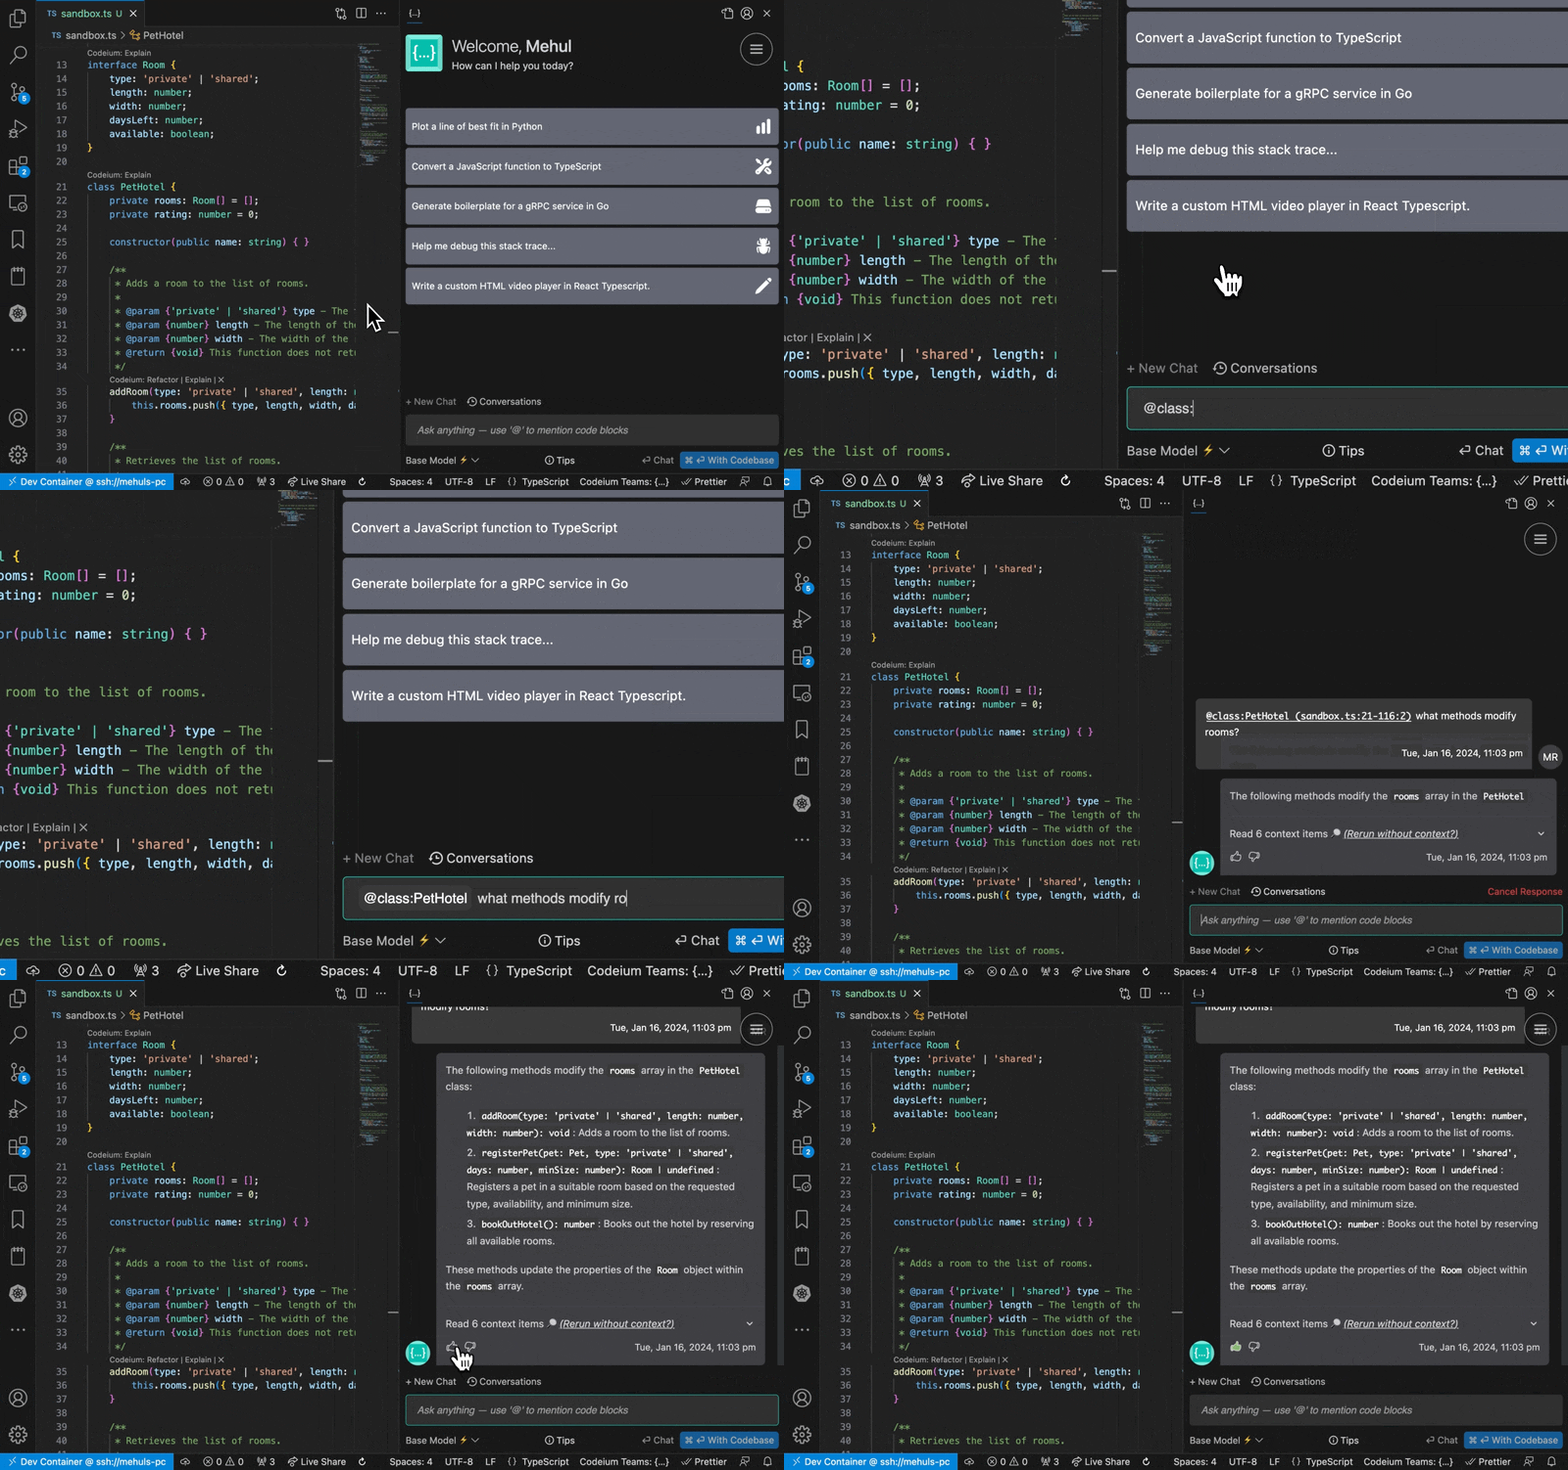
Chat with Code
The PetHotel class may take a while for us to read through so let’s ask a question about it and have Codeium Chat parse through it instead. Here is the one that we used:
NOTE: You must type out @ and select from the options, copy pasting it entirely will not work.

Chat with Libraries
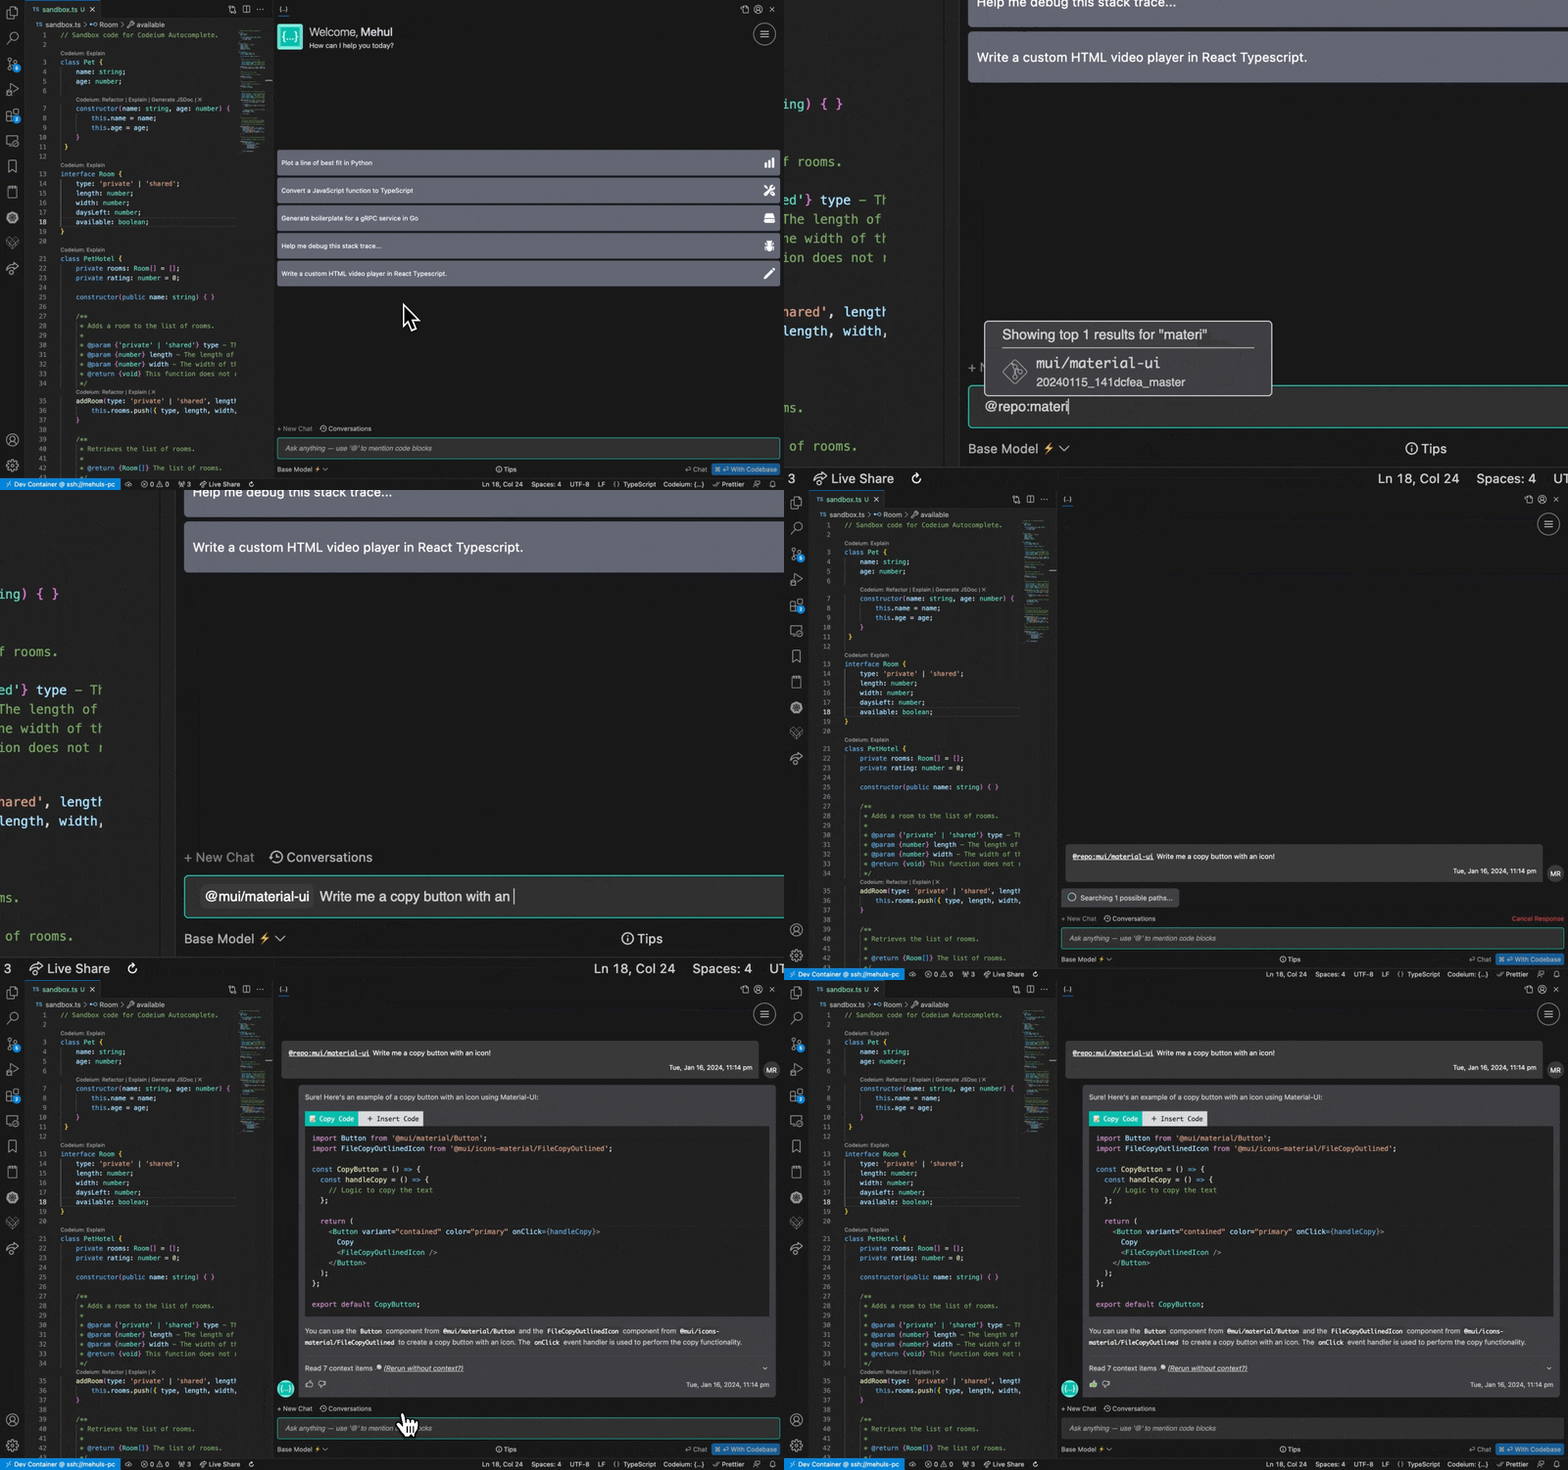
There are a variety of libraries we support, but for now let’s try using material-ui to write a button component. Use @mui/material-ui and prompt Codeium Chat with"Write me a copy button with an icon" and let it generate it for you!
Chat with Terminal
Finally, let’s try using Codeium Chat with our terminal. Open up the in-IDE terminal and run any command, then use @terminal:all to ask a question about it.
Problem Explanations
Codeium Chat also gives you an easy way to explain those pesky issues in your code. For all of the underlined errors in your code, you can simply hover over and get Codeium to explain what’s going wrong. With context from the surrounding code and it’s understanding of common issues, Codeium will attempt to suggest possible fixes or solutions.
This functionality can also be disabled if you find it too distracting in Codeium: Enable Explain Problem setting.
Let’s try it out in a buggy file:
Fix Lint Issues
There has been a small bug introduced in your code. Hover over the issue and click the Codeium: Explain Problem button to generate a summary and possibly solutions using Codeium Chat.
Cheat Sheet
Here is the full list of default VS Code shortcuts for your reference:
NOTE: Some of these will vary between IDEs or not be available on every IDE.
Accept Completion: TAB
Accept Word: ⌘+►
Trigger Completion: ⌥+\
Next Completion: ⌥+]
Previous Completion: ⌥+[
Start Codeium Command: ⌘+I
Cancel Command: ⌥+C
Accept Diff: ⌥+A
Reject Diff: ⌥+N
Open Chat: ⌘+⌥+A更多推荐
 已为社区贡献4条内容





所有评论(0)