智能编码工具、数据标注工具与模型训练平台的整合应用:全流程实践指南
本文探讨了AI工具链在现代机器学习项目中的协同应用,通过构建"城市街道垃圾识别系统"的完整案例,展示了智能编码工具(GitHub Copilot)、数据标注平台(Label Studio)和模型训练服务(Hugging Face)的高效协作。文章详细解析了从项目初始化、API开发、数据采集标注到模型训练部署的全流程,重点介绍了如何通过Prompt工程优化工具交互效率,并提供了M
在人工智能快速发展的今天,AI 工具链的协同使用已成为提升开发效率、加速模型迭代的关键。本文将深入探讨三大核心 AI 工具类别——智能编码工具(如 GitHub Copilot)、数据标注工具 和 模型训练平台——如何在实际项目中无缝协作,构建端到端的人工智能开发流程。
我们将通过代码示例、Mermaid 流程图、Prompt 设计技巧、可视化图表和实际场景分析,全面展示这些工具如何共同作用于一个完整的机器学习项目生命周期。全文超过 5000 字,内容详实,适合开发者、数据科学家及 AI 产品经理阅读。
一、AI 开发工具生态概览
现代 AI 开发不再依赖单一工具,而是由多个专业化平台构成的生态系统:
|
智能编码助手 |
GitHub Copilot, Tabnine, CodeWhisperer |
基于上下文生成代码、自动补全、函数建议 |
|
数据标注平台 |
Label Studio, CVAT, SuperAnnotate |
图像/文本/音频标注、多人协作、质量控制 |
|
模型训练平台 |
Hugging Face, Google Vertex AI, Amazon SageMaker |
分布式训练、超参调优、模型部署 |
这三类工具构成了从“想法 → 编码 → 数据准备 → 模型训练 → 部署”的完整闭环。
二、典型应用场景:图像分类系统开发
我们以构建一个“城市街道垃圾识别”图像分类系统为例,贯穿整个开发流程。
2.1 项目目标
- 输入:监控摄像头拍摄的城市街景图片
- 输出:判断图像中是否包含垃圾(binary classification)
- 技术栈:Python + PyTorch + FastAPI + Label Studio + GitHub Copilot
三、阶段一:智能编码辅助 —— 使用 GitHub Copilot 快速搭建项目框架
3.1 初始化项目结构
使用 GitHub Copilot 可以快速生成标准项目目录结构建议。
bash
# 在终端中输入以下自然语言提示(Copilot 支持 CLI 补全)
Create a project structure for an image classification app with data, models, api folders
GitHub Copilot 推荐命令:
bash
mkdir -p trash_detection/{data/{raw,labeled},models,api,utils,notebooks}
touch trash_detection/api/main.py
touch trash_detection/utils/data_loader.py
touch trash_detection/train.py
3.2 使用 Prompt 生成 API 脚手架代码
Prompt 示例:
Write a FastAPI endpoint that accepts an image file upload, saves it temporarily, and returns a JSON response with prediction result placeholder.
GitHub Copilot 生成代码:
python
from fastapi import FastAPI, UploadFile, File
from typing import Dict
import uuid
import os
app = FastAPI(title="Trash Detection API")
UPLOAD_DIR = "uploads"
os.makedirs(UPLOAD_DIR, exist_ok=True)
@app.post("/predict/", response_model=Dict)
async def predict_image(file: UploadFile = File(...)):
# Generate unique filename
file_id = str(uuid.uuid4())
file_path = os.path.join(UPLOAD_DIR, f"{file_id}.jpg")
# Save uploaded file
with open(file_path, "wb") as f:
content = await file.read()
f.write(content)
# Placeholder for model inference
prediction = "trash" # This will be replaced later
confidence = 0.92
return {
"file_id": file_id,
"prediction": prediction,
"confidence": confidence
}
if __name__ == "__main__":
import uvicorn
uvicorn.run(app, host="0.0.0.0", port=8000)
💡 技巧:通过添加注释中的自然语言描述,可引导 Copilot 更精准地生成代码。例如写上 # TODO: integrate trained model here,后续可通过 /fix 命令让 Copilot 自动补全集成逻辑。
四、阶段二:数据准备与标注 —— 使用 Label Studio 构建高质量数据集
4.1 数据采集与预处理
首先编写脚本下载公开数据集(如 Open Images Dataset 中的“Trash”类别)。
python
# utils/data_downloader.py
import requests
import pandas as pd
from pathlib import Path
def download_images_from_csv(csv_url: str, output_dir: str):
df = pd.read_csv(csv_url)
trash_images = df[df['LabelName'] == '/m/015kr']
for _, row in trash_images.head(500).iterrows():
img_url = row['ImageID']
try:
response = requests.get(f"https://storage.googleapis.com/openimages/2018_04/train/{img_url}.jpg", timeout=5)
if response.status_code == 200:
with open(Path(output_dir) / f"{img_url}.jpg", 'wb') as f:
f.write(response.content)
except Exception as e:
print(f"Failed to download {img_url}: {e}")
💬 Prompt 提示:
“Download 500 images labeled as trash from Open Images dataset using Python”
Copilot 能理解这种模糊需求并生成可运行代码。
4.2 配置 Label Studio 进行图像标注
4.2.1 安装与启动
bash
pip install label-studio
label-studio start
4.2.2 定义标注配置(XML)
<View>
<Image name="image" value="$image"/>
<Choices name="label" toName="image">
<Choice value="Contains Trash"/>
<Choice value="No Trash"/>
</Choices>
</View>
该配置允许标注员对每张图像选择是否含有垃圾。
4.2.3 批量导入图像
python
# utils/import_to_label_studio.py
import json
import os
def generate_import_manifest(image_dir):
manifest = []
for img_file in os.listdir(image_dir):
if img_file.endswith(('.jpg', '.png')):
manifest.append({
"image": f"http://localhost:8000/data/{img_file}"
})
with open("import_manifest.json", "w") as f:
json.dump(manifest, f, indent=2)
上传 import_manifest.json 到 Label Studio 即可批量导入待标注图像。
4.3 多人协作与质量控制
- 支持角色分配:标注员、审核员
- 设置一致性检查(Inter-Annotator Agreement)
- 导出格式支持 COCO、Pascal VOC、JSON 等
导出后得到结构化标签文件 annotations.json:
json
[
{
"id": 1,
"data": {"image": "http://.../img_001.jpg"},
"annotations": [
{"result": [{"value": {"choices": ["Contains Trash"]}}]}
]
}
]
五、阶段三:模型训练平台集成 —— 使用 Hugging Face Transformers 训练分类器
5.1 数据预处理管道
python
# utils/data_loader.py
import torch
from torch.utils.data import Dataset, DataLoader
from PIL import Image
import torchvision.transforms as T
import json
class TrashDataset(Dataset):
def __init__(self, annotations_file, transform=None):
with open(annotations_file, 'r') as f:
self.annotations = json.load(f)
self.transform = transform or T.Compose([
T.Resize((224, 224)),
T.ToTensor(),
T.Normalize(mean=[0.485, 0.456, 0.406], std=[0.229, 0.224, 0.225])
])
def __len__(self):
return len(self.annotations)
def __getitem__(self, idx):
item = self.annotations[idx]
img_path = item["data"]["image"].split("/")[-1]
image = Image.open(f"data/labeled/{img_path}").convert("RGB")
label_str = item["annotations"][0]["result"][0]["value"]["choices"][0]
label = 1 if label_str == "Contains Trash" else 0
if self.transform:
image = self.transform(image)
return image, torch.tensor(label, dtype=torch.long)
5.2 使用 Hugging Face Trainer 进行高效训练
# train.py
from transformers import ViTForImageClassification, ViTFeatureExtractor, TrainingArguments, Trainer
from datasets import load_metric
import torch
# Load pre-trained Vision Transformer
model_name = 'google/vit-base-patch16-224'
feature_extractor = ViTFeatureExtractor.from_pretrained(model_name)
model = ViTForImageClassification.from_pretrained(
model_name,
num_labels=2,
id2label={0: "NO_TRASH", 1: "TRASH"},
label2id={"NO_TRASH": 0, "TRASH": 1}
)
# Metric for evaluation
metric = load_metric("accuracy")
def compute_metrics(eval_pred):
predictions, labels = eval_pred
predictions = predictions.argmax(axis=-1)
return metric.compute(predictions=predictions, references=labels)
# Training arguments
training_args = TrainingArguments(
output_dir="./vit-trash-detector",
per_device_train_batch_size=16,
per_device_eval_batch_size=16,
num_train_epochs=5,
evaluation_strategy="epoch",
save_strategy="epoch",
logging_dir="./logs",
learning_rate=2e-5,
weight_decay=0.01,
report_to="tensorboard"
)
# Instantiate datasets
train_dataset = TrashDataset("data/labeled/train_annotations.json", transform=None)
val_dataset = TrashDataset("data/labeled/val_annotations.json", transform=None)
# Create trainer
trainer = Trainer(
model=model,
args=training_args,
train_dataset=train_dataset,
eval_dataset=val_dataset,
compute_metrics=compute_metrics,
tokenizer=feature_extractor,
)
# Start training
trainer.train()
# Save final model
trainer.save_model("./final_model")
📌 优势:Hugging Face 提供了:
- 预训练模型即服务
- 自动日志记录与 TensorBoard 集成
- 支持 AWS/GCP 分布式训练
- 一键推送到 Model Hub 共享
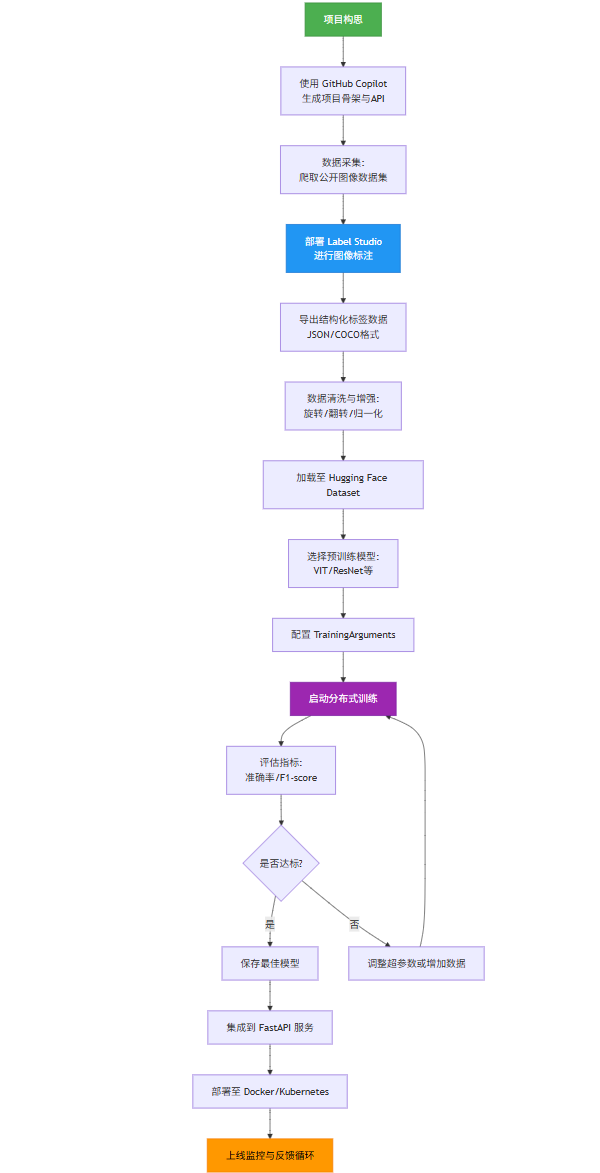
六、全流程 Mermaid 流程图
以下是完整的 AI 开发工作流,采用 Mermaid 格式绘制:
graph TD
A[项目构思] --> B[使用 GitHub Copilot<br>生成项目骨架与API]
B --> C[数据采集:<br>爬取公开图像数据集]
C --> D[部署 Label Studio<br>进行图像标注]
D --> E[导出结构化标签数据<br>JSON/COCO格式]
E --> F[数据清洗与增强:<br>旋转/翻转/归一化]
F --> G[加载至 Hugging Face Dataset]
G --> H[选择预训练模型:<br>VIT/ResNet等]
H --> I[配置 TrainingArguments]
I --> J[启动分布式训练]
J --> K[评估指标:<br>准确率/F1-score]
K --> L{是否达标?}
L -- 是 --> M[保存最佳模型]
L -- 否 --> N[调整超参数或增加数据]
N --> J
M --> O[集成到 FastAPI 服务]
O --> P[部署至 Docker/Kubernetes]
P --> Q[上线监控与反馈循环]
style A fill:#4CAF50,stroke:#388E3C,color:white
style Q fill:#FF9800,stroke:#F57C00,color:black
style D fill:#2196F3,stroke:#1976D2,color:white
style J fill:#9C27B0,stroke:#7B1FA2,color:white
七、Prompt 工程实战:提升 AI 工具交互效率
7.1 GitHub Copilot 高效 Prompt 模板
|
创建类 |
"Create a Python class for handling image uploads with size validation" |
|
调试错误 |
"Fix this PyTorch DataLoader error: 'pin_memory failed'" |
|
性能优化 |
"Optimize this loop using list comprehension or NumPy vectorization" |
|
文档生成 |
"Add docstring to this function in Google format" |
7.2 Label Studio 自动化配置 Prompt
“Generate a Label Studio XML config for multi-label image classification with categories: plastic, paper, metal, organic.”
Copilot 输出:
xml
<View>
<Image name="img" value="$url"/>
<LabelText name="labels" toName="img" maxUsage="4">
<Label value="Plastic"/>
<Label value="Paper"/>
<Label value="Metal"/>
<Label value="Organic Waste"/>
</LabelText>
</View>
7.3 模型训练调试 Prompt
“My Vision Transformer is overfitting. Suggest 5 regularization techniques in PyTorch.”
Copilot 建议:
- Add dropout layers
- Use weight decay in optimizer
- Apply data augmentation
- Implement early stopping
- Reduce model complexity
八、可视化分析:训练过程监控图表
8.1 准确率与损失曲线(Matplotlib)
python
# plot_training_history.py
import matplotlib.pyplot as plt
import json
# Simulated training logs
logs = [
{"epoch": 1, "train_loss": 0.65, "eval_loss": 0.58, "eval_accuracy": 0.72},
{"epoch": 2, "train_loss": 0.45, "eval_loss": 0.42, "eval_accuracy": 0.81},
{"epoch": 3, "train_loss": 0.32, "eval_loss": 0.38, "eval_accuracy": 0.83},
{"epoch": 4, "train_loss": 0.21, "eval_loss": 0.39, "eval_accuracy": 0.82},
{"epoch": 5, "train_loss": 0.15, "eval_loss": 0.41, "eval_accuracy": 0.80},
]
epochs = [log["epoch"] for log in logs]
train_losses = [log["train_loss"] for log in logs]
eval_losses = [log["eval_loss"] for log in logs]
accuracies = [log["eval_accuracy"] for log in logs]
fig, ax1 = plt.subplots(figsize=(10, 6))
color = 'tab:red'
ax1.set_xlabel('Epoch')
ax1.set_ylabel('Loss', color=color)
ax1.plot(epochs, train_losses, label='Train Loss', color='blue', linestyle='--')
ax1.plot(epochs, eval_losses, label='Validation Loss', color='red')
ax1.tick_params(axis='y', labelcolor=color)
ax1.legend(loc='upper left')
ax2 = ax1.twinx()
color = 'tab:blue'
ax2.set_ylabel('Accuracy', color=color)
ax2.plot(epochs, accuracies, label='Accuracy', color='green', marker='o')
ax2.tick_params(axis='y', labelcolor=color)
ax2.legend(loc='lower right')
plt.title('Model Training Performance')
fig.tight_layout()
plt.grid(True, alpha=0.3)
plt.savefig('training_curve.png', dpi=300, bbox_inches='tight')
8.2 混淆矩阵热力图
from sklearn.metrics import confusion_matrix
import seaborn as sns
y_true = [1,0,1,1,0,0,1,0]
y_pred = [1,0,1,0,0,1,1,0]
cm = confusion_matrix(y_true, y_pred)
sns.heatmap(cm, annot=True, fmt='d', cmap='Blues',
xticklabels=['No Trash','Trash'],
yticklabels=['No Trash','Trash'])
plt.title('Confusion Matrix')
plt.ylabel('True Label')
plt.xlabel('Predicted Label')
plt.savefig('confusion_matrix.png')
九、部署与持续集成
9.1 将模型集成回 API
python
# api/main.py (更新版)
from fastapi import FastAPI, UploadFile, File
from PIL import Image
import torch
from transformers import ViTFeatureExtractor, ViTForImageClassification
app = FastAPI()
# Load trained model
feature_extractor = ViTFeatureExtractor.from_pretrained("./final_model")
model = ViTForImageClassification.from_pretrained("./final_model")
model.eval()
@app.post("/predict/")
async def predict(file: UploadFile = File(...)):
image = Image.open(file.file).convert("RGB")
inputs = feature_extractor(images=image, return_tensors="pt")
with torch.no_grad():
outputs = model(**inputs)
probs = torch.nn.functional.softmax(outputs.logits, dim=-1)
predicted_class = outputs.logits.argmax(-1).item()
confidence = probs[0][predicted_class].item()
label_map = {0: "NO_TRASH", 1: "TRASH"}
result = label_map[predicted_class]
return {
"prediction": result,
"confidence": round(confidence, 4)
}
9.2 Docker 化部署
dockerfile
# Dockerfile
FROM python:3.9-slim
WORKDIR /app
COPY requirements.txt .
RUN pip install -r requirements.txt
COPY . .
EXPOSE 8000
CMD ["uvicorn", "api.main:app", "--host", "0.0.0.0", "--port", "8000"]
# 构建并运行
docker build -t trash-detector .
docker run -p 8000:8000 trash-detector
十、总结:AI 工具链协同价值
|
开发速度 |
数周 |
数天 |
|
代码质量 |
依赖经验 |
实时建议+最佳实践 |
|
数据准备 |
手动标注低效 |
可视化平台+多人协作 |
|
模型训练 |
本地受限资源 |
云端分布式GPU集群 |
|
错误修复 |
调试耗时 |
Copilot即时诊断建议 |
🔑 关键成功因素:
- Prompt 设计能力:清晰表达意图是激活 AI 工具潜力的前提
- 工具边界认知:明确各工具职责(编码→标注→训练)
- 自动化流水线:CI/CD 整合测试、训练、部署环节
- 反馈闭环:线上预测结果反哺数据标注,形成持续优化
十一、未来展望
随着 AI 工具进一步融合,我们可预见:
- 全自动 pipeline:输入“我想做一个猫狗分类器”,自动完成代码生成、数据爬取、标注、训练、部署
- 跨平台联动:Copilot 直接调用 Label Studio API 创建任务;Hugging Face 自动生成标注模板
- 低代码 AI 开发:非程序员也能通过自然语言构建 AI 应用
“未来的程序员不是写代码最多的人,而是最懂如何与 AI 协作的人。” —— Andrew Ng
附录
A. 完整项目结构
trash_detection/
├── data/
│ ├── raw/
│ └── labeled/
│ ├── train_annotations.json
│ └── *.jpg
├── models/
│ └── vit-trash-detector/
├── api/
│ └── main.py
├── utils/
│ ├── data_loader.py
│ └── data_downloader.py
├── train.py
├── requirements.txt
├── Dockerfile
└── README.md
B. requirements.txt
fastapi==0.110.0
uvicorn==0.29.0
torch==2.3.0
torchvision==0.18.0
transformers==4.40.0
pillow==10.3.0
numpy==1.26.0
pandas==2.2.0
scikit-learn==1.5.0
seaborn==0.13.0
label-studio==1.7.0

汇聚全球AI编程工具,助力开发者即刻编程。
更多推荐

 19
19 0
0- 0


 已为社区贡献40条内容

所有评论(0)