苍穹外卖day6
发送HTTP请求接收响应数据HttpClient 是Apache Jakarta Common 下的子项目,可以用来提供高效的、最新的、功能丰富的支持 HTTP 协议的客户端编程工具包,并且它支持 HTTP 协议最新的版本和建议。为什么要在Java程序中发送Http请求?有哪些应用场景呢?当我们在使用扫描支付、查看地图、获取验证码、查看天气等功能时。
课程内容
-
HttpClient:在java中构造请求,发送请
-
向微信发送请求,比如登录请求
-
-
微信小程序开发
-
微信登录
-
导入商品浏览功能代码
功能实现:微信登录、商品浏览
微信登录效果图:
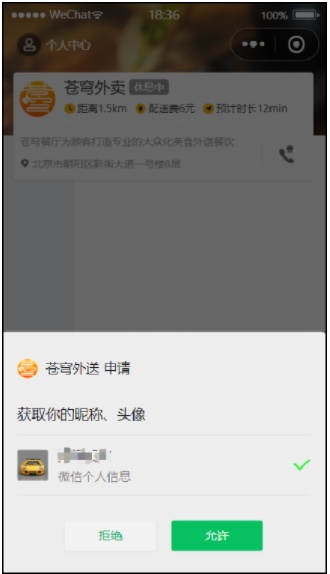
商品浏览效果图:
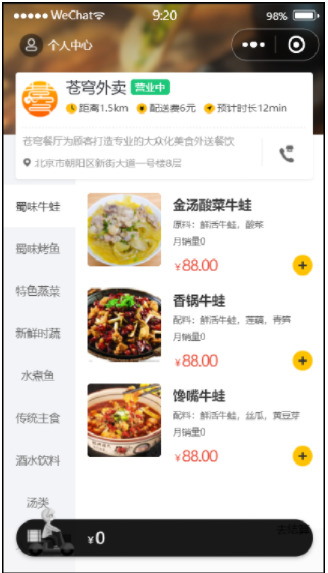
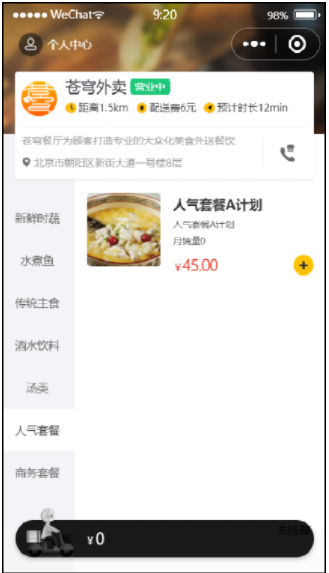
1. HttpClient
1.1 介绍
HttpClient作用:
-
发送HTTP请求
-
接收响应数据
HttpClient 是Apache Jakarta Common 下的子项目,可以用来提供高效的、最新的、功能丰富的支持 HTTP 协议的客户端编程工具包,并且它支持 HTTP 协议最新的版本和建议。

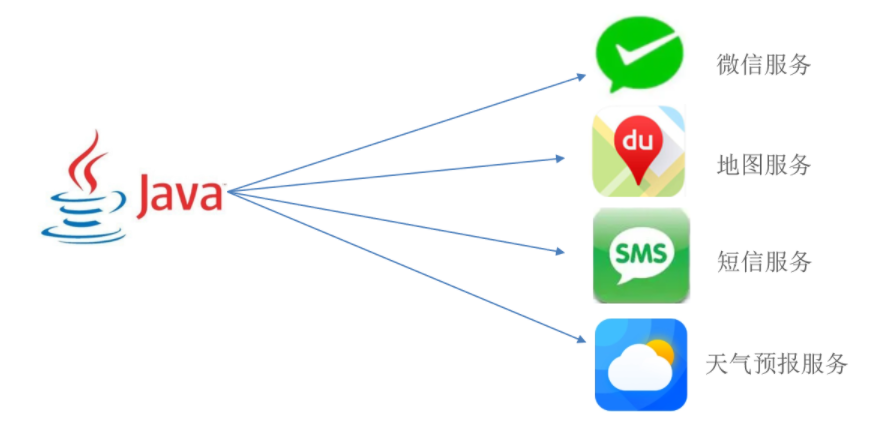
为什么要在Java程序中发送Http请求?有哪些应用场景呢?
HttpClient应用场景:
当我们在使用扫描支付、查看地图、获取验证码、查看天气等功能时
其实,应用程序本身并未实现这些功能,都是在应用程序里访问提供这些功能的服务,访问这些服务需要发送HTTP请求,并且接收响应数据,可通过HttpClient来实现。
HttpClient的maven坐标:
<dependency>
    <groupId>org.apache.httpcomponents</groupId>
    <artifactId>httpclient</artifactId>
    <version>4.5.13</version>
</dependency>
HttpClient的核心API:
-
HttpClient:Http客户端对象类型,使用该类型对象可发起Http请求。
-
HttpClients:可认为是构建器,可创建HttpClient对象。
-
CloseableHttpClient:实现类,实现了HttpClient接口。
-
HttpGet:Get方式请求类型。
-
HttpPost:Post方式请求类型。
HttpClient发送请求步骤:
-
创建HttpClient对象
-
创建Http请求对象
-
调用HttpClient的execute方法发送请求
1.2 入门案例
对HttpClient编程工具包有了一定了解后,那么,我们使用HttpClient在Java程序当中来构造Http的请求,并且把请求发送出去,接下来,就通过入门案例分别发送GET请求和POST请求,具体来学习一下它的使用方法。
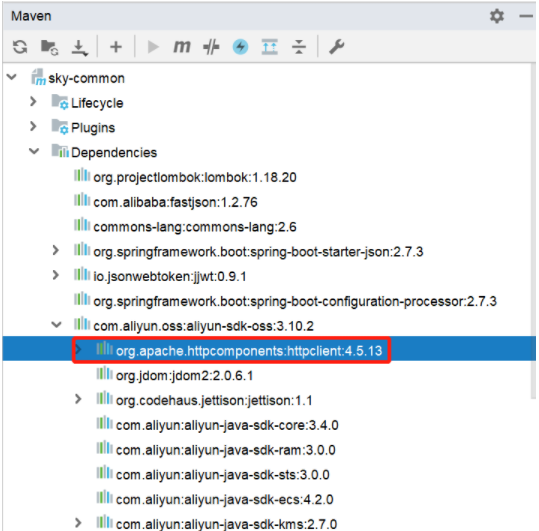
正常来说,首先,应该导入HttpClient相关的坐标,但在项目中,就算不导入,也可以使用相关的API。
因为在项目中已经引入了aliyun-sdk-oss坐标:
<dependency>
    <groupId>com.aliyun.oss</groupId>
    <artifactId>aliyun-sdk-oss</artifactId>
</dependency>
上述依赖的底层已经包含了HttpClient相关依赖。
1.2.1 GET方式请求
实现步骤:
-
创建HttpClient对象
-
创建请求对象,设置url
-
发送请求,接受响应结果
-
解析结果
-
状态码
-
响应体:getEntity接收响应体,EntityUtils解析响应体获得body数据
-
-
关闭资源
-
关闭响应
-
关闭HttpClient
-
    /**
     * 测试通过HttpClient发送GET方式请求
     */
    @Test
    public void testGet() throws IOException {
        //1.创建HttpClient对象
        CloseableHttpClient httpClient = HttpClients.createDefault();

        //2.创建HTTP请求对象
        HttpGet httpGet = new HttpGet("http://localhost:8090/user/shop/status");

        //3.发送请求,并接收响应结果
        CloseableHttpResponse response = httpClient.execute(httpGet);

        //4.获取服务端返回的状态码
        int statusCode = response.getStatusLine().getStatusCode();
        System.out.println("服务端返回的状态码为:"+statusCode);

        //5.获取服务端返回的响应体(数据)
        HttpEntity entity = response.getEntity();
        String body = EntityUtils.toString(entity);
        System.out.println("服务端返回的数据为:"+body);

        //6.关闭资源
        response.close();
        httpClient.close();
    }
1.2.2 POST方式请求
实现步骤:
- 创建HttpClient对象
- 创建HTTP请求对象
- 设置url
- 使用fastJson包下的JSONObject通过put方法,将键值对赋值给jsonObject对象
- 使用toString方法,将jsonObject赋值给StringEntity对象
- 指定请求的编码方式
- 指定数据格式
- 向httpPost中放入StringEntity对象,即请求体中的Json数据
-
发送请求,接受响应结果
-
解析结果
-
状态码
-
响应体:getEntity接收响应体,EntityUtils解析响应体获得body数据
-
-
关闭资源
-
关闭响应
-
关闭HttpClient
-
    /**
     * 测试通过HttpClient发送POST方式请求
     */
    @Test
    public void testPOST() throws Exception{
        //1.创建HttpClient对象
        CloseableHttpClient httpClient = HttpClients.createDefault();

        //2.创建HTTP请求对象
        HttpPost httpPost = new HttpPost("http://localhost:8090/admin/employee/login");
        //要通过请求体,以Json格式发送请求

        //使用fastJson包下的JSONObject通过put方法,将键值对赋值给jsonObject对象
        JSONObject jsonObject = new JSONObject();//fastJson包
        jsonObject.put("username","user");
        jsonObject.put("password","123456");
        //使用toString方法,将jsonObject赋值给StringEntity对象
        StringEntity entity = new StringEntity(jsonObject.toString());
        //指定请求的编码方式
        entity.setContentEncoding("utf-8");
        //指定数据格式
        entity.setContentType("application/json");
        //向httpPost中放入StringEntity对象,即请求体中的Json数据
        httpPost.setEntity(entity);

        //3.发送请求,并接收响应结果
        CloseableHttpResponse response = httpClient.execute(httpPost);

        //4.获取服务端返回的状态码
        int statusCode = response.getStatusLine().getStatusCode();
        System.out.println("服务端返回的状态码为:"+statusCode);

        //5.获取服务端返回的响应体(数据)
        HttpEntity responseEntity = response.getEntity();
        String body = EntityUtils.toString(responseEntity);
        System.out.println("服务端返回的数据为:"+body);

        //6.关闭资源
        response.close();
        httpClient.close();
    }
1.3 HttpClient工具类
package com.sky.utils;

import com.alibaba.fastjson.JSONObject;
import org.apache.http.NameValuePair;
import org.apache.http.client.config.RequestConfig;
import org.apache.http.client.entity.UrlEncodedFormEntity;
import org.apache.http.client.methods.CloseableHttpResponse;
import org.apache.http.client.methods.HttpGet;
import org.apache.http.client.methods.HttpPost;
import org.apache.http.client.utils.URIBuilder;
import org.apache.http.entity.StringEntity;
import org.apache.http.impl.client.CloseableHttpClient;
import org.apache.http.impl.client.HttpClients;
import org.apache.http.message.BasicNameValuePair;
import org.apache.http.util.EntityUtils;

import java.io.IOException;
import java.net.URI;
import java.util.ArrayList;
import java.util.List;
import java.util.Map;

/**
 * Http工具类
 */
public class HttpClientUtil {

    static final  int TIMEOUT_MSEC = 5 * 1000;

    /**
     * 发送GET方式请求
     * @param url
     * @param paramMap
     * @return
     */
    public static String doGet(String url,Map<String,String> paramMap){
        // 创建Httpclient对象
        CloseableHttpClient httpClient = HttpClients.createDefault();

        String result = "";
        CloseableHttpResponse response = null;

        try{
            URIBuilder builder = new URIBuilder(url);
            if(paramMap != null){
                for (String key : paramMap.keySet()) {
                    builder.addParameter(key,paramMap.get(key));
                }
            }
            URI uri = builder.build();

            //创建GET请求
            HttpGet httpGet = new HttpGet(uri);

            //发送请求
            response = httpClient.execute(httpGet);

            //判断响应状态
            if(response.getStatusLine().getStatusCode() == 200){
                result = EntityUtils.toString(response.getEntity(),"UTF-8");
            }
        }catch (Exception e){
            e.printStackTrace();
        }finally {
            try {
                response.close();
                httpClient.close();
            } catch (IOException e) {
                e.printStackTrace();
            }
        }

        return result;
    }

    /**
     * 发送POST方式请求
     * @param url
     * @param paramMap
     * @return
     * @throws IOException
     */
    public static String doPost(String url, Map<String, String> paramMap) throws IOException {
        // 创建Httpclient对象
        CloseableHttpClient httpClient = HttpClients.createDefault();
        CloseableHttpResponse response = null;
        String resultString = "";

        try {
            // 创建Http Post请求
            HttpPost httpPost = new HttpPost(url);

            // 创建参数列表
            if (paramMap != null) {
                List<NameValuePair> paramList = new ArrayList();
                for (Map.Entry<String, String> param : paramMap.entrySet()) {
                    paramList.add(new BasicNameValuePair(param.getKey(), param.getValue()));
                }
                // 模拟表单
                UrlEncodedFormEntity entity = new UrlEncodedFormEntity(paramList);
                httpPost.setEntity(entity);
            }

            httpPost.setConfig(builderRequestConfig());

            // 执行http请求
            response = httpClient.execute(httpPost);

            resultString = EntityUtils.toString(response.getEntity(), "UTF-8");
        } catch (Exception e) {
            throw e;
        } finally {
            try {
                response.close();
            } catch (IOException e) {
                e.printStackTrace();
            }
        }

        return resultString;
    }

    /**
     * 发送POST方式请求
     * @param url
     * @param paramMap
     * @return
     * @throws IOException
     */
    public static String doPost4Json(String url, Map<String, String> paramMap) throws IOException {
        // 创建Httpclient对象
        CloseableHttpClient httpClient = HttpClients.createDefault();
        CloseableHttpResponse response = null;
        String resultString = "";

        try {
            // 创建Http Post请求
            HttpPost httpPost = new HttpPost(url);

            if (paramMap != null) {
                //构造json格式数据
                JSONObject jsonObject = new JSONObject();
                for (Map.Entry<String, String> param : paramMap.entrySet()) {
                    jsonObject.put(param.getKey(),param.getValue());
                }
                StringEntity entity = new StringEntity(jsonObject.toString(),"utf-8");
                //设置请求编码
                entity.setContentEncoding("utf-8");
                //设置数据类型
                entity.setContentType("application/json");
                httpPost.setEntity(entity);
            }

            httpPost.setConfig(builderRequestConfig());

            // 执行http请求
            response = httpClient.execute(httpPost);

            resultString = EntityUtils.toString(response.getEntity(), "UTF-8");
        } catch (Exception e) {
            throw e;
        } finally {
            try {
                response.close();
            } catch (IOException e) {
                e.printStackTrace();
            }
        }

        return resultString;
    }
    private static RequestConfig builderRequestConfig() {
        return RequestConfig.custom()
                .setConnectTimeout(TIMEOUT_MSEC)
                .setConnectionRequestTimeout(TIMEOUT_MSEC)
                .setSocketTimeout(TIMEOUT_MSEC).build();
    }

}
2. 微信小程序入门
2.1 小程序目录结构
小程序包含一个描述整体程序的 app 和多个描述各自页面的 page。一个小程序主体部分由三个文件组成,必须放在项目的根目录,如下:
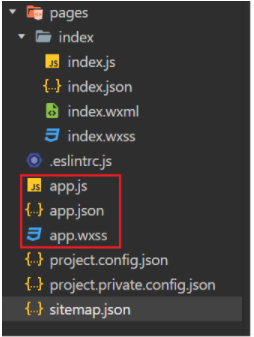
文件说明:
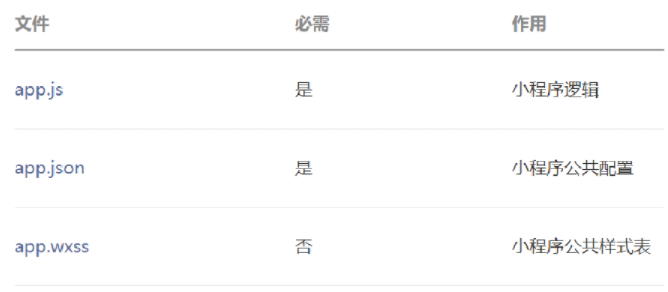
app.js:必须存在,主要存放小程序的逻辑代码
app.json:必须存在,小程序配置文件,主要存放小程序的公共配置
app.wxss: 非必须存在,主要存放小程序公共样式表,类似于前端的CSS样式
对小程序主体三个文件了解后,其实一个小程序又有多个页面。比如说,有商品浏览页面、购物车的页面、订单支付的页面、商品的详情页面等等。那这些页面会放在哪呢? 会存放在pages目录。
每个小程序页面主要由四个文件组成:
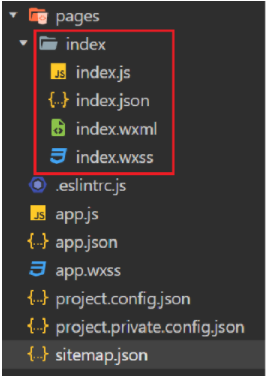
文件说明:
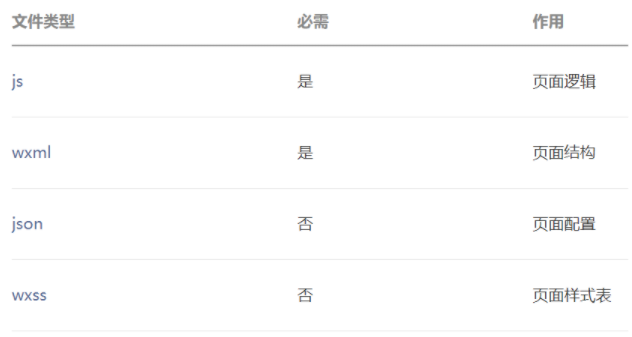
js文件:必须存在,存放页面业务逻辑代码,编写的js代码。
wxml文件:必须存在,存放页面结构,主要是做页面布局,页面效果展示的,类似于HTML页面。
json文件:非必须,存放页面相关的配置。
wxss文件:非必须,存放页面样式表,相当于CSS文件。
2.2 编写和编译小程序
1)编写
新建一个home文件夹,结构如下:
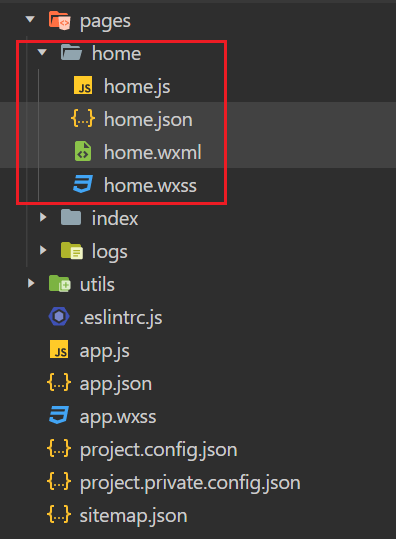
在app.json中配置home路径,将home放在最上层,代表默认页面为home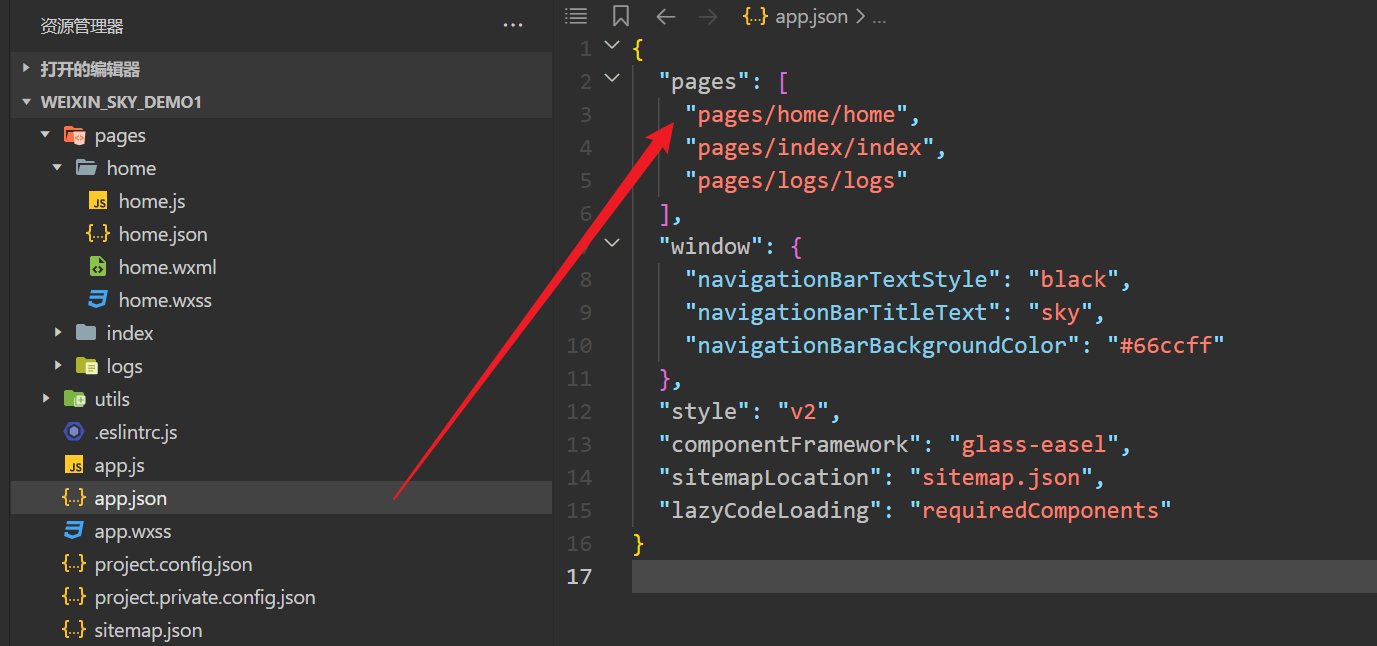
在wxml中编写页面布局,在js中编写页面逻辑
<view class="container">
  <!-- 插值显示信息 -->
  <view>{{msg}}</view>

  <!-- 获取用户信息 -->
  <view>
    <!-- 只保留 bindtap,触发 getUserInfo 方法 -->
    <button bindtap="getUserInfo" type="primary">获取用户信息</button>

    <!-- 显示用户信息 -->
    <view wx:if="{{nickName}}">
      昵称:{{nickName}}
      <image style="width: 100px; height: 100px; margin-top: 20rpx;" src="{{url}}"></image>
    </view>
  </view>

  <!-- 获取登录用户授权码 -->
  <view>
    <button type="warn" bind:tap="wxLogin">微信登录</button>
    授权码:{{code}}
  </view>

  <!-- 实现异步请求 -->
  <view>
    <button bind:tap="sendRequest" type="default" >发送请求</button>
  </view>

</view>
Page({
data: {
msg: 'hello world',
nickName: '', // 存储昵称
url: '', // 存储头像地址
code: ''
},
// 获取微信用户头像和昵称(修正后)
getUserInfo() {
// 关键修正:wx.getUserProfile({...}) 去掉多余的 ()
wx.getUserProfile({
desc: '获取用户信息用于展示头像和昵称', // 必填项,说明用途(不能空)
success: (res) => {
console.log('获取用户信息成功:', res.userInfo);
// 更新数据到页面
this.setData({
nickName: res.userInfo.nickName, // 正确获取昵称
url: res.userInfo.avatarUrl // 正确获取头像地址
});
},
fail: (err) => {
console.log('用户拒绝授权:', err);
// 可选:提示用户授权才能使用功能
wx.showToast({
title: '您拒绝了授权,无法显示信息',
icon: 'none',
duration: 1500
});
}
});
},
//微信登录,获取微信用户的授权码
wxLogin(){
wx.login({
success: (res) => {
console.log('用户授权码:'+ res.code)
this.setData({
code : res.code
})
},
})
},
//向后端发送请求
sendRequest(){
wx.request({
url: 'http://localhost:8090/user/shop/status',
method : 'GET',
success: (res)=>{
console.log(res.data)
}
})
}
})2). 运行效果
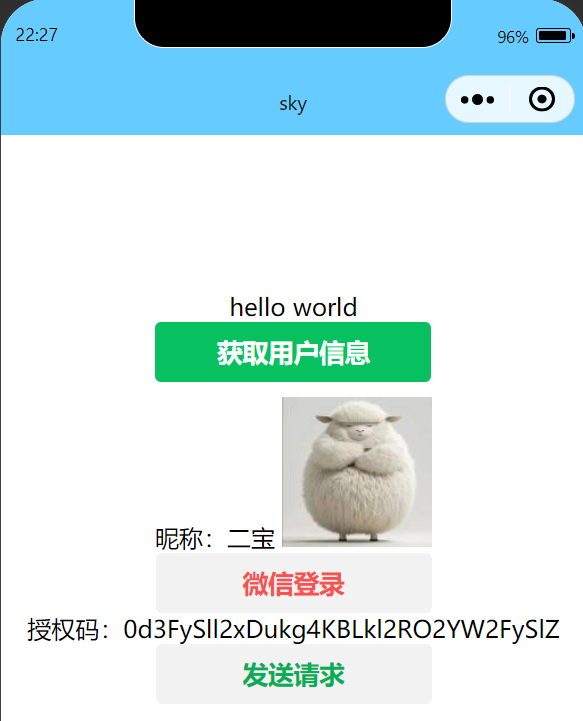
点击发送请求
因为请求http://localhost:8090/user/shop/status,先要启动后台项目。
注:设置不校验合法域名,若不勾选,请求发送失败。
3. 微信登录
微信登录:https://developers.weixin.qq.com/miniprogram/dev/framework/open-ability/login.html
流程图:
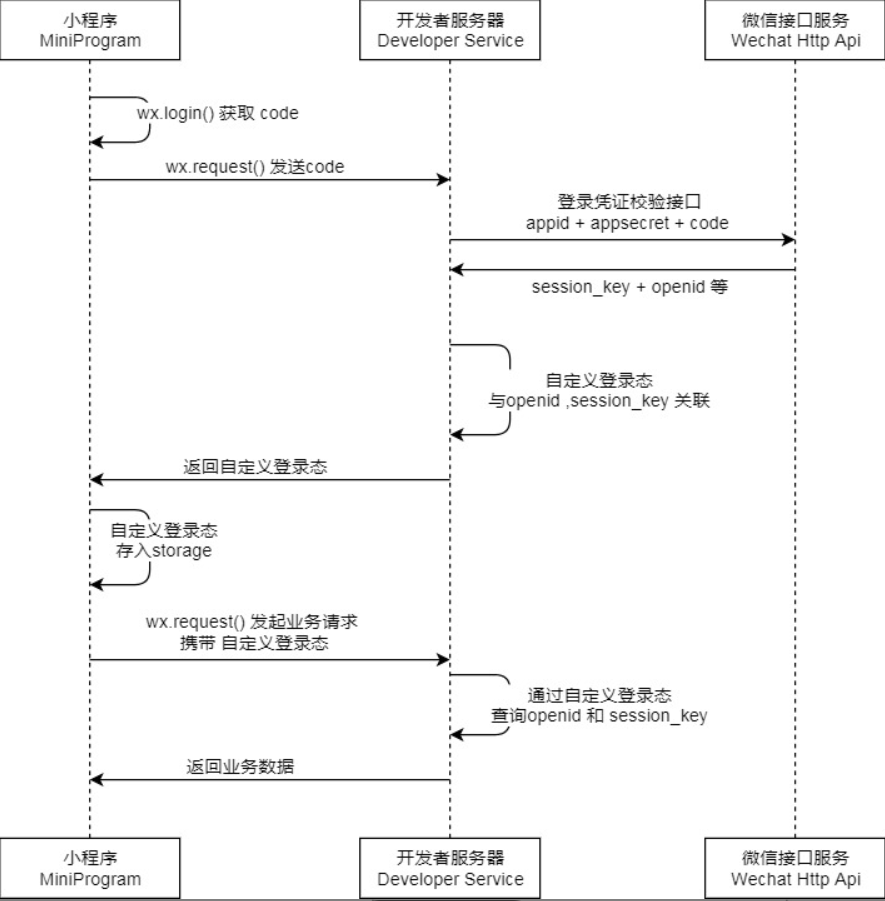
说明
-
调用 wx.login() 获取 临时登录凭证code ,并回传到开发者服务器。
- 调用 auth.code2Session 接口,换取 用户唯一标识 OpenID 、 用户在微信开放平台账号下的唯一标识UnionID(若当前小程序已绑定到微信开放平台账号) 和 会话密钥 session_key。
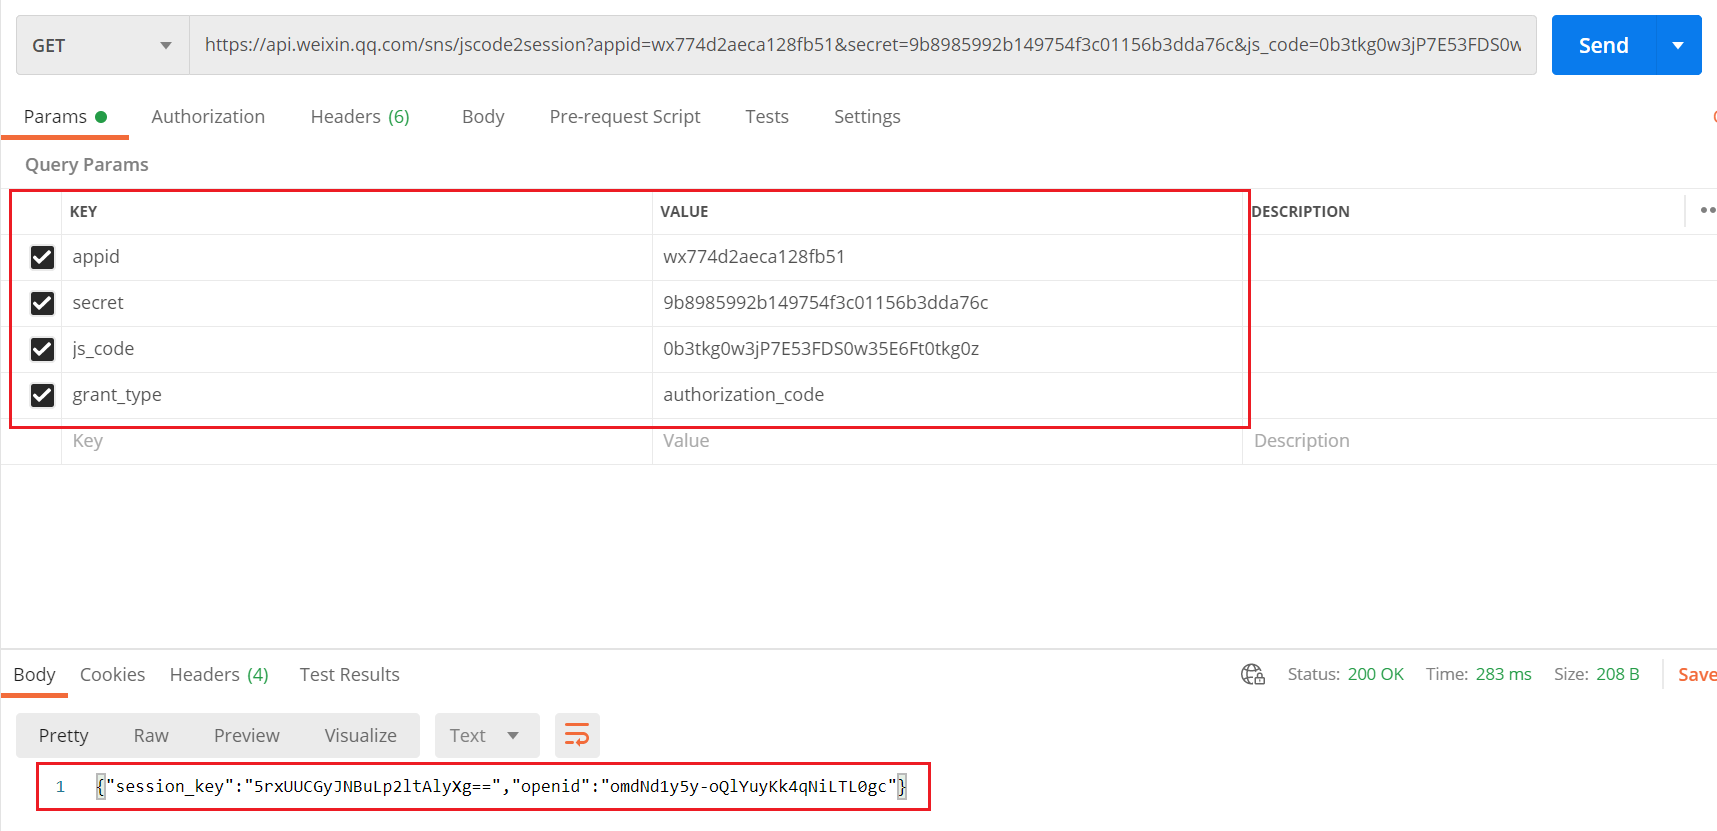
3.1 postman模拟微信登录
接口说明:
调用方式
HTTPS 调用
GET https://api.weixin.qq.com/sns/jscode2session
请求参数
| 属性 | 类型 | 必填 | 说明 |
|---|---|---|---|
| appid | string | 是 | 小程序 appId |
| secret | string | 是 | 小程序 appSecret |
| js_code | string | 是 | 登录时获取的 code,可通过wx.login获取 |
| grant_type | string | 是 | 授权类型,此处只需填写 authorization_code |
返回参数
| 属性 | 类型 | 说明 |
|---|---|---|
| session_key | string | 会话密钥 |
| unionid | string | 用户在开放平台的唯一标识符,若当前小程序已绑定到微信开放平台帐号下会返回,详见 UnionID 机制说明。 |
| errmsg | string | 错误信息,请求失败时返回 |
| openid | string | 用户唯一标识 |
| errcode | int32 | 错误码,请求失败时返回 |
3.2 实现微信登录
3.2.1 需求分析
用户进入到小程序的时候,微信授权登录之后才能点餐。需要获取当前微信用户的相关信息,比如昵称、头像等,这样才能够进入到小程序进行下单操作。是基于微信登录来实现小程序的登录功能,没有采用传统账户密码登录的方式。若第一次使用小程序来点餐,就是一个新用户,需要把这个新的用户保存到数据库当中完成自动注册。
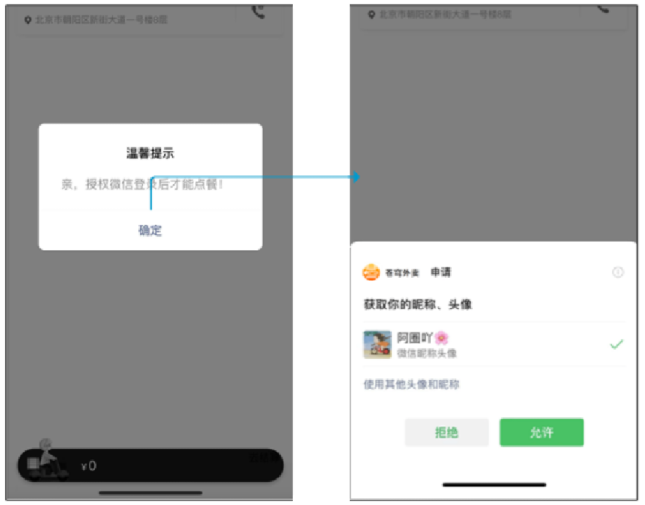
业务规则:
-
基于微信登录实现小程序的登录功能
-
如果是新用户需要自动完成注册
3.2.2 接口设计
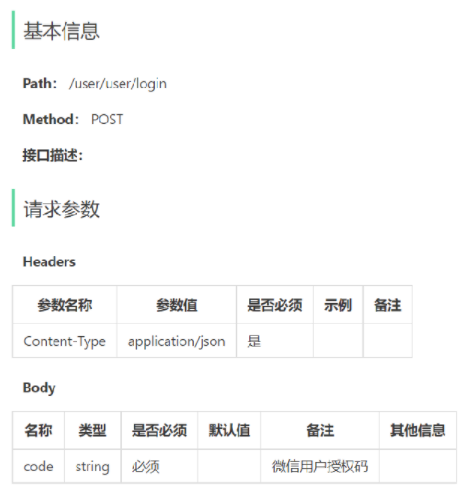
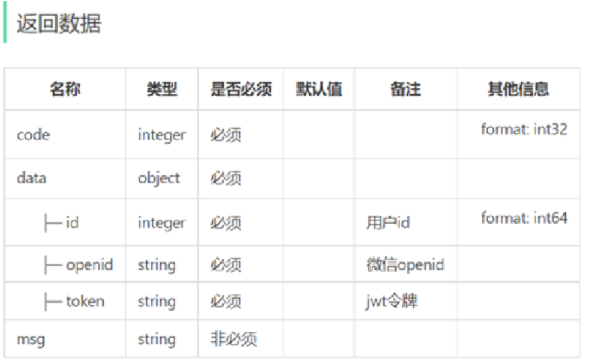
接口功能描述:微信小程序在弹出弹窗点击允许后,会向后台发送一个login请求并将code作为请求参数,后台需要完成:
- 接受请求,向微信服务接口发送请求获取openid
- 为微信用户生成jwt令牌
- 将用户id、openid、jwt令牌响应返回给微信小程序
3.2.3 代码开发
1)定义相关配置
向微信服务接口发送请求一共需要四个数据,其中有两个数据是写死的,为了统一管理,将这两个配置写在yml文件中,并使用一个properties类接收他们。
application.yml:
sky:
  wechat:
    appid: ${sky.wechat.appid}
    secert: ${sky.wechat.secert}
application-dev.yml:
sky:
  wechat:
    appid: wx774d22aeca128fb51
    secret: 9b89859292b149754f3c01156b3dda76c
WeChatProperties:
@Component
@ConfigurationProperties(prefix = "sky.wechat")
@Data
public class WeChatProperties {

    private String appid; //小程序的appid
    private String secret; //小程序的秘钥
    private String mchid; //商户号
    private String mchSerialNo; //商户API证书的证书序列号
    private String privateKeyFilePath; //商户私钥文件
    private String apiV3Key; //证书解密的密钥
    private String weChatPayCertFilePath; //平台证书
    private String notifyUrl; //支付成功的回调地址
    private String refundNotifyUrl; //退款成功的回调地址

}
设计对应的DTO类来接收请求参数、对应的VO来作为相应返回泛型。
/**
 * C端用户登录
 */
@Data
public class UserLoginDTO implements Serializable {

    private String code;

}
@Data
@Builder
@NoArgsConstructor
@AllArgsConstructor
public class UserLoginVO implements Serializable {

    private Long id;
    private String openid;
    private String token;

}
2)后台实现
注意点:
- Controller层:jwt令牌生成过程
- Service层:使用User作为返回类型;使用HttpClient向微信服务接口发送请求;使用JSONObject接收响应的json串;将获取openid方法提出来作为一个独立的方法。
- Mapper层:使用 useGeneratedKeys="true" keyProperty="id" 返回新插入数据的主键id
Controller:
    /**
     * 微信用户登录
     * @param userLoginDTO
     * @return
     */
    @PostMapping("/login")
    @ApiOperation(value = "用户登录接口")
    public Result<UserLoginVO> login(@RequestBody UserLoginDTO userLoginDTO){
        log.info("微信用户登录:{}",userLoginDTO.getCode());
        //微信登录
        User user = userService.wxLogin(userLoginDTO);
        //为微信用户生成jwt令牌
        Map<String, Object> claims = new HashMap<>();
        claims.put(JwtClaimsConstant.USER_ID,user.getId());
        String token = JwtUtil.createJWT(jwtProperties.getUserSecretKey(), jwtProperties.getUserTtl(), claims);

        UserLoginVO userLoginVO = UserLoginVO.builder()
                .id(user.getId())
                .openid(user.getOpenid())
                .token(token)
                .build();
        return Result.success(userLoginVO);
    }
Service:
@Service
public class UserServiceImpl implements UserService {
    //微信服务器接口设为常量
    public static final String WX_LOGIN = "https://api.weixin.qq.com/sns/jscode2session";

    @Autowired
    private WeChatProperties weChatProperties;
    @Autowired
    private UserMapper userMapper;

    /**
     * 微信用户登录
     * @param userLoginDTO
     * @return
     */
    @Override
    public User wxLogin(UserLoginDTO userLoginDTO) {
        //1.调用微信服务器接口获取当前用户的openId
//        Map<String,String> map = new HashMap<>();
//        map.put("appid",weChatProperties.getAppid());
//        map.put("secert",weChatProperties.getSecret());
//        map.put("js_code",userLoginDTO.getCode());
//        map.put("grant_type","authorization_code");
//        String json = HttpClientUtil.doGet(WX_LOGIN, map);
//
//        //fastJson包中
//        JSONObject jsonObject = JSON.parseObject(json);
//        String openid = jsonObject.getString("openid");
        String openid = getOpenid(userLoginDTO.getCode());

        //2.判断openId是否为空,如果为空则登录失败,抛出业务异常。
        if(openid == null){
            throw new LoginFailedException(MessageConstant.LOGIN_FAILED);
        }

        //3.openId不为空,判断当前用户是否为新用户
        User user = userMapper.getByOpenId(openid);
        if (user == null){
             user = User.builder()
                    .openid(openid)
                    .createTime(LocalDateTime.now())
                    .build();
             //4.如果是新用户,则需要自动完成注册
            userMapper.insert(user);
        }

        //5.返回用户对象
        return user;
    }

    /**
     * 调用微信接口服务,获取登录用户的openid
     * @param code
     * @return
     */
    private String getOpenid(String code){
        Map<String,String> map = new HashMap<>();
        map.put("appid",weChatProperties.getAppid());
        map.put("secret",weChatProperties.getSecret());
        map.put("js_code",code);
        map.put("grant_type","authorization_code");
        String json = HttpClientUtil.doGet(WX_LOGIN, map);

        //fastJson包中
        JSONObject jsonObject = JSON.parseObject(json);
        String openid = jsonObject.getString("openid");
        return openid;
    }
}
Mapper:
@Mapper
public interface UserMapper {

    @Select("select * from user where openid = #{openid}")
    User getByOpenId(String openid);


    void insert(User user);
}
<insert id="insert" useGeneratedKeys="true" keyProperty="id">
insert into user (openid, name, phone, sex, id_number, avatar, create_time)
values (#{openid}, #{name}, #{phone}, #{sex}, #{idNumber}, #{avatar}, #{createTime})
</insert>更多推荐
 已为社区贡献1条内容




所有评论(0)