
AutoGen 搭建智能体入门实践
·
本文将通过实际代码示例,带你从零开始学习微软 AutoGen 框架,快速搭建一个多智能体协作的代码助手。
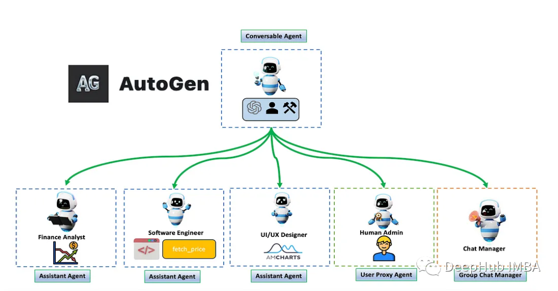
1、什么是 AutoGen?
AutoGen 是微软推出的开源多智能体对话框架,允许开发者通过简单的 API 调用构建复杂的 AI 应用。它支持:多智能体协作、自然语言对话、多工具灵活扩展。
2、环境准备
创建虚拟环境(venv/conda)并安装依赖
pip install openai
pip install "autogen-agentchat"
pip install "autogen-core"
pip install "autogen-ext[openai]"
3、从 Hello World 开始
让我们从最基础的单智能体开始:
import asyncio
from autogen_agentchat.agents import AssistantAgent
from autogen_ext.models.openai import OpenAIChatCompletionClient
import os
async def main() -> None:
    api_key = os.getenv("OPENAI_API_KEY")
    model_client = OpenAIChatCompletionClient(
        model="gpt-4o",
        api_key="your_api_key"
    )
    # 创建一个助手智能体
    agent = AssistantAgent("assistant", model_client=model_client)
    # 运行任务
    print(await agent.run(task="Say 'Hello World!', and introduce Autogen"))
    await model_client.close()
asyncio.run(main())
4、多智能体系统
实际应用中,我们通常需要多个智能体分工合作。下面是一个代码生成 + 代码审查的双智能体系统。
4.1 完整代码
import autogen

# 配置模型
config_list = [
    {
        "model": "glm-4.7",
        "api_key": "your_api_key",
        "base_url": "https://open.bigmodel.cn/api/paas/v4/" #以智谱4.7为例
    }
]

def init_agents():

    # 1. 程序员智能体 - 负责生成代码
    programmer = autogen.AssistantAgent(
        name="programmer",
        llm_config={"config_list": config_list, "cache_seed": None},
        system_message="你是一个优秀的人工智能编程助手,能够撰写 python 代码,并解释代码的运行逻辑。请在回复结束后输出 'TERMINATE'。"
    )

    # 2. 审查员智能体 - 负责代码审查
    reviewer = autogen.AssistantAgent(
        name="reviewer",
        llm_config={"config_list": config_list, "cache_seed": None},
        system_message="你是一个代码审查专家,能够检查和优化代码质量。请在回复结束后输出 'TERMINATE'。"
    )

    # 3. 用户代理 - 负责发起请求和协调
    user_proxy = autogen.UserProxyAgent(
        name="user_proxy",
        human_input_mode="NEVER",
        max_consecutive_auto_reply=0,
        code_execution_config=False,
    )
    return programmer, reviewer, user_proxy

# 初始化智能体
programmer, reviewer, user_proxy = init_agents()

def generate_code(user_input):

    """处理用户输入,生成代码并审查"""
    try:
        # 第一步:生成代码
        response = user_proxy.initiate_chat(
            programmer,
            message=user_input,
            clear_history=True
        )
        code_response = response.chat_history[-1]['content'].replace("TERMINATE", "").strip()

        # 第二步:代码审查
        review_response = user_proxy.initiate_chat(
            reviewer,
            message=f"请审查以下代码:\n{code_response}",
            clear_history=True
        )
        review_result = review_response.chat_history[-1]['content'].replace("TERMINATE", "").strip()
        return code_response, review_result
    except Exception as e:
        return f"发生错误:{str(e)}", "审查失败"
4.2 智能体角色说明
| 智能体 | 职责 | 关键配置 |
|---|---|---|
programmer | 代码生成 | system_message 定义角色 |
reviewer | 代码审查 | 独立的系统提示词 |
user_proxy | 协调发起 | human_input_mode="NEVER" |
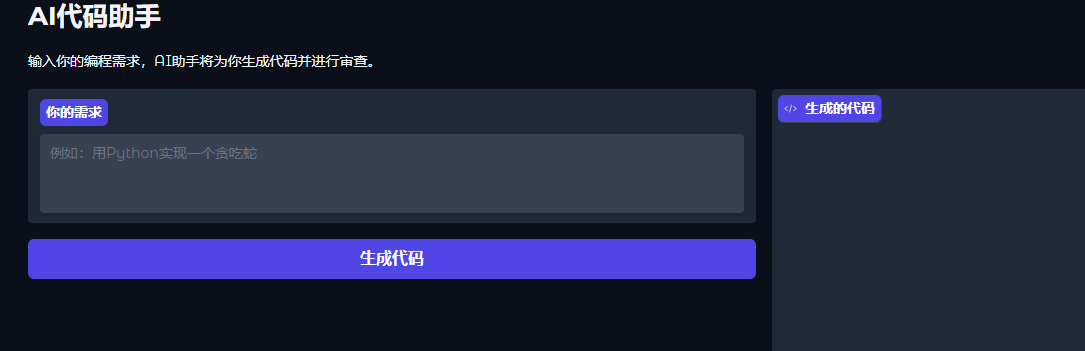
4.3、添加图形界面(
为了让应用更易用,我们可以添加一个 Web 界面:
# 接上一节的代码继续编写
import gradio as gr

with gr.Blocks(title="AI 代码助手", theme=gr.themes.Soft()) as demo:
    gr.Markdown("# AI 代码助手")
    gr.Markdown("输入你的编程需求,AI 助手将为你生成代码并进行审查。")
    with gr.Row():
        with gr.Column():
            user_input = gr.Textbox(
                label="你的需求",
                placeholder="例如:用 Python 实现一个贪吃蛇小游戏",
                lines=3
            )
            submit_btn = gr.Button("生成代码", variant="primary")
        with gr.Column():
            code_output = gr.Code(
                label="生成的代码",
                language="python",
                interactive=False
            )
            review_output = gr.Markdown(label="代码审查结果")
    submit_btn.click(
        fn=generate_code,
        inputs=user_input,
        outputs=[code_output, review_output]
    )

if __name__ == "__main__":
    demo.launch()
运行效果:
5、函数工具调用
AutoGen 支持让智能体调用外部函数,以下是调用获取时区函数的工具示例:
tools = [
    {
        "type": "function",
        "function": {
            "name": "get_time",
            "description": "Get the current time in a given timezone",
            "parameters": {
                "type": "object",
                "properties": {
                    "timezone": {
                        "type": "string",
                        "description": "The timezone, e.g. 'America/New_York'"
                    }
                },
                "required": ["timezone"]
            }
        }
    }
]

def get_current_time(timezone_str):

    """获取指定时区的当前时间"""
    tz = pytz.timezone(timezone_str)
    now = datetime.now(tz)
    return now.strftime("%Y-%m-%d %H:%M:%S %Z")
参考文献
官方文档:https://microsoft.github.io/autogen/
GitHub 仓库:https://github.com/microsoft/autogen
AutoGen【部署 01】Windows环境安装部署AutoGen、AutoGenStudio和LiteLLM流程说明-CSDN博客

汇聚全球AI编程工具,助力开发者即刻编程。
更多推荐

 5
5 0
0- 0


 已为社区贡献1条内容

所有评论(0)