
系列教程三:BitaHub上部署qwen2大模型web app实践
·
在实际工作中,我们往往更倾向于拥有一个直观且交互性强的界面来体验大模型。本教程将在上一篇文章的基础上,进一步指导您如何在Bitahub平台上部署大模型Web服务,并实现本地访问。我们将以Qwen-2模型为例,详细阐述这一过程。
总体技术难度:中等
操作环境:windows系统
平台地址:https://www.bitahub.com/
准备工作
代码准备
模型 web代码文件,这里使用的是qwen2.5官方的web app代码。
web.py文件
# Copyright (c) Alibaba Cloud.## This source code is licensed under the license found in the# LICENSE file in the root directory of this source tree."""A simple web interactive chat demo based on gradio."""from argparse import ArgumentParserfrom threading import Threadimport gradio as grimport torchfrom transformers import AutoModelForCausalLM, AutoTokenizer, TextIteratorStreamerDEFAULT_CKPT_PATH = "/test/qwen2/7b"def _get_args():parser = ArgumentParser(description="Qwen2.5-Instruct web chat demo.")parser.add_argument("-c","--checkpoint-path",type=str,default=DEFAULT_CKPT_PATH,help="Checkpoint name or path, default to %(default)r",)parser.add_argument("--cpu-only", action="store_true", help="Run demo with CPU only")parser.add_argument("--share",action="store_true",default=False,help="Create a publicly shareable link for the interface.",)parser.add_argument("--inbrowser",action="store_true",default=False,help="Automatically launch the interface in a new tab on the default browser.",)parser.add_argument("--server-port", type=int, default=8000, help="Demo server port.")parser.add_argument("--server-name", type=str, default="127.0.0.1", help="Demo server name.")args = parser.parse_args()return argsdef _load_model_tokenizer(args):tokenizer = AutoTokenizer.from_pretrained(args.checkpoint_path,resume_download=True,)if args.cpu_only:device_map = "cpu"else:device_map = "auto"model = AutoModelForCausalLM.from_pretrained(args.checkpoint_path,torch_dtype="auto",device_map=device_map,resume_download=True,).eval()model.generation_config.max_new_tokens = 2048 # For chat.return model, tokenizerdef _chat_stream(model, tokenizer, query, history):conversation = []for query_h, response_h in history:conversation.append({"role": "user", "content": query_h})conversation.append({"role": "assistant", "content": response_h})conversation.append({"role": "user", "content": query})input_text = tokenizer.apply_chat_template(conversation,add_generation_prompt=True,tokenize=False,)inputs = tokenizer([input_text], return_tensors="pt").to(model.device)streamer = TextIteratorStreamer(tokenizer=tokenizer, skip_prompt=True, timeout=60.0, skip_special_tokens=True)generation_kwargs = {**inputs,"streamer": streamer,}thread = Thread(target=model.generate, kwargs=generation_kwargs)thread.start()for new_text in streamer:yield new_textdef _gc():import gcgc.collect()if torch.cuda.is_available():torch.cuda.empty_cache()def _launch_demo(args, model, tokenizer):def predict(_query, _chatbot, _task_history):print(f"User: {_query}")_chatbot.append((_query, ""))full_response = ""response = ""for new_text in _chat_stream(model, tokenizer, _query, history=_task_history):response += new_text_chatbot[-1] = (_query, response)yield _chatbotfull_response = responseprint(f"History: {_task_history}")_task_history.append((_query, full_response))print(f"Qwen: {full_response}")def regenerate(_chatbot, _task_history):if not _task_history:yield _chatbotreturnitem = _task_history.pop(-1)_chatbot.pop(-1)yield from predict(item[0], _chatbot, _task_history)def reset_user_input():return gr.update(value="")def reset_state(_chatbot, _task_history):_task_history.clear()_chatbot.clear()_gc()return _chatbotwith gr.Blocks() as demo:gr.Markdown("""\<p align="center"><img src="https://qianwen-res.oss-accelerate-overseas.aliyuncs.com/assets/logo/qwen2.5_logo.png" style="height: 120px"/><p>""")gr.Markdown("""\<center><font size=3>This WebUI is based on Qwen2.5-Instruct, developed by Alibaba Cloud. \(本WebUI基于Qwen2.5-Instruct打造,实现聊天机器人功能。)</center>""")gr.Markdown("""\<center><font size=4>Qwen2.5-7B-Instruct <a href="https://modelscope.cn/models/qwen/Qwen2.5-7B-Instruct/summary">🤖 </a> |<a href="https://huggingface.co/Qwen/Qwen2.5-7B-Instruct">🤗</a>  |Qwen2.5-32B-Instruct <a href="https://modelscope.cn/models/qwen/Qwen2.5-32B-Instruct/summary">🤖 </a> |<a href="https://huggingface.co/Qwen/Qwen2.5-32B-Instruct">🤗</a>  |Qwen2.5-72B-Instruct <a href="https://modelscope.cn/models/qwen/Qwen2.5-72B-Instruct/summary">🤖 </a> |<a href="https://huggingface.co/Qwen/Qwen2.5-72B-Instruct">🤗</a>  | <a href="https://github.com/QwenLM/Qwen2.5">Github</a></center>""")chatbot = gr.Chatbot(label="Qwen", elem_classes="control-height")query = gr.Textbox(lines=2, label="Input")task_history = gr.State([])with gr.Row():empty_btn = gr.Button("🧹 Clear History (清除历史)")submit_btn = gr.Button("🚀 Submit (发送)")regen_btn = gr.Button("🤔️ Regenerate (重试)")submit_btn.click(predict, [query, chatbot, task_history], [chatbot], show_progress=True)submit_btn.click(reset_user_input, [], [query])empty_btn.click(reset_state, [chatbot, task_history], outputs=[chatbot], show_progress=True)regen_btn.click(regenerate, [chatbot, task_history], [chatbot], show_progress=True)gr.Markdown("""\<font size=2>Note: This demo is governed by the original license of Qwen2.5. \We strongly advise users not to knowingly generate or allow others to knowingly generate harmful content, \including hate speech, violence, pornography, deception, etc. \(注:本演示受Qwen2.5的许可协议限制。我们强烈建议,用户不应传播及不应允许他人传播以下内容,\包括但不限于仇恨言论、暴力、色情、欺诈相关的有害信息。)""")demo.queue().launch(share=args.share,inbrowser=args.inbrowser,server_port=args.server_port,server_name=args.server_name,)def main():args = _get_args()model, tokenizer = _load_model_tokenizer(args)_launch_demo(args, model, tokenizer)if __name__ == "__main__":main()
新建密钥
在密钥设置里面新建一个密钥
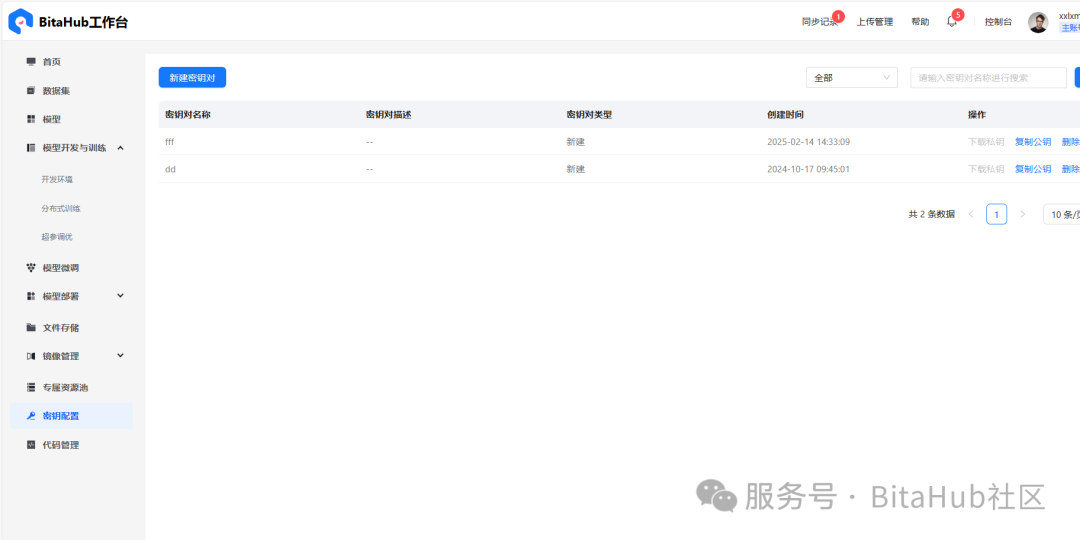
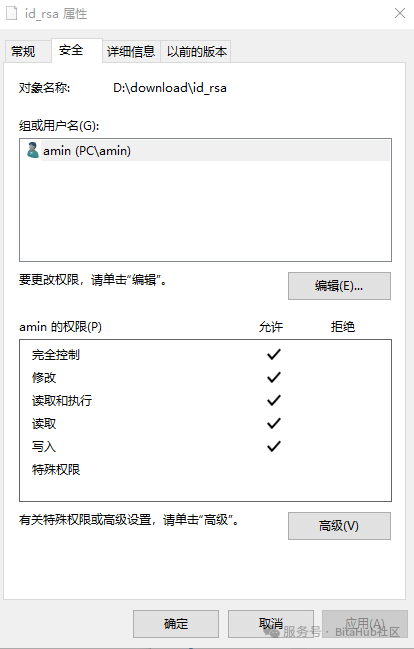
设置好密钥后,下载对应的私有密钥文件。对密钥文件id_rsa设置权限仅当前用户可以访问。
安装nmap软件
这个里面包含了下面需要的ncat文件,下载地址是https://nmap.org/download.html
bitahub平台新建任务
配置参数:绑定qwen2 7b模型和代码
需要设置jupyter(可选)和ssh两种连接方式,ssh连接使用提前设置好的密钥
平台服务部署
模型服务启动
在jupyter里面启动web服务,执行命令如下。
##安装依赖pip install gradio##启动服务python web.py --checkpoint-path model_path
当然你也可以使用ssh登录后执行上面的命令
ssh连接
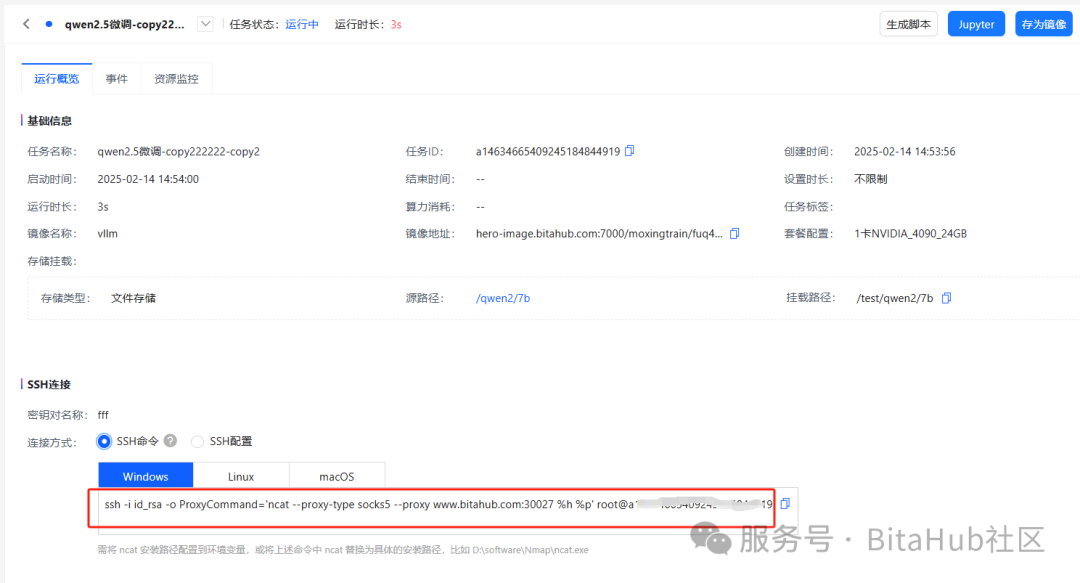
把其中的ssh命令复制出来,这个是连接ssh使用的。
执行ssh隧道代理命令
ssh -i id_rsa -o ProxyCommand="ncat.exe --proxy-type socks5 --proxy www.bitahub.com:30027 %h %p" -L port:localhost:localport root@host 这个里面port是web服务的端口号,localport是本地端口号,host是docker的机器号。
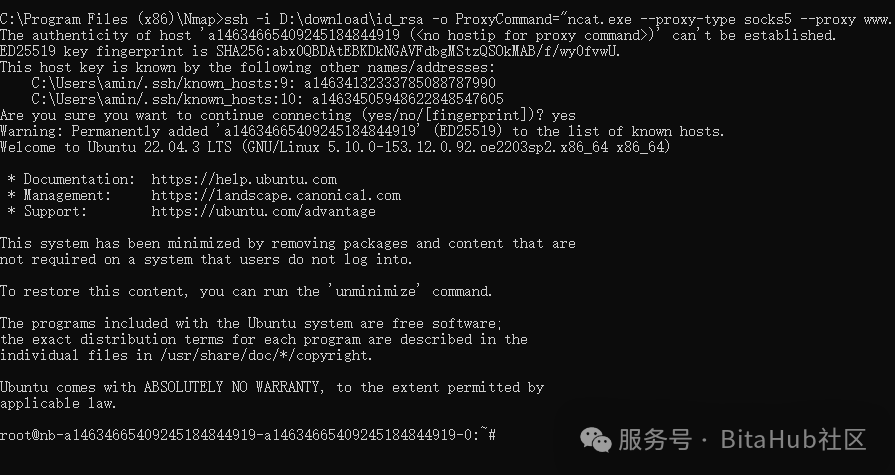
例子:
ssh -i D:\download\id_rsa -o ProxyCommand="ncat.exe --proxy-type socks5 --proxy www.bitahub.com:30027 %h %p" -L 8000:localhost:8000 root@a14634665409245184844919执行后会登录进去
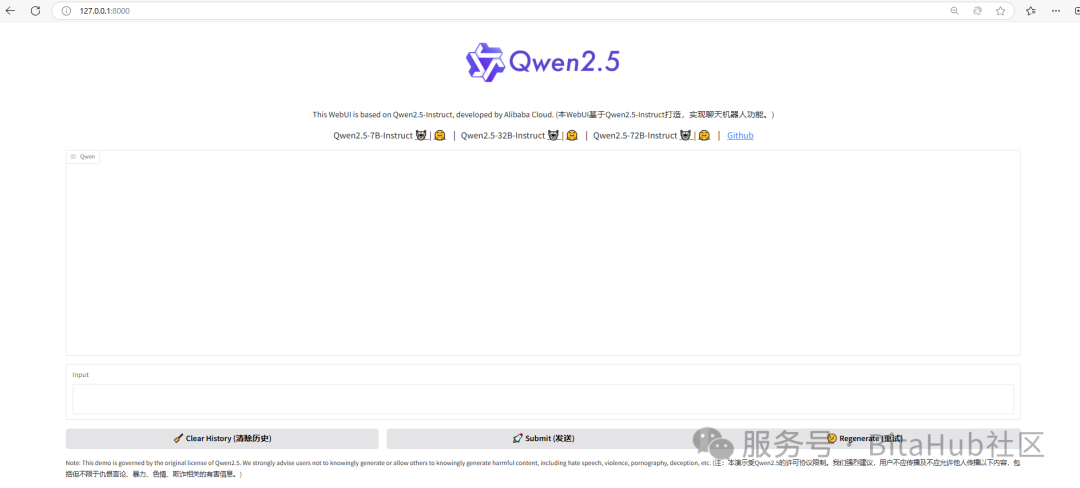
web服务使用
到了这一步测试下成果,在本地浏览器输入http://127.0.0.1:8000即可进入app页面了。
可能遇到问题
Permissions for 'D:\\download\\id_rsa' are too open.It is required that your private key files are NOT accessible by others.
这个需要修改文件权限。在文件的设置-安全里面改成当前用户的独有权限,删除其他用户权限。
BitaHub社区更多模型及教程持续更新中,期待您的关注!

汇聚全球AI编程工具,助力开发者即刻编程。
更多推荐
 5
5 0
0- 0


 已为社区贡献1条内容

所有评论(0)