
Tkinter库的学习记录-5
12、列表框Listbox与滚动条Scrollbar
列表框(Listbox)是一个显示一系列选项的Widget控件,用户可以进行单项或多项的选择。
12-1 建立列表框
它的使用格式如下。
Listbox(父对象, options, ...)参数一:同上
options参数:
(1) bg或background:背景色彩。
(2) borderwidth或bd:边界宽度,默认是2像素。
(3) cursor:当鼠标光标在列表框上时的光标形状、
(4) fg或foreground:字形色彩。
(5) font:字形
(6) height:高,单位是字符,默认是10.
(7) highlightcolor:当尺度条取得焦点时的颜色。
(8) highlightthickness:当列表框获得焦点时的厚度。
(9) listvariable:以变量方式处理选项内容。
(10) relief:默认是relief=FLAT,可由此控制列表框外框,默认是SUNKEN。
(11) selectbackground:被选取字符串的背景色彩。
(12) selectmode:可以决定有多少选项可以被选,以及鼠标拖拽如何影响选项。
① BROWSE:这是默认值,我们可以选择一个选项,如果选取一个选项同时拖拽鼠标,将
造成选项最后的位置是被选取的项目位置。
② SINGLE:只能选择一个选项,可以用单击方式选取,不可用拖拽方式更改所选的项目。
③ MULTIPLE:可以选择多个选项,单击项目可以切换是否选择该项目。
④ EXTENDED:单击第一个项目然后拖拽到最后一个项目,即可选择这个区间的一系列
选项。单击可以选择第一个项目,此时若是按住Shift键并单击另一个项目,可以选取区间
项目。
(13) width:宽,单位是字符。
(14) xscrollcommand:在x轴使用此滚动条。
(15) yscrollcommand:在y轴使用此滚动条。
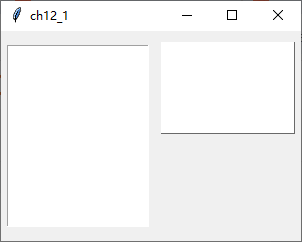
下面程序实例:建立列表框1,然后使用字符高度5建立列表框2。
from tkinter import *

root = Tk()
root.title("ch12_1")
root.geometry("300x210")

lb1 = Listbox(root)
lb1.pack(side=LEFT, padx=5, pady=10)
lb2 = Listbox(root, height=5, relief="raised")
lb2.pack(anchor=N, side=LEFT, padx=5, pady=10)

root.mainloop()
执行结果
12-2 建立列表框项目insert()
可以使用insert()方法为列表框建立项目,这个方法的使用格式如下。
insert(index, elements)上述index是项目插入位置,如果是插在最后面可以使用END。
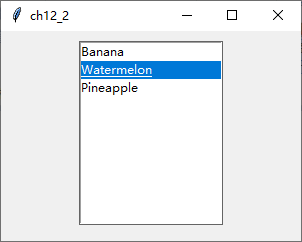
下面程序实例:建立列表框,同时为这个列表框建立Banana、Watermelon、Pineapple三个项目。
from tkinter import *

root = Tk()
root.title("ch12_2")
root.geometry("300x210")

lb = Listbox(root)
lb.insert(END, "Banana")
lb.insert(END, "Watermelon")
lb.insert(END, "Pineapple")
lb.pack(pady=10)

root.mainloop()
执行结果
上述程序中第8 ~ 10行是建立列表项目,因为只有三个项目所以使用上述方式一次建立一个还不会太复杂,但是如果所要建立的项目很多时,建议使用list方式先存储项目,然后使用for...in循环方式将list内的列表项目插入到列表框。
下面程序实例:建立含6个项目的列表框,程序第3、4行是建立fruits列表,第11、12行是分别将列表元素插入列表框内。
from tkinter import *
fruits = ["apple", "banana", "mango", "orange", "grape"]

root = Tk()
root.title("ch12_3")
root.geometry("300x210")

lb = Listbox(root)
for fruit in fruits:
    lb.insert(END, fruit)
lb.pack(pady=10)

root.mainloop()
执行结果
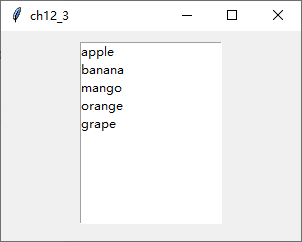
下面程序实例:重新设计ch12_3,主要是在第10行使用Listbox()构造方法时增加selectmode=MULTIPLE参数设置,这个设置可以让用户选取多个项目。
from tkinter import *
fruits = ["apple", "banana", "mango", "orange", "grape"]

root = Tk()
root.title("ch12_4")
root.geometry("300x210")

lb = Listbox(root, selectmode=MULTIPLE)
for fruit in fruits:
    lb.insert(END, fruit)
lb.pack(pady=10)

root.mainloop()
执行结果
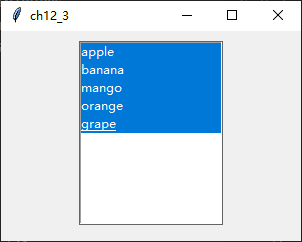
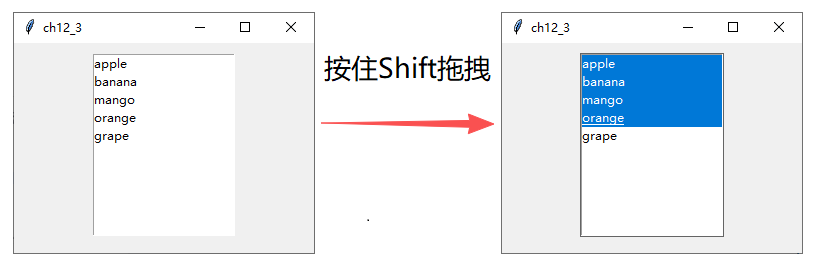
下面程序实例:使用selectmode=EXTENDED参数,重新设计ch12_4,此时可以用拖拽的方式选取区间项目。如果先单击一个项目,然后按住Shift键并单击另一个项目可以选取这个区间内的项目。
from tkinter import *
fruits = ["apple", "banana", "mango", "orange", "grape"]

root = Tk()
root.title("ch12_5")
root.geometry("300x210")

lb = Listbox(root, selectmode=EXTENDED)
for fruit in fruits:
    lb.insert(END, fruit)
lb.pack(pady=10)

root.mainloop()
执行结果
目前插入选项皆是插在最后面,所以语法是insert(END, elements),其实第一个参数是索引值,如果将END改为ACTIVE,表示是在目前选项前面加入一个项目,如果尚未选择选项则此ACTIVE是0.下面程序实例:先建立三个选项,然后使用insert(ACTIVE, elements...)在目前选项前方建立另外三个选项。
from tkinter import *
fruits = ["apple", "banana", "mango"]

root = Tk()
root.title("ch12_6")
root.geometry("300x210")

lb = Listbox(root, selectmode=EXTENDED)
for fruit in fruits:
    lb.insert(END, fruit)
lb.insert(ACTIVE, "orange", "grape")        # 在前面补充建立两个项目
lb.pack(pady=10)

root.mainloop()
执行结果
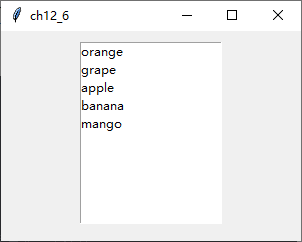
请注意第11行一次插入了两个项目的方式。
12-3 Listbox的基本操作
本节将介绍下列常用的Listbox控件操作的方法。
(1) size():传回列表项目的数量,可参考12-3-1节。
(2) selection_set():选取特定索引值,可参考12-3-2节。
(3) delete():删除特定索引项,可参考12-3-3节。
(4) get():传回指定索引项,可参考12-3-4节。
(5) curselection():传回选取项目的索引,可参考12-3-5节。
(6) selection_include():检查指定索引是否被选取,可参考12-3-6节。
12-3-1 列出列表框的选项数量size()
下面程序实例:参考ch12_5建立列表框,然后列出列表框中的项目数量。
from tkinter import *
fruits = ["apple", "banana", "mango", "orange", "grape"]

root = Tk()
root.title("ch12_7")
root.geometry("300x210")

lb = Listbox(root, selectmode=EXTENDED)
for fruit in fruits:
    lb.insert(END, fruit)
lb.pack(pady=10)
print("items数字: ", lb.size())

root.mainloop()
执行结果 下面是Python Shell窗口中的执行结果。
PS E:\code\python\GuiTkinter\ch12> python .\ch12.py
items数字:  5
12-3-2选取特定索引项selection_set()
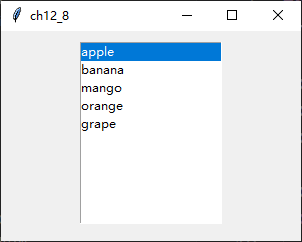
如果selection_set()方法内含一个参数,表示选取这个索引项,这个功能常被用于在建立好Listbox后,设定初次选择的项目。
下面程序实例:建立一个Listbox,然后设定初次的选择项目是索引为0的项目,需留意第12行。
from tkinter import *
fruits = ["apple", "banana", "mango", "orange", "grape"]

root = Tk()
root.title("ch12_8")
root.geometry("300x210")

lb = Listbox(root)
for fruit in fruits:
    lb.insert(END, fruit)
lb.pack(pady=10)
lb.select_set(0)            # 默认选择第0个项目

root.mainloop()
执行结果
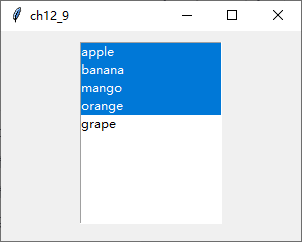
如果在select_set()方法内有两个参数时,则表示选取区间选项,第一个参数是区间的起始索引项,第二个参数是区间的结束索引项。
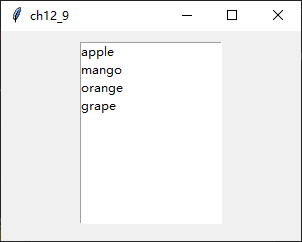
下面程序实例:建立一个Listbox,然后设定初次的选择项目是索引为0 ~ 3的项目,读者需留意第12行。
from tkinter import *
fruits = ["apple", "banana", "mango", "orange", "grape"]

root = Tk()
root.title("ch12_9")
root.geometry("300x210")

lb = Listbox(root, selectmode=EXTENDED)
for fruit in fruits:
    lb.insert(END, fruit)
lb.pack(pady=10)
lb.select_set(0, 3)            # 默认选择第0 ~ 3个项目

root.mainloop()
执行结果
12-3-3 删除特定索引项delete()
如果delete()方法内含一个参数,表示删除这个索引项。
下面程序实例:建立Listbox后删除索引为1的项目,原先索引为1的项目是banana,经执行后将没有显示,因为已经被删除了,读者需留意第12行。
from tkinter import *
fruits = ["apple", "banana", "mango", "orange", "grape"]

root = Tk()
root.title("ch12_10")
root.geometry("300x210")

lb = Listbox(root)
for fruit in fruits:
    lb.insert(END, fruit)
lb.pack(pady=10)
lb.delete(1)                # 删除索引为1的项目

root.mainloop()
执行结果
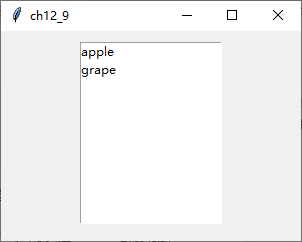
如果在delete()方法内有两个参数时,则表示删除区间选项,第一个参数是区间的起始索引项,第二个参数是区间的结束索引项。
下面程序实例:建立一个Listbox,然后删除索引为1 ~ 3的项目,需留意第12行。
from tkinter import *
fruits = ["apple", "banana", "mango", "orange", "grape"]

root = Tk()
root.title("ch12_11")
root.geometry("300x210")

lb = Listbox(root)
for fruit in fruits:
    lb.insert(END, fruit)
lb.pack(pady=10)
lb.delete(1, 3)                # 删除索引为1~3的项目

root.mainloop()
执行结果
12-3-4 传回指定的索引项get()
如果get()方法内含一个参数,表示传回这个索引项的元素内容。
下面程序实例,建立Listbox后,传回索引为1的项目。
from tkinter import *
fruits = ["apple", "banana", "mango", "orange", "grape"]

root = Tk()
root.title("ch12_12")
root.geometry("300x210")

lb = Listbox(root)
for fruit in fruits:
    lb.insert(END, fruit)
lb.pack(pady=10)
print(lb.get(1))              # 打印索引为1的项目

root.mainloop()
执行结果
PS E:\code\python\GuiTkinter\ch12> python .\ch12.py
banana
如果在get()方法内有两个参数时,则表示传回区间选项,第一个参数时区间的起始索引项,第二个参数时区间的结束索引项,所传回的值用元组方式传回。
下面程序实例:建立Listbox后,传回索引为1 ~ 3的项目。
from tkinter import *
fruits = ["apple", "banana", "mango", "orange", "grape"]

root = Tk()
root.title("ch12_13")
root.geometry("300x210")

lb = Listbox(root)
for fruit in fruits:
    lb.insert(END, fruit)
lb.pack(pady=10)
print(lb.get(1, 3))              # 打印索引为1 ~ 3的项目

root.mainloop()
执行结果
PS E:\code\python\GuiTkinter\ch12> python .\ch12.py
('banana', 'mango', 'orange')
12-3-5 传回所选取项目的索引curselection()
这个方法会传回所选取项目的索引。
下面程序实例:建立列表框,当选择选项时,若单击Print按钮可以在Python Shell窗口中打印所选取的内容。读者需留意程序第4行是获得所选的索引项,如果所选项目超过两个会用元组传回,所以第5、6行可以列出所选取索引项的内容。
from tkinter import *

def callback():
    indexs = lb.curselection()
    for index in indexs:            # 取得索引值
        print(lb.get(index))        # 打印所选项目

fruits = ["apple", "banana", "mango", "orange", "grape"]

root = Tk()
root.title("ch12_14")
root.geometry("300x250")

lb = Listbox(root, selectmode=MULTIPLE)
for fruit in fruits:
    lb.insert(END, fruit)
lb.pack(pady=5)
btn = Button(root, text="Print", command=callback)
btn.pack(pady=5)

root.mainloop()
执行结果

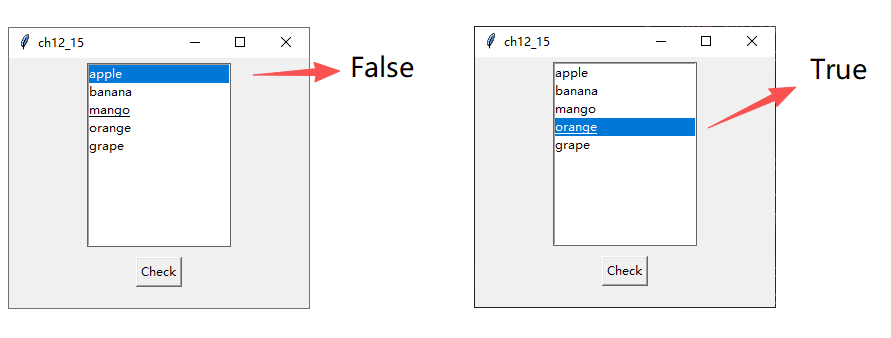
12-3-6 检查指定索引项是否被选取selection include()
如果指定索引项被选取会传回True,否则传回False。
下面程序实例:检查索引3的项目是否被选取,如果被选取单击Check按钮可以显示True,否则显示False。
from tkinter import *

def callback():
    print(lb.select_includes(3))

fruits = ["apple", "banana", "mango", "orange", "grape"]

root = Tk()
root.title("ch12_15")
root.geometry("300x250")

lb = Listbox(root, selectmode=MULTIPLE)
for fruit in fruits:
    lb.insert(END, fruit)
lb.pack(pady=5)
btn = Button(root, text="Check", command=callback)
btn.pack(pady=5)

root.mainloop()
执行结果
12-4 Listbox与事件绑定
12-4-1 虚拟绑定应用于单选
当Listbox执行选取操作时会产生<>虚拟事件,可以由此设置事件处理程序。
下面程序实例:当选择Listbox中的项目时,可以在上方列出所选的项目。
from tkinter import *

def itemSelected(event):            # 列出所选单一项目
    obj = event.widget              # 取得事件的对象
    index = obj.curselection()      # 取得索引
    var.set(obj.get(index))         # 设置标签内容

fruits = ["apple", "banana", "mango", "orange", "grape"]

root = Tk()
root.title("ch12_16")
root.geometry("300x250")

var = StringVar()
lab = Label(root, text="", textvariable=var)
lab.pack(pady=5)

lb = Listbox(root)
for fruit in fruits:
    lb.insert(END, fruit)
lb.bind("<<ListboxSelect>>", itemSelected)
lb.pack(pady=5)

root.mainloop()
执行结果
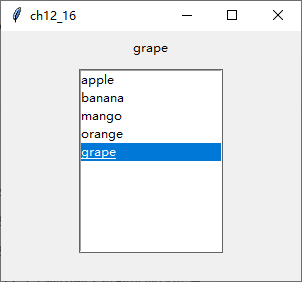
注意第21行,当单击Listbox中选项时会产生虚拟的<>事件,此时可以触发itemSlected()方法处理此事件。程序第3 ~ 6行也是新的概念,第第4行先取得事件对象obj,此例这个对象就是Listbox对象,然后利用这个obj对象取得所选的项目索引,再由索引取得所选的项目。
当然也可以省略第4行,直接使用原先的Listbox对象lb也可以,可以参考下面这个实例。
下面程序实例:重新设计ch12_16,修改itemSelected()方法,下面时此方法的内容。
def itemSelected(event):            # 列出所选单一项目
    index = lb.curselection()      # 取得索引
    var.set(lb.get(index))         # 设置标签内容
执行结果于ch12_16相同。
早期或网络上一些人不懂虚拟绑定的概念,在设计这类程序时,由于单击是被tkinter绑定选取Listbox的项目,就用双击方式处理,将所选项目放在标签上。
下面程序实例:重新设计ch12_16,使用取代虚拟事件。
lb.bind("<Double-Button-1>", itemSelected)执行结果与ch12_16相同。
讲解这个程序的目的是之前网络上有人如此处理,当然建议使用ch12_16的方法,因为站在使用者的角度,期望单击即可选取和将所选的项目处理完成。
12-4-2 虚拟绑定应用于多选
虚拟绑定的概念也可以应用于多选,下面直接以实例讲解。
下面程序实例:重新设计ch12_16,当选择多项时,这些被选的项目将被打印出来。这个程序的selectmode使用EXTENDED。
from tkinter import *

def itemSelected(event):            # 列出所选单一项目
    obj = event.widget              # 取得事件的对象
    indexs = lb.curselection()       # 取得索引
    for index in indexs:
        print(obj.get(index))
    print("------------------")

fruits = ["apple", "banana", "mango", "orange", "grape"]

root = Tk()
root.title("ch12_18")
root.geometry("300x250")

var = StringVar()
lab = Label(root, text="", textvariable=var)
lab.pack(pady=5)

lb = Listbox(root, selectmode=EXTENDED)
for fruit in fruits:
    lb.insert(END, fruit)
lb.bind("<<ListboxSelect>>", itemSelected)
lb.pack(pady=5)

root.mainloop()
执行结果
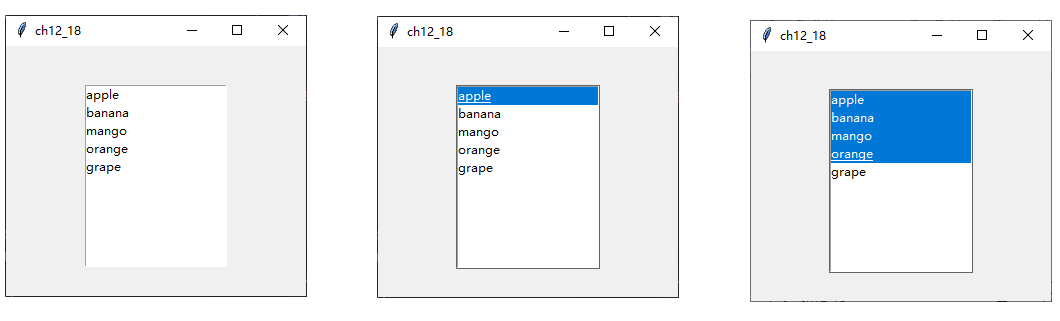
下面是Python Shell窗口的输出。
PS E:\code\python\GuiTkinter\ch12> python .\ch12.py
apple
------------------
apple
banana
mango
orange
------------------
12-5 活用加入和删除项目
本节将以一个比较实用的例子说明加入与删除Listbox项目的应用。
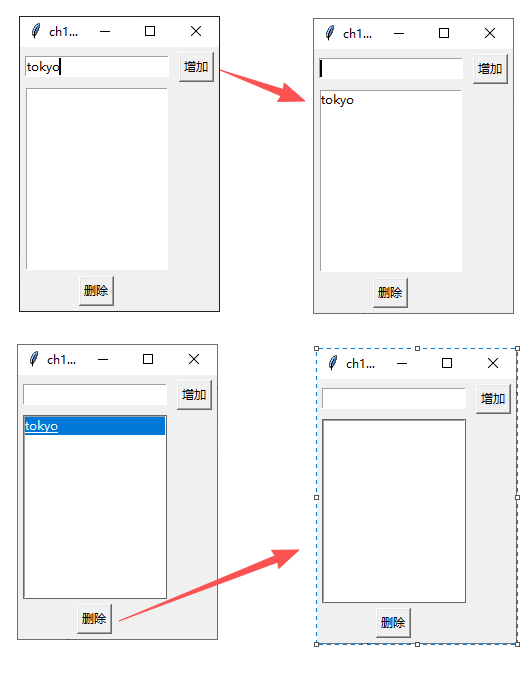
下面程序实例:增加与删除项目的操作。这个程序有4个Widget控件,Entry是输入控件,可以在此输入项目,输入完项目后单击“增加”按钮,Entry中的项目就会被加入Listbox,同时Entry将被清空。若是选择Listbox内的项目后再单击“删除”按钮,可以将所选的项目删除。
from tkinter import *

def itemAdded():
    varAdd = entry.get()
    if (len(varAdd.strip()) == 0):
        return
    lb.insert(END, varAdd)
    entry.delete(0, END)

def itemDeleted():
    index = lb.curselection()
    if (len(index) == 0):
        return
    lb.delete(index)

root = Tk()
root.title("ch12_19")

entry = Entry(root)
entry.grid(row=0,column=0, padx=5, pady=5)

# 建立“增加”按钮
btnAdd = Button(root, text="增加", command=itemAdded)
btnAdd.grid(row=0, column=1, padx=5, pady=5)

lb = Listbox(root)
lb.grid(row=1, column=0, columnspan=2, padx=5, sticky=W)

# 建立“删除”按钮
btnDel = Button(root, text="删除", command=itemDeleted)
btnDel.grid(row=2, column=0, padx=5, pady=5)


root.mainloop()
执行结果 下面是增加项目与删除项目的操作。
12-6 Listbox项目的排序
在使用Listbox时常需要处理项目排序工作,下面将以实例讲解。
下面程序实例:这个程序中单击”排序“按钮时默认是从小到大排序,若是勾选复选框再单击”排序“按钮将从大到小排序。
from tkinter import *

def itemSorted():
    if (var.get() == True):
        revBool = True                  # 大到小排序是True
    else:
        revBool = False                 # 小到大排序是False
    listTmp = list(lb.get(0, END))      # 取得Listbox的所有項目
    sortedList = sorted(listTmp, reverse=revBool)   # 执行排序
    lb.delete(0, END)                   # 删除原先Listbox内容
    for item in sortedList:             # 将排序结果插入Listbox
        lb.insert(END, item)

fruits = ['Apple', 'Banana', 'Cherry', 'Durian', 'Elderberry', 'Fig']

root = Tk()
root.title("ch12_20")

lb = Listbox(root)
for fruit in fruits:
    lb.insert(END, fruit)
lb.pack(padx=10, pady=5)

# 建立“排序”按钮
btn = Button(root, text="排序", command=itemSorted)
btn.pack(side=LEFT, padx=10, pady=5)

# 建立排序设置复选框
var = BooleanVar()
cb = Checkbutton(root, text="从大到小排序", variable=var)
cb.pack(side=LEFT)

root.mainloop()
执行结果 下面是使用默认排序与使用”从大到小“排序的操作界面。

12-7 拖拽Listbox中的项目
在建立Listbox的过程中,另一个很重要的应用是可以拖拽选项,下面将以实例讲解这方面的应用。
下面程序实例:先建立Listbox,然后可以拖拽所选的项目。
from tkinter import *

def getIndex(event):                    # 处理单击选项
    lb.index = lb.nearest(event.y)      # 目前选项的索引

def dragJob(event):                     # 处理拖拽选项
    newIndex = lb.nearest(event.y)      # 目前选项的新索引
    if newIndex < lb.index:             # 往上拖拽
        x = lb.get(newIndex)            # 获得新位置的内容
        lb.delete(newIndex)             # 删除新位置内容
        lb.insert(lb.index + 1, x)      # 放回原先新位置的内容
        lb.index = newIndex             # 选项的新索引
    elif newIndex > lb.index:           # 如果新索引比旧索引大,则将选项向上移动
        x = lb.get(newIndex)            # 获得新位置的内容
        lb.delete(newIndex)             # 删除新位置内容
        lb.insert(lb.index - 1, x)      # 放回原先新位置的内容
        lb.index = newIndex             # 选项的新索引

fruits = ['Apple', 'Banana', 'Cherry', 'Durian', 'Elderberry', 'Fig']

root = Tk()
root.title("ch12_21")

lb = Listbox(root)
for fruit in fruits:
    lb.insert(END, fruit)
    lb.bind("<Button-1>", getIndex)
    lb.bind("<B1-Motion>", dragJob)
lb.pack(padx=10, pady=10)

root.mainloop()
执行结果
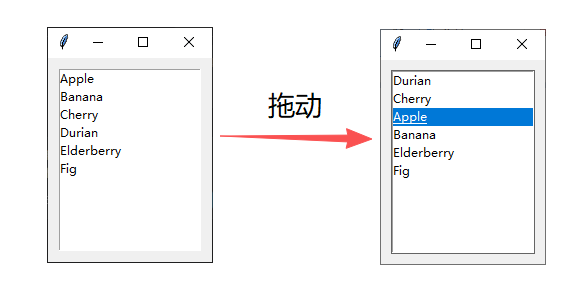
这个程序中在第4、7行使用了下列方法。
nearest(event, y)上述代码行可以传回最接近y坐标在Listbox中的索引。当有单击操作时会触发getIndex()方法,第4行可以传回目前选项的索引。在拖拽过程中会触发dragJob()方法,在第7行可以传回新选项的索引,在拖拽过程中这个方法会不断的被触发,至于会被触发多少次视移动速度而定。
若是以上述实例而言,目前选项Apple的索引时1,拖拽处理的过程如下。参考ch12_21的执行过程,是往下移动,整个流程说明如下。
(1) 新索引位置是1.
(2) 获得索引1的内容Banana,可参考14行。
(3) 删除索引1的内容Banana,可参考第15行。
(4) 将Banana的内容插入,相当于插入索引0位置,可参考第16行。
(5) 这时目前选项Apple的索引变成1,这样就达到移动选项的目的了,可参考第17行。
12-8 滚动条的设计
在默认的环境中Listbox是没有滚动条的,但是如果选项太多,将造成部分选项无法显示,此时可将滚动条Scrollbar控件加入Listbox。
注 Scrollbar控件除了可以应用在Listbox上,也可以应用在Text和Canvas控件上。
它的使用格式如下。
Scrollbar(父对象, options, ...)参数一:同上
options参数:
(1) activebackground:当光标经过滚动条时,滚动条和方向箭头的颜色。
(2) bg或background:当光标没有经过滚动条时,滚动条和方向箭头的颜色。
(3) borderwidth或bd:边界宽度,默认是2像素。
(4) command:滚动条移动时所触发的方法。
(5) cursor:当鼠标光标在滚动条上时的光标形状、
(6) elementborderwidth:滚动条和方向箭头的外部宽度,默认是1。
(7) highlightbackground:当滚动条没有获得焦点时的颜色。
(8) highlightcolor:当滚动条获得焦点时的颜色。
(9) highlightthickness:当获得焦点时的厚度,默认是1.
(10) jump:每次短距离地拖拽滚动条时都会触发command的方法,默认是0,如果设为1则只有放开鼠标按键时才会触发command的方法。
(11) orient:可设为HORIZONTAL/VERTICAL分别是水平轴/垂直轴。
(12) repeatdelay:单位是ms,默认是300ms,可以设置按住滚动条移动的停滞时间。
(13) takefocus:正常可以用按Tab键的方式切换滚动条成为焦点,如果设为0则取消此设置。
(14) troughcolor:滚动条槽的颜色。
(15) width:滚动条宽,默认是16。
下面程序实例:在Listbox中创建垂直滚动条。
from tkinter import *


root = Tk()
root.title("ch12_22")

scrollbar = Scrollbar(root)             # 创建滚动条
scrollbar.pack(side=RIGHT, fill=Y)

# 创建Listbox,yscrollcommand指向scrollbar.set方法
lb = Listbox(root, yscrollcommand=scrollbar.set)
for i in range(50):
    lb.insert(END, "Line " + str(i))
lb.pack(side=LEFT, fill=BOTH, expand=True)

scrollbar.config(command=lb.yview)

root.mainloop()
执行结果
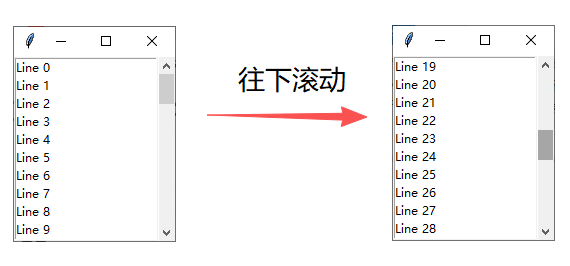
第11行是将Listbox的选项参数yscrollcommand设为scrollbar.set,表示将Listbox与滚动条做连动。
第16行scrollbar.config()方法主要是为scrollbar对象设置选择性参数内容,此例是设为command参数,也就是移动滚动条时,会去执行所指定的方法,此例是执行Listbox对象lb的yview()方法。
13、OptionMenu与Combobox
13-1 下拉式列表OptionMenu
OptionMenu可以翻译为下拉式列表,用户可以从中选择一项,它的构造方法如下。
OptionMenu(父对象, options, *value)其中,*value是一系列下拉列表,本节将通过实例进行讲解。
13-1-1 建立基本的OptionMenu
下面程序实例ch13_1,建立OptionMenu,这个下拉列表中有三个数据,分别是Python、Java、C。
from tkinter import *

root = Tk()
root.title("ch13_1")
root.geometry("300x180")

var = StringVar(root)
optionmenu = OptionMenu(root, var, "Python", "Java", "C")
optionmenu.pack()

root.mainloop()
执行结果 程序执行时OptionMenu中是空的,这是因为没有选择任何选项。
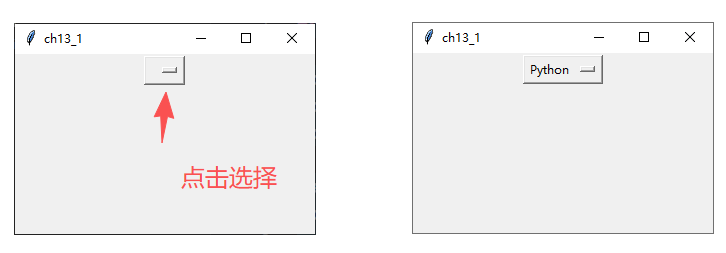
选择任一项后,选项会更改。
可以留意上述第8行建立OptionMenu下拉列表项目的方式。
13-1-2 使用元组建立列表项目
上述程序虽然可以建立列表,但是当列表中项目较多时,不是很方便,不过我们可以将列表项目建在元组内,再将元组数据放入OptionMenu()构造方法内。
下面程序实例ch13_2,重新设计ch13_1,使用元组存储列表项目。
from tkinter import *

root = Tk()
root.title("ch13_2")
root.geometry("300x180")

omTuple = ("Python", "Java", "C")
var = StringVar(root)
optionmenu = OptionMenu(root, var, *omTuple)    # 创建OptionMenu
optionmenu.pack()

root.mainloop()
执行结果 与ch13_1相同
13-1-3 建立默认选项set()
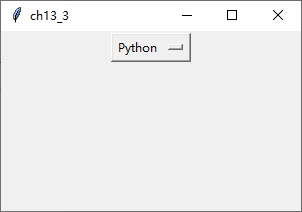
到目前,程序刚执行时,没有看到任何项目,不过我们可以使用set()方法为这个OptionMenu建立默认选项。
程序实例ch13_3,重新设计ch13_2,使用set()方法建立默认选项。
from tkinter import *

root = Tk()
root.title("ch13_3")
root.geometry("300x180")

omTuple = ("Python", "Java", "C")
var = StringVar(root)
var.set(omTuple[0])
optionmenu = OptionMenu(root, var, *omTuple)    # 创建OptionMenu
optionmenu.pack()

root.mainloop()
执行结果
13-1-4 获得选项内容get()
可以使用get()方法获得选项内容。
程序实例ch13_4:获得OptionMenu目前选项的内容,这个程序中提供了Print按钮,单击此按钮可以在Python Shell窗口中列出所选的内容。
from tkinter import *

def printSelection():
    print("The selection is: " + var.get())

root = Tk()
root.title("ch13_4")
root.geometry("300x180")

omTuple = ("Python", "Java", "C")
var = StringVar(root)
var.set(omTuple[0])
optionmenu = OptionMenu(root, var, *omTuple)    # 创建OptionMenu
optionmenu.pack(pady=10)

btn = Button(root, text="Print", command=printSelection)
btn.pack(pady=10, anchor=S, side=BOTTOM)

root.mainloop()
执行结果

Python Shell打印了The election is: Python
13-2 组合框Combobox
Combobox可以翻译为组合框,这是tkinter.ttk的Widget控件,它的特性与OptionMenu类似,可以说它是Entry和下拉菜单的组合。它的构造方法如下。
Combobox(父对象, options)常用的options参数如下。
(1) textvariable:可以设置Combobox的变量值。
(2) value:Combobox的选项内容,内容以元组方式存在。
13-2-1 建立Combobox
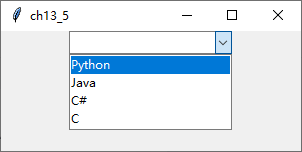
在Combobox()构造方法中,可以使用value参数建立选项内容。
程序实例ch13_5:建立一个Combobox。
from tkinter import *
from tkinter.ttk import *

root = Tk()
root.title("ch13_5")
root.geometry("300x120")

var = StringVar()
cb = Combobox(root, textvariable=var,
              value=("Python", "Java", "C#", "C"))
cb.pack()

root.mainloop()
执行结果
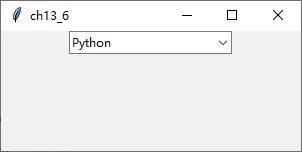
其实在设计上述程序时,若是选项很多,Combobox()方法的参数value一般是独立在Combobox()处处理,可以参考下列实例。
程序实例ch13_6:将Combobox的选项独立处理,可以参考第10行。
from tkinter import *
from tkinter.ttk import *

root = Tk()
root.title("ch13_6")
root.geometry("300x120")

var = StringVar()
cb = Combobox(root, textvariable=var)
cb['values'] = ('Python', 'Java', 'C#', 'C')
cb.pack()

root.mainloop()
执行结果 与上面相同。
13-2-2 设置默认选项current()
Combobox创建完成后,可以使用current()方法建立默认选项。
下面程序实例:设置元组索引0的元素Python为默认选项。
from tkinter import *
from tkinter.ttk import *

root = Tk()
root.title("ch13_7")
root.geometry("300x120")

var = StringVar()
cb = Combobox(root, textvariable=var)
cb['values'] = ('Python', 'Java', 'C', 'C++', 'C#')
cb.current(0)       # 设置默认选项
cb.pack()

root.mainloop()
执行结果
在前面建立Combobox过程中有textvariable=var,此var在第8行创建,有了它就可以用var.set("xx")方式建立默认选项,当然对这个实例而言,使用current()方法较为便利。
下面程序实例ch13_8:重新设计ch13_7,使用var.set()建立默认选项。
var.set("Python")执行结果与ch13_7相同。
13-2-3 获得目前选项get()
在前面建立Combobox过程中有textvariable=var,可以使用var.get()获得目前选项的内容。
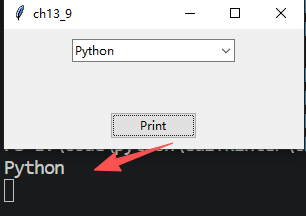
下面程序实例ch13_9:扩充设计ch13_7,增加Print按钮,当单击此按钮时可以在Python Shell窗口中打印此选项。
from tkinter import *
from tkinter.ttk import *

def printSelection():
    print(var.get())

root = Tk()
root.title("ch13_9")
root.geometry("300x120")

var = StringVar()
cb = Combobox(root, textvariable=var)
cb['values'] = ('Python', 'Java', 'C', 'C++', 'C#')
cb.current(0)       # 设置默认选项
cb.pack(pady=10)

btn = Button(root, text="Print", command=printSelection)
btn.pack(pady=10, anchor=S, side=BOTTOM)

root.mainloop()
执行结果
13-2-4 绑定Combobox
当Combobox中的选项有变动时,会产生虚拟<>事件,也可以使用这个特性将此事件绑定处理方法。
下面程序实例ch13_10:同步Combobox和Label的内容。
from tkinter import *
from tkinter.ttk import *

def comboSelection(event):
    labelVar.set(var.get())

root = Tk()
root.title("ch13_10")
root.geometry("300x120")

var = StringVar()
cb = Combobox(root, textvariable=var)
cb['values'] = ('Python', 'Java', 'C', 'C++', 'C#')
cb.current(0)
cb.bind("<<ComboboxSelected>>", comboSelection)
cb.pack(pady=10)

labelVar = StringVar()
label = Label(root, textvariable=labelVar)
labelVar.set(var.get())
label.pack(side=LEFT)

root.mainloop()
执行结果


汇聚全球AI编程工具,助力开发者即刻编程。
更多推荐


 6
6 0
0- 0


 已为社区贡献2条内容

所有评论(0)