
Hermes Agent 定制开发指南(Overview)
这篇文章准备从一个宏观的角度去看看如果开发者拿到这么一个项目,我们应该如何启动,能够快速上手。
下面从开发环境、架构、功能地图、定制开发、配置、测试、调试几个部分,将这个项目拆分开来。
▍ 开发环境
从 git 上拉到远程仓库,使用 uv 安装依赖:
git clone <repo-url> hermes-agent && cd hermes-agentuv venv venv --python 3.11 && source venv/bin/activateuv pip install -e ".[all,dev]"hermes doctor # 验证
▍ 架构概要
Hermes Agent 的核心是一个工具调用循环。整个流程如下:
用户输入消息
│
▼
AIAgent._run_agent_loop()
│
├── 1. 构建系统提示词(prompt_builder.py)
│      ├── 智能体身份(DEFAULT_AGENT_IDENTITY)
│      ├── 平台提示(OS 相关指导)
│      ├── 技能索引(可用 Skills 列表)
│      ├── 上下文文件(.hermes.md、SOUL.md)
│      └── 记忆注入(持久化记忆内容)
│
├── 2. 构建 API 请求参数
│      ├── 模型名称 & 提供商
│      ├── 消息历史
│      ├── 工具定义列表(JSON Schema)
│      └── 推理配置(reasoning effort)
│
├── 3. 调用 LLM(OpenAI 兼容 API)
│
├── 4. 解析响应
│      │
│      ├── [包含 tool_calls] ──► 执行工具
│      │      ├── 通过 registry 分发到具体 handler
│      │      ├── 将工具结果加入消息历史
│      │      └── 回到步骤 3(继续循环)
│      │
│      └── [纯文本响应] ──► 返回最终回答
│             ├── 持久化会话到 SQLite
│             └── 记录轨迹(可选,用于 RL 训练)
│
└── 5. 上下文压缩(如接近 token 上限)
└── 智能摘要中间对话,保留首尾
▍ 功能地图
核心的功能模块:
run_agent.py (AIAgent)          # 核心编排:对话循环、工具分发、会话管理
├── agent/
│   ├── prompt_builder.py       # 系统提示词组装(身份/平台/技能索引/记忆)
│   ├── context_compressor.py   # 上下文压缩(接近 token 上限时触发)
│   ├── model_metadata.py       # 模型元数据(context length、定价)
│   ├── memory_manager.py       # 记忆管理(预取/同步)
│   └── skill_utils.py          # 技能元数据解析
├── model_tools.py              # 工具发现 & 分发
├── tools/registry.py           # 工具注册中心
├── tools/                      # 50+ 工具实现
├── toolsets.py                 # 工具集分组定义
├── gateway/                    # 消息平台网关
│   ├── run.py                  # GatewayRunner
│   ├── session.py              # 会话管理
│   ├── delivery.py             # 消息投递
│   └── platforms/              # 各平台适配器
├── plugins/memory/             # 记忆提供商插件
├── cli.py                      # 交互式 TUI
├── hermes_cli/                 # CLI 子命令
├── skills/                     # 内置技能(Markdown)
├── cron/                       # 定时任务调度
└── acp_adapter/                # 编辑器集成(VS Code、Cursor)
模块的依赖关系如下:
┌─────────────────────────────────────────────────────┐
│              run_agent.py (AIAgent)                  │
│        核心编排:对话循环、工具分发、会话管理           │
└────────┬──────────────────────────────┬─────────────┘
│                              │
┌─────▼──────────┐          ┌───────▼──────────┐
│  agent/         │          │  hermes_cli/      │
│  内部模块       │          │  CLI 命令          │
│  ├ prompt_      │          │  ├ main.py        │
│  │ builder.py   │          │  ├ setup.py       │
│  ├ context_     │          │  ├ commands.py    │
│  │ compressor   │          │  └ ...            │
│  ├ memory_      │          └───────┬──────────┘
│  │ manager.py   │                  │
│  ├ model_       │          ┌───────▼──────────┐
│  │ metadata.py  │          │  cli.py           │
│  └ ...          │          │  交互式 TUI       │
└─────┬──────────┘          └──────────────────┘
│
┌─────▼──────────────────────────────────────┐
│  model_tools.py                             │
│  工具发现 & 分发编排                         │
│  ├ _discover_tools()  导入所有工具模块       │
│  ├ get_tool_definitions()  获取 Schema      │
│  └ handle_function_call()  路由执行          │
└─────┬──────────────────────────────────────┘
│
┌─────▼──────────┐     ┌───────────────────┐
│  tools/         │     │  gateway/          │
│  registry.py    │     │  消息平台网关       │
│  (工具注册中心)  │     │  ├ run.py          │
│                 │     │  ├ session.py      │
│  50+ 工具实现    │     │  ├ platforms/      │
│  ├ web_tools    │     │  │  ├ telegram.py  │
│  ├ terminal     │     │  │  ├ discord.py   │
│  ├ file_tools   │     │  │  ├ slack.py     │
│  ├ browser      │     │  │  └ ...          │
│  ├ vision       │     │  └ delivery.py     │
│  └ ...          │     └───────────────────┘
└────────────────┘
快速定位:
| 想改什么 | 去哪里 |
| 核心对话循环 | run_agent.py → AIAgent |
| 系统提示词 | agent/prompt_builder.py |
| 上下文压缩 | agent/context_compressor.py |
| 工具注册机制 | tools/registry.py |
| 工具集分组 | toolsets.py toolset_distributions.py |
| 工具发现/分发 | model_tools.py |
| 某个工具的实现 | tools/<tool_name>.py |
| 某个平台网关 | gateway/platforms/.py |
| 网关会话管理 | gateway/session.py |
| 技能解析 | agent/skill_utils.py |
| 定时任务 | cron/scheduler.py cron/jobs.py |
▍ 定制开发
1、添加工具
Step 1 :在 tools/ 下创建文件:
# tools/my_tool.py
from tools.registry import registry
def check_available():
import os
return os.environ.get("MY_API_KEY") is not None
async def handle_my_action(arguments: dict, **kwargs) -> str:
param1 = arguments.get("param1", "")
return f"结果: {param1}"
registry.register(
name="my_action",
toolset="my_toolset",
schema={
"type": "function",
"function": {
"name": "my_action",
"description": "执行我的操作",
"parameters": {
"type": "object",
"properties": {
"param1": {"type": "string", "description": "参数说明"}
},
"required": ["param1"]
}
}
},
handler=handle_my_action,
check_fn=check_available,
requires_env=["MY_API_KEY"],
is_async=True,
)
Step 2 :
在 model_tools.py 的 _discover_tools() 中添加
from tools import my_tool
Step 3(可选):
若创建了新工具集,在 toolsets.py 中注册:
TOOLSETS["my_toolset"] = ["my_action"]
2、添加消息平台
在 gateway/platforms/ 下创建适配器,继承 base.py 中的抽象基类:
# gateway/platforms/my_platform.py
from gateway.platforms.base import BasePlatform
class MyPlatformAdapter(BasePlatform):
async def start(self):
"""启动连接"""
async def stop(self):
"""断开连接"""
async def send_message(self, chat_id: str, text: str, **kwargs):
"""发送消息"""
async def on_message(self, message):
"""收到消息 -> 转为统一格式交给 GatewayRunner"""
然后在 gateway/config.py 的 Platform 枚举中注册。
3、创建技能
技能放在 ~/.hermes/skills/<类别>/<技能名>/SKILL.md:
---
platforms: [macos, linux]
tags: [automation]
requires: [GITHUB_TOKEN]
---
# 技能名称
简短描述(第一段作为索引摘要)。
## 步骤
1. ...
2. ...
技能会在 prompt 构建时被扫描索引,匹配后注入系统提示词。
参考:agent/skill_utils.py、agent/prompt_builder.py 中的 build_skills_system_prompt()。
4、MCP 工具集成
在 ~/.hermes/config.yaml 中声明 MCP 服务器,工具会自动注册:
mcp:
servers:
- name: my-server
command: npx
args: ["-y", "@my/mcp-server"]
env:
API_KEY: "..."
5、终端执行后端
通过策略模式切换(tools/environments/),实现 base.py 的抽象基类即可添加新后端:
tools/environments/├── base.py # 抽象基类├── local.py # 本地 Shell├── docker.py # Docker├── ssh.py # SSH├── modal.py # Modal├── daytona.py # Daytona├── singularity.py # Singularity└── persistent_shell.py
通过 config.yaml 中 terminal.env_type 切换。
▍ 配置
配置目录:~/.hermes/(可通过 HERMES_HOME 环境变量覆盖)
~/.hermes/├── config.yaml # 主配置├── .env # API 密钥├── skills/ # 技能├── memories/ # 记忆├── state.db # 会话数据库├── cron/ # 定时任务└── profiles/ # 多配置隔离
关键配置项:
model:default:"anthropic/claude-sonnet-4-20250514"provider:"openrouter"# openrouter/anthropic/openai/custombase_url:null# 自定义端点terminal:env_type:"local"# local/docker/ssh/modal/daytona/singularitycompression:enabled:truethreshold:0.5# token 使用率阈值agent:max_turns:50system_prompt:null# 追加自定义提示词delegation:max_iterations:20default_toolsets: [terminal, file, web]toolsets:enabled: [web, terminal, file, skills, memory, cron, delegate]disabled: [browser, vision]skills:disabled: [social-media/xitter]external_dirs: [/path/to/custom/skills]memory:provider:"builtin"# builtin/mem0/honcho/...
▍ 测试
pytest tests/ -v                          # 全部
pytest tests/test_agent_loop.py -v        # 单文件
pytest tests/test_agent_loop.py::test_name -v  # 单测试
pytest tests/ --cov=. --cov-report=html   # 覆盖率
测试目录与源码对应:tests/agent/、tests/gateway/、tests/hermes_cli/、tests/plugins/ 等。需要 API 的工具用 unittest.mock 模拟。
▍ 调试
HERMES_LOG_LEVEL=DEBUG hermes # 详细日志HERMES_LOG_API=1 hermes # 查看 API 请求
# 检查工具注册
from tools.registry import registry
print(registry.get_tool_to_toolset_map())
# 直接调用工具
from model_tools import handle_function_call
result = handle_function_call("web_search", {"query": "test"})
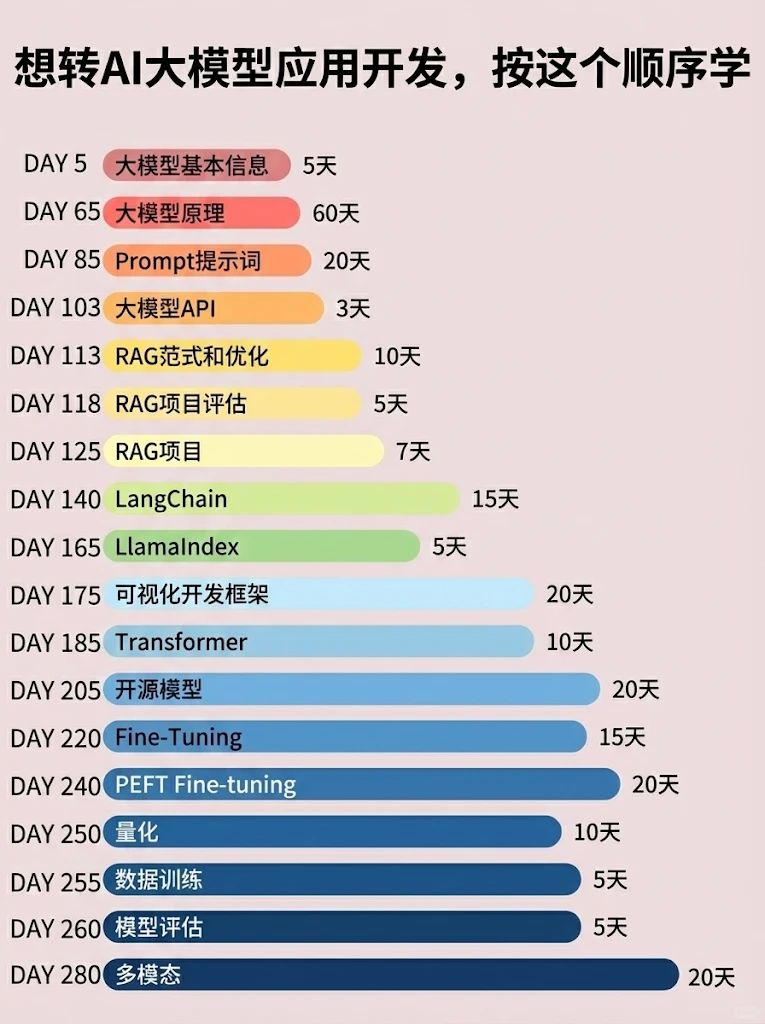
学AI大模型的正确顺序,千万不要搞错了
🤔2026年AI风口已来!各行各业的AI渗透肉眼可见,超多公司要么转型做AI相关产品,要么高薪挖AI技术人才,机遇直接摆在眼前!
有往AI方向发展,或者本身有后端编程基础的朋友,直接冲AI大模型应用开发转岗超合适!
就算暂时不打算转岗,了解大模型、RAG、Prompt、Agent这些热门概念,能上手做简单项目,也绝对是求职加分王🔋
📝给大家整理了超全最新的AI大模型应用开发学习清单和资料,手把手帮你快速入门!👇👇
学习路线:
✅大模型基础认知—大模型核心原理、发展历程、主流模型(GPT、文心一言等)特点解析
✅核心技术模块—RAG检索增强生成、Prompt工程实战、Agent智能体开发逻辑
✅开发基础能力—Python进阶、API接口调用、大模型开发框架(LangChain等)实操
✅应用场景开发—智能问答系统、企业知识库、AIGC内容生成工具、行业定制化大模型应用
✅项目落地流程—需求拆解、技术选型、模型调优、测试上线、运维迭代
✅面试求职冲刺—岗位JD解析、简历AI项目包装、高频面试题汇总、模拟面经
以上6大模块,看似清晰好上手,实则每个部分都有扎实的核心内容需要吃透!
我把大模型的学习全流程已经整理📚好了!抓住AI时代风口,轻松解锁职业新可能,希望大家都能把握机遇,实现薪资/职业跃迁~
这份完整版的大模型 AI 学习资料已经上传CSDN,朋友们如果需要可以微信扫描下方CSDN官方认证二维码免费领取【保证100%免费】


汇聚全球AI编程工具,助力开发者即刻编程。
更多推荐

 10
10 0
0- 0


 已为社区贡献31条内容

所有评论(0)