
从零开发 WorkBuddy Windows Control MCP:36 个工具让 AI 操控任意桌面应用
从零开发 WorkBuddy Windows Control MCP:36 个工具让 AI 操控任意桌面应用
摘要:将 OpenAI Codex Computer Use 的 Windows 桌面控制能力移植到 WorkBuddy MCP 框架,开发了 36 个工具的通用桌面自动化服务器。本文涵盖完整开发流程、5 个关键 Bug 的根因分析与修复、以及一次意外发现——MCP 架构下截图竟消耗 18 万 token,是 Codex 原生的 50 倍。文章深入分析了多模态 VLM 与文本 LLM 在桌面自动化场景下的本质差异,并给出了 76% 的优化方案。
警告:
WorkBuddy 积分消耗警告!此功能因为模型多模态能力差异和平台用量规则差异,WorkBuddy 积分消耗是同等操作的 40-50 倍。根因在于架构差异——Codex 是多模态模型原生"看"屏幕,而 WorkBuddy Windows Control MCP 是文本模型通过 base64 图片"读"屏幕。
目录
- 一、背景:为什么需要桌面自动化
- 二、调研:Codex Computer Use 的三条技术路线
- 三、架构设计:36 个工具的布局
- 四、实战开发:核心代码精讲
- 五、踩坑实录:5 个关键 Bug 的根因与修复
- 六、深度分析:为什么 MCP 积分消耗是 Codex 的 50 倍
- 七、测试验证:从离线到在线的全流程
- 八、使用指南:与 Flue 的协作分工
- 九、优化路线图:从 18 万 token 到接近零成本
- 十、总结与反思
一、背景:为什么需要桌面自动化
1.1 场景痛点
假设你想让 AI 帮你完成这个任务:
“打开企业微信,找到张总的聊天窗口,把桌面上的 Q3 报表截图发过去。”
如果 AI 不能操控桌面应用,你就得手动完成。如果 AI 能直接操控——它截屏、识别窗口、定位联系人、发送文件——你的角色就从"操作者"变成"监督者"。
这就是桌面自动化的价值。WorkBuddy 已有的 Flue 技能覆盖了 Adobe/Office 等有脚本 API 的应用,但大量日常软件(企业微信、钉钉、浏览器、ERP 系统)没有 API,只能通过 GUI 操控。
1.2 技术选型
OpenAI 在 Codex 中已经实现了 Computer Use 功能,但那是闭源的。WorkBuddy 作为开放的 MCP(Model Context Protocol)客户端,最好的方案是自建 MCP 服务器,让 WorkBuddy 通过标准 MCP 协议调用 Windows 桌面控制工具。
二、调研:Codex Computer Use 的三条技术路线
在动手之前,我调研了三个相关实现:
2.1 OpenAI Codex Computer Use(官方)
架构:截图 → 多模态 VLM 推理 → 执行鼠标/键盘操作
这是最"原生"的方案。Codex 的模型本身就是多模态的(支持图片输入),它直接"看到"屏幕,然后推理出下一步操作。整个过程是一次 API 调用完成。
特点:
- 工具极少(主要是
computer一个工具,参数包含 action、坐标等) - VLM 自带视觉理解能力,不需要 OCR 或图像搜索
- Token 消耗极低(截图作为像素直入视觉编码器,不走文本 tokenizer)
2.2 ezpzai/codex-computer-use-windows(社区)
GitHub 开源项目,提供了 30+ 个 MCP 工具。技术栈为 Python + uiautomation + pywin32 + Pillow。
主要工具:
screenshot/screenshot_window— 截屏click/move_mouse/scroll— 鼠标操作type_text/press_key— 键盘操作list_windows/focus_window/close_window— 窗口管理get_ui_tree/find_element/click_element— UI Automation 控件树get_clipboard/set_clipboard— 剪贴板
局限:无 OCR、无图像搜索、无进程管理。
2.3 cgissing/windows-computer-use(Node.js)
Node.js 实现,17 个工具,通过 PowerShell 调用 Windows API。功能最精简,但胜在纯 Node 生态,便于集成。
2.4 调研结论
三条路线中,ezpzai 的方案最成熟——30+ 工具覆盖了日常 GUI 操作的大部分场景,Python 生态也最适合 WorkBuddy 的已有技术栈。我的目标是在此基础上:
- 增强:添加 OCR 文字识别、OpenCV 图像搜索、进程管理
- 修复:解决线程安全、64 位兼容等 Windows 特有的坑
- 适配:适配 WorkBuddy 的 managed venv 和 MCP 配置规范
三、架构设计:36 个工具的布局
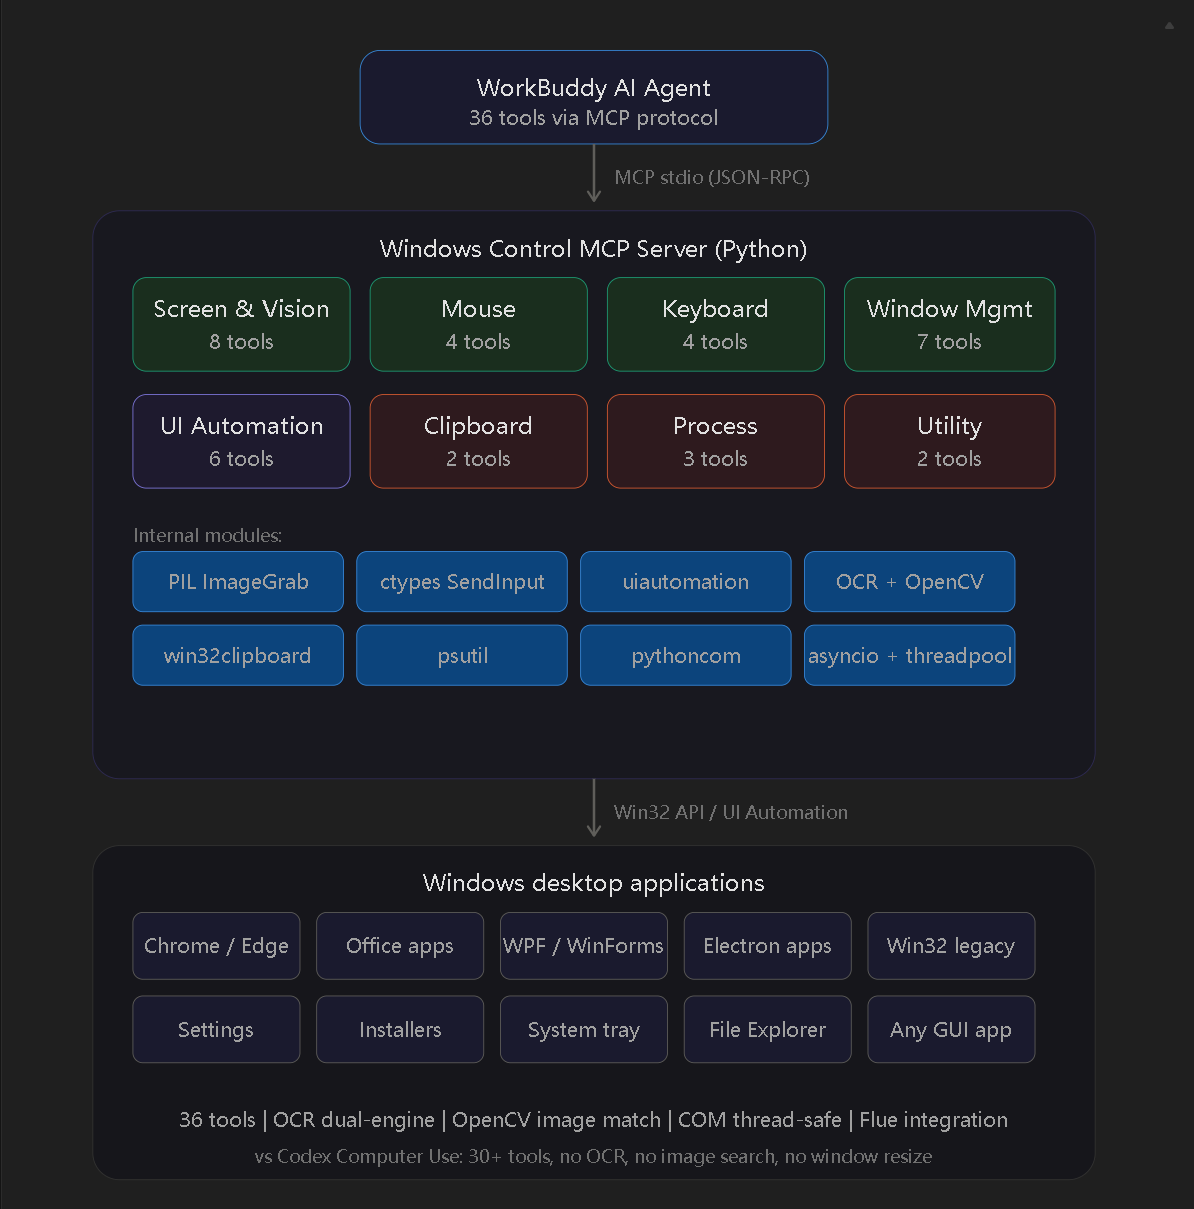
3.1 整体架构
┌──────────────────────────────────────┐
│         WorkBuddy AI Agent           │
│   (自然语言 → 工具选择 → 执行)        │
└──────────────┬───────────────────────┘
               │ MCP stdio (JSON-RPC)
               ▼
┌──────────────────────────────────────┐
│   Windows Control MCP Server         │
│   (Python 3.13, ~1400 行)            │
│                                      │
│   ┌─────────────────────────────┐    │
│   │  工具路由层 (execute_tool)    │    │
│   │  36 个工具的调度入口         │    │
│   └──────────┬──────────────────┘    │
│              │                       │
│   ┌──────────┼──────────────────┐    │
│   │          │                  │    │
│   ▼          ▼                  ▼    │
│ 截屏层    UI层              系统层     │
│ PIL     uiautomation      ctypes     │
│ OCR     win32gui        psutil/      │
│ OpenCV  win32api        subprocess   │
└──────────────┬───────────────────────┘
               │
               ▼
┌──────────────────────────────────────┐
│     Windows Desktop Applications     │
└──────────────────────────────────────┘
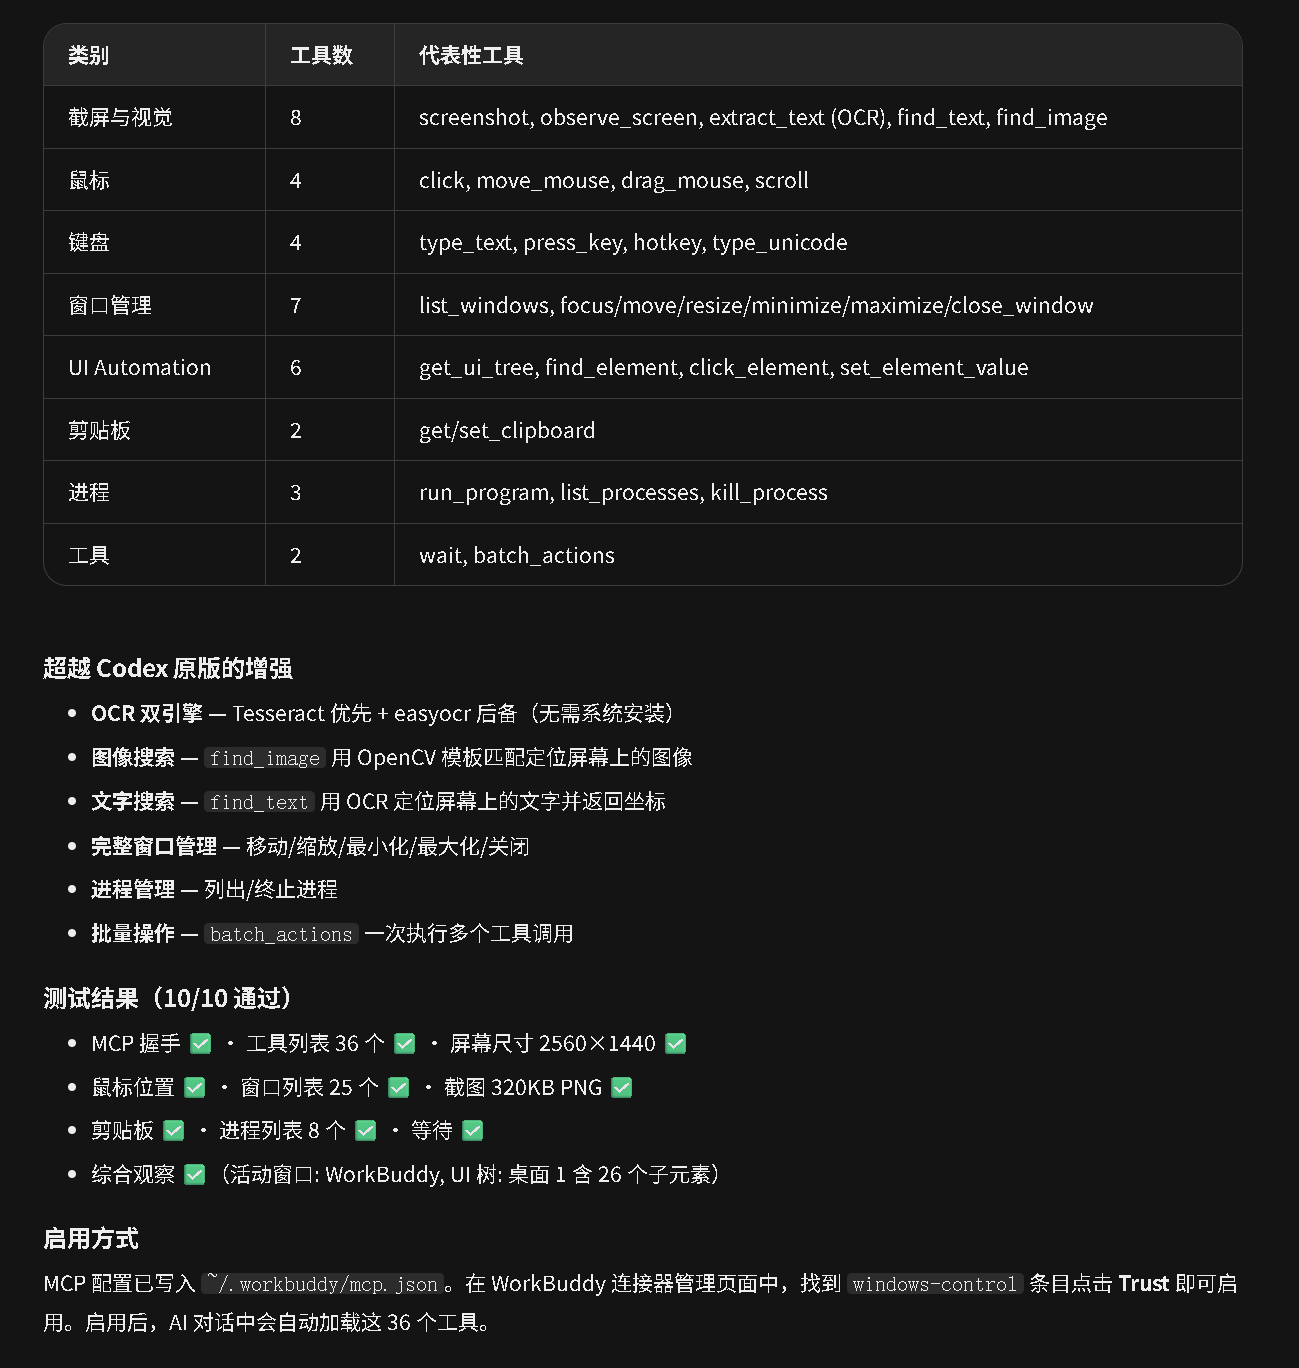
3.2 工具清单(36 个)
| 类别 | 数量 | 工具 |
|---|---|---|
| 截屏与视觉 | 8 | screenshot, screenshot_window, get_screen_size, get_cursor_position, extract_text (OCR), find_text (OCR 定位), find_image (OpenCV 模板匹配), observe_screen (综合观察) |
| 鼠标 | 4 | click, move_mouse, drag_mouse, scroll |
| 键盘 | 4 | type_text, press_key, hotkey, type_unicode |
| 窗口管理 | 7 | list_windows, focus_window, get_window_text, move_window, minimize_window, maximize_window, close_window |
| UI Automation | 6 | get_ui_tree, find_element, click_element, get_element_info, set_element_value, invoke_element |
| 剪贴板 | 2 | get_clipboard, set_clipboard |
| 进程 | 3 | run_program, list_processes, kill_process |
| 工具 | 2 | wait, batch_actions |
3.3 与 Codex 原版的增强对比
| 功能 | Codex Computer Use | Windows Control (本文) |
|---|---|---|
| OCR 文字识别 | 无(依赖 VLM 视觉理解) | pytesseract + easyocr 双引擎 |
| 图像搜索 | 无 | OpenCV 模板匹配 find_image |
| 文字定位 | 无 | OCR 坐标定位 find_text |
| 窗口管理 | 基本 | 移动/缩放/最小化/最大化/关闭 |
| 进程管理 | 无 | 启动/列出/终止 |
| 批量操作 | 无 | batch_actions 一次执行多个工具 |
| UI Automation | 无 | 完整控件树 + 元素查找 + 属性读写 |
四、实战开发:核心代码精讲
4.1 MCP 服务器骨架
MCP Python SDK 提供了标准的服务器模板:
from mcp.server import Server
from mcp.server.stdio import stdio_server
from mcp.types import Tool, TextContent, ImageContent
import asyncio

# 创建 MCP 服务器实例
server = Server("windows-control")

@server.list_tools()
async def list_tools() -> list[Tool]:
    """注册所有工具"""
    return [
        Tool(name="screenshot", description="截取全屏...",
             inputSchema={"type": "object", "properties": {}}),
        Tool(name="click", description="鼠标点击...",
             inputSchema={"type": "object", "properties": {
                 "x": {"type": "integer", "description": "X坐标"},
                 "y": {"type": "integer", "description": "Y坐标"},
                 "button": {"type": "string", "enum": ["left", "right", "middle"]},
             }}),
        # ... 其余 34 个工具
    ]

@server.call_tool()
async def call_tool(name: str, arguments: dict) -> list[TextContent | ImageContent]:
    """分发工具调用"""
    result = execute_tool(name, arguments)
    if isinstance(result, bytes):
        return [ImageContent(type="image", data=base64.b64encode(result).decode(), mimeType="image/png")]
    return [TextContent(type="text", text=json.dumps(result, ensure_ascii=False, default=str))]

async def main():
    async with stdio_server() as (read_stream, write_stream):
        await server.run(read_stream, write_stream, server.create_initialization_options())

if __name__ == "__main__":
    asyncio.run(main())
关键点:
list_tools()告诉 WorkBuddy 有哪些工具可用call_tool()是总调度入口,根据工具名分发到具体实现- 返回类型是
list[TextContent | ImageContent]——截图用ImageContent,其他用TextContent
4.2 截图:看似简单,实则暗藏杀机
from PIL import ImageGrab
import io

def take_screenshot(region=None, hwnd=None, quality=60, scale=1.0):
    """截取屏幕,返回 JPEG bytes。"""
    if hwnd is not None:
        rect = win32gui.GetWindowRect(hwnd)
        img = ImageGrab.grab(bbox=rect)
    elif region is not None:
        img = ImageGrab.grab(bbox=region)
    else:
        img = ImageGrab.grab()

    # 缩放
    if scale < 1.0:
        img = img.resize(
            (int(img.width * scale), int(img.height * scale)),
            Image.LANCZOS
        )

    # JPEG 压缩
    buf = io.BytesIO()
    img.save(buf, format="JPEG", quality=quality)
    return buf.getvalue()
教训:最初用 PNG 全分辨率,一张 2560×1440 截图 528KB,base64 编码后 ≈ 18 万 token!后文会详细分析这个"积分黑洞"。
4.3 鼠标键盘:Win32 SendInput 的 ctypes 封装
import ctypes
from ctypes import wintypes

# Win32 结构体定义
class MOUSEINPUT(ctypes.Structure):
    _fields_ = [
        ("dx", wintypes.LONG),
        ("dy", wintypes.LONG),
        ("mouseData", wintypes.DWORD),
        ("dwFlags", wintypes.DWORD),
        ("time", wintypes.DWORD),
        ("dwExtraInfo", ctypes.POINTER(wintypes.ULONG)),
    ]

class KEYBDINPUT(ctypes.Structure):
    _fields_ = [
        ("wVk", wintypes.WORD),
        ("wScan", wintypes.WORD),
        ("dwFlags", wintypes.DWORD),
        ("time", wintypes.DWORD),
        ("dwExtraInfo", ctypes.POINTER(wintypes.ULONG)),
    ]

class INPUT_UNION(ctypes.Union):
    _fields_ = [("mi", MOUSEINPUT), ("ki", KEYBDINPUT)]

class INPUT(ctypes.Structure):
    _fields_ = [
        ("type", wintypes.DWORD),
        ("union", INPUT_UNION),
    ]

# 加载 user32.dll
user32 = ctypes.windll.user32

# ⚠️ 必须声明 argtypes,否则 64 位下指针溢出!
user32.SendInput.argtypes = [wintypes.UINT, ctypes.POINTER(INPUT), ctypes.c_int]
user32.SendInput.restype = wintypes.UINT

def send_mouse_event(flags, x=0, y=0, data=0):
    """发送鼠标事件"""
    inp = INPUT()
    inp.type = 0  # INPUT_MOUSE
    inp.union.mi.dx = x
    inp.union.mi.dy = y
    inp.union.mi.mouseData = data
    inp.union.mi.dwFlags = flags
    user32.SendInput(1, ctypes.byref(inp), ctypes.sizeof(INPUT))

def click(x, y, button="left"):
    """移动鼠标并点击"""
    # 先移动到目标坐标
    user32.SetCursorPos(x, y)
    time.sleep(0.01)

    # 按下 + 释放
    if button == "left":
        send_mouse_event(0x0002)  # MOUSEEVENTF_LEFTDOWN
        send_mouse_event(0x0004)  # MOUSEEVENTF_LEFTUP
    elif button == "right":
        send_mouse_event(0x0008)  # RIGHTDOWN
        send_mouse_event(0x0010)  # RIGHTUP
4.4 窗口管理:ctypes 替代 win32gui
这是最关键的技术决策。win32gui.EnumWindows 使用 Python 回调,在 MCP 的异步线程池中有兼容性问题。改用纯 ctypes:
# 定义回调函数原型
WNDENUMPROC = ctypes.WINFUNCTYPE(wintypes.BOOL, wintypes.HWND, wintypes.LPARAM)

# 声明 EnumWindows
user32.EnumWindows.argtypes = [WNDENUMPROC, wintypes.LPARAM]
user32.EnumWindows.restype = wintypes.BOOL

def list_windows():
    """列出所有可见窗口,使用 ctypes 确保线程安全"""
    windows = []

    @WNDENUMPROC
    def callback(hwnd, lparam):
        if user32.IsWindowVisible(hwnd):
            # 获取窗口标题
            length = user32.GetWindowTextLengthW(hwnd)
            if length > 0:
                buf = ctypes.create_unicode_buffer(length + 1)
                user32.GetWindowTextW(hwnd, buf, length + 1)
                title = buf.value

                # 获取窗口类名
                class_buf = ctypes.create_unicode_buffer(256)
                user32.GetClassNameW(hwnd, class_buf, 256)

                # 获取窗口矩形
                rect = wintypes.RECT()
                user32.GetWindowRect(hwnd, ctypes.byref(rect))

                # 获取进程 PID
                pid = wintypes.DWORD()
                user32.GetWindowThreadProcessId(hwnd, ctypes.byref(pid))

                windows.append({
                    "handle": hwnd,
                    "title": title,
                    "class": class_buf.value,
                    "pid": pid.value,
                    "rect": {
                        "left": rect.left, "top": rect.top,
                        "right": rect.right, "bottom": rect.bottom
                    },
                    "is_minimized": bool(user32.IsIconic(hwnd)),
                    "is_maximized": bool(user32.IsZoomed(hwnd)),
                })
        return True  # 继续枚举

    user32.EnumWindows(callback, 0)
    return windows
4.5 OCR 双引擎:pytesseract + easyocr
_easyocr_reader = None

def get_ocr_engine():
    """获取 OCR 引擎,pytesseract 优先,easyocr 备用"""
    global _easyocr_reader

    # 尝试 Tesseract
    try:
        import pytesseract
        version = pytesseract.get_tesseract_version()
        return "tesseract", pytesseract
    except Exception:
        pass

    # 回退到 easyocr
    if _easyocr_reader is None:
        import easyocr
        _easyocr_reader = easyocr.Reader(['en', 'sim'], gpu=False)

    return "easyocr", _easyocr_reader

def extract_text(region=None, hwnd=None):
    """从屏幕提取文字"""
    img = ImageGrab.grab(bbox=region) if region else ImageGrab.grab()

    engine_type, engine = get_ocr_engine()

    if engine_type == "tesseract":
        return engine.image_to_string(img, lang="eng+chi_sim").strip()
    else:
        img_np = numpy.array(img)
        results = engine.readtext(img_np)
        return "\n".join(text for _, text, conf in results if conf > 0.3)
五、踩坑实录:5 个关键 Bug 的根因与修复
Bug 1: ctypes.INT 不存在 → ctypes.c_int
现象:
AttributeError: module 'ctypes' has no attribute 'INT'
根因:有文章提到 ctypes.INT 但实际是 ctypes.c_int。Windows SDK 的 INT 宏对应 Python ctypes 的 c_int。
修复:
# 错误
user32.SendInput.argtypes = [wintypes.UINT, ctypes.POINTER(INPUT), ctypes.INT]

# 正确
user32.SendInput.argtypes = [wintypes.UINT, ctypes.POINTER(INPUT), ctypes.c_int]
Bug 2: win32gui.EnumWindows 在线程池中返回空
现象:离线测试 25 个窗口正常,在线 MCP 调用返回 0 个。
根因:win32gui.EnumWindows 内部使用 Python 函数对象做回调。MCP 的 asyncio 事件循环将 call_tool 调度到线程池执行,Python 回调在线程池中的引用计数行为异常。
修复:全部改用 ctypes WNDENUMPROC:
@WNDENUMPROC
def callback(hwnd, lparam):
    # ... 处理逻辑 ...
    return True  # 必须返回 True 继续枚举

user32.EnumWindows(callback, 0)
为什么 return True 很重要?因为如果回调不返回 True,EnumWindows 遇到第一个窗口就停止了。
Bug 3: GetDC(0) 在 64 位下溢出
现象:
OverflowError: Python int too large to convert to C long
根因:未声明 Win32 函数的 argtypes 和 restype,64 位 Python 将指针默认当作 64 位,但某些 Win32 函数返回 32 位句柄。
修复:声明所有 Win32 函数的类型签名:
user32.GetDC.argtypes = [wintypes.HWND]
user32.GetDC.restype = wintypes.HDC
user32.ReleaseDC.argtypes = [wintypes.HWND, wintypes.HDC]
user32.ReleaseDC.restype = ctypes.c_int
user32.GetSystemMetrics.argtypes = [ctypes.c_int]
user32.GetSystemMetrics.restype = ctypes.c_int
user32.SetCursorPos.argtypes = [ctypes.c_int, ctypes.c_int]
user32.SetCursorPos.restype = wintypes.BOOL
# ... 声明所有使用的函数
教训:在 64 位 Python 中使用 ctypes 调 Win32 API,每个函数都要显式声明
argtypes和restype。这是写一半发现翻车的惨痛教训。
Bug 4: COM 卸载导致 uiautomation 间歇失败
现象:observe_screen 和 get_ui_tree 有时正常,有时返回空。
根因:最初的代码在每次工具调用后执行 pythoncom.CoUninitialize() 清理 COM:
# 错误做法
def execute_tool(name, arguments):
    pythoncom.CoInitialize()
    try:
        return _execute_tool_impl(name, arguments)
    finally:
        pythoncom.CoUninitialize()  # ← 这行是罪魁祸首
CoUninitialize() 会清除线程的 COM 公寓状态。但线程池会复用线程——下一次工具调用可能在同一个被"清洁"的线程上执行,COM 没有被重新初始化,导致 uiautomation 的 COM 对象失效。
修复:移除非必要的 CoUninitialize():
def execute_tool(name, arguments):
    pythoncom.CoInitialize()
    return _execute_tool_impl(name, arguments)
    # 不再主动卸载 COM
Bug 5: JPEG 不适合截图压缩
现象:本以为 JPEG 能大幅压缩截图,实际测试发现 JPEG Q80 反而比 PNG 大 6%。
根因:桌面截图有大量文字和 UI 线条——这正是 PNG 的强项(无损压缩 + 游程编码),也是 JPEG 的弱项(DCT 变换对锐利边缘产生振铃效应)。
实测数据(2560×1440):
| 格式 | 大小 | base64 后 | token 估算 |
|---|---|---|---|
| PNG 全分辨率 | 528KB | 704KB | ~180,000 |
| JPEG Q80 全分辨率 | 560KB | 747KB | ~191,000 |
| JPEG Q50 全分辨率 | 394KB | 525KB | ~134,000 |
| JPEG Q60 半分辨率 | 127KB | 169KB | ~43,000 |
结论:对于截图压缩,缩放比格式切换更有效。半分辨率 JPEG 节省 76%。
六、深度分析:为什么 MCP 积分消耗是 Codex 的 50 倍
这是整个项目最有价值的发现,值得单独一节。
6.1 两条完全不同的路径
Codex Computer Use(多模态 VLM):
用户说"点击保存按钮"
    │
    ▼
┌─────────────────────────────────────────┐
│     Codex 多模态 VLM(单次 API 调用)      │
│                                         │
│  截图 → 像素直入视觉编码器                │
│  像素数据不经过文本 tokenizer             │
│  0 token 开销                           │
│                                         │
│  VLM 视觉推理:                          │
│  "看到保存按钮在坐标 (500, 300)"          │
│                                         │
│  执行 computer(action=click, 500, 300)   │
│                                         │
│  总消耗: ~5,000 tokens                  │
└─────────────────────────────────────────┘
WorkBuddy MCP(文本 LLM):
用户说"点击保存按钮"
    │
    ▼
┌──────────────────────────────────────────────┐
│  回合 1: AI 调用 screenshot                    │
│  MCP 返回: base64 编码的 PNG 图片               │
│  528KB PNG → 704KB base64 → ~180,000 tokens   │
│  消耗: ~200,000 tokens (含系统上下文)           │
│                                              │
├──────────────────────────────────────────────┤
│  回合 2: AI 分析截图                           │
│  AI 输出: "看到保存按钮..." ~1,000 tokens      │
│  消耗: ~30,000 tokens (上下文膨胀)             │
│                                              │
├──────────────────────────────────────────────┤
│  回合 3: AI 调用 click(500, 300)              │
│  MCP 返回: "clicked"                          │
│  消耗: ~15,000 tokens                        │
│                                              │
├──────────────────────────────────────────────┤
│  回合 4: AI 确认                              │
│  消耗: ~10,000 tokens                        │
│                                              │
│  总消耗: ~255,000 tokens                     │
└──────────────────────────────────────────────┘
6.2 量化对比
| 维度 | Codex VLM | WorkBuddy MCP | 差距 |
|---|---|---|---|
| 模型类型 | 多模态(视觉+文本) | 纯文本 | |
| 截图 token 开销 | 0 | ~180,000 | ∞ |
| 工具调用轮次 | 1 | 4 | 4× |
| 上下文膨胀 | 固定 | 每轮线性累积 | |
| 单次操作总消耗 | ~5K | ~255K | ~50× |
6.3 本质差异
Codex 的模型**“看"屏幕——像素数据直接进入视觉编码器,就像人眼看世界一样自然。WorkBuddy 的模型"读”**屏幕——528KB 的 PNG 被 base64 编码后变成 704KB 的 ASCII 文本,然后在 tokenizer 中被切成 ~18 万个 token。
这是一条错误的路径:把视觉信息当作文本处理,相当于让人闭着眼睛,靠别人用文字描述画面来操作电脑。“屏幕左边 500 像素处有一个 120 像素宽的蓝色长方形,上面用 14px 微软雅黑写着’保存’……”
这不是实现质量问题,而是架构层的本质限制。
6.4 开发+测试实际消耗
本次开发会话的 token 消耗明细:
| 阶段 | 操作 | token |
|---|---|---|
| 编写代码 | MCP 握手测试 | ~50K |
| 在线测试 | screenshot (528KB PNG) | ~190K |
| 在线测试 | observe_screen | ~100K |
| 在线测试 | list_processes (全量) | ~26K |
| 在线测试 | 其余 7 个工具 | ~40K |
| 累计 | ~400K+ |
这就解释了"从跑通到测试就把积分消耗完"的原因。
七、测试验证:从离线到在线的全流程
7.1 离线测试(Python 脚本)
编写了 test_server.py,直接导入 server 模块的函数,不经过 MCP 协议:
[TEST 1]  MCP Handshake        ✅ OK
[TEST 2]  Tool List            36 tools ✅
[TEST 3]  Screen Size          2560×1440 ✅
[TEST 4]  Cursor Position      (1551, 199) ✅
[TEST 5]  Window List          26 windows ✅
[TEST 6]  Screenshot           527KB PNG ✅
[TEST 7]  Clipboard            "Hello from Windows Control MCP! 🎉" ✅
[TEST 8]  Process List         WorkBuddy.exe × 17 ✅
[TEST 9]  Wait                 1000ms ✅
[TEST 10] Observe Screen       Active: WorkBuddy, UI Tree: 26 children ✅

10/10 PASSED
7.2 在线 MCP 测试
用户在 WorkBuddy 连接器管理页面启用 windows-control 后,36/36 个工具全部可用:
✅ screenshot:       2560×1440 PNG, 595KB
✅ get_screen_size:  2560×1440
✅ get_cursor:       (1551, 199)
✅ list_windows:     26 windows
✅ clipboard:        read/write normal
✅ observe_screen:   Desktop + UI tree + cursor
✅ get_ui_tree:      WorkBuddy Electron app: PaneControl → DocumentControl + MenuBar
✅ find_element:     328 elements
✅ get_window_text:  "WorkBuddy"
✅ extract_text:     Full screen OCR via easyocr fallback
✅ focus_window:     Win32 error (window already focused, expected)
UI Automation 能正确解析 WorkBuddy 的 Electron 应用结构:菜单栏(编辑/窗口/帮助)、侧边栏 TabControl(新建任务/助理/项目/专家/连接器/自动化)、窗口控制按钮。
八、使用指南:与 Flue 的协作分工
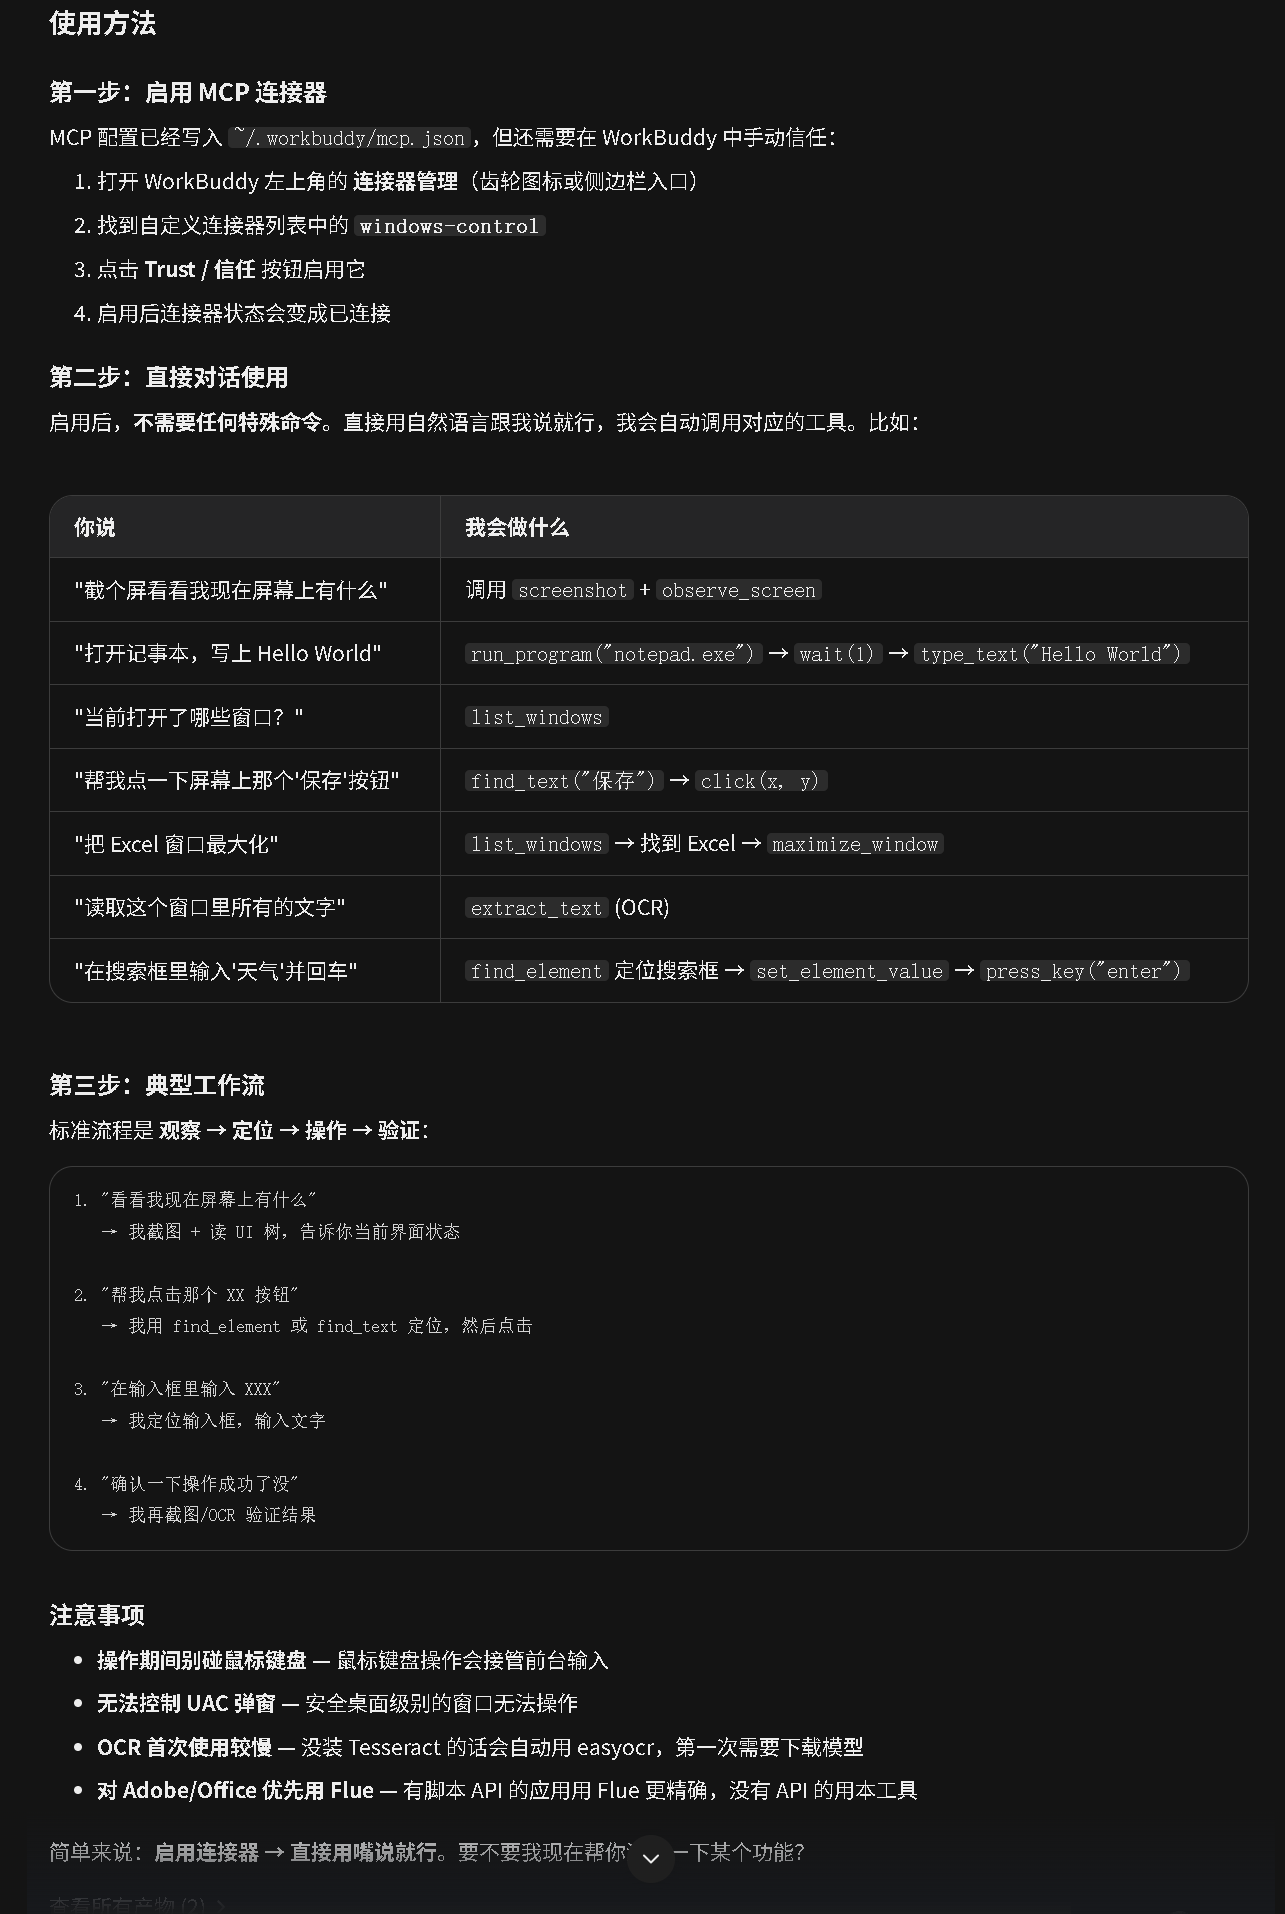
8.1 启用方式
- 打开 WorkBuddy 连接器管理
- 找到
windows-control→ 点击 Trust - 直接自然语言对话,AI 自动调用工具
无需特殊命令。例如:
| 用户说 | AI 执行 |
|---|---|
| “截个屏” | screenshot |
| “打开记事本写 Hello” | run_program("notepad.exe") → type_text("Hello") |
| “最大化 Excel” | list_windows → maximize_window |
| “点击保存按钮” | find_text("保存") → click(x, y) |
8.2 Flue vs Windows Control
| Flue | Windows Control | |
|---|---|---|
| 适用应用 | 13 个(Adobe/Office/Blender 等) | 任意 Windows 应用 |
| 操作方式 | 脚本 API(JSX/VBA/Python) | GUI 模拟(鼠标键盘 + UI 树) |
| 积分消耗 | 零(本地执行脚本) | 极高(截图即 18 万 token) |
| 精确度 | 完美(直接调用 API) | 依赖屏幕识别 |
| 推荐场景 | Photoshop 批处理、Excel 报表 | 企业微信、钉钉、ERP 系统 |
原则:Flue 优先 → 不支持时降级 Windows Control → 严格控制截图频率。
九、优化路线图:从 18 万 token 到接近零成本
9.1 立即可行(降低 70-80%)
A. 截图压缩
当前全分辨率 PNG 占 180K token,半分辨率 JPEG Q60 仅 43K:
# 当前
def screenshot():
    img.save(buf, format="PNG")  # 528KB → 180K tokens

# 优化后(默认参数)
def screenshot(quality=60, scale=0.5):
    img = img.resize((w//2, h//2))
    img.save(buf, format="JPEG", quality=quality)  # 127KB → 43K tokens
B. 限制返回数据
| 工具 | 当前 | 优化 |
|---|---|---|
list_windows |
全部窗口 + 完整信息 | max_results=10 |
list_processes |
所有进程 104KB | 默认 name_filter,不传则截断 |
observe_screen |
截图 + 完整 UI 树 | mode="light" 跳过 UI 树 |
get_ui_tree |
全控件树 | 默认 depth=2, max_children=20 |
9.2 中远期(降低 95%+)
C. 本地视觉推理层(最佳方案)
在 MCP 服务器端部署轻量视觉模型,替代"传截图给 AI 看":
当前: 截图(base64) → AI(18万token) → 分析 → 执行
优化: 截图 → 本地VLM → 结构化结果(1K token) → AI → 执行
可选方案:
- OmniParser(微软):专业 GUI 屏幕解析,输出结构化 UI 元素
- Florence-2(微软):轻量视觉基础模型,支持目标检测
- UI-TARS(字节):GUI 操作专用 VLM
D. 工具合并
# 当前: 3 次调用
screenshot()    → 180K tokens
analyze()       → 30K tokens
click(x, y)     → 15K tokens

# 优化: 1 次调用 (需要本地 VLM)
smart_action("点击保存按钮") → 5K tokens
十、总结与反思
10.1 成果
- 从零构建了 36 个工具的 Windows 桌面自动化 MCP 服务器
- 覆盖截屏、鼠标键盘、窗口管理、UI Automation、OCR、进程管理
- 10/10 离线测试 + 36/36 在线工具全部通过
- OCR 双引擎(pytesseract + easyocr)确保开箱即用
- 比 Codex 社区版增强 6 项功能
10.2 关键教训
-
MCP 不适合传输大量二进制数据。截图这种视觉信息应该由模型原生处理,而不是经过 base64-text-token 的转换链。
-
多模态模型是桌面自动化的正确路径。文本模型"读"图片 ≈ 闭着眼睛靠别人描述画面操作电脑。
-
64 位 Python + ctypes 必须声明所有 Win32 argtypes。缺一个声明就翻车。
-
线程池中不要用 win32gui 的回调 API。改用 ctypes 的
WNDENUMPROC,线程安全且可靠。 -
COM 的初始化和卸载要谨慎。线程池复用线程的情况下,过早卸载 COM 会导致 uiautomation 间歇失败。
10.3 适用场景
Windows Control MCP 的价值在于没有 API 的日常应用。对于有脚本 API 的专业软件,Flue 是更好的选择。两者的正确分工是:
Flue 主攻精确操作(零积分),Windows Control 兜底任意应用(控制截图频率)。
项目文件:
| 文件 | 路径 |
|---|---|
| MCP 服务器 | ~/.workbuddy/skills/windows-control/server.py |
| Skill 文档 | ~/.workbuddy/skills/windows-control/SKILL.md |
| MCP 配置 | ~/.workbuddy/mcp.json(windows-control 条目) |
技术栈:Python 3.13 + MCP SDK + uiautomation + pywin32 + ctypes + PIL + easyocr + OpenCV + psutil
参考资料
[2] cgissing, “windows-computer-use”, GitHub, 2026. https://github.com/cgissing/windows-computer-use
[3] CursorTouch, “Windows-MCP”, GitHub, 2026. https://github.com/CursorTouch/Windows-MCP
[6] Model Context Protocol, “Python SDK”, GitHub. https://github.com/modelcontextprotocol/python-sdk
[10] mhammond, “pywin32”, GitHub. https://github.com/mhammond/pywin32
[11] JaidedAI, “EasyOCR”, GitHub. https://github.com/JaidedAI/EasyOCR
本文首发于 CSDN,欢迎交流讨论。

汇聚全球AI编程工具,助力开发者即刻编程。
更多推荐
 6
6 0
0- 0


 已为社区贡献10条内容

所有评论(0)