
数据分析agent_三:docker 拉取embedding镜像部署
·
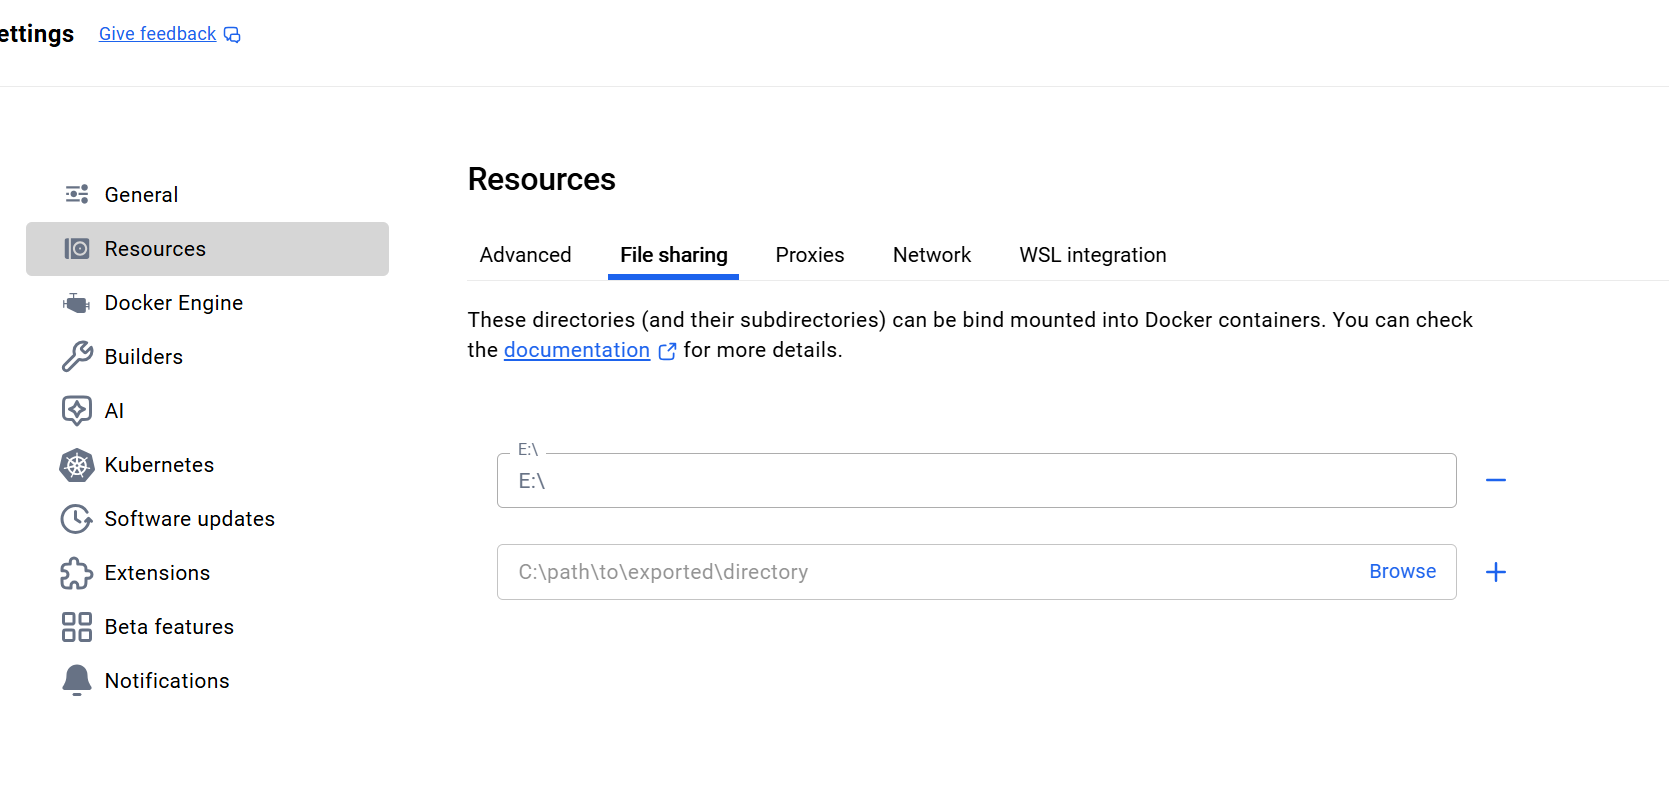
加上 :/models/bge-m3(容器内挂载路径)

⚠️ 前提条件检查
在执行之前,先确认:

1. 本地模型文件是否存在

powershell
# 检查目录里有没有模型文件
dir G:\ever2026\cache\BAAI\bge-m3
应该能看到 config.json、pytorch_model.bin 或 model.safetensors 等文件。

2. 如果模型不完整,先下载完整模型

powershell
# 设置镜像
$env:HF_ENDPOINT = "https://hf-mirror.com"

# 下载完整模型到指定目录(确保包含所有必要文件)
pip install huggingface-hub
huggingface-cli download BAAI/bge-m3 --local-dir G:/ever2026/cache/BAAI/bge-m3 --local-dir-use-symlinks False
注意:bge-m3 比 bge-small-zh 大得多(约2.2GB),确保磁盘空间充足。


# 1,不需要gpu  cpu版本
     docker run -d --name bge-large-zh-cpu -p 8080:80 -v "E:/笔记2026项目/项目一_问数/day/资料/1_windows_docker安装/embedding/bge-large-zh-v1.5":/models/bge-large-zh-v1.5 ghcr.io/huggingface/text-embeddings-inference:cpu-latest --model-id /models/bge-large-zh-v1.5 --auto-truncate
# 2,Gpu版本

## 本地
    docker run -d --name bge-large-zh -p 8080:80 --gpus all -v "E:/笔记2026项目/项目一_问数/day/资料/1_windows_docker安装/embedding/bge-large-zh-v1.5":/models/bge-large-zh-v1.5 ghcr.io/huggingface/text-embeddings-inference:cuda-1.9 --model-id /models/bge-large-zh-v1.5 --auto-truncate
## 需要下载
    docker run -d --name bge-small-zh -p 8080:80 --gpus all -e HF_ENDPOINT=https://hf-mirror.com ghcr.io/huggingface/text-embeddings-inference:cuda-1.9 --model-id BAAI/bge-small-zh-v1.5 --auto-truncate
如果你要部署 bge-small-zh-v1.5(之前讨论的小模型):

bash
# 3,下载小模型
    huggingface-cli download BAAI/bge-small-zh-v1.5 --local-dir G:/ever2026/cache/BAAI/bge-small-zh-v1.5 --local-dir-use-symlinks False

# 4,挂载运行
    docker run -d --name bge-small-zh -p 8080:80 --gpus all -v G:/ever2026/cache/BAAI/bge-small-zh-v1.5:/models/bge-small-zh ghcr.io/huggingface/text-embeddings-inference:cuda-1.9 --model-id /models/bge-small-zh --auto-truncate


# 💡 方案一:给Docker容器配置镜像加速(侵入式)
    在运行Docker命令时,通过 -e 参数设置环境变量,让容器内的下载工具自动走镜像源,这是最直接的办法:

    bash
    docker run -d --name bge-small-zh -p 8080:80 \
      --gpus all \
      -e HF_ENDPOINT=https://hf-mirror.com \
      ghcr.io/huggingface/text-embeddings-inference:cuda-1.9 \
      --model-id BAAI/bge-small-zh-v1.5 \
      --auto-truncate
    这个 -e HF_ENDPOINT=https://hf-mirror.com 是关键。不过,这个方法是否对所有TEI镜像都有效,有时会因镜像的构建方式而异。如果不行,可以试试下面的“曲线救国”办法。

# 🛠 方案二:先在Windows本地下载,再挂载进容器(稳定可靠)
    先在Windows上用镜像工具把模型下到本地文件夹,然后用Docker挂载进去,完全绕过容器内的下载环节。这个办法非常稳妥,兼容性最好。

## 第1步:在Windows下载模型
    打开Windows的 PowerShell,依次执行:

powershell
### 1. 设置镜像环境变量
    $env:HF_ENDPOINT = "https://hf-mirror.com"

### 2. 安装下载工具
    pip install huggingface-hub

###  3. 下载模型到本地指定目录,例如 D:\bge_model
    huggingface-cli download BAAI/bge-small-zh-v1.5 --local-dir D:\bge_model
    注意:对Windows系统,务必加上 --local-dir 参数指定路径,避免因权限问题导致下载失败。

## 第2步:把本地模型挂载进Docker容器
    下载完成后,用 -v 参数把本地目录挂载到容器内,并告诉TEI直接读取本地模型:

    bash
    docker run -d --name bge-small-zh -p 8080:80 \
      --gpus all \
      -v D:\bge_model:/models/bge-small-zh \
      ghcr.io/huggingface/text-embeddings-inference:cuda-1.9 \
      --model-id /models/bge-small-zh \
      --auto-truncate


启动容器
1. 启动命令
如果容器已经创建但停止了,用这个命令启动:

bash
docker start bge-large-zh-cpu
如果是首次创建并运行,直接用之前的 docker run 命令即可。

2. 查看容器状态
bash
# 查看所有容器(包括停止的)
docker ps -a

# 只看运行中的容器
docker ps

# 查看容器详细信息
docker inspect bge-large-zh-cpu
验证部署是否成功
方法一:查看启动日志(最直接)
bash
docker logs bge-large-zh-cpu
成功标志:日志末尾出现类似 Server started at http://0.0.0.0:80 或 Ready 的字样,没有报错。

常见错误排查:

如果出现 No such file or directory:检查模型路径挂载是否正确

如果出现 CUDA 相关错误:CPU 版本不应该有 CUDA 报错,检查镜像是否选对

方法二:健康检查
bash
# 检查容器是否在运行
docker ps | grep bge-large-zh-cpu

# 检查端口是否监听
netstat -ano | findstr 8080
import requests
import numpy as np
from typing import List, Optional, Dict, Any
from dataclasses import dataclass
import time
import logging

logging.basicConfig(level=logging.INFO)
logger = logging.getLogger(__name__)


@dataclass
class EmbeddingConfig:
    """配置类"""
    url: str = "http://localhost:8080"
    model_name: str = "BAAI/bge-large-zh-v1.5"


    timeout: int = 30
    max_retries: int = 3
    batch_size: int = 32  # 批量处理大小
    dimension: int = 1024  # bge-small-zh 是1024维


class EmbeddingClientManager:
    """Embedding 客户端管理器"""

    def __init__(self, config: EmbeddingConfig = None):
        self.config = config or EmbeddingConfig()
        self.session = requests.Session()
        self.session.timeout = self.config.timeout
        # 连接池配置
        self.session.mount('http://', requests.adapters.HTTPAdapter(
            pool_connections=10,
            pool_maxsize=20
        ))

    def encode(self, texts: List[str]) -> np.ndarray:
        """
        单个或批量编码文本
        用法:
            embeddings = client.encode(["你好", "世界"])
            # 返回 shape: (2, 1024)
        """
        if isinstance(texts, str):
            texts = [texts]

        # 分批处理
        all_embeddings = []
        for i in range(0, len(texts), self.config.batch_size):
            batch = texts[i:i + self.config.batch_size]
            batch_embeddings = self._encode_batch(batch)
            all_embeddings.append(batch_embeddings)

        return np.vstack(all_embeddings) if all_embeddings else np.array([])

    def _encode_batch(self, texts: List[str]) -> np.ndarray:
        """单批次编码(带重试)"""
        payload = {
            "inputs": texts,
            "truncate": True
        }

        for attempt in range(self.config.max_retries):
            try:
                response = self.session.post(
                    f"{self.config.url}/embed",
                    json=payload
                )
                response.raise_for_status()
                data = response.json()

                # TEI返回格式: [[vec1], [vec2], ...]
                if isinstance(data, list):
                    return np.array(data)
                # 某些服务可能返回字典
                elif isinstance(data, dict) and 'embeddings' in data:
                    return np.array(data['embeddings'])
                else:
                    raise ValueError(f"未知返回格式: {type(data)}")

            except Exception as e:
                logger.warning(f"批次请求失败 (尝试 {attempt + 1}/{self.config.max_retries}): {e}")
                if attempt == self.config.max_retries - 1:
                    raise
                time.sleep(2 ** attempt)  # 指数退避

    def encode_single(self, text: str) -> np.ndarray:
        """编码单个文本,返回1D向量"""
        result = self.encode([text])
        return result[0] if len(result) > 0 else np.array([])

    def similarity(self, text1: str, text2: str) -> float:
        """计算两个文本的余弦相似度"""
        vec1 = self.encode_single(text1)
        vec2 = self.encode_single(text2)

        # 归一化
        vec1 = vec1 / np.linalg.norm(vec1)
        vec2 = vec2 / np.linalg.norm(vec2)

        return float(np.dot(vec1, vec2))

    def batch_similarity(self, query: str, candidates: List[str]) -> List[float]:
        """
        计算查询与多个候选文本的相似度
        用法:
            scores = client.batch_similarity("我喜欢猫", ["猫很可爱", "狗很忠诚", "今天天气好"])
            # 返回: [0.89, 0.45, 0.23]
        """
        query_vec = self.encode_single(query)
        candidate_vecs = self.encode(candidates)

        # 归一化
        query_vec = query_vec / np.linalg.norm(query_vec)
        candidate_vecs = candidate_vecs / np.linalg.norm(candidate_vecs, axis=1, keepdims=True)

        similarities = np.dot(candidate_vecs, query_vec)
        return similarities.tolist()

    def health_check(self) -> bool:
        """检查服务是否可用"""
        try:
            response = self.session.get(f"{self.config.url}/health", timeout=5)
            return response.status_code == 200
        except:
            return False

    def close(self):
        """关闭session"""
        self.session.close()

    def __enter__(self):
        return self

    def __exit__(self, exc_type, exc_val, exc_tb):
        self.close()


# ============ 使用示例 ============

if __name__ == "__main__":
    # 1. 配置连接
    config = EmbeddingConfig(
        # url="http://你的WindowsIP:8080",  # 远程地址
        url="http://127.0.0.1:8080",  # 远程地址
        batch_size=16,
        max_retries=3
    )

    # 2. 创建客户端
    with EmbeddingClientManager(config) as client:
        # 健康检查
        if not client.health_check():
            print("❌ 服务不可用,请检查容器是否启动")
            exit(1)

        print("✅ 服务连接成功")

        # 3. 编码单个文本
        vec = client.encode_single("你好,世界")
        print(f"单条向量维度: {vec.shape}")  # (1024,)

        # 4. 批量编码
        texts = ["我喜欢编程", "今天天气很好", "机器学习很有趣"]
        vecs = client.encode(texts)
        print(f"批量向量形状: {vecs.shape}")  # (3, 1024)

        # 5. 相似度计算
        score = client.similarity("我喜欢猫", "猫很可爱")
        print(f"相似度: {score:.4f}")

        # 6. 批量相似度排序
        query = "推荐一本好书"
        candidates = [
            "《三体》科幻小说",
            "《深度学习》技术书籍",
            "今天吃什么"
        ]
        scores = client.batch_similarity(query, candidates)

        # 按相似度降序
        ranked = sorted(zip(candidates, scores), key=lambda x: x[1], reverse=True)
        print("\n相似度排序:")
        for text, score in ranked:
            print(f"  {score:.4f} - {text}")
✅ 服务连接成功
单条向量维度: (1024,)
批量向量形状: (3, 1024)
相似度: 0.7915相似度排序:
0.3683 - 《深度学习》技术书籍
0.2914 - 《三体》科幻小说
0.2098 - 今天吃什么

汇聚全球AI编程工具,助力开发者即刻编程。
更多推荐



 0
0 0
0- 0


 已为社区贡献3条内容

所有评论(0)