
Java基础(9) | I/O 与文件操作:从 BIO 到 NIO 与 Files 工具类
📚 本系列系统梳理了 Java 开发的详细知识点,从基础语法到工程实践层层递进,内容详实成体系,建议先收藏再慢慢阅读,方便日后随时回顾查阅。
前言
Java 的 I/O 体系庞大且历史悠久——从 Java 1.0 的字节流/字符流(BIO),到 Java 1.4 的 NIO,再到 Java 7 的 NIO.2(Files/Path),经历了三代演进。这篇文章按照"先会用、再理解模型"的思路,把日常开发中会用到的 I/O 操作梳理清楚。
1. 传统 I/O(BIO):流的体系
传统 I/O 是理解 Java I/O 体系的基础,但日常开发中更推荐使用 NIO 的
Files工具类。
了解装饰器模式和流的概念即可,重点看 2.x 节的 NIO 部分。
1.1 四大抽象基类
Java 的传统 I/O 按两个维度分成四个基类:
| 字节流(二进制) | 字符流(文本) | |
|---|---|---|
| 输入 | InputStream | Reader |
| 输出 | OutputStream | Writer |
什么时候用哪种? 文本文件(.txt, .csv, .json, .xml)用字符流,其他一切(图片、音频、视频、压缩包、序列化对象)用字节流。不确定时用字节流,总不会错。
1.2 字节流
// 读文件(逐字节)
try (FileInputStream fis = new FileInputStream("data.bin")) {
    int b;
    while ((b = fis.read()) != -1) {  // read() 返回 -1 表示读完
        System.out.print(b + " ");
    }
}

// 读文件(缓冲区,性能更好)
try (FileInputStream fis = new FileInputStream("data.bin")) {
    byte[] buffer = new byte[1024];
    int len;
    while ((len = fis.read(buffer)) != -1) {
        // buffer[0..len-1] 是本次读到的数据
    }
}

// 写文件
try (FileOutputStream fos = new FileOutputStream("output.bin")) {
    fos.write(new byte[]{72, 101, 108, 108, 111});  // "Hello" 的 ASCII
}

// 复制文件(经典写法)
try (
    FileInputStream fis = new FileInputStream("source.bin");
    FileOutputStream fos = new FileOutputStream("target.bin")
) {
    byte[] buffer = new byte[8192];
    int len;
    while ((len = fis.read(buffer)) != -1) {
        fos.write(buffer, 0, len);
    }
}
1.3 字符流
// 读文本文件(逐行)
try (BufferedReader reader = new BufferedReader(new FileReader("data.txt"))) {
    String line;
    while ((line = reader.readLine()) != null) {
        System.out.println(line);
    }
}

// 写文本文件
try (BufferedWriter writer = new BufferedWriter(new FileWriter("output.txt"))) {
    writer.write("第一行");
    writer.newLine();
    writer.write("第二行");
}

// PrintWriter:更方便的写入,支持 println / printf
try (PrintWriter pw = new PrintWriter(new FileWriter("output.txt"))) {
    pw.println("Hello");
    pw.printf("name: %s, age: %d%n", "Alice", 25);
}
1.4 装饰器模式:流的嵌套
Java I/O 大量使用装饰器模式——给基础流"套壳"增加功能:
// FileInputStream → 基础字节流
// BufferedInputStream → 加缓冲区,减少系统调用
// DataInputStream → 可以直接读 int/double/String 等类型

try (DataInputStream dis = new DataInputStream(
        new BufferedInputStream(
            new FileInputStream("data.bin")))) {
    int n = dis.readInt();
    double d = dis.readDouble();
    String s = dis.readUTF();
}
常用的装饰器组合:
| 需求 | 组合 |
|---|---|
| 高效读字节 | BufferedInputStream(FileInputStream) |
| 高效读文本 | BufferedReader(FileReader) |
| 读基本类型 | DataInputStream(BufferedInputStream(FileInputStream)) |
| 读对象 | ObjectInputStream(BufferedInputStream(FileInputStream)) |
| 指定编码读文本 | BufferedReader(InputStreamReader(FileInputStream, "UTF-8")) |
1.5 编码问题
FileReader / FileWriter 使用系统默认编码,跨平台容易乱码。明确指定编码的写法:
// 读:指定 UTF-8
try (BufferedReader reader = new BufferedReader(
        new InputStreamReader(new FileInputStream("data.txt"), StandardCharsets.UTF_8))) {
    String line = reader.readLine();
}

// 写:指定 UTF-8
try (BufferedWriter writer = new BufferedWriter(
        new OutputStreamWriter(new FileOutputStream("out.txt"), StandardCharsets.UTF_8))) {
    writer.write("你好世界");
}
2. NIO.2:现代文件操作(Java 7+)
2.1 Path:文件路径对象
java.io.File 是 Java 1.0 的路径类,设计有很多问题(比如删除失败只返回 false 不告诉你原因)。Java 7 引入了 java.nio.file.Path 作为替代,它只表示一个路径字符串,本身不操作文件,文件操作全交给 Files 工具类。
创建 Path:
// Java 7+
Path p1 = Paths.get("data.txt");
Path p2 = Paths.get("/home", "user", "data.txt");   // 多段拼接

// Java 11+ 可以直接用 Path.of(更简洁,推荐)
Path p1 = Path.of("data.txt");
Path p2 = Path.of("/home", "user", "data.txt");

// 两种写法完全等价,Path.of 底层就是调用 Paths.get
路径信息提取(对比 Python os.path):
Path p = Path.of("/home/user/project/data.txt");

p.getFileName();      // data.txt        ← Python: os.path.basename()
p.getParent();        // /home/user/project  ← Python: os.path.dirname()
p.getRoot();          // /                   ← 根目录
p.toAbsolutePath();   // 转为绝对路径       ← Python: os.path.abspath()
p.toString();         // "/home/user/project/data.txt"(转为字符串)
路径拼接与变换(对比 Python os.path.join):
Path base = Path.of("/home/user");

// resolve:拼接子路径(= Python os.path.join)
base.resolve("project");               // /home/user/project
base.resolve("project").resolve("src"); // /home/user/project/src
base.resolve("project/src/Main.java");  // /home/user/project/src/Main.java

// resolveSibling:替换最后一段(同级替换)
Path file = Path.of("/home/user/data.txt");
file.resolveSibling("config.txt");  // /home/user/config.txt

// normalize:解析 . 和 ..
Path.of("/home/user/../admin/./config.txt").normalize();
// /home/admin/config.txt

// relativize:计算相对路径
Path a = Path.of("/home/user/project");
Path b = Path.of("/home/user/docs/readme.md");
a.relativize(b);  // ../../docs/readme.md
Path 和 File 互转(和老 API 对接时用):
File file = path.toFile();    // Path → File
Path path = file.toPath();    // File → Path
2.2 Files:一站式文件操作
java.nio.file.Files 是一个纯静态方法的工具类,覆盖了几乎所有文件操作。下面按用途分类,每个都和 Python 对标。
判断类(对比 Python os.path.exists 等):
| Java | Python | 说明 |
|---|---|---|
Files.exists(path) | os.path.exists() | 路径是否存在 |
Files.isDirectory(path) | os.path.isdir() | 是否是目录 |
Files.isRegularFile(path) | os.path.isfile() | 是否是普通文件 |
Files.isReadable(path) | os.access(path, os.R_OK) | 是否可读 |
Files.size(path) | os.path.getsize() | 文件大小(字节) |
Path p = Path.of("data.txt");
Files.exists(p);         // true
Files.isDirectory(p);    // false
Files.size(p);           // 1024(字节)
创建类(对比 Python os.mkdir / os.makedirs):
// 创建文件
Files.createFile(Path.of("newfile.txt"));         // ← Python: open("newfile.txt", "w")

// 创建单层目录(父目录必须存在,否则报错)
Files.createDirectory(Path.of("newdir"));         // ← Python: os.mkdir()

// 创建多层目录(父目录不存在也能创建)
Files.createDirectories(Path.of("a/b/c"));        // ← Python: os.makedirs()

// 创建临时文件
Path tmp = Files.createTempFile("prefix-", ".tmp");
// /tmp/prefix-1234567890.tmp
复制 / 移动 / 删除(对比 Python shutil.copy / os.rename / os.remove):
Path src = Path.of("a.txt");
Path dst = Path.of("b.txt");

// 复制(目标存在则报错)
Files.copy(src, dst);                                          // ← Python: shutil.copy()
// 复制(覆盖已存在的文件)
Files.copy(src, dst, StandardCopyOption.REPLACE_EXISTING);

// 移动/重命名
Files.move(src, dst);                                          // ← Python: os.rename()
Files.move(src, dst, StandardCopyOption.REPLACE_EXISTING);     // 覆盖
Files.move(src, dst, StandardCopyOption.ATOMIC_MOVE);          // 原子操作

// 删除
Files.delete(Path.of("tmp.txt"));           // 不存在则抛异常    ← Python: os.remove()
Files.deleteIfExists(Path.of("tmp.txt"));   // 不存在也不报错
读写文件:
// 一行代码读整个文件
String content = Files.readString(Path.of("data.txt"));             // Java 11+
List<String> lines = Files.readAllLines(Path.of("data.txt"));       // Java 7+,全部行
byte[] bytes = Files.readAllBytes(Path.of("image.png"));            // Java 7+,全部字节

// 一行代码写文件
Files.writeString(Path.of("out.txt"), "Hello World");               // Java 11+
Files.write(Path.of("out.txt"), List.of("line1", "line2"));         // Java 7+,写多行

// 追加写入
Files.writeString(Path.of("log.txt"), "new line\n",
    StandardOpenOption.CREATE, StandardOpenOption.APPEND);

// 大文件逐行处理(惰性 Stream,内存友好)
try (Stream<String> lines = Files.lines(Path.of("big.csv"))) {
    lines.filter(l -> l.contains("ERROR"))
         .forEach(System.out::println);
}
遍历目录(对比 Python os.listdir / os.walk):
// 列出直接子项(不递归)← Python: os.listdir()
try (Stream<Path> entries = Files.list(Path.of("."))) {
    entries.forEach(System.out::println);
}

// 递归遍历所有文件(深度优先)← Python: os.walk()
try (Stream<Path> tree = Files.walk(Path.of("src"))) {
    tree.filter(Files::isRegularFile)
        .filter(p -> p.toString().endsWith(".java"))
        .forEach(System.out::println);
}

// 递归查找(带匹配条件,第二个参数是最大深度)
try (Stream<Path> found = Files.find(Path.of("src"), 10,
        (path, attrs) -> attrs.isRegularFile() && path.toString().endsWith(".java"))) {
    found.forEach(System.out::println);
}
Files.list()、Files.walk()、Files.find()都返回 Stream,必须用 try-with-resources 关闭,否则会泄漏文件句柄。
Java vs Python 文件操作速查表:
| Python | Java(NIO) |
|---|---|
os.path.join(a, b) | path.resolve(b) |
os.path.basename(p) | path.getFileName() |
os.path.dirname(p) | path.getParent() |
os.path.abspath(p) | path.toAbsolutePath() |
os.path.exists(p) | Files.exists(path) |
os.path.isdir(p) | Files.isDirectory(path) |
os.path.isfile(p) | Files.isRegularFile(path) |
os.path.getsize(p) | Files.size(path) |
os.mkdir(p) | Files.createDirectory(path) |
os.makedirs(p) | Files.createDirectories(path) |
os.listdir(p) | Files.list(path) |
os.walk(p) | Files.walk(path) |
os.remove(p) | Files.delete(path) |
os.rename(a, b) | Files.move(a, b) |
shutil.copy(a, b) | Files.copy(a, b) |
open(f).read() | Files.readString(path) |
open(f).readlines() | Files.readAllLines(path) |
for line in open(f) | Files.lines(path)(惰性 Stream,大文件友好) |
open(f, "rb").read() | Files.readAllBytes(path) |
open(f, "w").write(s) | Files.writeString(path, s) |
open(f, "a").write(s) | Files.writeString(path, s, APPEND, CREATE) |
open(f, "w").writelines(lst) | Files.write(path, List.of("l1", "l2")) |
open(f, "a").writelines(lst) | Files.write(path, list, APPEND, CREATE) |
open(f, "wb").write(b) | Files.write(path, byteArray) |
追加写入中的
APPEND和CREATE是StandardOpenOption.APPEND和StandardOpenOption.CREATE的缩写,CREATE表示文件不存在时自动创建。
2.3 用 Files 还是传统 IO?
| 场景 | 推荐 |
|---|---|
| 读写小文件(几 MB 以内) | Files.readString() / Files.writeString() 最简洁 |
| 逐行处理大文件 | Files.lines(path) 返回惰性 Stream,内存友好 |
| 二进制流处理 | 传统 InputStream/OutputStream |
| 需要精细控制缓冲区 | 传统 BufferedReader/BufferedWriter |
| 文件/目录操作(创建、复制、遍历) | Files 一站式搞定 |
| 网络 I/O | NIO Channel/Selector(见下节) |
3. NIO 核心概念
NIO(New I/O,Java 1.4)引入了 Channel + Buffer + Selector 模型,主要面向高并发网络编程场景。日常文件操作用 Files 就够了,但理解 NIO 模型对后面学 Netty 等框架很重要。
3.1 BIO vs NIO 模型
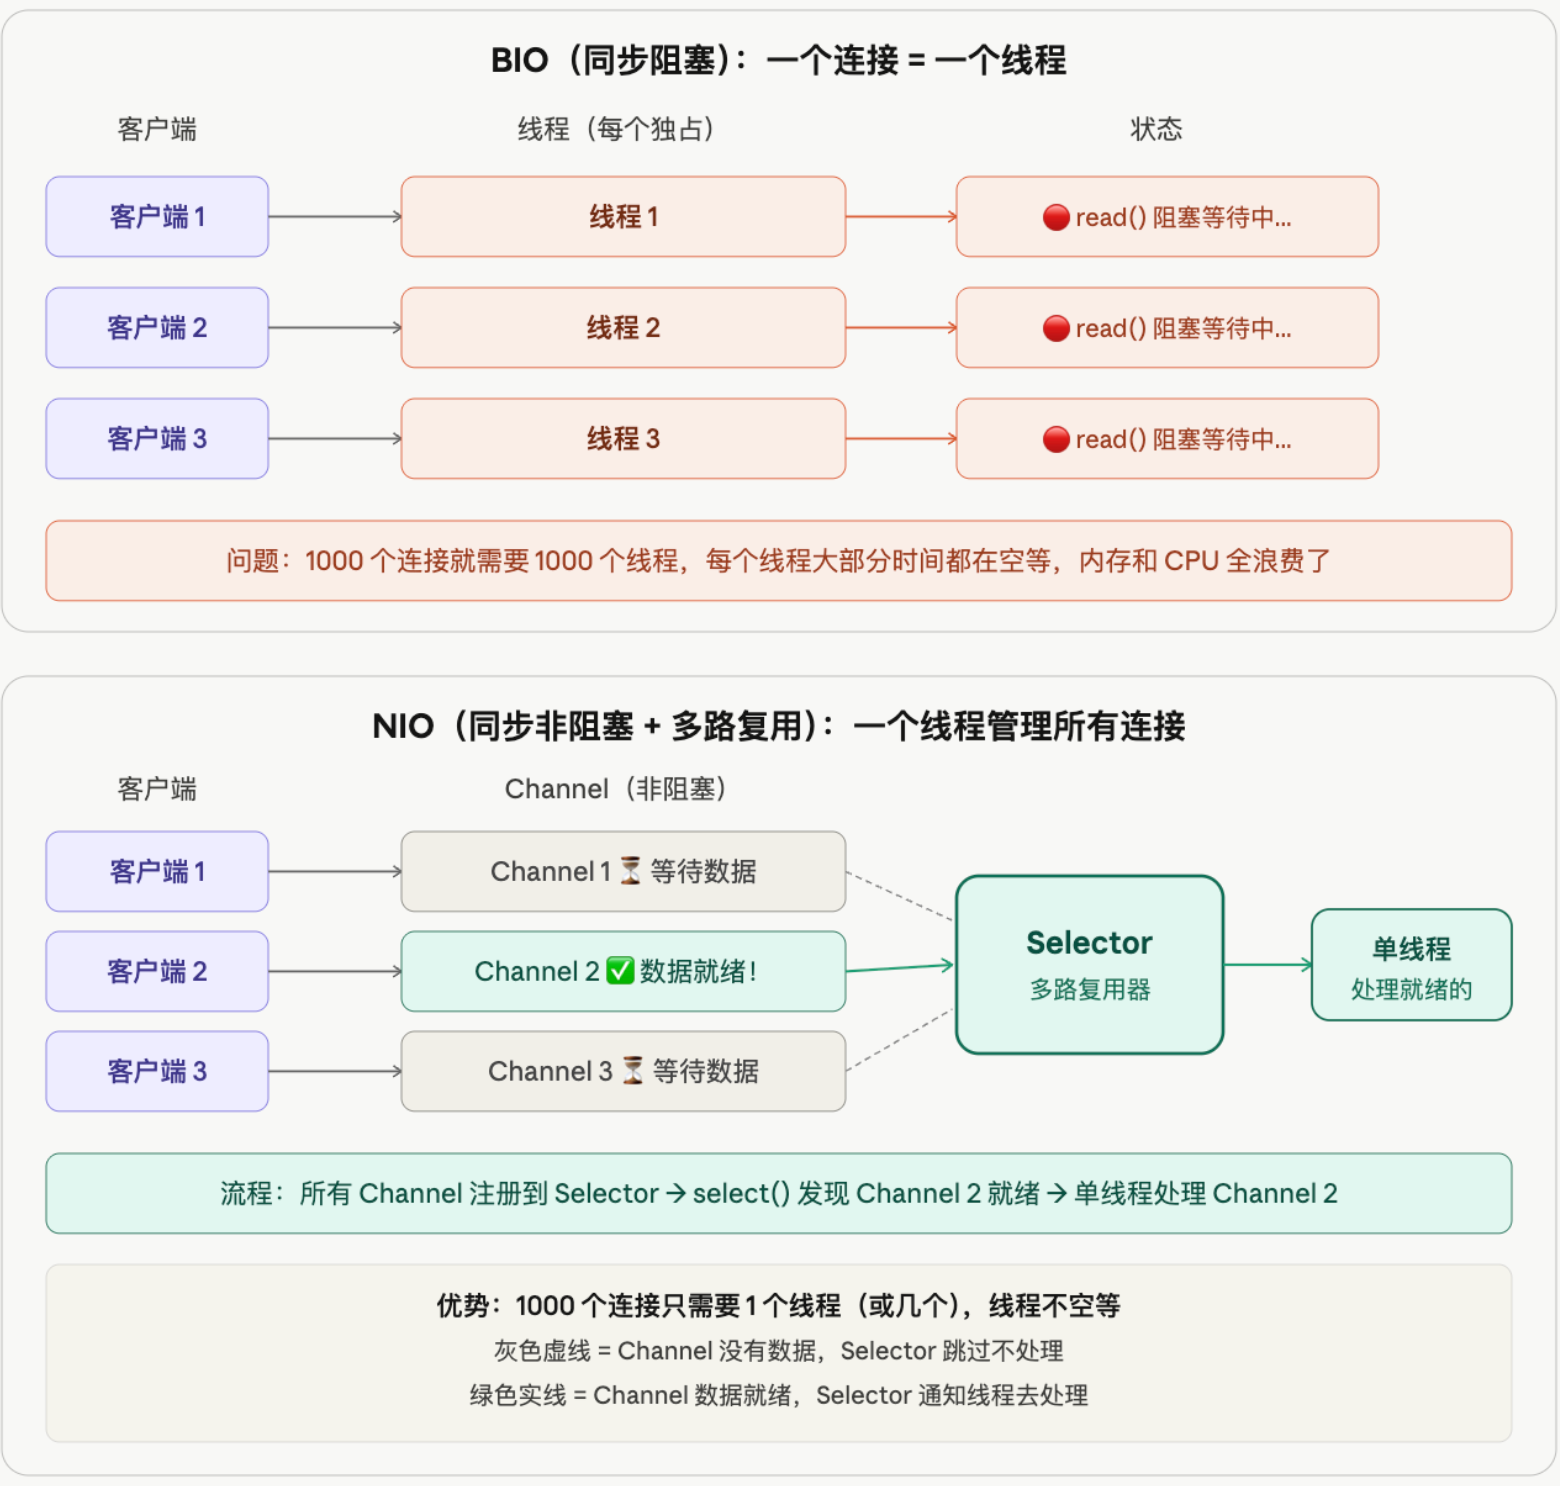
BIO(同步阻塞):每来一个客户端连接,服务端就分配一个专属线程。这个线程调用 read() 时会一直阻塞等待,直到客户端发来数据才继续执行。如果客户端迟迟不发数据,线程就干等着,什么也做不了。1000 个连接就需要 1000 个线程,而大部分线程都在空等,内存和 CPU 全浪费了。
NIO(同步非阻塞 + 多路复用):所有客户端连接都注册到一个 Selector(多路复用器)上。单线程调用 select() 轮询,发现哪个 Channel 有数据就绪就去处理哪个,没有数据的直接跳过。1000 个连接只需要 1 个线程(或几个),线程永远不空等,资源利用率大幅提升。
这也是为什么 Netty 等高性能网络框架都基于 NIO 模型——用少量线程就能处理上万个并发连接。
3.2 三大组件
NIO 的核心就是三个东西,用快递站类比:
| 组件 | 比喻 | 作用 |
|---|---|---|
| Buffer | 包裹箱 | 数据的容器,所有读写都要经过它 |
| Channel | 快递通道 | 连接数据源(文件/网络),双向可读可写 |
| Selector | 调度员 | 一个人盯着所有通道,哪个有包裹就处理哪个 |
Buffer(缓冲区)
Buffer 本质是一块内存数组,有一个指针 position 记录当前读写到哪了:
// 1. 创建一个能装 1024 字节的 Buffer
ByteBuffer buffer = ByteBuffer.allocate(1024);
// 此时状态:[ _______________________ ]
//           ↑ position=0      capacity=1024

// 2. 写入数据
buffer.put("Hello".getBytes());
// 此时状态:[ H e l l o _____________ ]
//                     ↑ position=5

// 3. 想要读数据?必须先调 flip() 切换为读模式
//    flip() 做的事:position 归零,limit 设为之前写到的位置
buffer.flip();
// 此时状态:[ H e l l o ]
//           ↑ position=0
//                     ↑ limit=5

// 4. 读取数据
while (buffer.hasRemaining()) {
    System.out.print((char) buffer.get());  // 输出 Hello
}

// 5. 读完了,想重新写?调 clear() 重置
buffer.clear();
// 回到初始状态,可以重新写入
关键就一点:写完要 flip() 才能读,读完要 clear() 才能写。
Channel(通道)
Channel 类似传统的流(InputStream/OutputStream),但有两个区别:
- 双向的:同一个 Channel 既能读也能写
- 必须通过 Buffer:不能直接读写字节,数据要先放进 Buffer
// 从文件读数据:Channel → Buffer → 你的代码
try (FileChannel fc = FileChannel.open(Path.of("data.txt"), StandardOpenOption.READ)) {
    ByteBuffer buffer = ByteBuffer.allocate(1024);
    while (fc.read(buffer) != -1) {  // Channel 把数据读进 Buffer
        buffer.flip();                // 切换为读模式
        // 从 buffer 里取数据处理
        buffer.clear();               // 清空,准备下次读
    }
}

// Channel 之间直接传输(零拷贝,跳过 Buffer,性能最好的文件复制方式)
try (
    FileChannel src = FileChannel.open(Path.of("source.bin"), StandardOpenOption.READ);
    FileChannel dst = FileChannel.open(Path.of("target.bin"),
        StandardOpenOption.CREATE, StandardOpenOption.WRITE)
) {
    src.transferTo(0, src.size(), dst);  // 一行搞定文件复制
}
Selector(多路复用器)
Selector 是 NIO 实现高并发的核心,主要用于网络编程。上面 BIO vs NIO 图中的"调度员"就是它:
// 简化的服务端示意(了解流程即可,实际项目用 Netty 不手写)

// 1. 创建 Selector(调度员上班)
Selector selector = Selector.open();

// 2. 创建 Channel 并设为非阻塞
ServerSocketChannel server = ServerSocketChannel.open();
server.bind(new InetSocketAddress(8080));
server.configureBlocking(false);  // 关键:非阻塞模式

// 3. 把 Channel 注册到 Selector(告诉调度员:帮我盯着这个通道)
server.register(selector, SelectionKey.OP_ACCEPT);  // 关注"新连接"事件

// 4. 调度员开始工作:循环检查谁有事件
while (true) {
    selector.select();  // 阻塞等待,直到至少有一个 Channel 就绪
    Set<SelectionKey> keys = selector.selectedKeys();

    for (SelectionKey key : keys) {
        if (key.isAcceptable()) {
            // 有新客户端连接进来了
        } else if (key.isReadable()) {
            // 某个客户端发来了数据
        }
    }
    keys.clear();  // 处理完要清空,否则下次会重复处理
}
实际开发中不会手写 Selector,而是用 Netty 框架。但理解这个模型是读懂 Netty 源码的前提。
3.3 BIO / NIO / AIO 对比
| 维度 | BIO | NIO | AIO (NIO.2) |
|---|---|---|---|
| 模型 | 同步阻塞 | 同步非阻塞 + 多路复用 | 异步非阻塞 |
| 线程模型 | 一连接一线程 | 少量线程 + Selector | 回调/Future |
| 适用场景 | 连接数少、延迟低 | 高并发、长连接 | 理论最优,但 Linux 支持差 |
| 实际使用 | 简单场景 | 主流(Netty 基于 NIO) | 很少用 |
| 编程复杂度 | 低 | 高(Buffer/Channel/Selector) | 中 |
实际开发中,很少直接写 NIO 代码,而是用 Netty 框架封装。但理解 NIO 的 Channel + Buffer + Selector 模型,是读懂 Netty 源码的前提。
4. 序列化与反序列化
4.1 什么是序列化?
Java 对象存在于 JVM 内存中,程序结束就消失了。如果想把对象保存到文件、存进数据库、通过网络传给另一台机器,就需要把对象转成一串字节——这个过程叫序列化。反过来,把字节还原成对象叫反序列化。
序列化:Java 对象  → 字节流(可以存储、传输)
反序列化:字节流   → Java 对象(还原回来继续用)
类比 Python:pickle.dumps() 就是序列化,pickle.loads() 就是反序列化。
4.2 什么可以被序列化?
必须实现 Serializable 接口的类才能序列化。这个接口没有任何方法,只是一个标记,告诉 JVM “这个类允许被序列化”:
// ✅ 可以序列化
public class User implements Serializable {
    private String name;
    private int age;
}

// ❌ 没实现 Serializable,序列化时抛 NotSerializableException
public class User {
    private String name;
    private int age;
}
不能被序列化的东西:
| 类型 | 原因 |
|---|---|
没有实现 Serializable 的类 | JVM 拒绝序列化 |
transient 修饰的字段 | 主动标记为不参与序列化 |
static 字段 | 属于类不属于对象,不跟着对象走 |
| 线程、数据库连接、Socket 等资源 | 这些是运行时资源,序列化了也没意义 |
4.3 Java 原生序列化
public class User implements Serializable {
    private static final long serialVersionUID = 1L;  // 版本号(下面解释)
    private String name;
    private int age;
    private transient String password;  // 密码不参与序列化

    public User(String name, int age, String password) {
        this.name = name;
        this.age = age;
        this.password = password;
    }

    @Override
    public String toString() {
        return "User{name=" + name + ", age=" + age + ", password=" + password + "}";
    }
}
序列化:对象 → 字节流 → 文件
User user = new User("Alice", 25, "123456");

try (ObjectOutputStream oos = new ObjectOutputStream(
        new FileOutputStream("user.dat"))) {
    oos.writeObject(user);
}
// user.dat 文件中保存了 Alice 的对象数据(二进制格式)
反序列化:文件 → 字节流 → 对象
try (ObjectInputStream ois = new ObjectInputStream(
        new FileInputStream("user.dat"))) {
    User user = (User) ois.readObject();
    System.out.println(user);
    // User{name=Alice, age=25, password=null}
    //                           ↑ transient 字段没有被还原,变成默认值 null
}
serialVersionUID 是什么?
版本号,用于反序列化时校验类的版本是否一致:
private static final long serialVersionUID = 1L;
比如你序列化时 User 有 name 和 age 两个字段,后来给 User 加了一个 email 字段。如果 serialVersionUID 没变,反序列化时 email 取默认值 null;如果 serialVersionUID 改了,反序列化直接抛 InvalidClassException,告诉你版本不兼容。
4.4 实际项目中的选择
Java 原生序列化存在安全漏洞、性能差、跨语言不兼容等问题,实际项目中几乎不用。替代方案:
| 方案 | 格式 | 优点 | 常用场景 |
|---|---|---|---|
| Jackson / Gson | JSON | 人类可读、跨语言、调试方便 | REST API、配置文件 |
| Protobuf | 二进制 | 体积小、速度快、跨语言 | RPC、微服务通信 |
| Kryo | 二进制 | Java 生态内最快 | 缓存、Spark |
// 原生序列化(不推荐)
oos.writeObject(user);
User u = (User) ois.readObject();

// Jackson(推荐):对象 ↔ JSON 字符串
ObjectMapper mapper = new ObjectMapper();
String json = mapper.writeValueAsString(user);        // 序列化:对象 → JSON
User u = mapper.readValue(json, User.class);          // 反序列化:JSON → 对象
了解原生序列化的机制即可(面试会问 Serializable、transient、serialVersionUID),新项目直接用 Jackson。
4.5 Jackson:JSON 序列化实战
Spring Boot 默认集成了 Jackson——Controller 返回对象自动转 JSON、@RequestBody 接收 JSON 自动转对象,背后都是 Jackson 在工作。核心类是 ObjectMapper,手动操作的场景(缓存、消息队列、调用第三方接口)也是用它。
基本用法:对象 ↔ JSON
ObjectMapper mapper = new ObjectMapper();

// 序列化:对象 → JSON 字符串
User user = new User(1L, "Alice", "alice@example.com");
String json = mapper.writeValueAsString(user);
// {"id":1,"name":"Alice","email":"alice@example.com"}

// 反序列化:JSON 字符串 → 对象
User u = mapper.readValue(json, User.class);
集合/泛型的反序列化:TypeReference
String json = "[{\"id\":1,\"name\":\"Alice\"},{\"id\":2,\"name\":\"Bob\"}]";

// ❌ 错的:List.class 无法表达"装的是 User",结果变成 List<LinkedHashMap>
List<User> list = mapper.readValue(json, List.class);

// ✅ 对的:用 TypeReference 保留完整的泛型信息
List<User> list = mapper.readValue(json, new TypeReference<List<User>>() {});
为什么 List.class 不行?Java 的泛型在运行时会被擦除——List<User> 和 List<String> 在运行时是同一个 List.class,Jackson 拿到 List.class 根本不知道该把每个元素转成什么类型,只能用默认的 LinkedHashMap 兜底。TypeReference<List<User>> 是一个匿名内部类技巧:Jackson 通过反射读取这个匿名类的父类泛型参数,从而拿到完整的 List<User> 类型信息。
Object ↔ 具体类型转换:convertValue
如果手里已经是一个反序列化好的 Object(比如从 Redis 取出来的值,类型是 LinkedHashMap),想转换成具体的实体类,不需要先转回 JSON 字符串再 readValue,可以直接用 convertValue:
Object cached = redisTemplate.opsForValue().get(key);  // 实际类型是 LinkedHashMap

// 单个对象
User user = mapper.convertValue(cached, User.class);

// List:同样不能直接用 List.class,用 TypeFactory 构造带泛型的集合类型
List<User> list = mapper.convertValue(cached,
    mapper.getTypeFactory().constructCollectionType(List.class, User.class));
convertValue 本质是"先序列化成中间表示,再反序列化成目标类型",比手动转 JSON 字符串再解析更直接。
常用注解
| 注解 | 作用 |
|---|---|
@JsonProperty("user_name") | 指定这个字段对应的 JSON 字段名 |
@JsonIgnore | 序列化和反序列化时都忽略这个字段 |
@JsonInclude(JsonInclude.Include.NON_NULL) | 字段为 null 时不出现在 JSON 里 |
@JsonFormat(pattern = "yyyy-MM-dd HH:mm:ss") | 指定日期时间的格式 |
@JsonAlias({"user_name", "uname"}) | 反序列化时,这些字段名都映射到同一个属性 |
public class User {
    private Long id;

    @JsonProperty("user_name")
    private String name;

    @JsonInclude(JsonInclude.Include.NON_NULL)
    private String email;          // email 为 null 时,JSON 里不会有这个字段

    @JsonFormat(pattern = "yyyy-MM-dd HH:mm:ss")
    private LocalDateTime createdAt;

    @JsonIgnore
    private String password;        // 永远不会出现在 JSON 里
}
LocalDateTime:JavaTimeModule
ObjectMapper mapper = new ObjectMapper();
mapper.registerModule(new JavaTimeModule());
Jackson 默认不认识 Java 8 的 LocalDateTime/LocalDate/Instant,不注册 JavaTimeModule 直接序列化会报错,或者把时间序列化成 [2026,5,21,10,30,0] 这种数组。
Spring Boot 项目里通常不用手动注册——只要 classpath 里有 jackson-datatype-jsr310(spring-boot-starter-web 默认带),Spring Boot 自动配置的 ObjectMapper 已经注册好了。只有自己 new ObjectMapper()(比如 21 节 Redis 的 RedisTemplate 配置里)才需要手动注册一次。
命名策略:camelCase ↔ snake_case
Java 属性习惯驼峰 userName,但有些前端约定或第三方接口用下划线 user_name,可以全局配置命名策略,不用在每个字段上加 @JsonProperty:
@Configuration
public class JacksonConfig {
    @Bean
    public ObjectMapper objectMapper() {
        ObjectMapper mapper = new ObjectMapper();
        mapper.setPropertyNamingStrategy(PropertyNamingStrategies.SNAKE_CASE);
        return mapper;
    }
}
配置后,Java 属性 userName 自动对应 JSON 字段 "user_name",序列化和反序列化都生效。
常见异常
| 异常 | 原因 | 解决 |
|---|---|---|
UnrecognizedPropertyException | JSON 里有 Java 类没声明的字段 | 类上加 @JsonIgnoreProperties(ignoreUnknown = true) |
InvalidDefinitionException | 类没有无参构造方法,Jackson 无法实例化 | 加一个无参构造方法 |
MismatchedInputException | 字段类型不匹配(JSON 是字符串,Java 字段是 Integer) | 检查两边的字段类型是否一致 |
5. 小结
| 主题 | 关键要点 |
|---|---|
| 四大基类 | 字节流 InputStream/OutputStream,字符流 Reader/Writer |
| 装饰器模式 | 流的嵌套组合增加功能(Buffered、Data、Object) |
| 编码 | 不要用 FileReader/FileWriter 默认编码,用 InputStreamReader 指定 UTF-8 |
| Files 工具类 | 现代 Java 首选,一行代码读写小文件,Stream 处理大文件 |
| Path | 替代 File,用 Path.of() 创建(Java 11+),Paths.get()(Java 7+) |
| NIO 三件套 | Channel(双向通道)、Buffer(数据容器)、Selector(多路复用) |
| BIO vs NIO | BIO 一连接一线程,NIO 少量线程 + Selector;实际用 Netty |
| 序列化 | 原生 Serializable 了解即可,实际用 Jackson / Protobuf |
| Jackson 实战 | ObjectMapper 读写 JSON;TypeReference 处理泛型;convertValue 转换 Object;JavaTimeModule 处理 LocalDateTime |
传统 I/O 类分类速查:
所有类只有两层——基础流直接连数据源,装饰流套在外面增强功能:
| 基础流(连接数据源) | 装饰流(增强功能) | |
|---|---|---|
| 字节输入 | FileInputStream | BufferedInputStream(加缓冲)、DataInputStream(读基本类型)、ObjectInputStream(读对象) |
| 字节输出 | FileOutputStream | BufferedOutputStream(加缓冲)、DataOutputStream(写基本类型)、ObjectOutputStream(写对象) |
| 字符输入 | FileReader、InputStreamReader(指定编码) | BufferedReader(加缓冲 + readLine) |
| 字符输出 | FileWriter、OutputStreamWriter(指定编码) | BufferedWriter(加缓冲)、PrintWriter(println/printf) |
桥接流:InputStreamReader / OutputStreamWriter 比较特殊,它们把字节流转成字符流,同时可以指定编码,是连接两个体系的桥梁:
FileInputStream(字节)→ InputStreamReader(桥接,指定UTF-8)→ BufferedReader(装饰)
// 对应代码:从内向外一层一层套
try (BufferedReader reader = new BufferedReader(              // 第三层:装饰,加缓冲 + readLine
        new InputStreamReader(                                // 第二层:桥接,字节→字符 + 指定编码
            new FileInputStream("data.txt"),                  // 第一层:基础,连接文件
            StandardCharsets.UTF_8))) {
    String line;
    while ((line = reader.readLine()) != null) {
        System.out.println(line);
    }
}
下一篇预告:并发编程——线程基础、synchronized、线程池与 CompletableFuture
🎯 如果这篇文章对你有帮助,别忘了点赞、收藏、关注三连!关注我,让你在 Java 学习的道路上不迷路,持续为你带来成体系的 Java 干货~

汇聚全球AI编程工具,助力开发者即刻编程。
更多推荐

 8
8 0
0- 0


 已为社区贡献13条内容

所有评论(0)