
《从理论到生产:Keepalived+LVS+Nginx+NFS高可用架构实战复盘》
Keepalived + LVS(DR)+ Nginx + NFS
摘要:本文详细介绍了如何构建一套基于 Keepalived + LVS(DR)+ Nginx + NFS 的高可用、高并发Web服务集群架构。文章首先分析了传统单点架构的痛点,包括单点故障风险、并发承载能力不足、数据一致性难题和运维效率低下等问题。随后阐述了技术选型逻辑,选择LVS(DR模式)实现四层负载均衡,Keepalived保障高可用,Nginx作为Web服务器,NFS提供共享存储。实践部分提供了完整的部署指南,包括环境规划、网络配置、免密登录设置、网关配置、各组件(router、nfs、web、LVS-RS、HA/LVS-DS)的详细配置步骤,以及功能性、高可用性和负载均衡测试方法。该架构可将Web服务可用性提升至99.99%,并发承载能力扩展至10万+,同时显著提升运维效率。
项目背景
业务场景与核心需求
随着企业数字化转型加速,Web 服务作为业务对外输出的核心载体,其高可用性、高并发承载能力、数据一致性成为支撑业务稳定运行的关键。以电商平台、企业官网、在线教育等典型场景为例,需满足以下核心需求:
- 高可用保障:Web 服务需实现 7×24 小时不间断运行,避免因单点故障(如服务器宕机、网络中断)导致业务中断,尤其在促销活动、峰值访问时段,服务不可用将直接造成经济损失或用户流失;
- 高并发承载:面对日益增长的用户访问量(如日均 PV 从 10 万级提升至百万级),单台 Web 服务器的 CPU、内存、网络带宽易成为瓶颈,需通过负载均衡分摊请求压力,保障页面响应速度(目标:95% 请求响应时间<1 秒);
- 数据一致性:Web 服务涉及大量静态资源(如 HTML、CSS、图片、视频)与动态业务数据(如用户上传文件、订单记录),多台 Web 服务器需共享资源,避免出现 “不同服务器展示内容不一致”(如用户在 A 服务器上传的图片,在 B 服务器无法访问)的问题;
- 易维护与扩展性:业务增长过程中,需支持快速新增 Web 节点扩展集群能力,同时减少运维复杂度(如避免每台服务器重复部署资源、手动同步配置)。 传统架构的痛点与局限
在采用《Keepalived + LVS(DR)+ Nginx+ NFS》方案前,多数企业曾使用 “单 Web 服务器” 或 “简单负载均衡” 架构,面临以下难以突破的局限:
1.单点故障风险高:
- 传统 “单台 Nginx服务器 + 本地存储” 架构中,服务器硬件故障(如硬盘损坏、电源故障)或软件异常(如 Nginx进程崩溃)将直接导致服务完全不可用,MTTR(平均恢复时间)依赖人工干预,通常超过 30 分钟,远无法满足业务连续性要求;
- 即使采用 “2 台 Nginx服务器 + 简单 DNS 轮询”,若其中一台服务器宕机,DNS 缓存可能导致部分用户仍被解析至故障节点,且 DNS 轮询无法感知服务器负载状态,易出现 “故障节点持续接收请求” 或 “高负载节点被分配更多请求” 的问题。
2.并发承载能力不足:
-
单台 Nginx服务器受限于 CPU 核心数(如 4 核 8G 服务器仅能稳定承载约 2000-3000 并发连接),当访问量峰值超过阈值时,会出现请求排队、页面超时、503 错误等问题;
-
若仅通过 “增加服务器数量” 扩展,缺乏高效的负载均衡机制,无法将请求合理分配至各节点,导致资源浪费(部分服务器空闲)与性能瓶颈(部分服务器过载)并存。
3.数据共享与一致性难题:
- 多台 Nginx服务器采用 “本地存储静态资源” 时,需通过脚本定期同步资源(如 rsync),但同步延迟易导致 “用户访问不同节点看到不同版本内容”(如首页图片更新后,部分节点仍展示旧图);
- 动态数据(如用户上传的头像、订单附件)若存储在本地,将无法在多节点间共享,导致 “用户在 A 节点上传文件后,切换至 B 节点无法查看” 的业务异常。
4.运维效率低下:
- 每台 Web 服务器需单独部署 Nginx配置、静态资源、业务代码,新增节点时运维人员需重复操作,耗时且易出错(如配置文件漏改、资源版本不一致);
- 缺乏统一的资源管理机制,当静态资源更新(如 CSS 样式调整、图片替换)时,需逐台服务器修改,运维成本随节点数量增加呈线性上升。
技术方案的选型逻辑
针对上述痛点,需构建一套 “高可用负载均衡 + 共享存储 + Web 服务集群” 的一体化架构,而《Keepalived + LVS(DR)+ Nginx+ NFS》组合正是基于以下核心诉求选型:
1.解决高可用与负载均衡:
- LVS(Direct Routing 模式)作为四层负载均衡器,具备超高并发承载能力(单机可支撑 10 万 + 并发连接),通过 DR 模式避免 “请求回程流量” 占用带宽,保障转发效率;
- Keepalived 通过 VRRP 协议实现 LVS 主备高可用,主节点故障时,备节点可在 1-3 秒内自动接管虚拟 IP(VIP),实现 “无感知切换”,彻底消除负载均衡层单点故障。
2.保障 Web 服务稳定性:
- Nginx作为成熟的 Web 服务器,兼容性强、配置灵活,可稳定运行 PHP、Python 等动态业务代码,同时通过模块(如 mod_cache、mod_gzip)优化静态资源访问性能;
- 多台 Nginx组成集群,通过 LVS 分摊请求压力,单节点故障时,LVS 自动将请求转发至其他健康节点,保障服务连续性。
3.实现数据一致性与共享:
- NFS(网络文件系统)作为共享存储,将所有 Web 服务器的静态资源(如 /images、/css 目录)与动态上传目录(如 /uploads)挂载至 NFS 服务器,实现 “多节点访问同一存储资源”,彻底解决数据同步问题;
- NFS 支持权限控制与读写分离(可选配置),可保障资源访问安全性与存储性能。
4.降低运维复杂度:
- 架构模块化设计,各组件职责清晰(LVS 负责转发、Nginx负责服务、NFS 负责存储),便于故障定位与单独扩展;
- 新增 Web 节点时,仅需安装 Nginx并挂载 NFS 目录,无需重复部署资源,运维效率提升 80% 以上。
项目价值与预期目标
通过部署《Keepalived + LVS(DR)+ Nginx+ NFS》架构,预期实现以下业务与技术价值:
- 业务连续性:Web 服务可用性从 99.9% 提升至 99.99%(年均 downtime 从 8.76 小时降至 52.56 分钟),核心业务场景(如电商促销、在线考试)无服务中断风险;
- 性能提升:并发承载能力从单台服务器 3000 并发提升至集群 10 万 + 并发,页面响应时间稳定在 500ms 以内,用户体验显著优化;
- 运维效率:资源部署与更新效率提升 80%,新增节点时间从 2 小时缩短至 15 分钟,减少重复人工操作;
- 扩展性:支持 Web 节点与 NFS 存储独立扩展(如新增 Nginx节点提升并发、扩容 NFS 存储容量),满足业务 3-5 年增长需求。
项目实践
项目环境
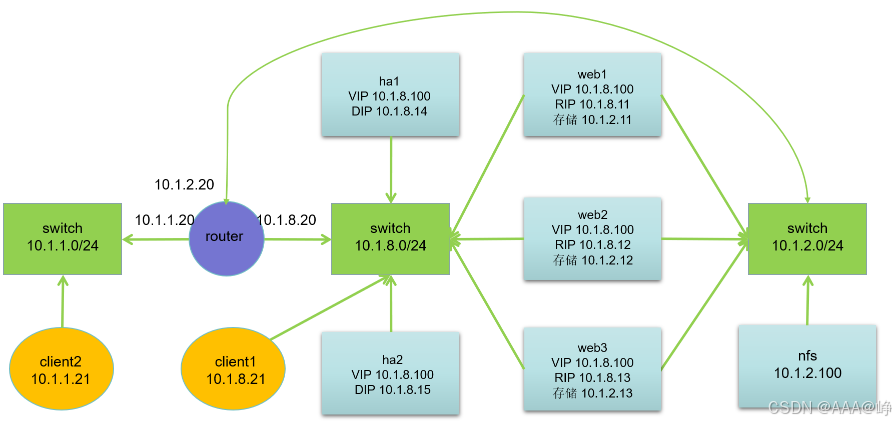
| 主机名 | net1 | net8 | net2 | VIP | 服务器角色 |
|---|---|---|---|---|---|
| client2 | 10.1.1.21 | 外部客户端 | |||
| router | 10.1.1.20 | 10.1.8.20 | 10.1.2.20 | 出口路由器 | |
| client1 | 10.1.8.21 | 内部客户端 | |||
| web1 | 10.1.8.11 | 10.1.2.11 | 10.1.8.100 | Web 服务器 | |
| web2 | 10.1.8.12 | 10.1.2.12 | 10.1.8.100 | Web 服务器 | |
| web3 | 10.1.8.13 | 10.1.2.13 | 10.1.8.100 | Web 服务器 | |
| ha1 | 10.1.8.14 | 10.1.8.100 | HA 和 LVS 服务器 | ||
| ha2 | 10.1.8.15 | 10.1.8.100 | HA 和 LVS 服务器 | ||
| nfs | 10.1.2.100 | 存储服务器 |
基础配置
新添一个controller为控制节点,用于辅助项目操作
添加一个VMnet2,设置为10.1.2.0
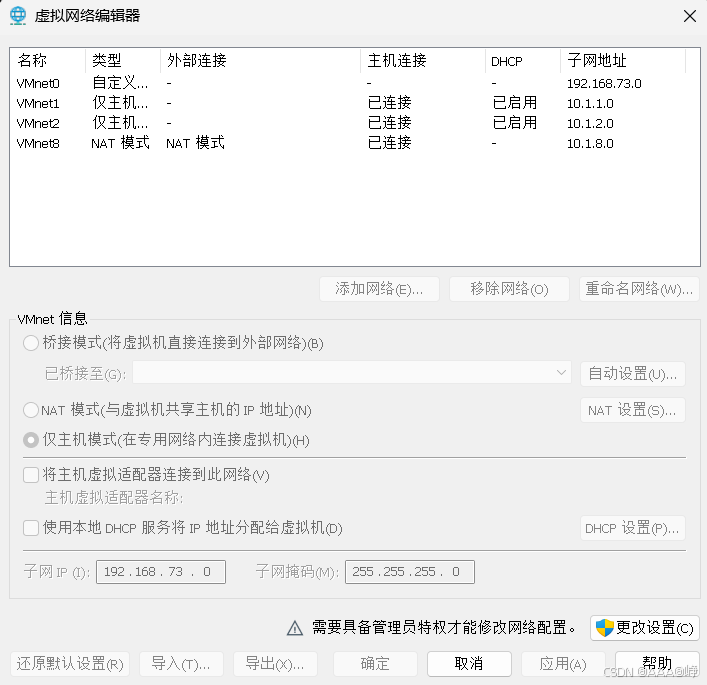
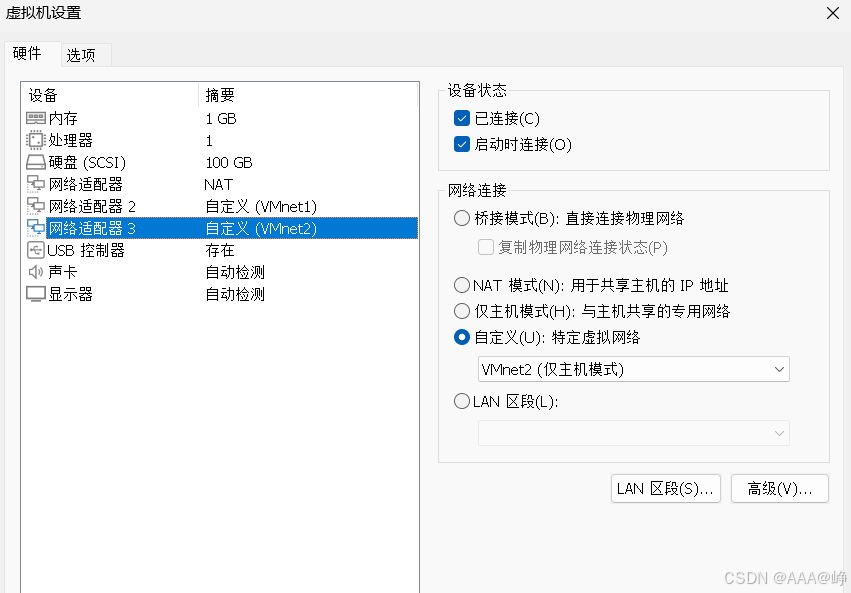
根据上面环境,给虚拟机设置网络适配器10.1.1.0/24是VMnet1,10.1.2.0/24是VMnet2,
10.1.8.0/24是NAT。
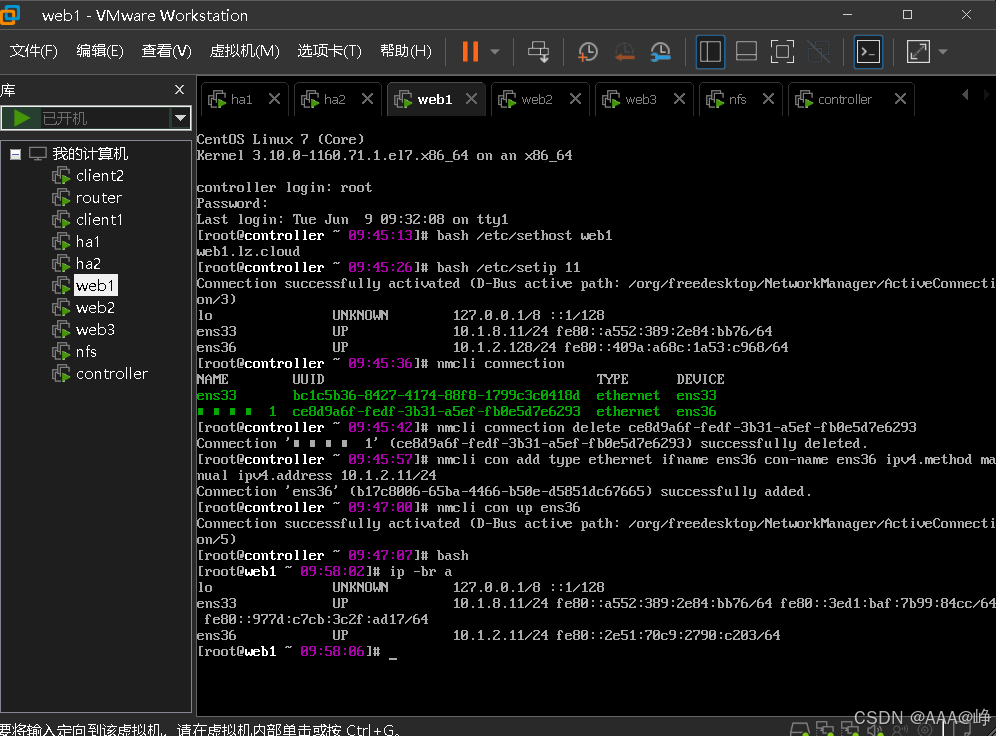
设置主机名和网络
配置免密登录
#编辑本机域名解析文件,把多 IP、主机名、域名做映射
[root@controller ~ 10:07:42]# vim /etc/hosts
[root@controller ~ 10:12:27]# cat /etc/hosts
127.0.0.1   localhost localhost.localdomain localhost4 localhost4.localdomain4
::1         localhost localhost.localdomain localhost6 localhost6.localdomain6

10.1.1.21 client2 client2.lz.cloud
10.1.1.20 10.1.8.20 10.1.2.20 router router.lz.cloud
10.1.8.21 client1 xlient1.lz.cloud
10.1.8.11 10.1.2.11  web1 web1.lz.cloud
10.1.8.12 10.1.2.12  web2 web2.lz.cloud
10.1.8.13 10.1.2.13  web3 web3.lz.cloud
10.1.8.14 ha1 ha1.lz.cloud
10.1.8.15 ha2 ha2.lz.cloud
10.1.2.100 nfs nfs.lz.cloud
#作用是后续可以直接用主机名 / 域名代替 IP 访问,方便运维

#关闭 SSH 首次连接主机密钥询问
[root@controller ~ 10:12:31]# echo 'StrictHostKeyChecking no' >> /etc/ssh/ssh_config

#生成 SSH 免密密钥对(RSA)
[root@controller ~ 10:13:56]# ssh-keygen -t rsa -f .ssh/id_rsa -N ''
Generating public/private rsa key pair.
Saving key ".ssh/id_rsa" failed: No such file or directory
# 报错:No such file or directory

[root@controller ~ 10:14:03]# mkdir -p .ssh
# 重新生成
[root@controller ~ 10:14:27]# ssh-keygen -t rsa -f .ssh/id_rsa -N ''
Generating public/private rsa key pair.
Your identification has been saved in .ssh/id_rsa.
Your public key has been saved in .ssh/id_rsa.pub.
The key fingerprint is:
SHA256:hgxS+FeWu4PEohhSq6fzzruusl3AvKjxmBVd4Uz4f+E root@controller.lz.cloud
The key's randomart image is:
+---[RSA 2048]----+
|   ...o  .       |
|  o..+ .+        |
| ..o.o+o .       |
|oo.oo+=.. .      |
|.+=..+ooSo .     |
|o.o+  ..+ E      |
|ooo .    o       |
|=O .             |
|BBXo             |
+----[SHA256]-----+

#方法1:需要输入密码
[root@controller ~ 10:14:29]# for host in 10.1.1.{20,21} 10.1.8.{11..15} 10.1.2.100 10.1.8.21;do ssh-copy-id root@$host;done
/usr/bin/ssh-copy-id: INFO: Source of key(s) to be installed: "/root/.ssh/id_rsa.pub"
/usr/bin/ssh-copy-id: INFO: attempting to log in with the new key(s), to filter out any that are already installed
/usr/bin/ssh-copy-id: INFO: 1 key(s) remain to be installed -- if you are prompted now it is to install the new keys
root@10.1.1.20's password:

Number of key(s) added: 1

Now try logging into the machine, with:   "ssh 'root@10.1.1.20'"
and check to make sure that only the key(s) you wanted were added.

/usr/bin/ssh-copy-id: INFO: Source of key(s) to be installed: "/root/.ssh/id_rsa.pub"
/usr/bin/ssh-copy-id: INFO: attempting to log in with the new key(s), to filter out any that are already installed
/usr/bin/ssh-copy-id: INFO: 1 key(s) remain to be installed -- if you are prompted now it is to install the new keys
root@10.1.1.21's password:

Number of key(s) added: 1

Now try logging into the machine, with:   "ssh 'root@10.1.1.21'"
and check to make sure that only the key(s) you wanted were added.

/usr/bin/ssh-copy-id: INFO: Source of key(s) to be installed: "/root/.ssh/id_rsa.pub"
/usr/bin/ssh-copy-id: INFO: attempting to log in with the new key(s), to filter out any that are already installed
/usr/bin/ssh-copy-id: INFO: 1 key(s) remain to be installed -- if you are prompted now it is to install the new keys
root@10.1.8.11's password:

Number of key(s) added: 1

Now try logging into the machine, with:   "ssh 'root@10.1.8.11'"
and check to make sure that only the key(s) you wanted were added.

/usr/bin/ssh-copy-id: INFO: Source of key(s) to be installed: "/root/.ssh/id_rsa.pub"
/usr/bin/ssh-copy-id: INFO: attempting to log in with the new key(s), to filter out any that are already installed
/usr/bin/ssh-copy-id: INFO: 1 key(s) remain to be installed -- if you are prompted now it is to install the new keys
root@10.1.8.12's password:

Number of key(s) added: 1

Now try logging into the machine, with:   "ssh 'root@10.1.8.12'"
and check to make sure that only the key(s) you wanted were added.

/usr/bin/ssh-copy-id: INFO: Source of key(s) to be installed: "/root/.ssh/id_rsa.pub"
/usr/bin/ssh-copy-id: INFO: attempting to log in with the new key(s), to filter out any that are already installed
/usr/bin/ssh-copy-id: INFO: 1 key(s) remain to be installed -- if you are prompted now it is to install the new keys
root@10.1.8.13's password:

Number of key(s) added: 1

Now try logging into the machine, with:   "ssh 'root@10.1.8.13'"
and check to make sure that only the key(s) you wanted were added.

/usr/bin/ssh-copy-id: INFO: Source of key(s) to be installed: "/root/.ssh/id_rsa.pub"
/usr/bin/ssh-copy-id: INFO: attempting to log in with the new key(s), to filter out any that are already installed
/usr/bin/ssh-copy-id: INFO: 1 key(s) remain to be installed -- if you are prompted now it is to install the new keys
root@10.1.8.14's password:

Number of key(s) added: 1

Now try logging into the machine, with:   "ssh 'root@10.1.8.14'"
and check to make sure that only the key(s) you wanted were added.

/usr/bin/ssh-copy-id: INFO: Source of key(s) to be installed: "/root/.ssh/id_rsa.pub"
/usr/bin/ssh-copy-id: INFO: attempting to log in with the new key(s), to filter out any that are already installed
/usr/bin/ssh-copy-id: INFO: 1 key(s) remain to be installed -- if you are prompted now it is to install the new keys
root@10.1.8.15's password:

Number of key(s) added: 1

Now try logging into the machine, with:   "ssh 'root@10.1.8.15'"
and check to make sure that only the key(s) you wanted were added.

/usr/bin/ssh-copy-id: INFO: Source of key(s) to be installed: "/root/.ssh/id_rsa.pub"
/usr/bin/ssh-copy-id: INFO: attempting to log in with the new key(s), to filter out any that are already installed
/usr/bin/ssh-copy-id: INFO: 1 key(s) remain to be installed -- if you are prompted now it is to install the new keys
root@10.1.2.100's password:

Number of key(s) added: 1

Now try logging into the machine, with:   "ssh 'root@10.1.2.100'"
and check to make sure that only the key(s) you wanted were added.

/usr/bin/ssh-copy-id: INFO: Source of key(s) to be installed: "/root/.ssh/id_rsa.pub"
/usr/bin/ssh-copy-id: INFO: attempting to log in with the new key(s), to filter out any that are already installed
/usr/bin/ssh-copy-id: INFO: 1 key(s) remain to be installed -- if you are prompted now it is to install the new keys
root@10.1.8.21's password:

Number of key(s) added: 1

Now try logging into the machine, with:   "ssh 'root@10.1.8.21'"
and check to make sure that only the key(s) you wanted were added.

#方法2
# 定义统一密码
PWD="你的目标主机root密码"

for host in 10.1.1.{20,21} 10.1.8.{11..15} 10.1.2.100 10.1.8.21
do
  echo "正在推送密钥至 $host"
  sshpass -p $PWD ssh-copy-id -o StrictHostKeyChecking=no root@$host
done

#验证 SSH 免密是否生效
[root@controller ~ 10:21:44]# for host in 10.1.1.{20,21} 10.1.8.{11..15} 10.1.2.100 10.1.8.21;do ssh root@$host hostname;done
router.lz.cloud
client2.lz.cloud
web1.lz.cloud
web2.lz.cloud
web3.lz.cloud
ha1.lz.cloud
ha2.lz.cloud
nfs.lz.cloud
client1.lz.cloud

#批量同步本地 /etc/hosts 到所有目标主机(重点)
[root@controller ~ 11:04:44]# for host in 10.1.1.{20,21} 10.1.8.{11..15} 10.1.2.100 10.1.8.21
> do
>   echo "==== 追加 hosts 内容到 $host ===="
>   cat /etc/hosts | ssh root@$host "cat >> /etc/hosts"
> done
配置网关
#单台节点手动修改网关(client2)
[root@controller ~ 10:29:47]# ssh client2
Warning: Permanently added 'client2' (ECDSA) to the list of known hosts.
Last login: Thu Jun 11 09:33:19 2026

#查看初始默认网关为10.1.8.2
[root@client2 ~ 10:34:17]# ip route
default via 10.1.8.2 dev ens33 proto static metric 100
10.1.1.0/24 dev ens33 proto kernel scope link src 10.1.1.21 metric 100
10.1.8.2 dev ens33 proto static scope link metric 100

#修改 IPv4 默认网关为 10.1.8.20
[root@client2 ~ 10:34:31]# nmcli con modify ens33 ipv4.gateway 10.1.8.20

#重新激活网卡连接,让新网关配置立即生效
[root@client2 ~ 10:35:28]# nmcli con up ens33
连接已成功激活(D-Bus 活动路径:/org/freedesktop/NetworkManager/ActiveConnection/4)

#验证
[root@client2 ~ 10:35:36]# ip route
default via 10.1.8.20 dev ens33 proto static metric 100
10.1.1.0/24 dev ens33 proto kernel scope link src 10.1.1.21 metric 100
10.1.8.20 dev ens33 proto static scope link metric 100
[root@client2 ~ 10:35:39]# exit
登出
Connection to client2 closed.

#批量修改多节点网关 + 批量重载网卡
[root@controller ~ 10:35:57]# for host in 10.1.8.{11..15} 10.1.8.21;do ssh root@$host nmcli con modify ens33 ipv4.gateway 10.1.8.20;done

[root@controller ~ 10:39:08]# for host in 10.1.8.{11..15} 10.1.8.21;do ssh root@$host nmcli con up ens33;done
连接已成功激活(D-Bus 活动路径:/org/freedesktop/NetworkManager/ActiveConnection/6)
连接已成功激活(D-Bus 活动路径:/org/freedesktop/NetworkManager/ActiveConnection/6)
连接已成功激活(D-Bus 活动路径:/org/freedesktop/NetworkManager/ActiveConnection/3)
连接已成功激活(D-Bus 活动路径:/org/freedesktop/NetworkManager/ActiveConnection/3)
连接已成功激活(D-Bus 活动路径:/org/freedesktop/NetworkManager/ActiveConnection/3)
连接已成功激活(D-Bus 活动路径:/org/freedesktop/NetworkManager/ActiveConnection/3)

#单独修改 nfs 节点网关
[root@controller ~ 10:40:37]# ssh nfs
Warning: Permanently added 'nfs' (ECDSA) to the list of known hosts.
Last login: Thu Jun 11 09:51:44 2026

## 查看本机网卡连接列表,确认网卡名为 ens33
[root@nfs ~ 10:40:50]# nmcli con
NAME        UUID                                  TYPE      DEVICE
ens33       66e72bab-b930-450c-8d23-2b823b2ab655  ethernet  ens33
## 设置网关为 10.1.2.20
[root@nfs ~ 10:41:10]# nmcli con modify ens33 ipv4.gateway 10.1.2.20

# # 激活网卡,配置生效
[root@nfs ~ 10:42:21]# nmcli con up ens33
连接已成功激活(D-Bus 活动路径:/org/freedesktop/NetworkManager/ActiveConnection/5)
[root@nfs ~ 10:42:31]# exit
登出
Connection to nfs closed.

#批量查看:主机名 + 当前默认网关
[root@controller ~ 10:43:05]# for host in 10.1.8.{11..15}  10.1.8.20 10.1.8.21 10.1.1.21 10.1.2.100; do     HOSTNAME=$(ssh root@$host hostname); ROUTER=$(ssh root@$host ip route | awk 'NR==1 {print $3}'); echo "$HOSTNAME: $ROUTER"; done
web1.lz.cloud: 10.1.8.20
web2.lz.cloud: 10.1.8.20
web3.lz.cloud: 10.1.8.20
ha1.lz.cloud: 10.1.8.20
ha2.lz.cloud: 10.1.8.20
router.lz.cloud: 10.1.8.2
client1.lz.cloud: 10.1.8.20
client2.lz.cloud: 10.1.8.20
nfs.lz.cloud: 10.1.2.20

#批量查看:主机名 + 网卡 IP 地址
[root@controller ~ 10:44:11]# for host in 10.1.8.{11..15}  10.1.8.20 10.1.8.21 10.1.1.21 10.1.2.100
> do
>     ssh root@$host hostname
>     ssh root@$host ip -br a | awk '/^ens/ {print $3}'
>     echo
> done
web1.lz.cloud
10.1.8.11/24
10.1.2.11/24

web2.lz.cloud
10.1.8.12/24
10.1.2.12/24

web3.lz.cloud
10.1.8.13/24
10.1.2.13/24

ha1.lz.cloud
10.1.8.14/24

ha2.lz.cloud
10.1.8.15/24

router.lz.cloud
10.1.8.20/24
10.1.1.20/24
10.1.2.20/24

client1.lz.cloud
10.1.8.21/24

client2.lz.cloud
10.1.1.21/24

nfs.lz.cloud
10.1.2.100/24
配置 router
#免密登录网关主机 router。
[root@controller ~ 10:49:00]# ssh router
Warning: Permanently added 'router' (ECDSA) to the list of known hosts.
Last login: Thu Jun 11 09:38:17 2026

#向内核参数配置文件追加 net.ipv4.ip_forward=1
#作用:开启 Linux 内核 IP 路由转发,让这台主机可以转发不同网段的数据包,充当路由器。
[root@router ~ 11:00:48]# echo "net.ipv4.ip_forward=1" >> /etc/sysctl.conf

#立即启动 firewalld 防火墙,并设置开机自启。
[root@router ~ 11:02:14]# systemctl enable firewalld --now
Created symlink from /etc/systemd/system/dbus-org.fedoraproject.FirewallD1.service to /usr/lib/systemd/system/firewalld.service.
Created symlink from /etc/systemd/system/multi-user.target.wants/firewalld.service to /usr/lib/systemd/system/firewalld.service.

#临时开启地址伪装(SNAT),内网主机访问外网时,统一转换成 router 公网 / 出口 IP;
[root@router ~ 11:02:31]# firewall-cmd --add-masquerade
success

#写入永久配置,重启防火墙 / 主机后依然生效;
#组合效果:内网多网段主机可通过 router 正常访问外网。
[root@router ~ 11:03:01]# firewall-cmd --add-masquerade --permanent
success
[root@router ~ 11:04:21]# exit
登出
Connection to router closed.

#批量检测所有节点外网连通性
[root@controller ~ 11:20:11]# for host in 10.1.8.{11..15} 10.1.8.20 10.1.8.21 10.1.1.21 10.1.2.100; do     HOSTNAME=$(ssh $host hostname);     if ssh $host ping -c 1 1.1.1.1 &>/dev/null;then echo "$HOSTNAME: ok";else echo "$HOSTNAME: no ok";fi; done
web1.lz.cloud: ok
web2.lz.cloud: ok
web3.lz.cloud: ok
ha1.lz.cloud: ok
ha2.lz.cloud: ok
router.lz.cloud: ok
client1.lz.cloud: ok
client2.lz.cloud: ok
nfs.lz.cloud: ok
配置 nfs
#在线安装 NFS 服务必备套件
[root@nfs ~ 11:37:11]# yum install -y nfs-utils

#递归创建目录,目录已存在也不会报错
#新建 /usr/share/nginx/html 作为NFS 共享目录,后续用于存放网页文件
[root@nfs ~ 11:43:13]# mkdir /usr/share/nginx/html -p

#新建网页首页文件 index.html,写入测试内容,作为共享的网页资源。
# > 覆盖写入,文件不存在则创建
[root@nfs ~ 11:45:49]# echo Welcome to www.lz.cloud > /usr/share/nginx/html/index.html

#/etc/exports 是 NFS 核心配置文件,用来定义共享规则。
#/usr/share/nginx/html:本地要共享的目录;
#10.1.2.0/24:仅允许 10.1.2 整个网段 的主机访问;
#rw:客户端拥有读写权限;sync:同步写入,数据先落盘再返回成功,保证数据安全;
# >> 追加内容,不覆盖原有配置。
[root@nfs ~ 11:46:00]# echo '/usr/share/nginx/html 10.1.2.0/24(rw,sync)' >> /etc/exports

#立即启动服务 + 设置开机自启;
[root@nfs ~ 11:46:56]# systemctl enable nfs-server.service --now
Created symlink from /etc/systemd/system/multi-user.target.wants/nfs-server.service to /usr/lib/systemd/system/nfs-server.service.
配置 web
[root@web1-3 ~]#

## 部署 web
#安装 Nginx 网页服务
yum install -y nginx

#生成专属测试页面
echo Welcome to $(hostname) > /usr/share/nginx/html/index.html

#立即启动 Nginx,并设置开机自启
systemctl enable nginx.service --now

#客户端测试访问(client1 节点)
[root@client1 ~ 13:13:20]# curl 10.1.8.11
Welcome to web1.lz.cloud
[root@client1 ~ 13:14:12]# curl 10.1.8.12
Welcome to web2.lz.cloud
[root@client1 ~ 13:14:13]# curl 10.1.8.13
Welcome to web3.lz.cloud

[root@web1-3 ~]#
#安装 NFS 客户端工具
yum install -y nfs-utils

#写入 fstab(开机自动挂载配置)
echo '10.1.2.100:/usr/share/nginx/html /usr/share/nginx/html nfs defaults 0 0' >> /etc/fstab

#重载系统挂载配置
systemctl daemon-reload

#执行全部挂载
mount -a

#查看挂载状态
df /usr/share/nginx/html
配置 LVS-RS
所有后端主机都要做相同配置。
[root@web1-3 ~]#

## 增加虚拟网卡
nmcli connection add type dummy ifname dummy con-name dummy ipv4.method manual ipv4.address 10.1.8.100/32
nmcli connection up dummy

## 配置arp参数,关闭arp对dummy网卡的解析
cat >> /etc/sysctl.conf << EOF
net.ipv4.conf.all.arp_ignore = 1
net.ipv4.conf.all.arp_announce = 2
net.ipv4.conf.dummy.arp_ignore = 1
net.ipv4.conf.dummy.arp_announce = 2
EOF

#默认加载 /etc/sysctl.conf,输出所有已生效的内核参数。
sysctl -p
配置 HA 和 LVS-DS
配置 ha1
#安装依赖包
[root@ha1 ~ 13:19:27]# yum install -y keepalived ipvsadm

#备份原有配置文件
[root@ha1 ~ 13:19:44]# cp /etc/keepalived/keepalived.conf{,.bak}

#编辑 Keepalived 主配置
[root@ha1 ~ 13:19:56]# vim /etc/keepalived/keepalived.conf
! Configuration File for keepalived

global_defs {
   router_id ha1
}

vrrp_instance web {
    state MASTER
    interface ens33
    virtual_router_id 51
    priority 110
    advert_int 1
    authentication {
        auth_type PASS
        auth_pass lz@123
    }
    virtual_ipaddress {
        10.1.8.100/24
    }
}

virtual_server 10.1.8.100 80 {
    delay_loop 6
    lb_algo rr
    lb_kind DR
    protocol TCP

    real_server 10.1.8.11 80 {
        weight 1
        TCP_CHECK {
            connect_timeout 3
            retry 3
            delay_before_retry 3
        }
    }
    real_server 10.1.8.12 80 {
        weight 2
        TCP_CHECK {
            connect_timeout 3
            retry 3
            delay_before_retry 3
        }
    }
    real_server 10.1.8.13 80 {
        weight 2
        TCP_CHECK {
            connect_timeout 3
            retry 3
            delay_before_retry 3
        }
    }
}

#重启服务,设置开机自启
[root@ha1 ~ 13:21:13]# systemctl enable keepalived.service --now
配置 ha2
[root@ha1 ~ 13:21:43]# ssh ha2
Warning: Permanently added 'ha2,10.1.8.15' (ECDSA) to the list of known hosts.
root@ha2's password:
Last login: Thu Jun 11 09:44:45 2026

#安装依赖包
[root@ha2 ~ 13:22:12]# yum install -y keepalived ipvsadm

##备份原有配置文件
[root@ha2 ~ 13:22:33]# cp /etc/keepalived/keepalived.conf{,.bak}

#编辑备节点配置文件
[root@ha2 ~ 13:22:33]# vim /etc/keepalived/keepalived.conf
! Configuration File for keepalived

global_defs {
   router_id ha2
}

vrrp_instance web {
    state BACKUP
    interface ens33
    virtual_router_id 51
    priority 100
    advert_int 1
    authentication {
        auth_type PASS
        auth_pass lz@123
    }
    virtual_ipaddress {
        10.1.8.100/24
    }
}

virtual_server 10.1.8.100 80 {
    delay_loop 6
    lb_algo rr
    lb_kind DR
    protocol TCP

    real_server 10.1.8.11 80 {
        weight 1
        TCP_CHECK {
            connect_timeout 3
            retry 3
            delay_before_retry 3
        }
    }
    real_server 10.1.8.12 80 {
        weight 1
        TCP_CHECK {
            connect_timeout 3
            retry 3
            delay_before_retry 3
        }
    }
    real_server 10.1.8.13 80 {
        weight 1
        TCP_CHECK {
            connect_timeout 3
            retry 3
            delay_before_retry 3
        }
    }
}

#启动并开机自启
[root@ha2 ~ 13:23:19]# systemctl enable keepalived.service --now
测试
功能性测试
1.NFS 正常运行 + 挂载生效
Nginx 读取 NFS 共享目录的页面,所有节点统一输出:
[root@client1 ~ 13:14:16]# while true ;do curl -s http://10.1.8.100;sleep 1;done
Welcome to www.lz.cloud
......
[root@client2 ~ 13:24:55]# while true ;do curl -s http://10.1.8.100;sleep 1;done
Welcome to www.lz.cloud
......
高可用测试
持续监控集群可用性。
[root@client2 ~ 13:25:04]# while true ;do curl -s http://10.1.8.100;sleep 1;done
......
测试1:停止 ha1 上 keepalived 服务。
[root@ha1 ~ 13:26:06]# systemctl stop keepalived.service
结果:客户端无感知故障,正常访问集群。
测试2:恢复 ha1 上 keepalived 服务。
[root@ha1 ~ 17:06:10]# systemctl start keepalived.service
结果:客户端无感知故障,正常访问集群。
负载均衡测试
关闭 NFS 服务 / 卸载 NFS 挂载
Web 节点会读取本地/usr/share/nginx/html 里各自的页面,就会轮询出现:
[root@client2 ~ 17:03:55]# while true ;do curl -s http://10.1.8.100;sleep 1;done
Welcome to web1.lz.cloud
Welcome to web3.lz.cloud
Welcome to web2.lz.cloud
......
测试1:停止 web2 上 nginx 服务,监控客户端访问情况。
[root@web2 ~ 17:06:37]# systemctl stop nginx
结果:大概 15 秒,LVS 将 web2 从后端虚拟主机中剔除。
Welcome to web1.lz.cloud
Welcome to web3.lz.cloud
Welcome to web1.lz.cloud
Welcome to web3.lz.cloud
......
测试2:启动 web2 上 nginx 服务,监控客户端访问情况。
[root@web2 ~ 17:06:50]# systemctl start nginx
结果:大概 5 秒,LVS将web2加入后端虚拟主机中。
Welcome to web1.lz.cloud
Welcome to web3.lz.cloud
Welcome to web1.lz.cloud
Welcome to web2.lz.cloud
Welcome to web3.lz.cloud

汇聚全球AI编程工具,助力开发者即刻编程。
更多推荐

 16
16 0
0- 0


 已为社区贡献5条内容

所有评论(0)