
Web——安装httpd服务(Nginx)
Nginx介绍
1.nginx是什么
Nginx是一款高性能、轻量级Web服务软件/反向代理服务器及电子邮件(IMAP/POP3)代理服务 器。
由俄罗斯的程序设计师Igor Sysoev所开发,官方测试nginx能够支支撑5万并发链接,并且cpu、 内存等资源消耗却非常低,运行非常稳定
2.应用场景
1.http服务器
Nginx是一个http服务可以独立提供http服务。可以做网页静态服务器。
2.虚拟web主机
可以实现在一台服务器虚拟出多个网站。例如个人网站使用的虚拟主机。
3.反向代理,负载均衡
当网站的访问量达到一定程度后,单台服务器不能满足用户的请求时, 需要用多台服务器集群可以使用nginx做反向代理。并且多台服务器可以平均分担负载,不会因为 某台服务器负载高宕机而某台服务器闲置的情况。
3.Nginx特点
高可靠
稳定性master进程管理调度请求分发到worker;worker进程响应请求 ;一master多 worker
热部署
1.支持长时间运行不重启平滑升级
2.可以快速重载配置
高并发
单台物理服务器可支持30 000~50 000个并发请求,(epoll模型内核级) 响应快:尤其在处理静态文件上,响应速度很快
低消耗
cpu和内存1w个请求内存平平均使用在2-3MB 分布式支持:反向代理 七层负载均衡
4.Nginx下载
官方网址
http://nginx.org/
版本
| 版本 | 说明 |
|---|---|
| Mainline version | Mainline 是 Nginx 目前主力在做的版本,可以说是开发版 |
| Stable version | 最新稳定版,生产环境上建议使用的版本 |
| Legacy versions | 历史的老版本的稳定 |
编译安装部署Nginx
1.基本规划
1)关闭防火墙
systemctl stop firewalld
systemctl disable firewalld



2)关闭selinux
setenforce 0

vim /etc/selinux/config
SELINUX=disabled
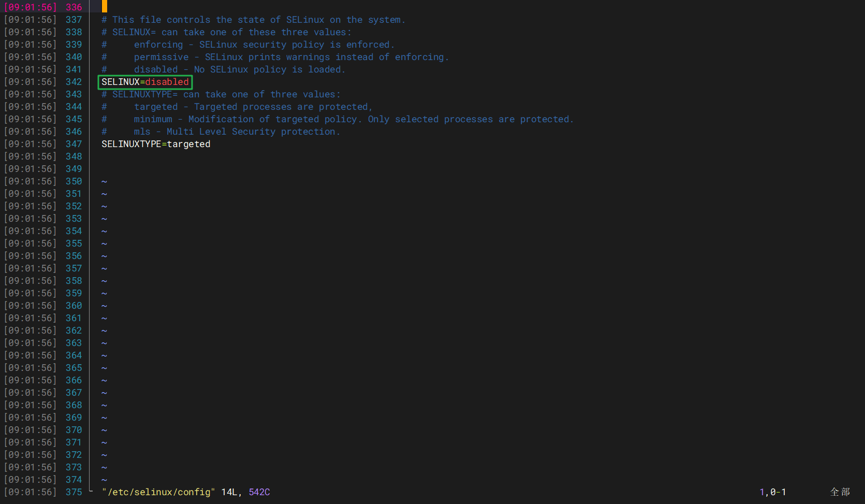
selinux改完重启后生效(init 6 / reboot)
3)源
配置aliyun的源和epel源
已加载插件:fastestmirror
Loading mirror speeds from cached hostfile
 * base: mirrors.aliyun.com
 * epel: pubmirror1.math.uh.edu
 * extras: mirrors.aliyun.com
 * updates: mirrors.aliyun.com
源标识                                             源名称                                                                           状态
base/7/x86_64                                      CentOS-7 - Base - mirrors.aliyun.com                                             10,072
epel/x86_64                                        Extra Packages for Enterprise Linux 7 - x86_64                                   13,791
extras/7/x86_64                                    CentOS-7 - Extras - mirrors.aliyun.com                                              526
updates/7/x86_64                                   CentOS-7 - Updates - mirrors.aliyun.com                                           6,173
repolist: 30,562

2.创建目录并上传
1)创建存放目录
mkdir -pv /usr/local/src/lnmp
cd /usr/local/src/lnmp/
pwd
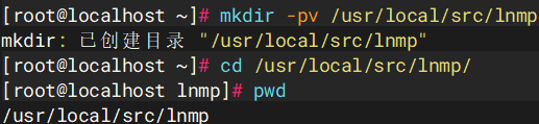
2)存放软件包
3.编译安装nginx
(1).安装nginx
1)安装依赖
yum -y install gcc gcc-c++ pcre-devel zlib-devel openssl-devel perl-devel
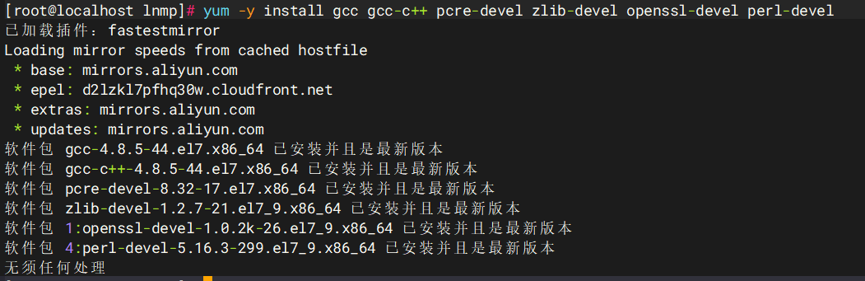
2)创建nginx系统用户
useradd -M -s /sbin/nologin nginx

3)解压nginx
cd /usr/local/src/lnmp
tar -xvzf nginx-1.16.1.tar.gz

4)预编译nginx
./configure --prefix=/usr/local/nginx \
--user=nginx \
--group=nginx \
--with-http_stub_status_module \
--with-http_ssl_module \
--with-stream ; echo $?

5)编译安装nginx
make -j $(nproc) && make install ; echo $?

6)安装目录介绍
ll /usr/local/nginx/
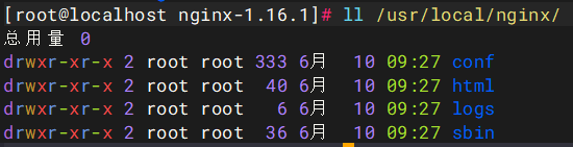
其中:
conf -----配置文件
html -----默认网站根文件
logs -----日志文件
sbin -----主要二进制程序nginx主程序
(2).nginx设置及启动
1)路径优化(目的是在任意位置执行nginx)
ln -sv /usr/local/nginx/sbin/nginx /usr/local/sbin/
ls -lhrt /usr/local/sbin/nginx

2)配置文件语法检查(nginx.conf)
指定Nginx主配置文件,检测语法
nginx -t -c /usr/local/nginx/conf/nginx.conf
检测Nginx的语法
nginx -t

3)启动nginx服务
nginx
netstat -anpt | grep :80
nginx ; pgrep nginx ; ps aux | grep nginx ; ps -efL | grep nginx
4)修改worker(尽量和当前CPU数量相同)
vim /usr/local/nginx/conf/nginx.conf
grep -n worker_process /usr/local/nginx/conf/nginx.conf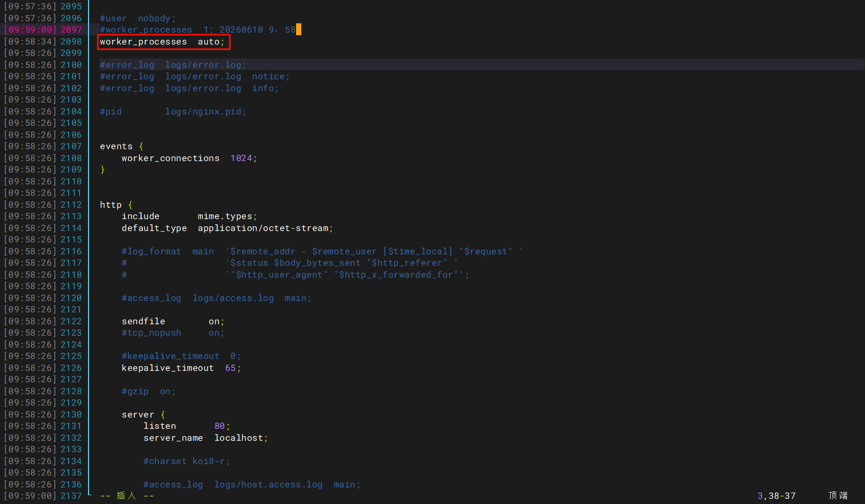

5)查看及重载Nginx配置
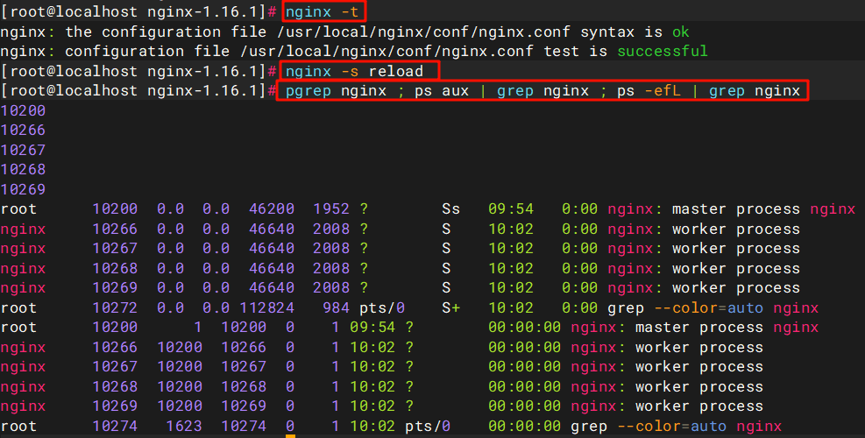
重新检测配置文件语法是否正确
nginx -t
重新加载Nginx配置及进程热重启
nginx -s reload
查看
pgrep nginx ; ps aux | grep nginx ; ps -efL | grep nginx
说明:
1.pgrep nginx 查看名称为nginx的进程号
2.ps aux 查看Nginx进程信息
3.ps -efL | grep nginx 统计Nginx进程数量
6)重载nginx配置文件
killall nginx
nginx -s reload
7)关闭nginx服务
killall nginx
nginx -s stop
8)nginx服务脚本(建议使用2)
1、service服务脚本centos6、7通用
vim /etc/init.d/nginx
#!/bin/sh
#chkconfig: - 33 33
#description: Nginx is a high-performance web and proxy server.
PROG="/usr/local/nginx/sbin/nginx"
PIDF="/usr/local/nginx/logs/nginx.pid"
case "$1" in
start)
 $PROG
;;
stop)
 kill -s QUIT $(cat $PIDF) &> /dev/null
;;
restart)
 $0 stop &> /dev/null
 $0 start
;;
reload)
 kill -s HUP $(cat $PIDF)
;;
*)
 echo "Usage: $0 {start|stop|restart|reload}"
 exit 1
esac
exit 0
-------------或使用下面的内容------------------
#!/bin/bash
chkconfig: - 85 15
description: Nginx is a high-performance web and proxy server.
case $1 in
'stop')
       /usr/local/nginx/sbin/nginx -s stop
;;
'start')
       /usr/local/nginx/sbin/nginx
;;
'restart')
       /usr/local/nginx/sbin/nginx -s stop
       /usr/local/nginx/sbin/nginx
;;
'reload')
       /usr/local/nginx/sbin/nginx -s reload
;;
*)
       echo 'Usage:service nginx stop|restart|start|reload'
esac
添加执行权限
chmod +x /usr/lib/systemd/system/nginx.service
chkconfig --add nginx
chkconfig nginx on
service nginx start
2、systemctl服务脚本centos7适用
vim /usr/lib/systemd/system/nginx.service
[Unit]
Description=nginx - high performance web server
Documentation=http://nginx.org/en/docs/
After=network.target remote-fs.target nss-lookup.target
[Service]
Type=forking
PIDFile=/usr/local/nginx/logs/nginx.pid
ExecStartPre=/usr/local/nginx/sbin/nginx -t -c /usr/local/nginx/conf/nginx.conf
ExecStart=/usr/local/nginx/sbin/nginx -c /usr/local/nginx/conf/nginx.conf
ExecReload=/bin/kill -s HUP $MAINPID
ExecStop=/bin/kill -s QUIT $MAINPID
PrivateTmp=true
[Install]
WantedBy=multi-user.target
添加执行权限
chmod +x /usr/lib/systemd/system/nginx.service
systemctl daemon-reload
systemctl start nginx
systemctl enable nginx
(3).备份
1)备份
cp -av /usr/local/nginx/conf/nginx.conf /opt/nginx.conf_lengmx

2)微调配置文件
vim /usr/local/nginx/conf/nginx.conf
# 1.用户
#user  nobody;
user nginx;

# 2.进程信息
#worker_processes  1; 20260610 9:58
worker_processes  auto;


# 3.全局错误日志
#error_log  logs/error.log;
#error_log  logs/error.log  notice;
#error_log  logs/error.log  info;

# 4.进程启动后的pid信息,pid是一组整数信息
#pid        logs/nginx.pid;


# 5.events模块,连接数信息,高并发、大流量的基础配置,默认每个work进程建立的连接数是1024个
events {
    worker_connections  1024;
}


# 6.http模块
http {
    include       mime.types;
    default_type  application/octet-stream;

    #log_format  main  '$remote_addr - $remote_user [$time_local] "$request" '
    #                  '$status $body_bytes_sent "$http_referer" '
    #                  '"$http_user_agent" "$http_x_forwarded_for"';


    log_format  main  '$remote_addr - $remote_user [$time_local] "$request" '
                      '$status $body_bytes_sent "$http_referer" '
                      '"$http_user_agent" "$http_x_forwarded_for"';


    access_log  logs/access.log  main;
    #access_log  logs/access.log  main;

    sendfile        on;
    #tcp_nopush     on;

    #keepalive_timeout  0;
    keepalive_timeout  65;

    #gzip  on;

# 7.Server段,虚拟主机,服务器的配置
# location,一个server段{},可以包含多个location{}
    server {
        listen       80;
        server_name  localhost;

        #charset koi8-r;

        #access_log  logs/host.access.log  main;

        location / {
            root   html;
            index  index.html index.htm;
        }

        #error_page  404              /404.html;

        # redirect server error pages to the static page /50x.html
        #
        error_page   500 502 503 504  /50x.html;
        location = /50x.html {
            root   html;
        }

        # proxy the PHP scripts to Apache listening on 127.0.0.1:80
        #
        #location ~ \.php$ {
        #    proxy_pass   http://127.0.0.1;
        #}

        # pass the PHP scripts to FastCGI server listening on 127.0.0.1:9000
        #
        #location ~ \.php$ {
        #    root           html;
        #    fastcgi_pass   127.0.0.1:9000;
        #    fastcgi_index  index.php;
        #    fastcgi_param  SCRIPT_FILENAME  /scripts$fastcgi_script_name;
        #    include        fastcgi_params;
        #}

        # deny access to .htaccess files, if Apache's document root
        # concurs with nginx's one
        #
        #location ~ /\.ht {
        #    deny  all;
        #}
    }


    # another virtual host using mix of IP-, name-, and port-based configuration
    #
    #server {
    #    listen       8000;
    #    listen       somename:8080;
    #    server_name  somename  alias  another.alias;
3)测试
修改完配置文件一定要测试,务必要测试
nginx -t

(4).基于nginx域名的虚拟主机
1)新建虚拟主机目录
cd /usr/local/nginx或者cd /usr/local/nginx/conf
mkdir -pv vhosts

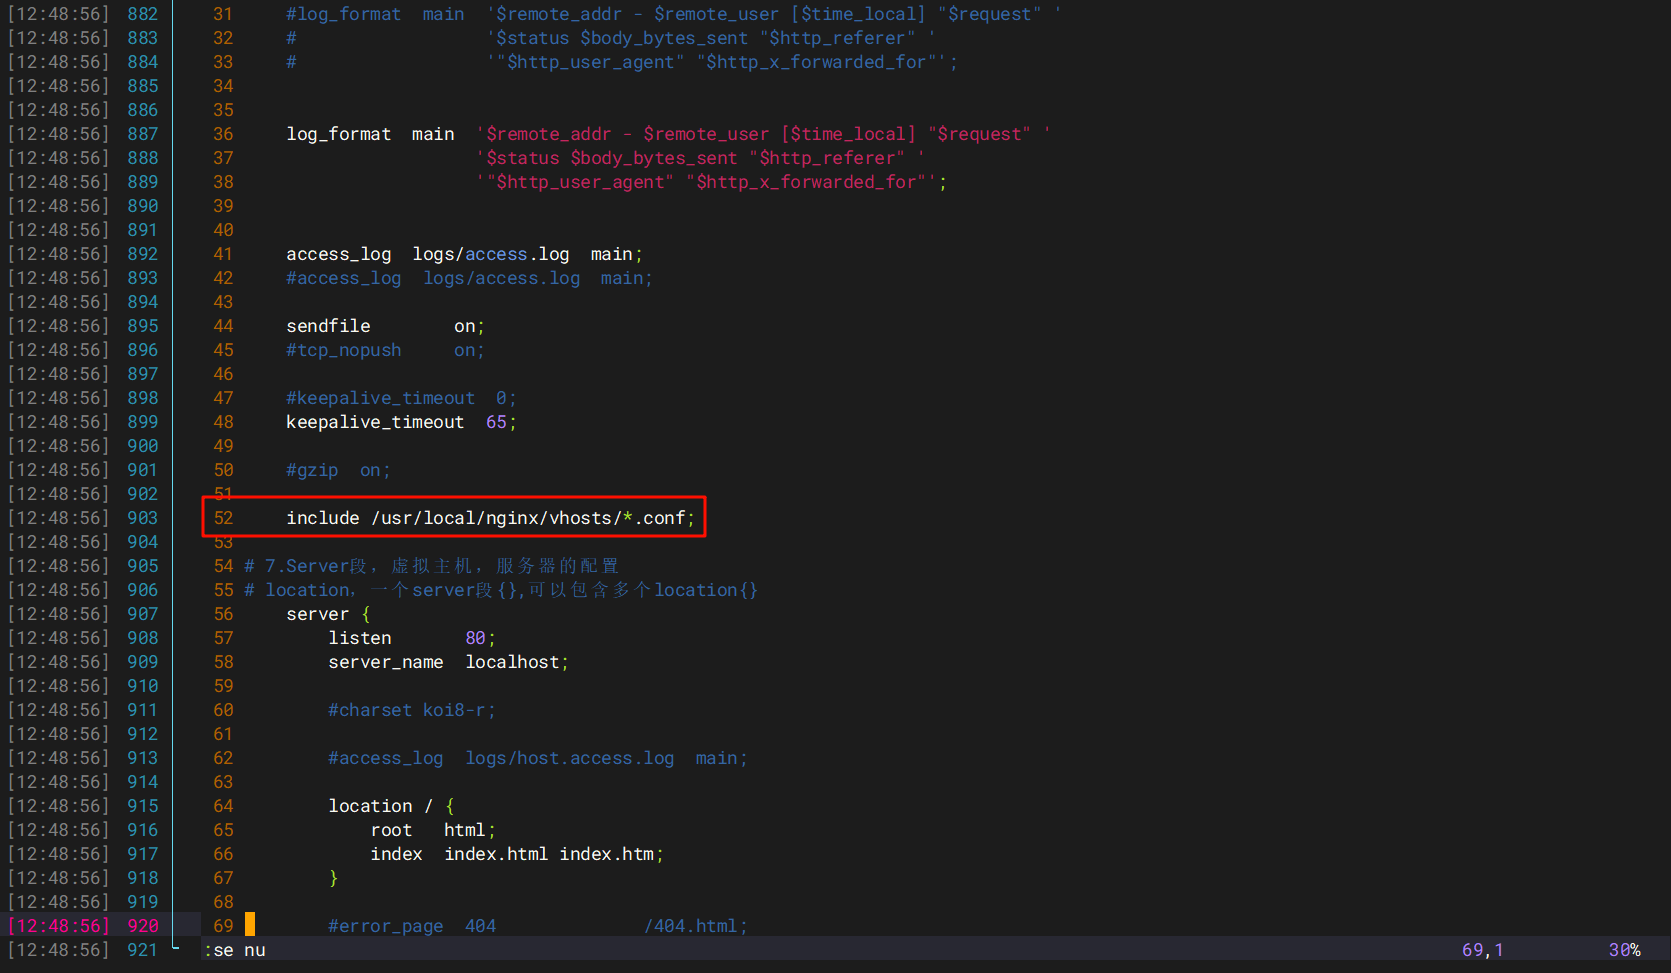
2)引入虚拟主机配置文件
在配置文件添加以下配置,在第52行
include /usr/local/nginx/vhosts/*.conf;
vim /usr/local/nginx/conf/nginx.conf
整体如下
# 1.用户
#user  nobody;
user nginx;

# 2.进程信息
#worker_processes  1; 20260610 9:58
worker_processes  auto;


# 3.全局错误日志
#error_log  logs/error.log;
#error_log  logs/error.log  notice;
#error_log  logs/error.log  info;

# 4.进程启动后的pid信息,pid是一组整数信息
#pid        logs/nginx.pid;


# 5.events模块,连接数信息,高并发、大流量的基础配置,默认每个work进程建立的连接数是1024个
events {
    worker_connections  1024;
}


# 6.http模块
http {
    include       mime.types;
    default_type  application/octet-stream;

    #log_format  main  '$remote_addr - $remote_user [$time_local] "$request" '
    #                  '$status $body_bytes_sent "$http_referer" '
    #                  '"$http_user_agent" "$http_x_forwarded_for"';


    log_format  main  '$remote_addr - $remote_user [$time_local] "$request" '
                      '$status $body_bytes_sent "$http_referer" '
                      '"$http_user_agent" "$http_x_forwarded_for"';


    access_log  logs/access.log  main;
    #access_log  logs/access.log  main;

    sendfile        on;
    #tcp_nopush     on;

    #keepalive_timeout  0;
    keepalive_timeout  65;

    #gzip  on;

    include /usr/local/nginx/vhosts/*.conf;

# 7.Server段,虚拟主机,服务器的配置
# location,一个server段{},可以包含多个location{}
    server {
        listen       80;
        server_name  localhost;

        #charset koi8-r;

        #access_log  logs/host.access.log  main;

        location / {
            root   html;
            index  index.html index.htm;
        }

        #error_page  404              /404.html;

        # redirect server error pages to the static page /50x.html
        #
        error_page   500 502 503 504  /50x.html;
        location = /50x.html {
            root   html;
        }

        # proxy the PHP scripts to Apache listening on 127.0.0.1:80
        #
        #location ~ \.php$ {
        #    proxy_pass   http://127.0.0.1;
        #}

        # pass the PHP scripts to FastCGI server listening on 127.0.0.1:9000
        #
        #location ~ \.php$ {
        #    root           html;
        #    fastcgi_pass   127.0.0.1:9000;
        #    fastcgi_index  index.php;
        #    fastcgi_param  SCRIPT_FILENAME  /scripts$fastcgi_script_name;
        #    include        fastcgi_params;
        #}

        # deny access to .htaccess files, if Apache's document root
        # concurs with nginx's one
        #
        #location ~ /\.ht {
        #    deny  all;
        #}
    }


    # another virtual host using mix of IP-, name-, and port-based configuration
    #
    #server {
    #    listen       8000;
    #    listen       somename:8080;
    #    server_name  somename  alias  another.alias;

    #    location / {
    #        root   html;
    #        index  index.html index.htm;
    #    }
    #}


    # HTTPS server
    #
    #server {
    #    listen       443 ssl;
    #    server_name  localhost;

    #    ssl_certificate      cert.pem;
    #    ssl_certificate_key  cert.key;

    #    ssl_session_cache    shared:SSL:1m;
    #    ssl_session_timeout  5m;

    #    ssl_ciphers  HIGH:!aNULL:!MD5;
    #    ssl_prefer_server_ciphers  on;

    #    location / {
    #        root   html;
    #        index  index.html index.htm;
    #    }
    #}

}
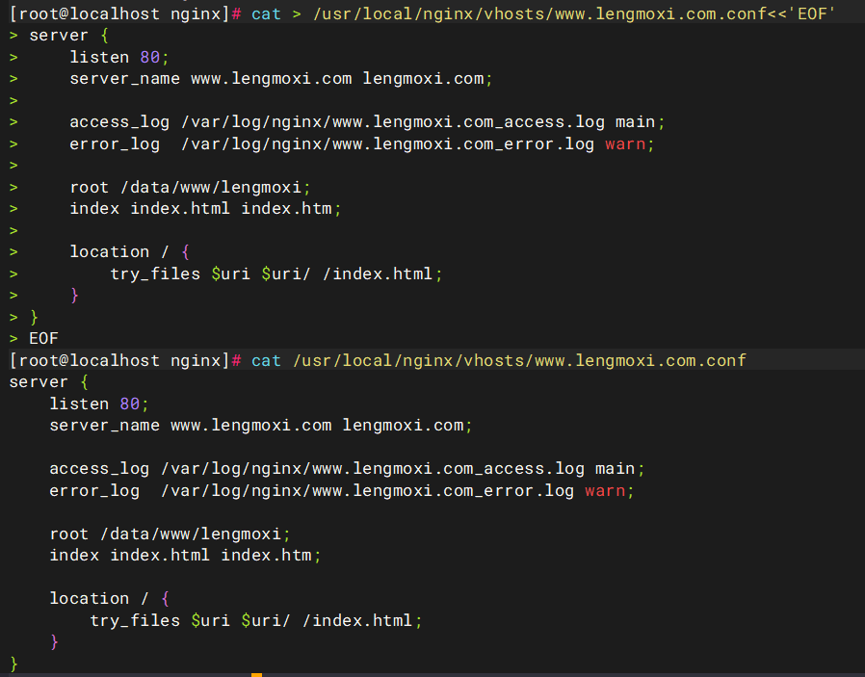
3)编写虚拟主机配置
cat > /usr/local/nginx/vhosts/www.lengmoxi.com.conf<<'EOF'
server {
    listen 80;
    server_name www.lengmoxi.com lengmoxi.com;

    access_log /var/log/nginx/www.lengmoxi.com_access.log main;
    error_log  /var/log/nginx/www.lengmoxi.com_error.log warn;

    root /data/www/lengmoxi;
    index index.html index.htm;

    location / {
        try_files $uri $uri/ /index.html;
    }
}
EOF
cat /usr/local/nginx/vhosts/www.lengmoxi.com.conf
cat > /usr/local/nginx/vhosts/img.lengmoxi.com.conf<<'EOF'
server {
    listen 80;
    server_name img.lengmoxi.com;

    access_log off;
    error_log  /var/log/nginx/img.lengmoxi.com_error.log warn;

    root /data/www/img;
    index index.html;

    location / {
        try_files $uri $uri/ =404;
    }

    # 静态资源缓存
    location ~* \.(jpg|jpeg|png|gif|ico|svg|webp)$ {
        expires 30d;
        add_header Cache-Control "public, immutable";
        access_log off;
    }
}
EOF
cat /usr/local/nginx/vhosts/img.lengmoxi.com.conf
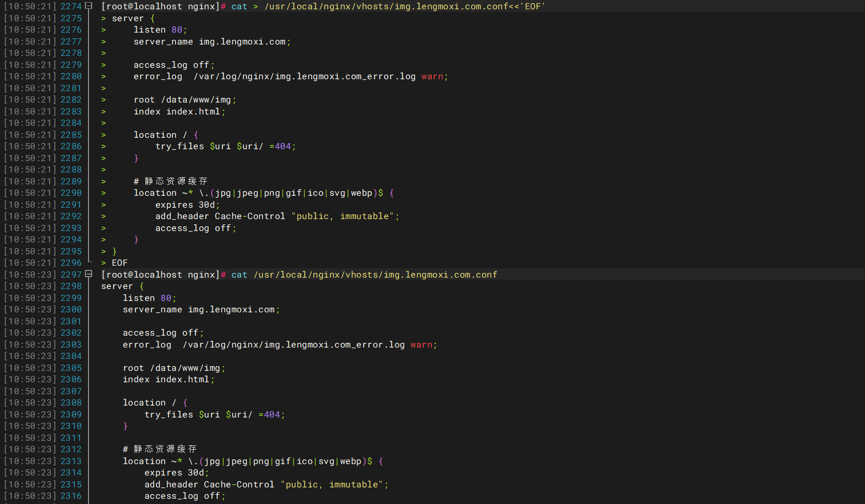
ls -lhrt /usr/local/nginx/vhosts/*.conf

4)解决检测语法时的报错
错误一

加到server块上面
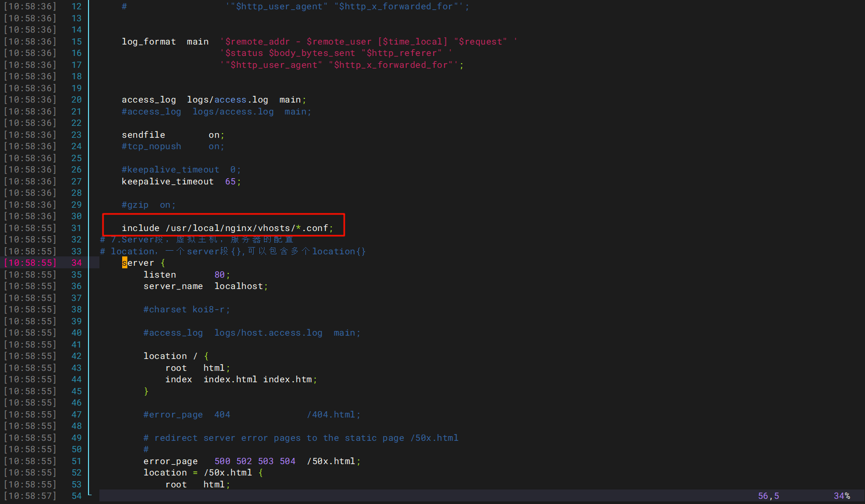
错误二

mkdir -p /var/log/nginx

将目录所有者改为 nginx 用户(根据你的实际运行用户调整)
chown -R nginx:nginx /var/log/nginx

或者直接赋予所有用户写权限(不推荐用于生产环境,但可快速解决问题)
chmod -R 755 /var/log/nginx

nginx -t

重载nginx
nginx -s reload

(5).创建站点
1)创建站点目录并授权
mkdir -pv /data/www/{lengmoxi,img}

chown -R nginx:nginx /usr/local/nginx /data/www/

2)创建默认首页
编辑www.lengmoxi.com的测试文件
cat > /data/www/lengmoxi/index.html << 'EOF'
<!DOCTYPE html>
<html lang="zh-CN">
<head>
    <meta charset="UTF-8">
    <title>www.lengmoxi.com</title>
    <style>
        body {
            font-family: Arial, sans-serif;
            background-color: #f5f7fa;
            text-align: center;
            padding-top: 100px;
        }
        .box {
            display: inline-block;
            padding: 40px 60px;
            background: #ffffff;
            border-radius: 8px;
            box-shadow: 0 4px 10px rgba(0,0,0,.1);
        }
        h1 { color: #2f80ed; }
        p { color: #555; }
    </style>
</head>
<body>
    <div class="box">
        <h1>www.lengmoxi.com</h1>
        <p>Nginx 虚拟主机配置成功 🎉</p >
        <p>时间:<span id="t"></span></p >
    </div>

    <script>
        document.getElementById("t").innerText = new Date().toLocaleString();
    </script>
</body>
</html>
EOF
cat /data/www/lengmoxi/index.html
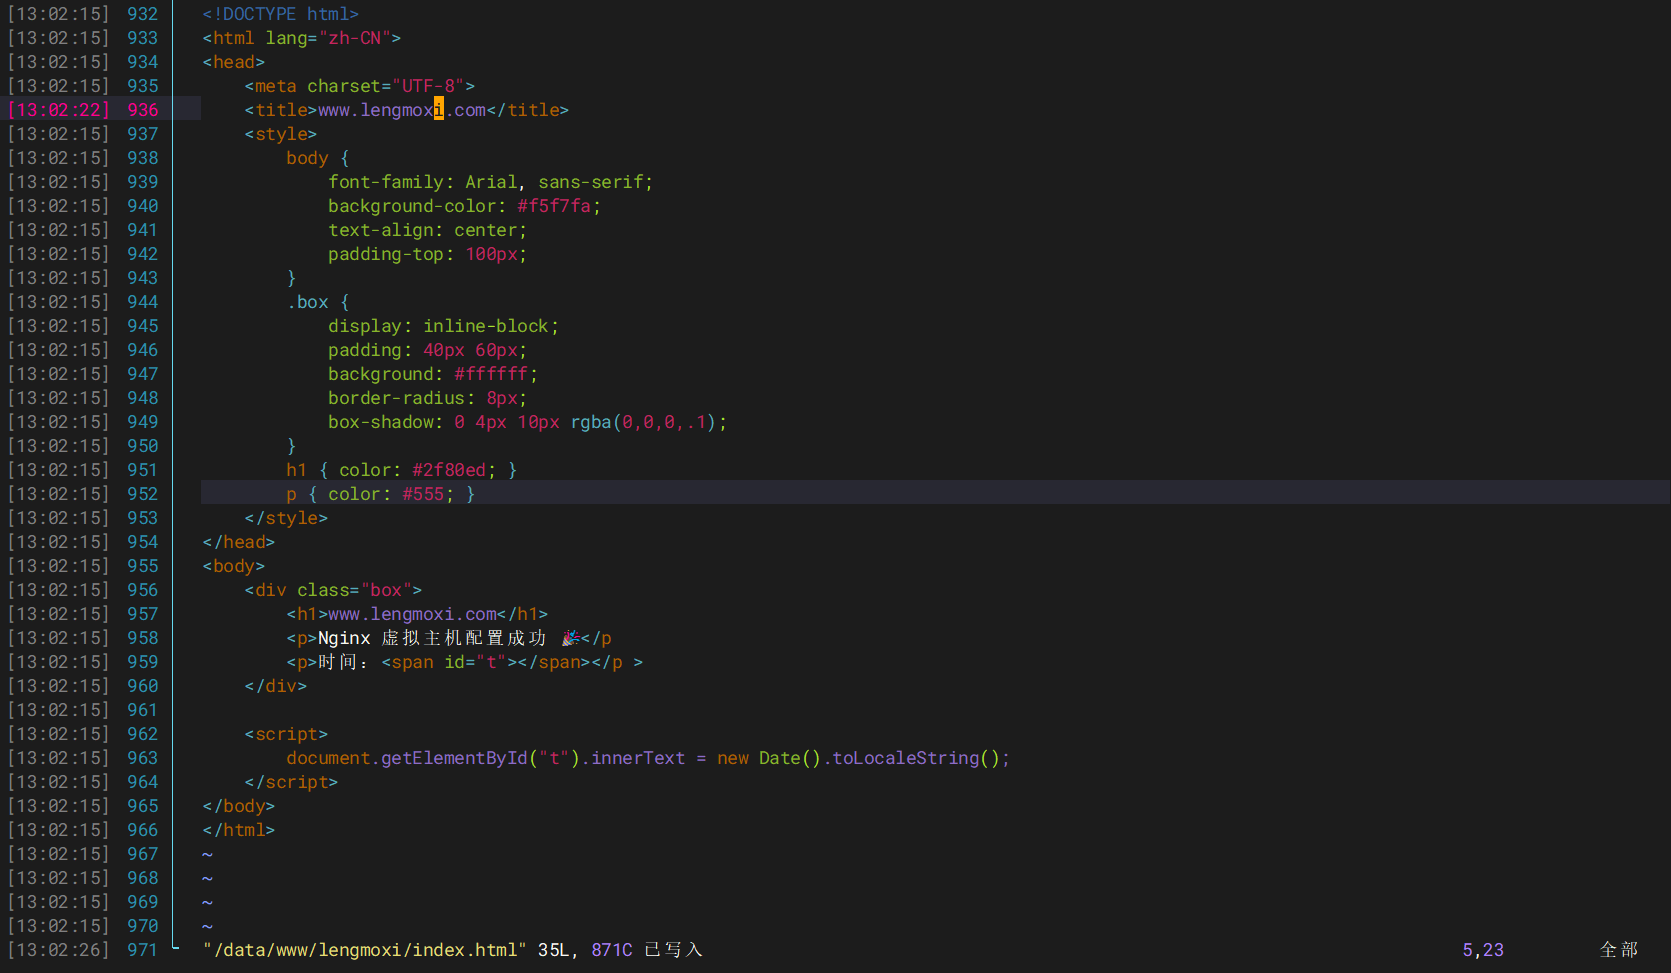
编辑img.lengmoxi.com的测试文件
cat >/data/www/img/index.html<<'EOF'
<!DOCTYPE html>
<html lang="zh-CN">
<head>
    <meta charset="UTF-8">
    <title>img.lengmoxi.com</title>
    <style>
        body {
            font-family: Arial, sans-serif;
            background-color: #eef2f7;
            text-align: center;
            padding-top: 100px;
        }
        .box {
            display: inline-block;
            padding: 40px 60px;
            background: #ffffff;
            border-radius: 8px;
            box-shadow: 0 4px 10px rgba(0,0,0,.1);
        }
        h1 { color: #27ae60; }
        p { color: #555; }
    </style>
</head>
<body>
    <div class="box">
        <h1>img.lengmoxi.com</h1>
        <p>静态资源 / 图片站点已就绪 🚀</p >
        <p>可用于 JS / CSS / 图片加速</p >
    </div>
</body>
</html>
EOF
cat /data/www/img/index.html
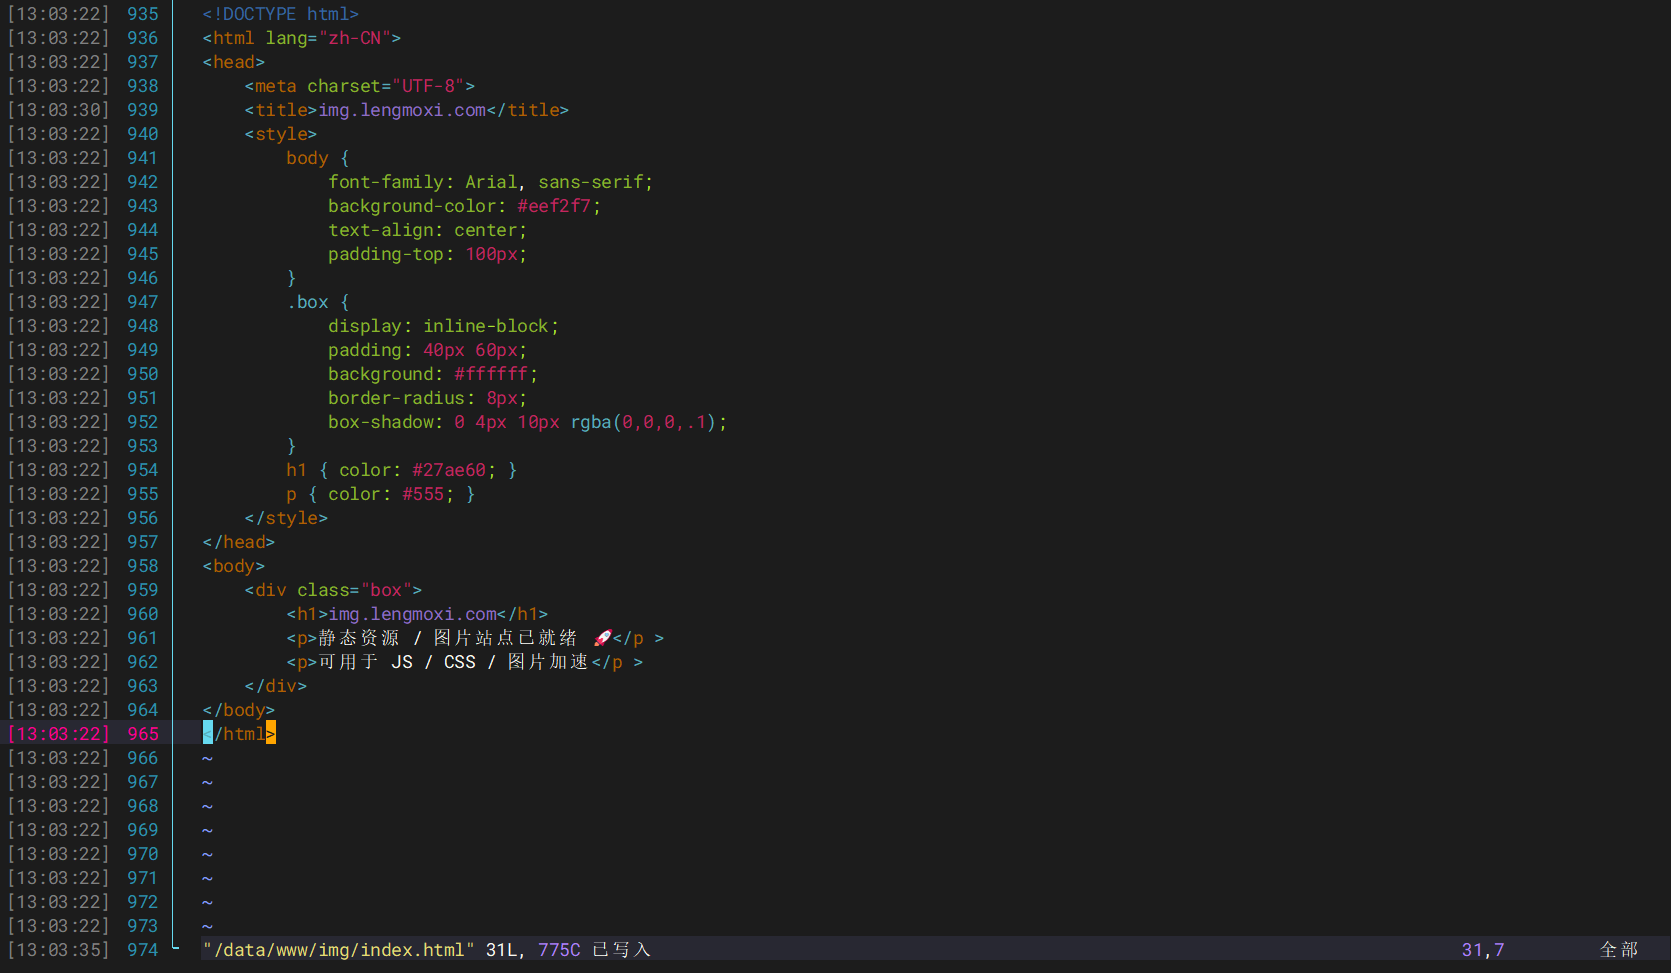
(6).修改host文件
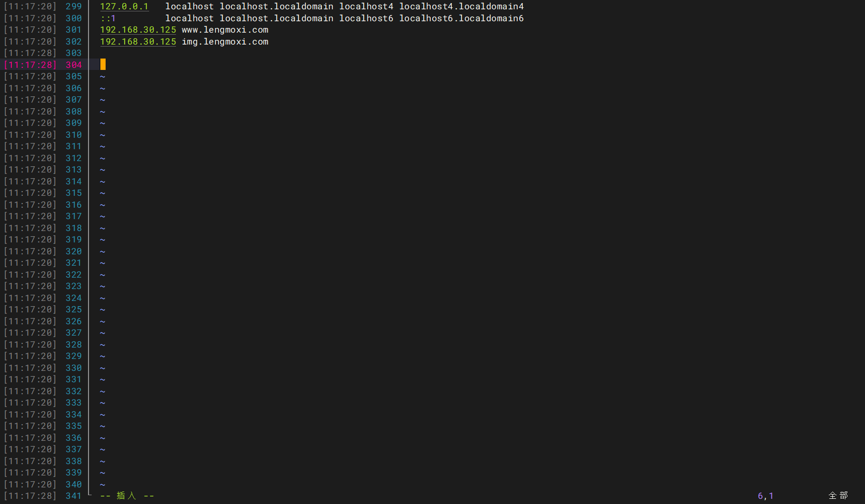
1)修改服务器的hosts文件
vim /etc/hosts
192.168.30.125 www.lengmoxi.com
192.168.30.125 img.lengmoxi.com
2)修改客户机hosts文件
以管理员方式打开记事本,在C:\Windows\System32\drivers\etc中打开hosts
添加
192.168.30.125 www.lengmoxi.com
192.168.30.125 img.lengmoxi.com

(7).测试
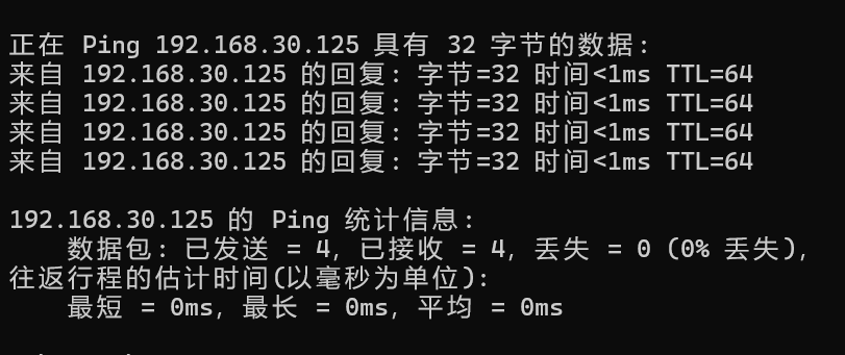
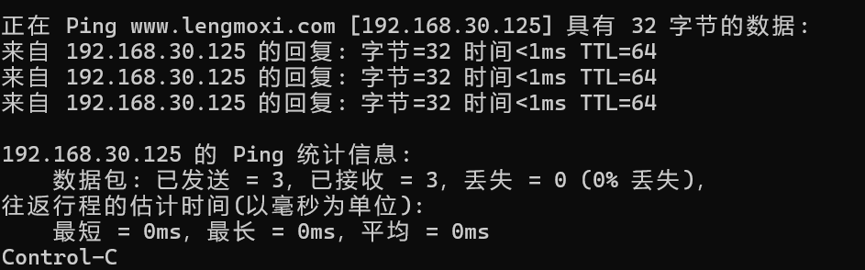
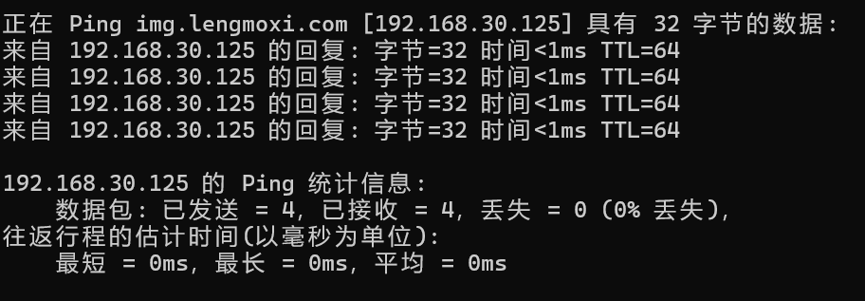
1)测试连通性
ping 192.168.30.125
ping www.lengmoxi.com
ping img.lengmoxi.com
2)测试nginx测试页面
www.lengmoxi.com

img.lengmoxi.com


汇聚全球AI编程工具,助力开发者即刻编程。
更多推荐



 11
11 0
0- 0


 已为社区贡献4条内容

所有评论(0)