
Elasticsearch 三节点集群部署
目录
3 所有节点执行:安装 ES(root → appuser)
4 所有节点执行:elasticsearch.yml 配置(appuser)
5 所有节点执行:jvm.options 配置(4C4G, 其它配置按需修改)
6 主节点(node01)生成 SSL 证书并同步(appuser)
6.1 node02/node03 先创建证书目录(root)
6.3 node02/node03 修正证书权限(root)
9 所有节点执行:appuser 免密 sudo(root)
14.2 node01 主节点脚本(192.168.36.10)
1 基础信息
- 节点信息
- ES-node01:192.168.36.10(主节点)
- ES-node02:192.168.36.20
- ES-node03:192.168.36.30
- 系统:Kylin V10 / CentOS/RHEL
- 软件版本:elasticsearch-7.17.22-linux-x86_64.tar.gz
- 运行用户:appuser(禁止 root)
- 安装目录:/usr/local/elasticsearch
- 数据目录:/usr/local/elasticsearch/data
- 日志目录:/usr/local/elasticsearch/logs
- 证书目录:/usr/local/elasticsearch/config/cert
2 所有节点执行:系统前置优化(root)
2.1 创建 appuser
ES 禁止 root 用户运行,创建单用户 appuser 兼具「运行 ES 进程」和「运维启停服务」权限,简化权限管理
groupadd appuser
useradd -g appuser appuser
passwd appuser
2.2 关闭防火墙、SELinux、swap
避免防火墙拦截 ES 节点间 9300 通信端口 / 9200 访问端口,SELinux 限制文件权限,swap 影响 ES 性能
systemctl stop firewalld
systemctl disable firewalld
setenforce 0
sed -i 's/^SELINUX=.*/SELINUX=disabled/' /etc/selinux/config
swapoff -a
sed -i '/swap/s/^/#/' /etc/fstab
2.3 调整 limits.conf
ES 运行需要大量文件句柄和进程数,默认系统限制不足,需要调大并给 appuser 解锁内存锁定限制
cat >> /etc/security/limits.conf <<EOF
* soft nofile 65535
* hard nofile 65535
* soft nproc 4096
* hard nproc 4096
appuser soft memlock unlimited
appuser hard memlock unlimited
EOF
2.4 修正 nproc 子配置
部分系统存在 20-nproc.conf 子配置,会覆盖 limits.conf 的 nproc 设置,需同步修改
if [ -f /etc/security/limits.d/20-nproc.conf ]; then
cat >> /etc/security/limits.d/20-nproc.conf <<EOF
* soft nproc 4096
appuser soft nproc unlimited
EOF
fi
2.5 内核参数优化
调整虚拟内存、网络连接、文件数等内核参数,适配 ES 高性能运行要求
cat >> /etc/sysctl.conf <<EOF
vm.max_map_count=262144
net.core.somaxconn=65535
fs.file-max=655350
vm.swappiness=0
EOF
sysctl -p
3 所有节点执行:安装 ES(root → appuser)
3.1 下载并解压
cd /usr/local
wget https://artifacts.elastic.co/downloads/elasticsearch/elasticsearch-7.17.22-linux-x86_64.tar.gz
tar -zxvf elasticsearch-7.17.22-linux-x86_64.tar.gz
mv elasticsearch-7.17.22 elasticsearch
mkdir -p /usr/local/elasticsearch/{data,logs}
chown -R appuser:appuser /usr/local/elasticsearch
chmod -R 755 /usr/local/elasticsearch
4 所有节点执行:elasticsearch.yml 配置(appuser)
4.1 ES-node01(192.168.36.10)
配置集群名称、节点信息、网络地址、发现规则等,是 ES 集群组建的核心配置,需按节点修改 node.name 和 network.host
cluster.name: es-cluster
node.name: ES-node01
node.master: true
node.data: true
path.data: /usr/local/elasticsearch/data
path.logs: /usr/local/elasticsearch/logs
network.host: 192.168.36.10
http.port: 9200
transport.tcp.port: 9300
discovery.seed_hosts: ["192.168.36.10","192.168.36.20","192.168.36.30"]
cluster.initial_master_nodes: ["ES-node01","ES-node02","ES-node03"]
http.cors.enabled: true
http.cors.allow-origin: "*"
bootstrap.memory_lock: true
4.2 ES-node02(192.168.36.20)
仅修改:
node.name: ES-node02
network.host: 192.168.36.20
4.3 ES-node03(192.168.36.30)
仅修改:
node.name: ES-node03
network.host: 192.168.36.30
5 所有节点执行:jvm.options 配置(4C4G, 其它配置按需修改)
配置 ES 的 JVM 堆内存,堆内存大小直接影响 ES 性能,4G 物理内存按 50% 配置为 2G,且 Xms=Xmx 避免内存抖动
-Xms2g
-Xmx2g
-XX:+UseG1GC
-XX:+HeapDumpOnOutOfMemoryError
-XX:HeapDumpPath=/usr/local/elasticsearch/logs/heapdump.hprof
6 主节点(node01)生成 SSL 证书并同步(appuser)
生成 SSL 证书实现 ES 节点间通信加密,提升集群安全性,必须切换至 appuser 用户执行,证书生成需非 root 权限
su - appuser
cd /usr/local/elasticsearch
bin/elasticsearch-certutil ca
bin/elasticsearch-certutil cert --ca elastic-stack-ca.p12
mkdir -p config/cert
mv /usr/elasticsearch/config/elastic-*.p12 config/cert/
chown -R appuser:appuser config/cert
chmod 700 config/cert
chmod 600 config/cert/elastic-certificates.p12
exit
6.1 node02/node03 先创建证书目录(root)
mkdir -p /usr/local/elasticsearch/config/cert
chown -R appuser:appuser /usr/local/elasticsearch/config/cert
chmod 700 /usr/local/elasticsearch/config/cert
6.2 主节点同步证书(root)
将主节点生成的 SSL 证书同步到 node-2、node-3,实现所有节点证书统一,支持加密通信
scp /usr/local/elasticsearch/config/cert/* appuser@192.168.36.20:/usr/local/elasticsearch/config/cert/
scp /usr/local/elasticsearch/config/cert/* appuser@192.168.36.30:/usr/local/elasticsearch/config/cert/
6.3 node02/node03 修正证书权限(root)
同步后的证书目录 / 文件权限会变为 root,需重新授权给 appuser,确保 ES 可读取证书
chown -R appuser:appuser /usr/local/elasticsearch/config/cert
chmod 700 /usr/local/elasticsearch/config/cert
chmod 600 /usr/local/elasticsearch/config/cert/elastic-certificates.p12
chmod 700 /usr/local/elasticsearch/config
chmod 770 /usr/local/elasticsearch/data
7 所有节点执行:开启 X-Pack 安全(root)
cat >> /usr/local/elasticsearch/config/elasticsearch.yml <<'EOF'
xpack.security.enabled: true
xpack.security.transport.ssl.enabled: true
xpack.security.transport.ssl.verification_mode: certificate
xpack.security.transport.ssl.keystore.path: /usr/local/elasticsearch/config/cert/elastic-certificates.p12
xpack.security.transport.ssl.truststore.path: /usr/local/elasticsearch/config/cert/elastic-certificates.p12
EOF
chown appuser:appuser /usr/local/elasticsearch/config/elasticsearch.yml
8 所有节点执行:systemd 服务(root)
将 ES 注册为 systemd 系统服务,支持开机自启、失败自动重启、统一的 systemd 命令运维,固定运行用户为 appuser
cat > /etc/systemd/system/elasticsearch.service <<'EOF'
[Unit]
Description=Elasticsearch
Documentation=https://www.elastic.co
Wants=network-online.target
After=network-online.target

[Service]
Type=simple
User=appuser
Group=appuser
WorkingDirectory=/usr/local/elasticsearch
Environment=ES_PATH_CONF=/usr/local/elasticsearch/config
ExecStart=/usr/local/elasticsearch/bin/elasticsearch
Restart=always
LimitNOFILE=65535
LimitNPROC=4096
LimitMEMLOCK=infinity

[Install]
WantedBy=multi-user.target
EOF

systemctl daemon-reload
systemctl enable elasticsearch
9 所有节点执行:appuser 免密 sudo(root)
echo 'appuser ALL=(ALL) NOPASSWD: /usr/bin/systemctl * elasticsearch*' >> /etc/sudoers
visudo -c
10 集群启动(appuser)
10.1 先启动 node01
su - appuser
sudo systemctl start elasticsearch
sudo systemctl status elasticsearch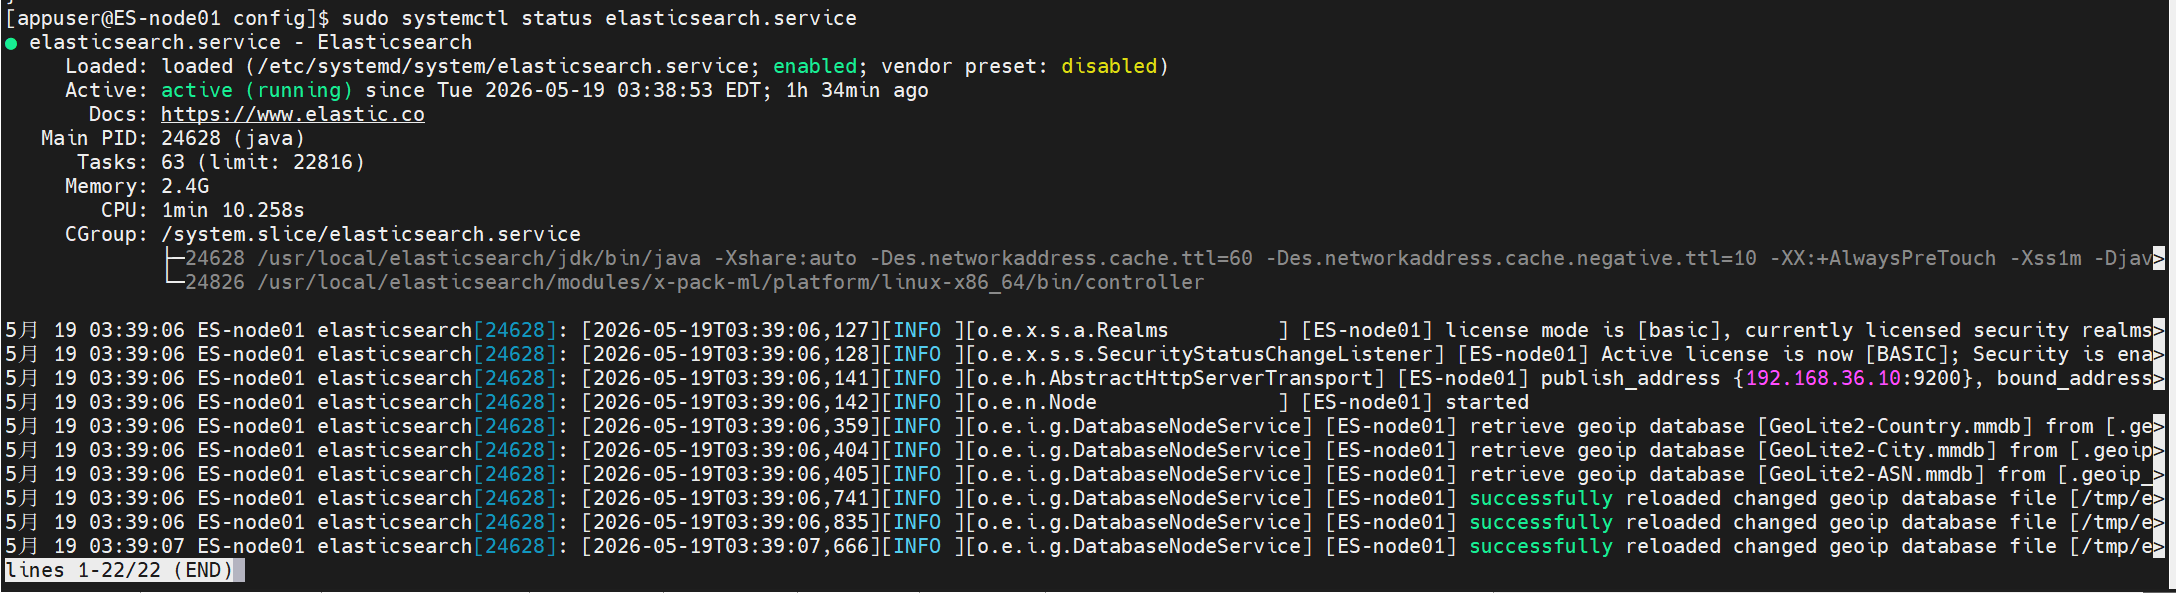
10.2 node01 设置密码(仅一次)
/usr/local/elasticsearch/bin/elasticsearch-setup-passwords interactive记住 elastic 密码(后续访问会用)
10.3 启动 node02、node03
su - appuser
sudo systemctl start elasticsearch
sudo systemctl status elasticsearch

11 集群验证(node01 appuser)
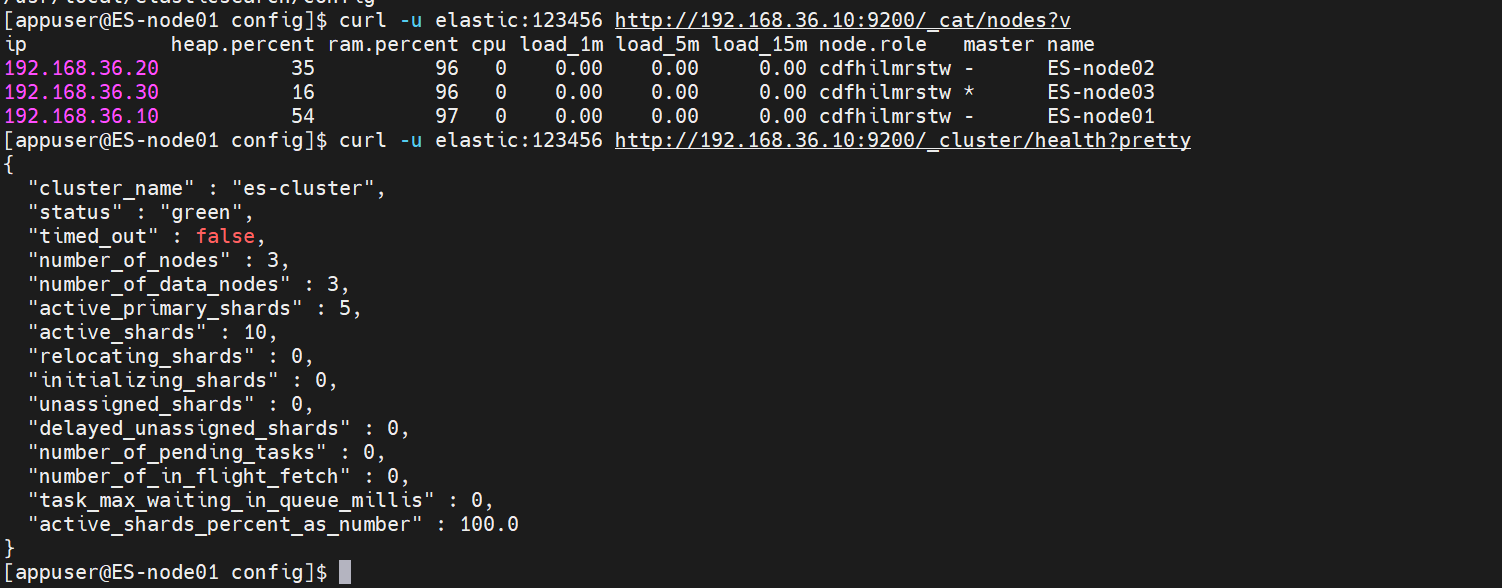
curl -u elastic:你的密码 http://192.168.36.10:9200/_cat/nodes?v
curl -u elastic:你的密码 http://192.168.36.10:9200/_cluster/health?pretty- status: green
- number_of_nodes: 3
- 3 个节点均在线
12 常用运维命令
# 启动
sudo systemctl start elasticsearch
# 停止
sudo systemctl stop elasticsearch
# 重启
sudo systemctl restart elasticsearch
# 状态
sudo systemctl status elasticsearch
# 集群健康
curl -u elastic:密码 http://IP:9200/_cluster/health?pretty
# 节点列表
curl -u elastic:密码 http://IP:9200/_cat/nodes?v
13 常见报错及快速修复
- vm.max_map_count 不足:sysctl -p
- memory lock 失败:检查 limits.conf + 重新登录 appuser
- 权限不足:chown -R appuser:appuser /usr/local/elasticsearch
- 节点无法加入:关闭防火墙、确认 discovery 列表 IP 正确
- 证书报错:证书权限 600、目录 700、属主 appuser
14 脚本部署
14.1 系统优化,所有节点执行 1 次
脚本:00_pre_all_node.sh
#!/bin/bash
set -e

# 关闭防火墙
systemctl stop firewalld
systemctl disable firewalld

# 关闭 SELinux
setenforce 0
sed -i 's/^SELINUX=.*/SELINUX=disabled/' /etc/selinux/config

# 关闭 swap
swapoff -a
sed -i '/swap/s/^/#/' /etc/fstab

# 创建 appuser
groupadd appuser || true
useradd -g appuser appuser || true

# limits.conf
cat >> /etc/security/limits.conf <<EOF
* soft nofile 65535
* hard nofile 65535
* soft nproc 4096
* hard nproc 4096
appuser soft memlock unlimited
appuser hard memlock unlimited
EOF

# 20-nproc.conf
if [ -f /etc/security/limits.d/20-nproc.conf ]; then
cat >> /etc/security/limits.d/20-nproc.conf <<EOF
* soft nproc 4096
appuser soft nproc unlimited
EOF
fi

# sysctl
cat >> /etc/sysctl.conf <<EOF
vm.max_map_count=262144
net.core.somaxconn=65535
fs.file-max=655350
vm.swappiness=0
EOF
sysctl -p

# sudo 免密
echo 'appuser ALL=(ALL) NOPASSWD: /usr/bin/systemctl * elasticsearch*' >> /etc/sudoers
visudo -c

echo "=== 所有节点前置优化完成 ==="
14.2 node01 主节点脚本(192.168.36.10)
脚本:01_deploy_node01.sh
#!/bin/bash
set -e

# 下载安装
cd /usr/local
wget https://artifacts.elastic.co/downloads/elasticsearch/elasticsearch-7.17.22-linux-x86_64.tar.gz
tar -zxvf elasticsearch-7.17.22-linux-x86_64.tar.gz
mv elasticsearch-7.17.22 elasticsearch
mkdir -p /usr/local/elasticsearch/{data,logs}
chown -R appuser:appuser /usr/local/elasticsearch
chmod -R 755 /usr/local/elasticsearch

# elasticsearch.yml
cat > /usr/local/elasticsearch/config/elasticsearch.yml <<EOF
cluster.name: es-cluster
node.name: ES-node01
node.master: true
node.data: true
path.data: /usr/local/elasticsearch/data
path.logs: /usr/local/elasticsearch/logs
network.host: 192.168.36.10
http.port: 9200
transport.tcp.port: 9300
discovery.seed_hosts: ["192.168.36.10","192.168.36.20","192.168.36.30"]
cluster.initial_master_nodes: ["ES-node01","ES-node02","ES-node03"]
http.cors.enabled: true
http.cors.allow-origin: "*"
bootstrap.memory_lock: true
EOF

# jvm.options 4C4G 最优
cat > /usr/local/elasticsearch/config/jvm.options <<EOF
-Xms2g
-Xmx2g
-XX:+UseG1GC
-XX:+HeapDumpOnOutOfMemoryError
-XX:HeapDumpPath=/usr/local/elasticsearch/logs/heapdump.hprof
EOF

# 生成证书(appuser)
su - appuser <<EOF
cd /usr/local/elasticsearch
bin/elasticsearch-certutil ca --out config/cert/elastic-stack-ca.p12 --pass ""
bin/elasticsearch-certutil cert --ca config/cert/elastic-stack-ca.p12 --out config/cert/elastic-certificates.p12 --pass ""
mkdir -p config/cert
chmod 700 config/cert
chmod 600 config/cert/elastic-certificates.p12
EOF

# X-Pack
cat >> /usr/local/elasticsearch/config/elasticsearch.yml <<'EOF'
xpack.security.enabled: true
xpack.security.transport.ssl.enabled: true
xpack.security.transport.ssl.verification_mode: certificate
xpack.security.transport.ssl.keystore.path: /usr/local/elasticsearch/config/cert/elastic-certificates.p12
xpack.security.transport.ssl.truststore.path: /usr/local/elasticsearch/config/cert/elastic-certificates.p12
EOF
chown appuser:appuser /usr/local/elasticsearch/config/elasticsearch.yml

# systemd
cat > /etc/systemd/system/elasticsearch.service <<'EOF'
[Unit]
Description=Elasticsearch
Documentation=https://www.elastic.co
Wants=network-online.target
After=network-online.target

[Service]
Type=simple
User=appuser
Group=appuser
WorkingDirectory=/usr/local/elasticsearch
Environment=ES_PATH_CONF=/usr/local/elasticsearch/config
ExecStart=/usr/local/elasticsearch/bin/elasticsearch
Restart=always
LimitNOFILE=65535
LimitNPROC=4096
LimitMEMLOCK=infinity

[Install]
WantedBy=multi-user.target
EOF

systemctl daemon-reload
systemctl enable elasticsearch

echo "=== node01 部署完成 ==="
echo "请先启动:su - appuser -c 'sudo systemctl start elasticsearch'"
echo "然后设置密码:su - appuser -c '/usr/local/elasticsearch/bin/elasticsearch-setup-passwords interactive'"
14.3 node02 脚本(192.168.36.20)
脚本:02_deploy_node02.sh
#!/bin/bash
set -e

cd /usr/local
wget https://artifacts.elastic.co/downloads/elasticsearch/elasticsearch-7.17.22-linux-x86_64.tar.gz
tar -zxvf elasticsearch-7.17.22-linux-x86_64.tar.gz
mv elasticsearch-7.17.22 elasticsearch
mkdir -p /usr/local/elasticsearch/{data,logs}
chown -R appuser:appuser /usr/local/elasticsearch
chmod -R 755 /usr/local/elasticsearch

# elasticsearch.yml
cat > /usr/local/elasticsearch/config/elasticsearch.yml <<EOF
cluster.name: es-cluster
node.name: ES-node02
node.master: true
node.data: true
path.data: /usr/local/elasticsearch/data
path.logs: /usr/local/elasticsearch/logs
network.host: 192.168.36.20
http.port: 9200
transport.tcp.port: 9300
discovery.seed_hosts: ["192.168.36.10","192.168.36.20","192.168.36.30"]
cluster.initial_master_nodes: ["ES-node01","ES-node02","ES-node03"]
http.cors.enabled: true
http.cors.allow-origin: "*"
bootstrap.memory_lock: true
EOF

# jvm
cat > /usr/local/elasticsearch/config/jvm.options <<EOF
-Xms2g
-Xmx2g
-XX:+UseG1GC
-XX:+HeapDumpOnOutOfMemoryError
-XX:HeapDumpPath=/usr/local/elasticsearch/logs/heapdump.hprof
EOF

# 证书目录
mkdir -p /usr/local/elasticsearch/config/cert
chown -R appuser:appuser /usr/local/elasticsearch/config/cert
chmod 700 /usr/local/elasticsearch/config/cert

# X-Pack
cat >> /usr/local/elasticsearch/config/elasticsearch.yml <<'EOF'
xpack.security.enabled: true
xpack.security.transport.ssl.enabled: true
xpack.security.transport.ssl.verification_mode: certificate
xpack.security.transport.ssl.keystore.path: /usr/local/elasticsearch/config/cert/elastic-certificates.p12
xpack.security.transport.ssl.truststore.path: /usr/local/elasticsearch/config/cert/elastic-certificates.p12
EOF
chown appuser:appuser /usr/local/elasticsearch/config/elasticsearch.yml

# systemd
cat > /etc/systemd/system/elasticsearch.service <<'EOF'
[Unit]
Description=Elasticsearch
Documentation=https://www.elastic.co
Wants=network-online.target
After=network-online.target

[Service]
Type=simple
User=appuser
Group=appuser
WorkingDirectory=/usr/local/elasticsearch
Environment=ES_PATH_CONF=/usr/local/elasticsearch/config
ExecStart=/usr/local/elasticsearch/bin/elasticsearch
Restart=always
LimitNOFILE=65535
LimitNPROC=4096
LimitMEMLOCK=infinity

[Install]
WantedBy=multi-user.target
EOF

systemctl daemon-reload
systemctl enable elasticsearch

echo "=== node02 部署完成 ==="
echo "等待 node01 启动后,执行:su - appuser -c 'sudo systemctl start elasticsearch'"
14.4 node03 脚本(192.168.36.30)
脚本:03_deploy_node03.sh
#!/bin/bash
set -e

cd /usr/local
wget https://artifacts.elastic.co/downloads/elasticsearch/elasticsearch-7.17.22-linux-x86_64.tar.gz
tar -zxvf elasticsearch-7.17.22-linux-x86_64.tar.gz
mv elasticsearch-7.17.22 elasticsearch
mkdir -p /usr/local/elasticsearch/{data,logs}
chown -R appuser:appuser /usr/local/elasticsearch
chmod -R 755 /usr/local/elasticsearch

# elasticsearch.yml
cat > /usr/local/elasticsearch/config/elasticsearch.yml <<EOF
cluster.name: es-cluster
node.name: ES-node03
node.master: true
node.data: true
path.data: /usr/local/elasticsearch/data
path.logs: /usr/local/elasticsearch/logs
network.host: 192.168.36.30
http.port: 9200
transport.tcp.port: 9300
discovery.seed_hosts: ["192.168.36.10","192.168.36.20","192.168.36.30"]
cluster.initial_master_nodes: ["ES-node01","ES-node02","ES-node03"]
http.cors.enabled: true
http.cors.allow-origin: "*"
bootstrap.memory_lock: true
EOF

# jvm
cat > /usr/local/elasticsearch/config/jvm.options <<EOF
-Xms2g
-Xmx2g
-XX:+UseG1GC
-XX:+HeapDumpOnOutOfMemoryError
-XX:HeapDumpPath=/usr/local/elasticsearch/logs/heapdump.hprof
EOF

# 证书目录
mkdir -p /usr/local/elasticsearch/config/cert
chown -R appuser:appuser /usr/local/elasticsearch/config/cert
chmod 700 /usr/local/elasticsearch/config/cert

# X-Pack
cat >> /usr/local/elasticsearch/config/elasticsearch.yml <<'EOF'
xpack.security.enabled: true
xpack.security.transport.ssl.enabled: true
xpack.security.transport.ssl.verification_mode: certificate
xpack.security.transport.ssl.keystore.path: /usr/local/elasticsearch/config/cert/elastic-certificates.p12
xpack.security.transport.ssl.truststore.path: /usr/local/elasticsearch/config/cert/elastic-certificates.p12
EOF
chown appuser:appuser /usr/local/elasticsearch/config/elasticsearch.yml

# systemd
cat > /etc/systemd/system/elasticsearch.service <<'EOF'
[Unit]
Description=Elasticsearch
Documentation=https://www.elastic.co
Wants=network-online.target
After=network-online.target

[Service]
Type=simple
User=appuser
Group=appuser
WorkingDirectory=/usr/local/elasticsearch
Environment=ES_PATH_CONF=/usr/local/elasticsearch/config
ExecStart=/usr/local/elasticsearch/bin/elasticsearch
Restart=always
LimitNOFILE=65535
LimitNPROC=4096
LimitMEMLOCK=infinity

[Install]
WantedBy=multi-user.target
EOF

systemctl daemon-reload
systemctl enable elasticsearch

echo "=== node03 部署完成 ==="
echo "等待 node01 启动后,执行:su - appuser -c 'sudo systemctl start elasticsearch'"
14.5 同步证书
在 node01 执行
scp /usr/local/elasticsearch/config/cert/* appuser@192.168.36.20:/usr/local/elasticsearch/config/cert/
scp /usr/local/elasticsearch/config/cert/* appuser@192.168.36.30:/usr/local/elasticsearch/config/cert/
14.6 启动
1.node01启动
su - appuser -c 'sudo systemctl start elasticsearch'2.node01设置密码(执行一次)
su - appuser -c '/usr/local/elasticsearch/bin/elasticsearch-setup-passwords interactive'3.node02、node03 启动
su - appuser -c 'sudo systemctl start elasticsearch'14.7 集群验证
curl -u elastic:你设置的密码 http://192.168.36.10:9200/_cluster/health?pretty出现 green、3 个节点 即成功。

汇聚全球AI编程工具,助力开发者即刻编程。
更多推荐



 9
9 0
0- 0


 已为社区贡献3条内容

所有评论(0)