
负载均衡LVS keepalived+lvs+mysql
·
lvs
VS (Virtual Server):负载均衡器(入口),
VS一般配两个IP地址:VIP,向外提供服务的IP地址;DIP,与后端RS通信的IP地址。
RS (Real Server):真实后端服务器(Nginx/APACHE/TOMCAT)
VIP:虚拟 IP(用户访问的 IP),向外提供服务的IP地址
DIP:与后端RS通信的IP地址。
CIP:客户端 IP
RIP:后端服务器 IP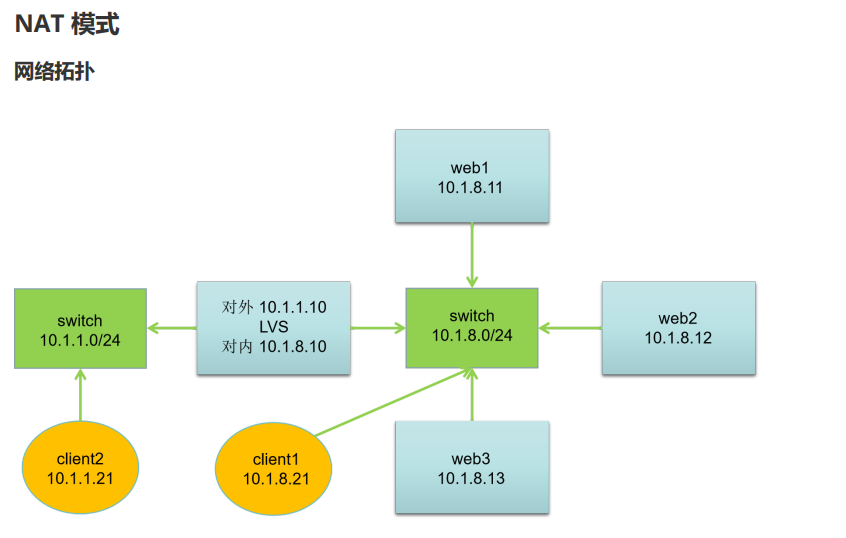
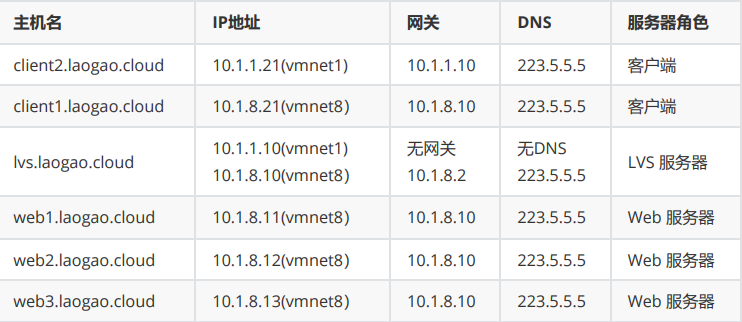
网络说明:
- 所有主机:第一块网卡名为 ens33,第二块网卡名为xx
- 默认第一块网卡模式为nat,第二块网卡模式为hostonly
- 网关设置:10.1.1.0/24 网段网关为10.1.1.10,10.1.8.0/24 网段网关为10.1.8.10
注意:本次实验的网关指向 LVS 服务器
配置主机
clent2:
hostnamectl set-hostname client2.laogao.cloud
nmcli connection modify ens33 ipv4.method manual ipv4.addresses 10.1.1.21/24
ipv4.gateway 10.1.1.10 ipv4.dns 223.5.5.5 autoconnect yes
nmcli connection up ens33
clent1:
hostnamectl set-hostname client1.laogao.cloud
nmcli connection modify ens33 ipv4.method manual ipv4.addresses 10.1.8.21/24
ipv4.gateway 10.1.8.10 ipv4.dns 223.5.5.5 autoconnect yes
nmcli connection up ens33
lvs:
hostnamectl set-hostname lvs.laogao.cloud
nmcli connection modify ens33 ipv4.method manual ipv4.addresses 10.1.8.10/24
ipv4.gateway 10.1.8.2 ipv4.dns 223.5.5.5 autoconnect yes
nmcli connection up ens33
nmcli connection add type ethernet con-name ens36 ifname ens36 ipv4.method manual
ipv4.addresses 10.1.1.10/24 autoconnect yes
nmcli connection up ens36
web1:
hostnamectl set-hostname web1.laogao.cloud
nmcli connection modify ens33 ipv4.method manual ipv4.addresses 10.1.8.11/24
ipv4.gateway 10.1.8.10 ipv4.dns 223.5.5.5 autoconnect yes
nmcli connection up ens33
web2:
hostnamectl set-hostname web2.laogao.cloud
nmcli connection modify ens33 ipv4.method manual ipv4.addresses 10.1.8.12/24
ipv4.gateway 10.1.8.10 ipv4.dns 223.5.5.5 autoconnect yes
nmcli connection up ens33
web3:
hostnamectl set-hostname web3.laogao.cloud
nmcli connection modify ens33 ipv4.method manual ipv4.addresses 10.1.8.13/24
ipv4.gateway 10.1.8.10 ipv4.dns 223.5.5.5 autoconnect yes
nmcli connection up ens33
配置路由
# 开启路由
echo "net.ipv4.ip_forward=1" >> /etc/sysctl.conf
sysctl -p
# 设置防火墙
systemctl enable firewalld.service --now
firewall-cmd --set-default-zone=trusted
firewall-cmd --add-masquerade --permanent
firewall-cmd --add-masquerade
配置 web
注意:所有web都要执行以下命令。
[root@web1 ~ 10:56:10]# yum install -y nginx
[root@web1 ~ 11:19:49]# echo Welcome to $(hostname) > /usr/share/nginx/html/index.html
[root@web1 ~ 11:20:57]# systemctl enable nginx.service --now
Created symlink from /etc/systemd/system/multi-user.target.wants/nginx.service to /usr/lib/systemd/system/nginx.service.
##测试
[root@client1 ~ 11:21:25]# curl 10.1.8.11
Welcome to web1.zhu.cloud
[root@client1 ~ 11:22:55]# curl 10.1.8.12
Welcome to web2.zhu.cloud
[root@client1 ~ 11:22:58]# curl 10.1.8.13
Welcome to web3.zhu.cloud
配置 LVS
[root@lvs ~ 10:56:01]# yum install -y ipvsadm
# ipvsadm 服务启动的时候,从该文件中读取ipvs规则
touch /etc/sysconfig/ipvsadm
systemctl enable ipvsadm --now
# 创建轮询负载
## 增加一个tcp模式虚拟IP,调度模式:轮询
ipvsadm -A -t 10.1.1.10:80 -s rr
# 未虚拟IP增加后端真实主机,模式masquerade(NAT)
ipvsadm -a -t 10.1.1.10:80 -r 10.1.8.11 -m
ipvsadm -a -t 10.1.1.10:80 -r 10.1.8.12 -m
ipvsadm -a -t 10.1.1.10:80 -r 10.1.8.13 -m

[root@lvs ~ 11:36:51]# ipvsadm-save -n > /etc/sysconfig/ipvsadm
[root@lvs ~ 11:38:56]# ipvsadm -Ln
IP Virtual Server version 1.2.1 (size=4096)
Prot LocalAddress:Port Scheduler Flags
  -> RemoteAddress:Port           Forward Weight ActiveConn InActConn
TCP  10.1.1.10:80 rr
  -> 10.1.8.11:80                 Masq    1      0          0
  -> 10.1.8.12:80                 Masq    1      0          0
  -> 10.1.8.13:80                 Masq    1      0          0


[root@client2 ~ 11:23:07]# for i in {1..90}
> do
> curl -s 10.1.1.10
> done| sort | uniq -c
     30 Welcome to web1.zhu.cloud
     30 Welcome to web2.zhu.cloud
     30 Welcome to web3.zhu.cloud
负载均衡改为权重
# 修改 调度模式为:带权重的轮询
[root@lvs ~ 11:39:05]# ipvsadm -E -t 10.1.1.10:80 -s wrr
# 设置权重为2
[root@lvs ~ 11:49:34]# ipvsadm -e -t 10.1.1.10:80 -r 10.1.8.12 -m -w 2
# 设置权重为3
[root@lvs ~ 11:50:06]# ipvsadm -e -t 10.1.1.10:80 -r 10.1.8.13 -m -w 3
[root@lvs ~ 11:50:13]# ipvsadm -Ln
IP Virtual Server version 1.2.1 (size=4096)
Prot LocalAddress:Port Scheduler Flags
  -> RemoteAddress:Port           Forward Weight ActiveConn InActConn
TCP  10.1.1.10:80 wrr
  -> 10.1.8.11:80                 Masq    1      0          0
  -> 10.1.8.12:80                 Masq    2      0          0
  -> 10.1.8.13:80                 Masq    3      0          0


测试
[root@client2 ~ 11:39:53]# for i in {1..60}; do curl -s 10.1.1.10; done| sort | uniq -c
     10 Welcome to web1.zhu.cloud
     20 Welcome to web2.zhu.cloud
     30 Welcome to web3.zhu.cloud
Keepalived + LVS(DR) + MariaDB 主主
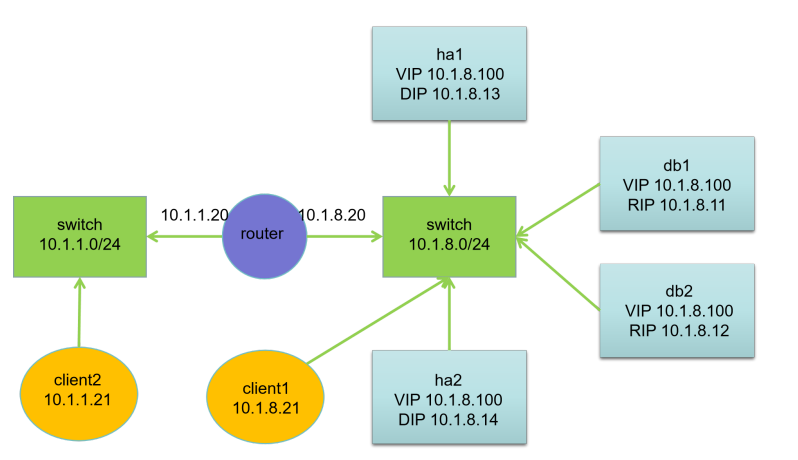
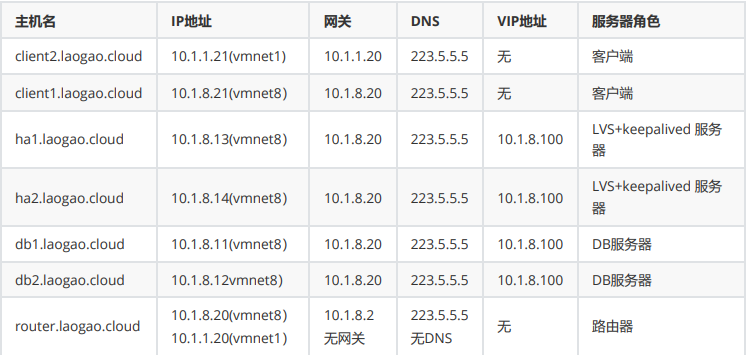
配置 router
# 开启路由
echo "net.ipv4.ip_forward=1" >> /etc/sysctl.conf
sysctl -p
# 设置防火墙
systemctl enable firewalld.service --now
firewall-cmd --set-default-zone=trusted
firewall-cmd --add-masquerade --permanent
firewall-cmd --add-masquerade
MariaDB 安装和初始化
[root@db2 ~ 15:34:35]# yum install -y mariadb-server
[root@db2 ~ 15:43:44]# vim /etc/my.cnf.d/server.cnf
[mysqld]
server-id=2
log_bin=mysql-bin
relay_log=mysql-relay-bin
[root@db2 ~ 15:47:33]# systemctl enable mariadb.service --now
Created symlink from /etc/systemd/system/multi-user.target.wants/mariadb.service to /usr/lib/systemd/system/mariadb.service.
##初始化
[root@db2 ~ 15:47:48]# mysql_secure_installation

##db1与db2操作一样
##注意修改
##db1
server-id=1
log_bin=mysql-bin
relay_log=mysql-relay-bin
MariaDB 主从:db2->db1
主库:db1,从库:db2
##配置主数据库
[root@db1 ~ 15:42:51]# mysql -uroot -p123
Welcome to the MariaDB monitor.  Commands end with ; or \g.
Your MariaDB connection id is 10
Server version: 5.5.68-MariaDB MariaDB Server

Copyright (c) 2000, 2018, Oracle, MariaDB Corporation Ab and others.

Type 'help;' or '\h' for help. Type '\c' to clear the current input statement.

MariaDB [(none)]> grant replication slave, replication client on *.* to 'repl'@'10.1.8.12' identified by '123';
Query OK, 0 rows affected (0.00 sec)
##刷新
MariaDB [(none)]> flush privileges
    -> ;
Query OK, 0 rows affected (0.00 sec)

MariaDB [(none)]> show master status\G;
*************************** 1. row ***************************
            File: mysql-bin.000003
        Position: 1722
    Binlog_Do_DB:
Binlog_Ignore_DB:
1 row in set (0.00 sec)

ERROR: No query specified

##从库配置
[root@db2 ~ 15:56:55]# mysql -uroot -p123
Welcome to the MariaDB monitor.  Commands end with ; or \g.
Your MariaDB connection id is 10
Server version: 5.5.68-MariaDB MariaDB Server

Copyright (c) 2000, 2018, Oracle, MariaDB Corporation Ab and others.

Type 'help;' or '\h' for help. Type '\c' to clear the current input statement.

MariaDB [(none)]> change master to master_host='10.1.8.11',
    -> master_user='repl',
    -> master_password='123',
    -> master_port=3306,
    -> master_log_file='mysql-bin.000003',
    -> mqster_log_pos=1722,
    -> master_connect_retry=30;
ERROR 1064 (42000): You have an error in your SQL syntax; check the manual that corresponds to your MariaDB server version for the right syntax to use near 'mqster_log_pos=1722,
master_connect_retry=30' at line 6
MariaDB [(none)]> change master to master_host='10.1.8.11', master_user='repl', master_password='123', master_port=3306, master_log_file='mysql-bin.000003', master_log_pos=1722, master_connect_retry=30;
Query OK, 0 rows affected (0.00 sec)

MariaDB [(none)]> start slave
    -> ;
Query OK, 0 rows affected (0.00 sec)

MariaDB [(none)]> show slave status\G;
*************************** 1. row ***************************
               Slave_IO_State: Waiting for master to send event
                  Master_Host: 10.1.8.11
                  Master_User: repl
                  Master_Port: 3306
                Connect_Retry: 30
              Master_Log_File: mysql-bin.000003
          Read_Master_Log_Pos: 1722
               Relay_Log_File: mysql-relay-bin.000002
                Relay_Log_Pos: 529
        Relay_Master_Log_File: mysql-bin.000003
             Slave_IO_Running: Yes
            Slave_SQL_Running: Yes
.....  ##出现俩个yes

ERROR: No query specified

##主库创建表
MariaDB [(none)]> create database test;
Query OK, 1 row affected (0.00 sec)

MariaDB [(none)]> use test;
Database changed
MariaDB [test]> create table linux(username varchar(15) not null,password varchar(15) not null);
Query OK, 0 rows affected (0.01 sec)

MariaDB [test]> insert into linux values ('zhu1','123')
    -> ;
Query OK, 1 row affected (0.00 sec)

MariaDB [test]> insert into linux values ('zhu2','123');
Query OK, 1 row affected (0.00 sec)

MariaDB [test]> insert into linux values ('zhu3','123');
Query OK, 1 row affected (0.00 sec)

MariaDB [test]> commit
    -> ;
Query OK, 0 rows affected (0.00 sec)
MariaDB [test]> select * from linux;
+----------+----------+
| username | password |
+----------+----------+
| zhu1     | 123      |
| zhu2     | 123      |
| zhu3     | 123      |
+----------+----------+
3 rows in set (0.00 sec)

MariaDB [test]> exit

##从库查看是否同步到
MariaDB [(none)]> select * from test.linux
    -> ;
+----------+----------+
| username | password |
+----------+----------+
| zhu1     | 123      |
| zhu2     | 123      |
| zhu3     | 123      |
+----------+----------+
3 rows in set (0.00 sec)
MariaDB 主从:db1->db2
主库:db2,从库:db1
##配置主数据库
MariaDB [(none)]> grant replication slave, replication client on *.* to
    -> 'repl'@'10.1.8.11' identified by '123'
    -> ;
Query OK, 0 rows affected (0.00 sec)

MariaDB [(none)]> flush privileges;
Query OK, 0 rows affected (0.00 sec)

MariaDB [(none)]> show master status\G;
*************************** 1. row ***************************
            File: mysql-bin.000003
        Position: 1722
    Binlog_Do_DB:
Binlog_Ignore_DB:
1 row in set (0.00 sec)

ERROR: No query specified

MariaDB [(none)]> create database zhu;
Query OK, 1 row affected (0.00 sec)


##配置从数据库
[root@db1 ~ 16:28:51]# mysql -uroot -p123
Welcome to the MariaDB monitor.  Commands end with ; or \g.
Your MariaDB connection id is 13
Server version: 5.5.68-MariaDB MariaDB Server

Copyright (c) 2000, 2018, Oracle, MariaDB Corporation Ab and others.

Type 'help;' or '\h' for help. Type '\c' to clear the current input statement.

MariaDB [(none)]> change master to master_host='10.1.8.12',
    -> master_user='repl',
    -> master_password='123',
    -> master_port=3306,
    -> master_log_file='mysql-bin.000003',
    -> master_log_pos=1722,
    -> master_connect_retry=30;
Query OK, 0 rows affected (0.00 sec)

MariaDB [(none)]> start slave;
Query OK, 0 rows affected (0.00 sec)

MariaDB [(none)]> show slave status\G;
*************************** 1. row ***************************
               Slave_IO_State: Waiting for master to send event
                  Master_Host: 10.1.8.12
                  Master_User: repl
                  Master_Port: 3306
                Connect_Retry: 30
              Master_Log_File: mysql-bin.000003
          Read_Master_Log_Pos: 1722
               Relay_Log_File: mysql-relay-bin.000002
                Relay_Log_Pos: 529
        Relay_Master_Log_File: mysql-bin.000003
             Slave_IO_Running: Yes
            Slave_SQL_Running: Yes
....     ##出现俩个yes

ERROR: No query specified

##主数据库创建库
MariaDB [(none)]> create database zhu;
Query OK, 1 row affected (0.00 sec)

##从数据库查看是否同步到
MariaDB [(none)]> show databases
    -> ;
+--------------------+
| Database           |
+--------------------+
| information_schema |
| mysql              |
| performance_schema |
| test               |
| zhu                |
+--------------------+
5 rows in set (0.00 sec)
配置 LVS-RS
所有后端主机都要做相同配置。
##db1和db2一起配置
# 增加虚拟网卡
[root@db1 ~ 17:08:15]# nmcli connection add type dummy ifname dummy con-name dummy ipv4.method manual ipv4.addresses 10.1.8.100/32
Connection 'dummy' (9c812a4e-5853-4d7c-9ad2-9329f992646a) successfully added.
[root@db1 ~ 17:08:46]# nmcli connection up dummy
Connection successfully activated (D-Bus active path: /org/freedesktop/NetworkManager/ActiveConnection/4)
# 配置arp参数,关闭arp对dummy网卡的解析
[root@db1 ~ 17:09:01]# cat >> /etc/sysctl.conf << EOF
> net.ipv4.conf.all.arp_ignore = 1
> net.ipv4.conf.all.arp_announce = 2
> net.ipv4.conf.dummy.arp_ignore = 1
> net.ipv4.conf.dummy.arp_announce = 2
> EOF
[root@db1 ~ 17:09:16]# sysctl -p
net.ipv4.conf.all.arp_ignore = 1
net.ipv4.conf.all.arp_announce = 2
net.ipv4.conf.dummy.arp_ignore = 1
net.ipv4.conf.dummy.arp_announce = 2
配置 HA 和 LVS-DS
配置 ha1
[root@ha1 ~ 15:36:16]# yum install -y keepalived ipvsadm
[root@ha1 ~ 17:12:46]# cp /etc/keepalived/keepalived.conf{,.bak}
[root@ha1 ~ 17:13:05]# vim /etc/keepalived/keepalived.conf

! Configuration File for keepalived

global_defs {
   router_id ha1
}

vrrp_instance db {
    state MASTER
    interface ens33
    virtual_router_id 51
    priority 110
    advert_int 1
    authentication {
        auth_type PASS
        auth_pass 1111
    }
    virtual_ipaddress {
        10.1.8.100/24
    }
}

virtual_server 10.1.8.100 3306 {
    delay_loop 6
    lb_algo rr
    lb_kind DR
    persistence_timeout 50
    protocol TCP

    real_server 10.1.8.11 3306 {
        weight 1
        TCP_CHECK {
            connect_timeout 3
            retry 3
            delay_before_retry 3
        }
    }
    real_server 10.1.8.12 3306 {
        weight 1
        TCP_CHECK {
            connect_timeout 3
            retry 3
            delay_before_retry 3
        }
    }
}
配置 ha2
 [root@ha2 ~ 17:23:56]# cp /etc/keepalived/keepalived.conf{,.bak}
[root@ha2 ~ 17:24:12]# vim /etc/keepalived/keepalived.conf
/bin/bash: Configuration: command not found
bal_defs {
   router_id ha2
}

vrrp_instance db {
    state BACKUP
    interface ens33
    virtual_router_id 51
    priority 100
    advert_int 1
    authentication {
        auth_type PASS
        auth_pass 1111
    }
    virtual_ipaddress {
        10.1.8.100/24
    }
}

virtual_server 10.1.8.100 3306 {
    delay_loop 6
    lb_algo rr
    lb_kind DR
    persistence_timeout 50
    protocol TCP

    real_server 10.1.8.11 3306 {
        weight 1
        TCP_CHECK {
            connect_timeout 3
            retry 3
            delay_before_retry 3
        }
    }
    real_server 10.1.8.12 3306 {
        weight 1
        TCP_CHECK {
            connect_timeout 3
            retry 3
            delay_before_retry 3
        }
    }
}
[root@ha2 ~ 17:29:16]# systemctl enable keepalived.service --now
测试
##创建测试账户
[root@db1 ~ 17:09:21]# mysql -uroot -p123
Welcome to the MariaDB monitor.  Commands end with ; or \g.
Your MariaDB connection id is 184
Server version: 5.5.68-MariaDB MariaDB Server

Copyright (c) 2000, 2018, Oracle, MariaDB Corporation Ab and others.

Type 'help;' or '\h' for help. Type '\c' to clear the current input statement.

MariaDB [(none)]> grant ALL PRIVILEGES on *.* to 'laogao'@'%' identified by '123';
Query OK, 0 rows affected (0.00 sec)

MariaDB [(none)]> FLUSH PRIVILEGES;
Query OK, 0 rows affected (0.00 sec)

MariaDB [(none)]> quit
Bye

# client测试
[root@db2 ~ 18:00:23]# systemctl stop mariadb
[root@client1 ~ 18:07:36]# mysql -u laogao -p123 -h 10.1.8.100
Welcome to the MariaDB monitor.  Commands end with ; or \g.
Your MariaDB connection id is 63
Server version: 5.5.68-MariaDB MariaDB Server

Copyright (c) 2000, 2018, Oracle, MariaDB Corporation Ab and others.

Type 'help;' or '\h' for help. Type '\c' to clear the current input statement.

MariaDB [(none)]>

汇聚全球AI编程工具,助力开发者即刻编程。
更多推荐


 5
5 0
0- 0


 已为社区贡献4条内容

所有评论(0)