
redis-数据缓存
redis-数据缓存
redis常见应用场景
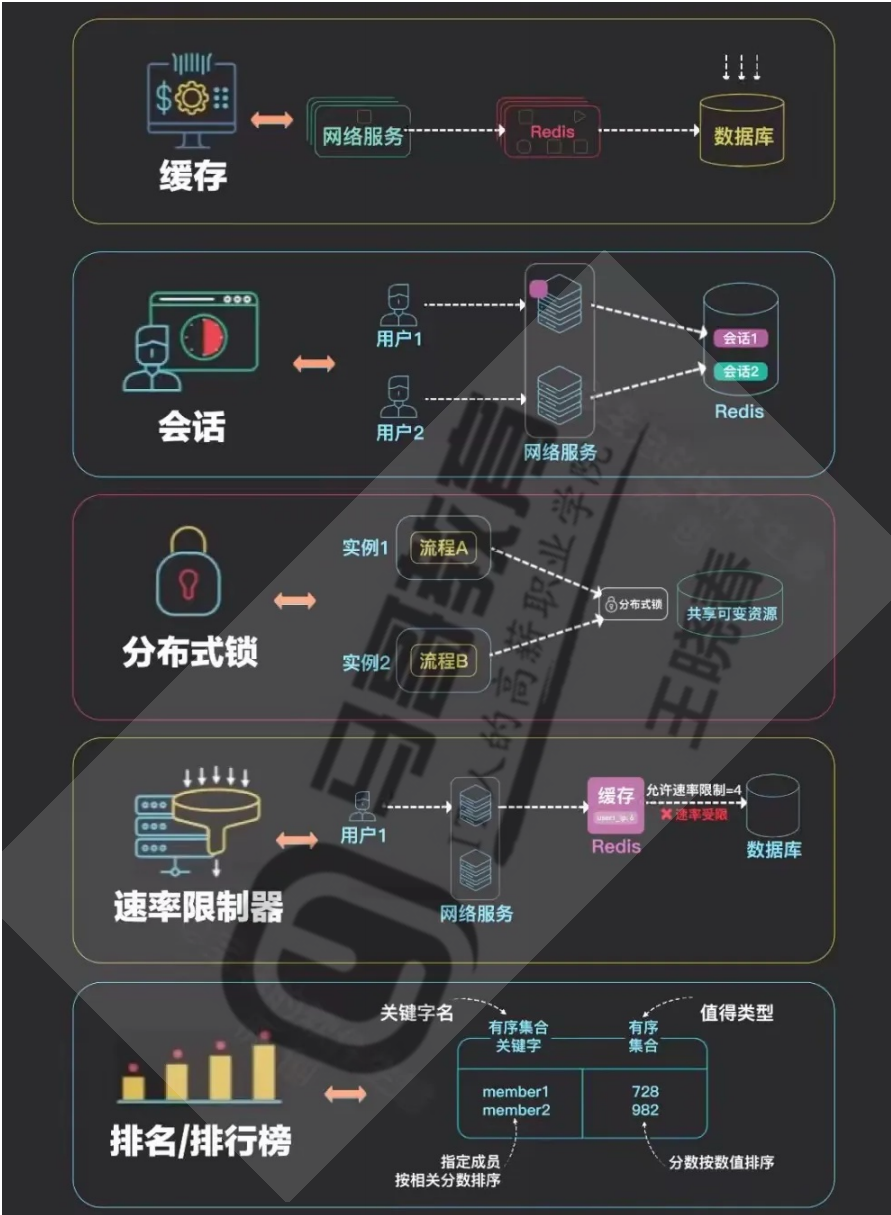
缓存:缓存RDBMS中数据,比如网站的查询结果、商品信息、微博、新闻、消息
消息队列:ELK等日志系统缓存、业务的订阅/发布系统
1. redis基础
1.1redis缓存
Redis 缓存,就是把 Redis 这个内存数据库当作临时数据存储仓库,用来存放高频访问的数据,目的是加速应用读写速度、降低后端数据库压力。
1.1.1缓存实现的流程
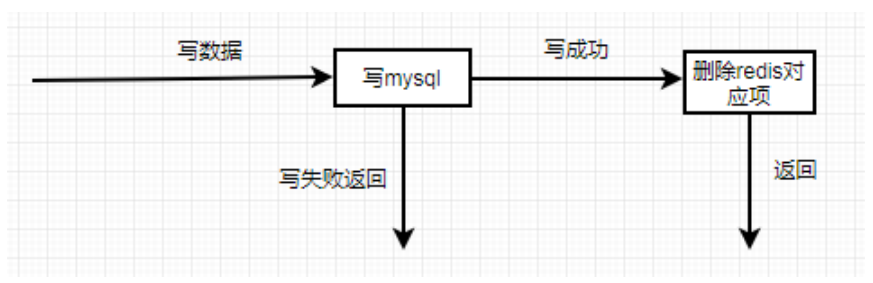
数据更新操作流程:
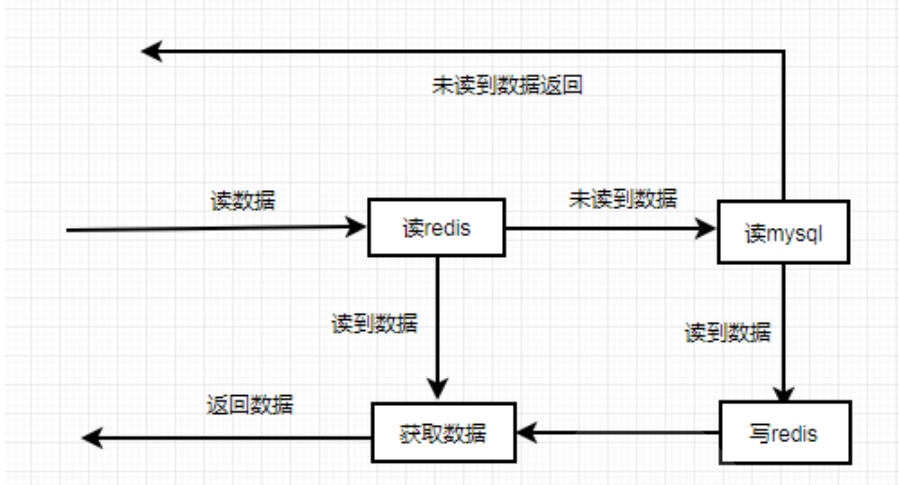
数据查询操作流程:
1.2 缓存穿透
缓存穿透是指缓存和数据库中都没有的数据,而用户不断发起请求,比如: 发起为id为 “-1” 的数据或id为特别大不存在的数据。
这时的用户很可能是攻击者,攻击会导致数据库压力过大。
解决办法:接口层增加校验,如用户鉴权校验,id做基础校验,id<=0的直接拦截从缓存取不到的数据,在数据库中也没有取到,这时也可以将key-value对写为key-null,缓存有效时间可以设置短点,如30秒(设置太长会导致正常情况也没法使用)。这样可以防止攻击用户反复用同一个id暴力攻击。
1.3 缓存击穿
缓存击穿是指缓存中没有但数据库中有的数据,比如:热点数据的缓存时间到期后,这时由于并发用户特别多,同时读缓存没读到数据,又同时去数据库去取数据,引起数据库压力瞬间增大,造成过大压力。
解决办法:设置热点数据永远不过期。
1.4 缓存雪崩
缓存雪崩是指缓存中数据大批量到过期时间,而查询数据量巨大,引起数据库压力过大甚至down机。和缓存击穿不同的是,缓存击穿指并发查同一条数据,缓存雪崩是不同数据都过期了,很多数据都查不到从而查数据库。
解决办法:
-
缓存数据的过期时间设置随机,防止同一时间大量数据过期现象发生
-
如果缓存数据库是分布式部署,将热点数据均匀分布在不同搞得缓存数据库中
-
设置热点数据永远不过期
1.5 缓存宕机
Redis 缓存服务宕机,造成 缓存服务失效
解决方法:Redis高可用集群
2 redis安装
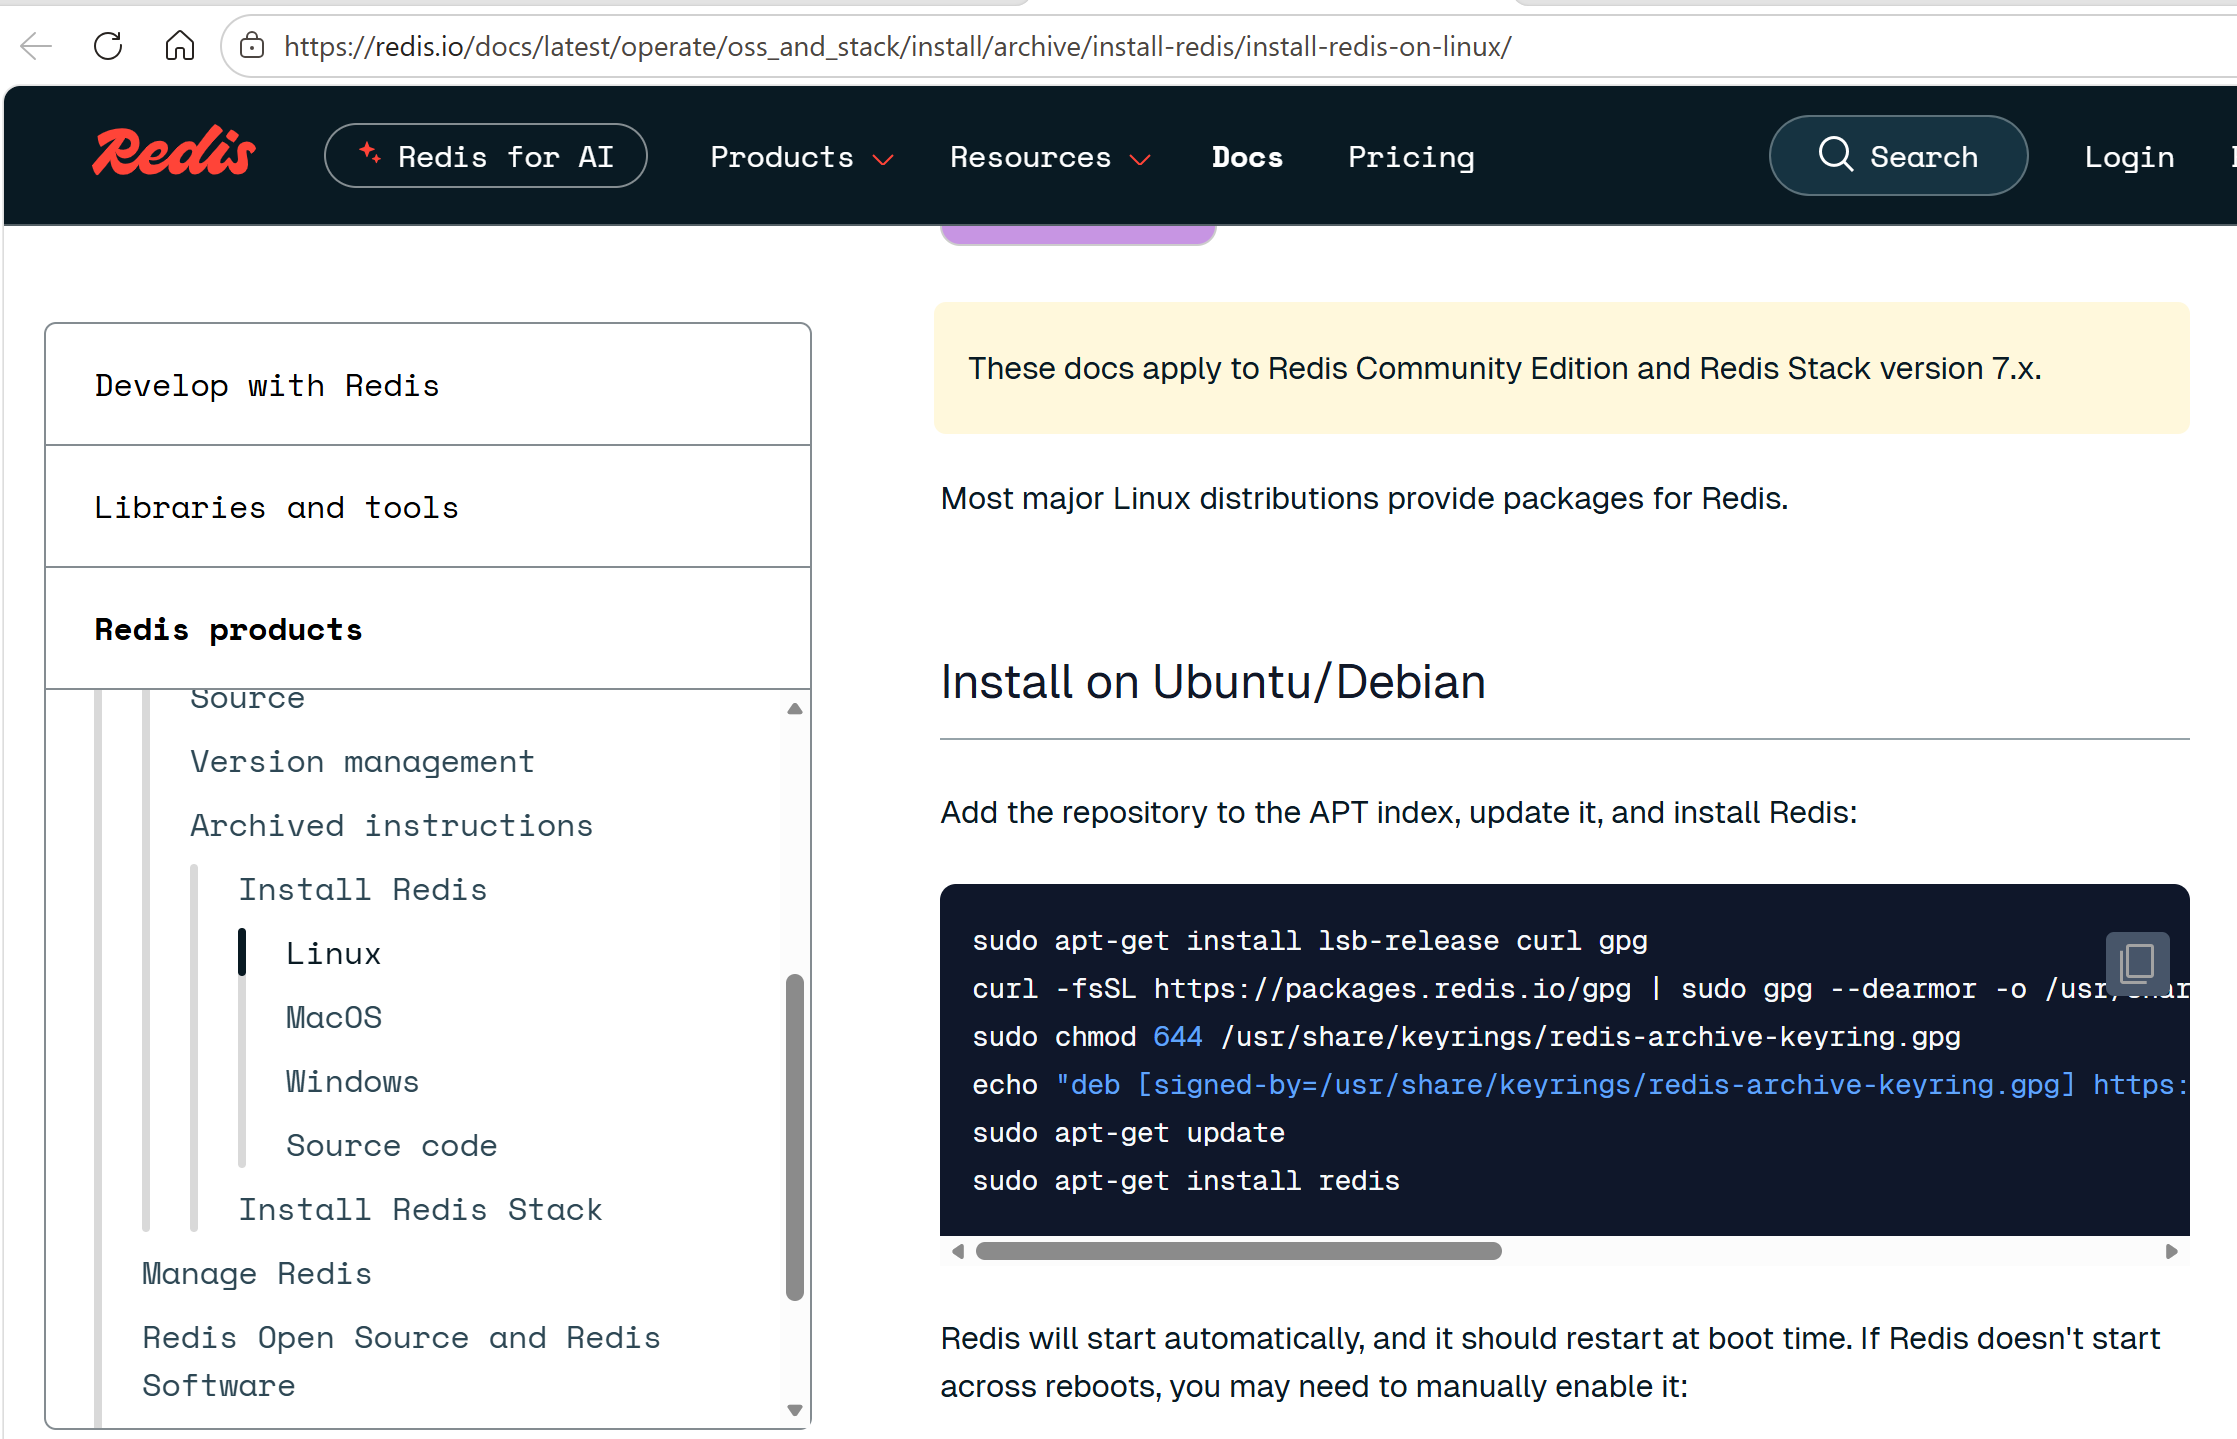
基于官方仓库包安装,一步一步的根据教程安装就可以
官方访问地址
https://redis.io/docs/latest/operate/oss_and_stack/install/archive/install-redis/install-redis-on-linux/
2.1 redis常用命令
1 info
显示当前节点redis运行状态信息
[root@ubuntu2404 ~]#redis-cli
127.0.0.1:6379> ping
PONG
127.0.0.1:6379> info
# Server
redis_version:8.2.2
redis_git_sha1:00000000
redis_git_dirty:0
redis_build_id:673d8c0ee1a8872
redis_mode:standalone
os:Linux 3.10.0-1062.el7.x86_64 x86_64
arch_bits:64
multiplexing_api:epoll
atomicvar_api:atomic-builtin
gcc_version:4.8.5
process_id:1669
run_id:5e0420e92e35ad1d740e9431bc655bfd0044a5d1
tcp_port:6379
uptime_in_seconds:140
uptime_in_days:0
hz:10......
远程连接redis(无密码)
redis-cli -h 远程服务器IP -p 端口
远程连接redis(带密码)
redis-cli -h 远程IP -p 端口 -a 密码
2 SELECT
切换数据库,相当于在MySQL的 USE DBNAME 指令
[root@ubuntu2404 ~]#redis-cli
127.0.0.1:6379> info cluster
# Cluster
cluster_enabled:0
127.0.0.1:6379[15]> SELECT 0
OK
127.0.0.1:6379> SELECT 1
OK
127.0.0.1:6379[1]> SELECT 15
OK
127.0.0.1:6379[15]> SELECT 16
(error) ERR DB index is out of range
127.0.0.1:6379[15]>
注意: 在 Redis cluster 模式下不支持多个数据库,会出现下面错误
[root@ubuntu2404 ~]#redis-cli
127.0.0.1:6379> info cluster
# Cluster
cluster_enabled:1
127.0.0.1:6379> select 0
OK
127.0.0.1:6379> select 1
(error) ERR SELECT is not allowed in cluster mode
3 KEYS
查看当前库下的所有key,此命令慎用!
| 命令 | 时间复杂度 |
|---|---|
| keys | O(n) |
| dbsize | O(1) |
| del | O(1) |
| exists | O(1) |
| xepire | O(1) |
| type | O(1) |
127.0.0.1:6379[15]> SELECT 0
OK
127.0.0.1:6379> KEYS *
1) "9527"
2) "9526"
3) "course"
4) "list1"
127.0.0.1:6379> SELECT 1
OK
127.0.0.1:6379[1]> KEYS *
(empty list or set)
127.0.0.1:6379[1]>
redis>MSET one 1 two 2 three 3 four 4  # 一次设置 4 个 key
OK
redis> KEYS *o*
1) "four"
2) "two"
3) "one"
redis> KEYS t??
1) "two"
redis> KEYS t[w]*
1) "two"
redis> KEYS *  # 匹配数据库内所有 key
1) "four"
2) "three"
3) "two"
4) "one"
3.1 DBSIZE
返回当前库下的所有key 数量
127.0.0.1:6379> DBSIZE
(integer) 4
127.0.0.1:6379> SELECT 1
OK
127.0.0.1:6379[1]> DBSIZE
(integer) 0
3.2 FLUSHDB
强制清空当前库中的所有key,此命令慎用!
127.0.0.1:6379[1]> SELECT 0
OK
127.0.0.1:6379> DBSIZE
(integer) 4
127.0.0.1:6379> FLUSHDB
OK
127.0.0.1:6379> DBSIZE
(integer) 0
127.0.0.1:6379>
3.3 FLUSHALL
强制清空当前Redis服务器所有数据库中的所有key,即删除所有数据,此命令慎用!
127.0.0.1:6379> FLUSHALL
OK
#生产建议修改配置使用rename-command禁用此命令
vim /apps/redis/etc/redis.conf
rename-command FLUSHALL ""  #flushdb和和AOF功能冲突,需要设置 appendonly no,不区分命令大小写,但和flushall (v7.2.3不冲突)
2.2 设置客户端连接密码
#设置连接密码
127.0.0.1:6379> CONFIG SET requirepass 123456
OK
#查看连接密码
127.0.0.1:6379> CONFIG GET requirepass
1) "requirepass"
2) "123456
3. RDB
RDB工作原理
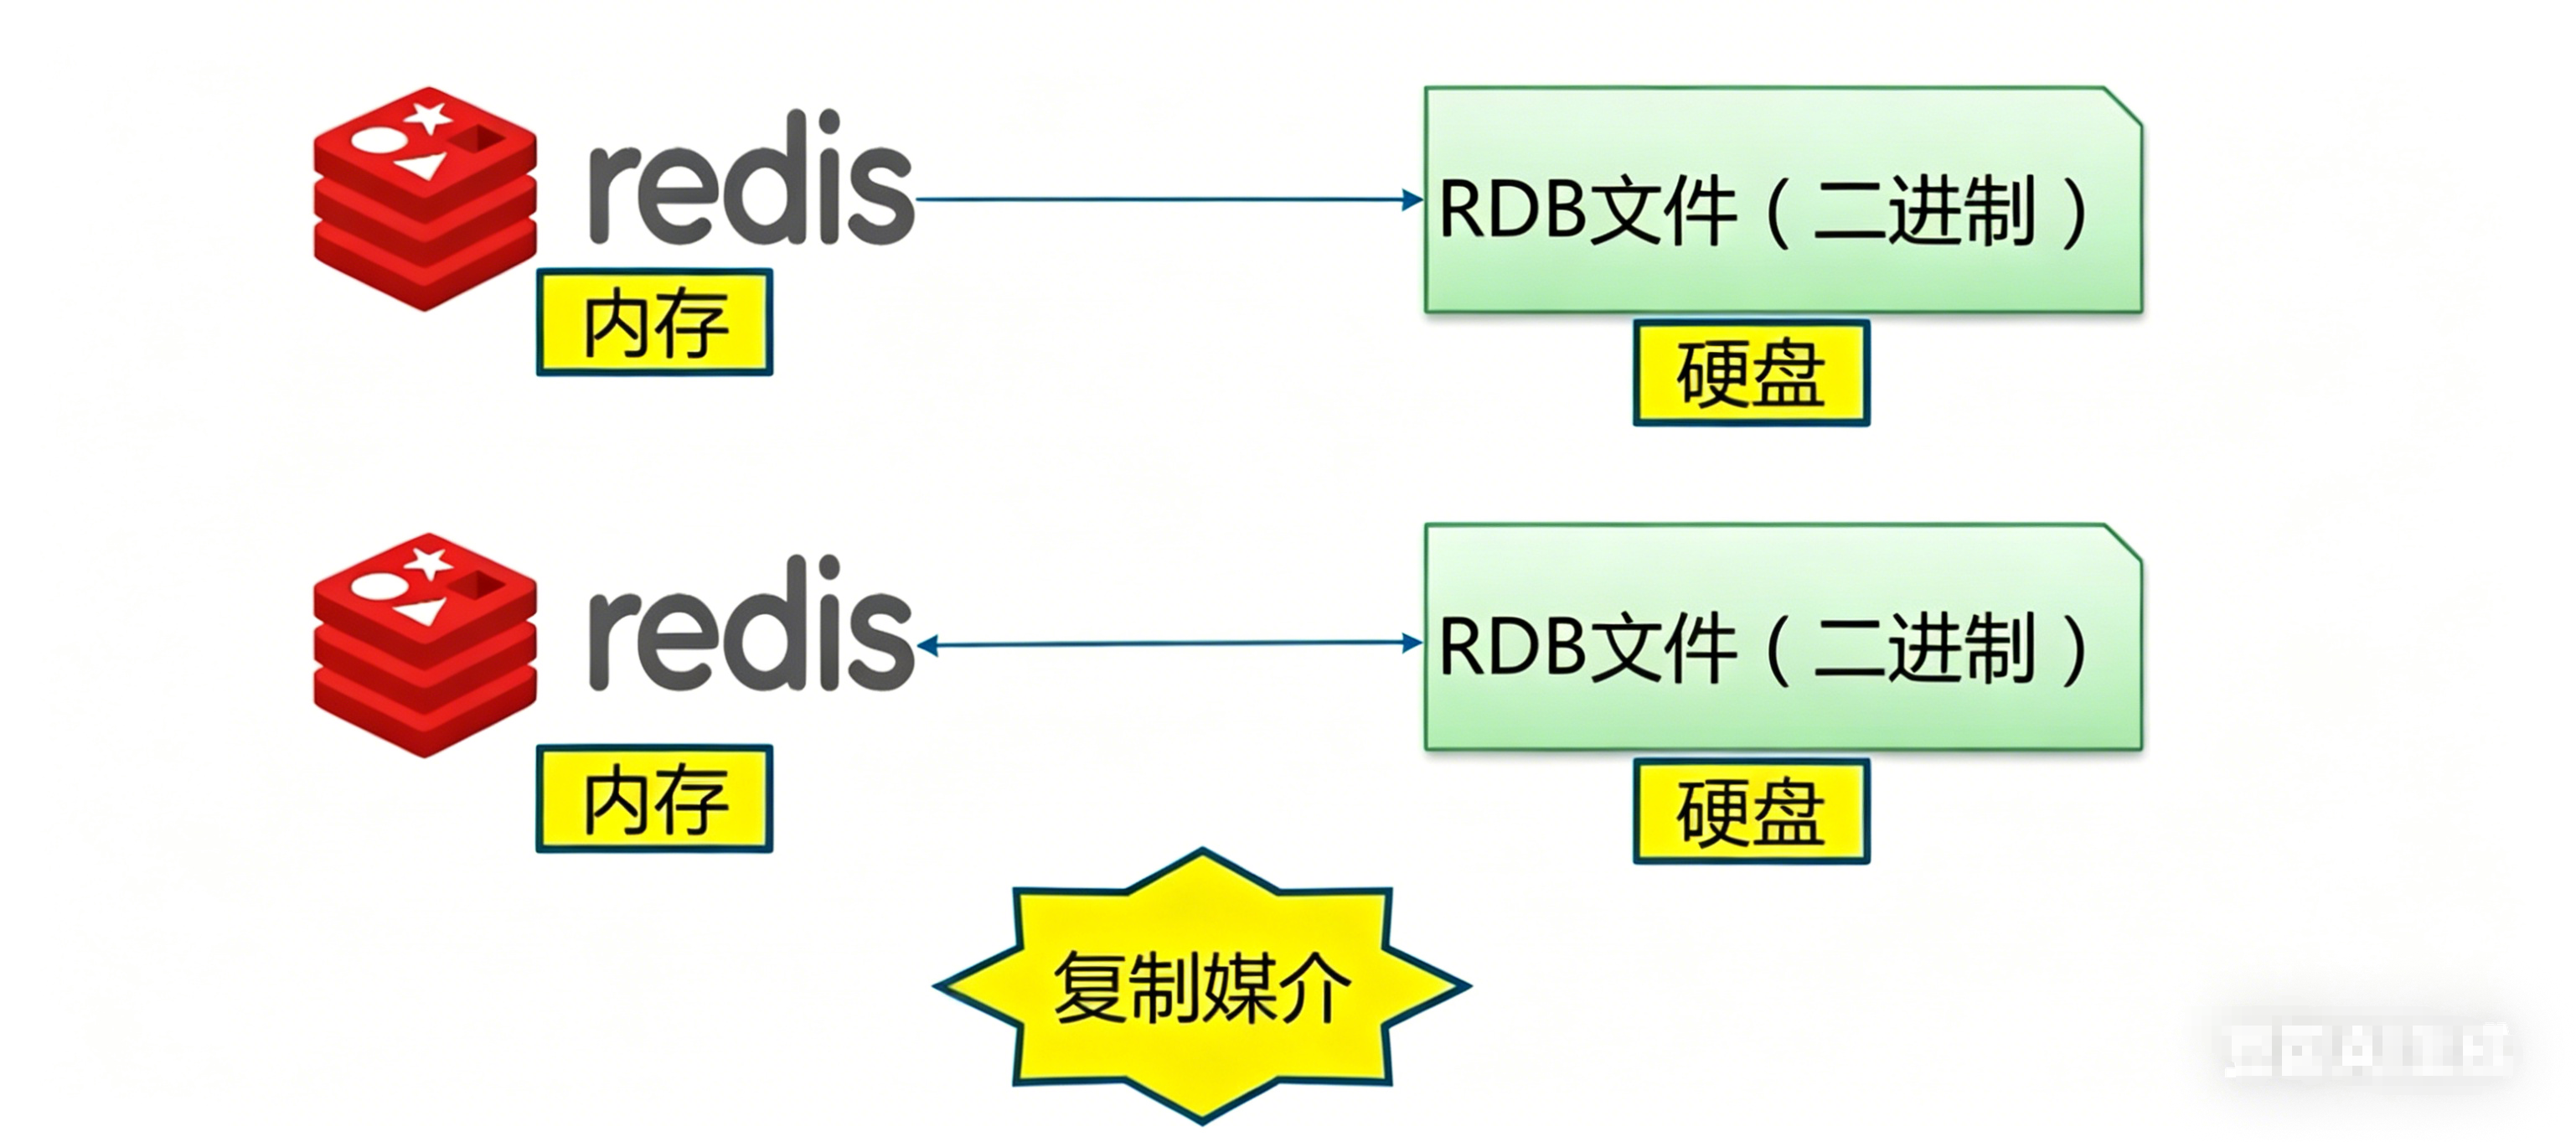
RDB(Redis DataBase):是基于某个时间点的快照,注意RDB只保留当前最新版本的一个快照,相当于MySQL中的完全备份
RDB bgsave 实现快照的具体过程
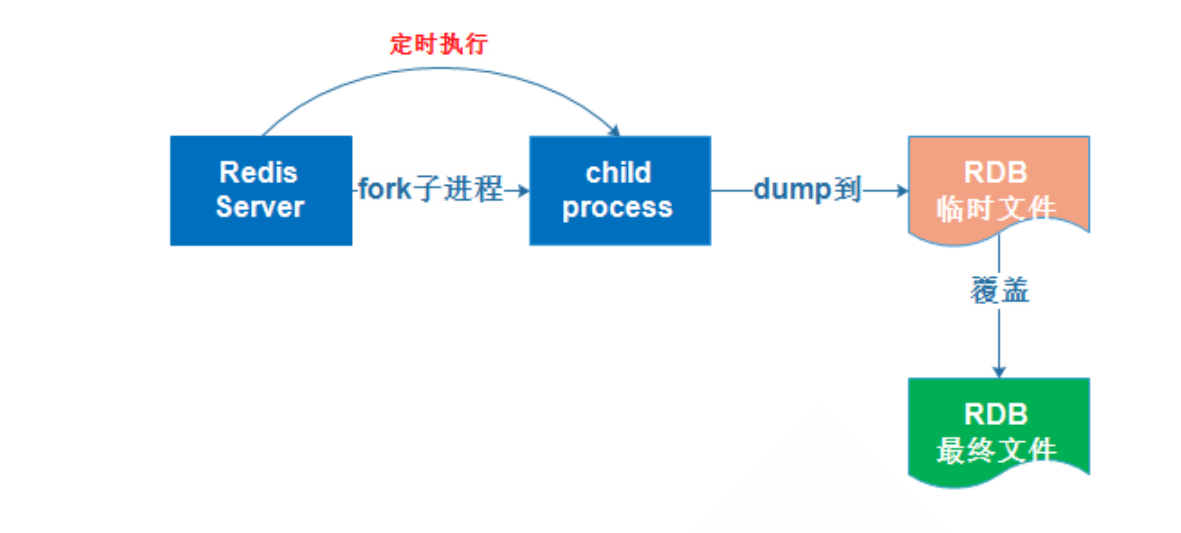
首先从redis 主进程先fork生成一个新的子进程,此子进程负责将Redis内存数据保存为一个临时文件tmp-<子进程pid>.rdb
当数据保存完成后,再将此临时文件改名为RDB文件,如果有前一次保存的RDB文件则会被替换,最后关闭此子进程
范例: bgsave 执行过程会使用主进程进行快照
[root@ubuntu2404 ~]#redis-cli -a 123456 bgsave; redis-cli -a 123456 set name wangsi ; redis-cli -a 123456 get name ;redis-cli -a 123456 info Persistence |grep rdb_bgsave_in_progress; pstree -p |grep redis ;ll /apps/redis/data
rdb_bgsave_in_progress:1
           |-redis-server(1521)-+-redis-server(1558)
           |                   |-{redis-server}(1522)
           |                   |-{redis-server}(1523)
           |                   |-{redis-server}(1524)
           |                   |-{redis-server}(1525)
           |                    `-{redis-server}(1526)
total 185744
drwxr-xr-x 2 redis redis      4096 Jun 18 10:44 ./
drwxr-xr-x 7 redis redis      4096 Jun 16 16:25 ../
-rw-r--r-- 1 redis redis 189855676 Jun 18 10:43 dump.rdb
-rw-r--r-- 1 redis redis    335872 Jun 18 10:44 temp-1558.rdb
#过一会儿备份完成
[root@ubuntu2404 ~]#redis-cli -a 123456 info Persistence |grep
rdb_bgsave_in_progress; pstree -p |grep redis ;ll /apps/redis/data
Warning: Using a password with '-a' or '-u' option on the command line interface
may not be safe.
rdb_bgsave_in_progress:0
           |-redis-server(1521)-+-{redis-server}(1522)
           |                   |-{redis-server}(1523)
           |                   |-{redis-server}(1524)
           |                   |-{redis-server}(1525)
           |                    `-{redis-server}(1526)
total 185416
drwxr-xr-x 2 redis redis      4096 Jun 18 10:44 ./
drwxr-xr-x 7 redis redis      4096 Jun 16 16:25 ../
-rw-r--r-- 1 redis redis 189855676 Jun 18 10:44 dump.rdb
RDB相关配置
#在配置文件中的 save 选项设置多个保存条件,只有任何一个条件满足,服务器都会自动执行 BGSAVE 命
令
#Redis7.0以后支持写在一行,如:save 3600 1 300 100 60 10000,此也为默认值
save 900 1         #900s内修改了1个key即触发保存RDB
save 300 10        #300s内修改了10个key即触发保存RDB
save 60 10000      #60s内修改了10000个key即触发保存RDB
dbfilename dump.rdb
dir ./             #编泽编译安装时默认RDB文件存放在Redis的工作目录,此配置可指定保存的数据目录
stop-writes-on-bgsave-error yes  #当快照失败是否仍允许写入,yes为出错后禁止写入,建议为no
rdbcompression yes
rdbchecksum yes
范例
[root@ubuntu2404 ~]#grep save /apps/redis/etc/redis.conf
# save <seconds> <changes>
# Redis will save the DB if both the given number of seconds and the given
# save ""
# Unless specified otherwise, by default Redis will save the DB:
# save 3600 1
# save 300 100
# save 60 10000
#以上是默认值
[root@ubuntu2404 ~]#redis-cli config get save
1) "save"
2) "3600 1 300 100 60 10000"
#禁用系统的自动快照
[root@ubuntu2404 ~]#vim /apps/redis/etc/redis.conf
save ""
# save 3600 1
# save 300 100
# save 60 10000
#支持动态修改,注意:需要添加双引号
127.0.0.1:6379> config set save "60 3"
OK
127.0.0.1:6379> config get save
1) "save"
2) "60 3"
范例: 手动执行备份RDB
[root@ubuntu2404 ~]#redis-cli
127.0.0.1:6379> debug populate 5000000
OK
(3.96s)
127.0.0.1:6379> dbsize
(integer) 5000000
127.0.0.1:6379> get key:0
"value:0"
127.0.0.1:6379> get key:1
"value:1"
127.0.0.1:6379> get key:2
"value:2"
127.0.0.1:6379> get key:499999
"value:499999"
127.0.0.1:6379> get key:5000000
(nil)
127.0.0.1:6379> bgsave
Background saving started
[root@ubuntu2404 ~]#ll /apps/redis/data/ -h
total 127M
-rw-r--r-- 1 redis redis 127M Jun 13 23:07 dump.rdb
4. AOF
AOF 可以指定不同的保存策略,默认为每秒钟执行一次 fsync,按照操作的顺序地将变更命令追加至指定的AOF日志文件尾部
在第一次启用AOF功能时,会做一次完全备份,后续将执行增量性备份,相当于完全数据备份+增量变化如果同时启用RDB和AOF,进行恢复时,默认AOF文件优先级高于RDB文件,即会使用AOF文件进行恢复在第一次开启AOF功能时,会自动备份所有数据到AOF文件中,后续只会记录数据的更新指令

注意: AOF 模式默认是关闭的,第一次开启AOF后,并重启服务生效后,会因为AOF的优先级高于RDB,而AOF默认没有数据文件存在,从而导致所有数据丢失.
范例: 正确启用AOF功能,访止数据丢失
[root@ubuntu2404 ~]#ll /apps/redis/data
total 314392
-rw-r--r-- 1 redis redis 187779391 Oct 17 14:23 dump.rdb
[root@ubuntu2404 ~]#redis-cli
127.0.0.1:6379> config get appendonly
1) "appendonly"
2) "no"
127.0.0.1:6379> config set appendonly  yes  #自动触发AOF重写,会自动备份所有数据到AOF文件
OK
[root@ubuntu2404 ~]#ll /apps/redis/data
total 314392
-rw-r--r-- 1 redis redis 187779391 Oct 17 14:23 dump.rdb
-rw-r--r-- 1 redis redis  85196805 Oct 17 14:45 temp-rewriteaof-2146.aof
[root@ubuntu2404 ~]#ll /apps/redis/data
total 366760
-rw-r--r-- 1 redis redis 187779391 Oct 17 14:45 appendonly.aof
-rw-r--r-- 1 redis redis 187779391 Oct 17 14:23 dump.rdb
[root@ubuntu2404 ~]#vim /apps/redis/etc/redis.conf
appendonly yes #改为yes
#config set appendonly yes 后可以同时看到下面显示
AOF相关配置
appendonly no #是否开启AOF日志记录,默认redis使用的是rdb方式持久化,这种方式在许多应用中已经
足够用了,但是redis如果中途宕机,会导致可能有几分钟的数据丢失(取决于dump数据的间隔时间),根据
save来策略进行持久化,Append Only File是另一种持久化方式,可以提供更好的持久化特性,Redis会把每次写入的数据在接收后都写入 appendonly.aof 文件,每次启动时Redis都会先把这个文件的数据读入内存里,先忽略RDB文件。默认不启用此功能
appendfilename "appendonly.aof"  #6.X 以前版本文件AOF的文件名,存放在dir指令指定的目录中
appenddirname "appendonlydir"    #7.X 以后版本指定目录名称
#aof持久化策略的配置
appendfsync everysec
#no表示由操作系统保证数据同步到磁盘,Linux的默认fsync策略是30秒,最多会丢失30s的数据
#always表示每次写入都执行fsync,以保证数据同步到磁盘,安全性高,性能较差
#everysec表示每秒执行一次fsync,可能会导致丢失这1s数据,此为默认值,也生产建议值
#数据持久化目录
dir /path
#rewrite相关
no-appendfsync-on-rewrite yes
auto-aof-rewrite-percentage 100
auto-aof-rewrite-min-size 64mb
aof-load-truncated yes
实验
5. 主从复制
redis默认都是主节点
5.1 配置主节点
#编译安装Redis
过程略,参看 2 小节实现
#在设置master的连接密码,才可以同步
vi /apps/redis/etc/redis.conf
#添加下面行
bind 0.0.0.0
requirepass 123456
masterauth 123456 #建议配置,可选
systemctl restart redis
5.2 配置从节点
#所有从节点配置
vi /apps/redis/etc/redis.conf
#添加下面行
bind 0.0.0.0
requirepass 123456  #和Master节点连接密码一致
replicaof 10.0.0.101 6379 #指定Master节点的地址
masterauth  123456  #和Master节点连接密码一致
#重启生效
systemctl restart redis
127.0.0.1:6379> REPLICAOF MASTER_IP PORT #新版推荐使用
#127.0.0.1:6379> CONFIG SET masterauth <masterpass>
127.0.0.1:6379> CONFIG SET masterauth 123456
5.3 登录主节点在master上查看状态
127.0.0.1:6379> info replication
# Replication
role:master
connected_slaves:1
slave0:ip=10.0.0.135,port=6379,state=online,offset=644,lag=0,io-thread=0
master_failover_state:no-failover
master_replid:229dc725872bd699a68953bc8c5676294084322a
master_replid2:0000000000000000000000000000000000000000
master_repl_offset:644
second_repl_offset:-1
repl_backlog_active:1
repl_backlog_size:1048576
repl_backlog_first_byte_offset:1
repl_backlog_histlen:644
127.0.0.1:6379>
5.4 登录从节点在slave上查看状态
10.0.0.135:6379> INFO replication
# Replication
role:slave
master_host:10.0.0.134
master_port:6379
master_link_status:up
master_last_io_seconds_ago:2
master_sync_in_progress:0
slave_read_repl_offset:728
slave_repl_offset:728
replica_full_sync_buffer_size:0
replica_full_sync_buffer_peak:1048560
master_current_sync_attempts:8
master_total_sync_attempts:5308
master_link_up_since_seconds:500
master_client_io_thread:0
total_disconnect_time_sec:22
slave_priority:100
slave_read_only:1
replica_announced:1
connected_slaves:0
master_failover_state:no-failover
master_replid:229dc725872bd699a68953bc8c5676294084322a
master_replid2:0000000000000000000000000000000000000000
master_repl_offset:728
second_repl_offset:-1
repl_backlog_active:1
repl_backlog_size:1048576
repl_backlog_first_byte_offset:15
repl_backlog_histlen:714
10.0.0.135:6379>
5.5 验证主从复制结果
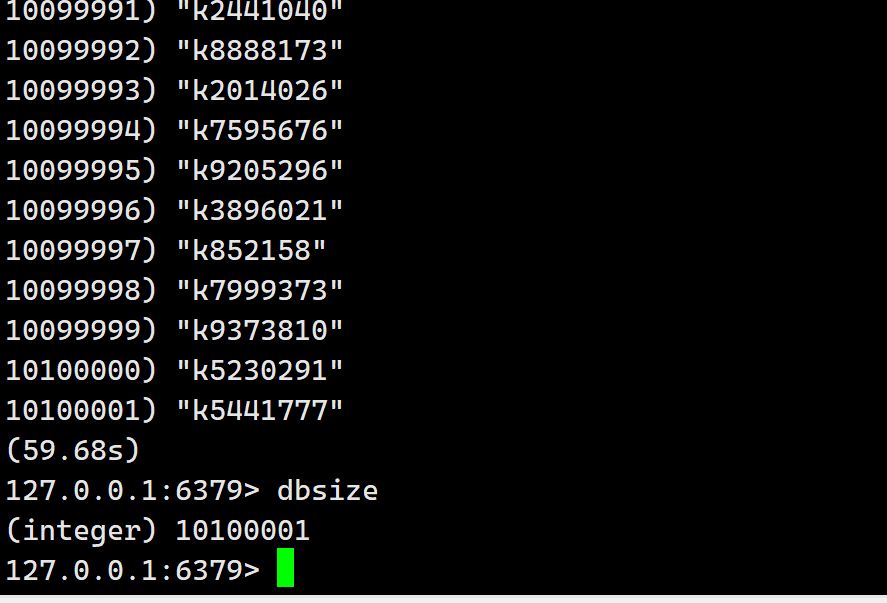
我在主节点写入上万条数据,验证从节点是否有数据
主节点截图
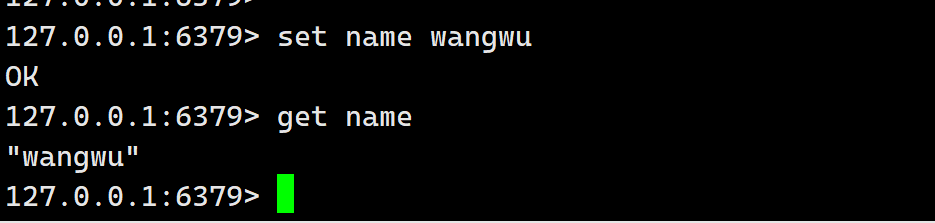
从节点截图
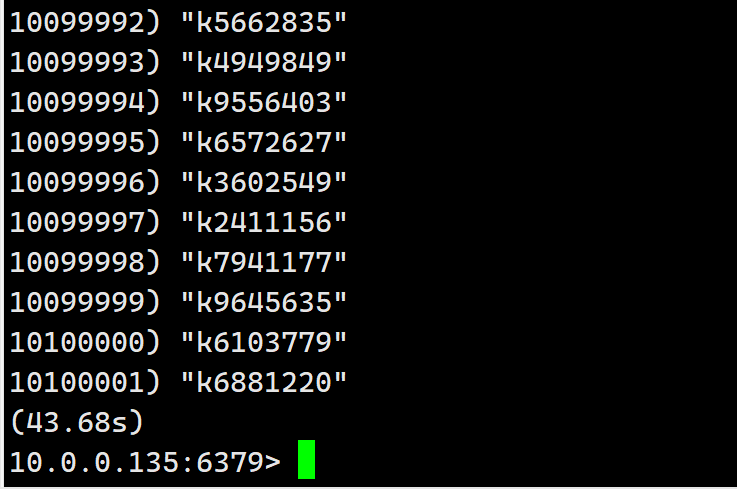

结果显示达到我们的效果
6. 删除主从同步
6.1 在从节点执行命令
#新版
127.0.0.1:6379> REPLICAOF NO ONE
#旧版
127.0.0.1:6379> SLAVEOF NO ONE
6.2 验证,在主节点写入数据
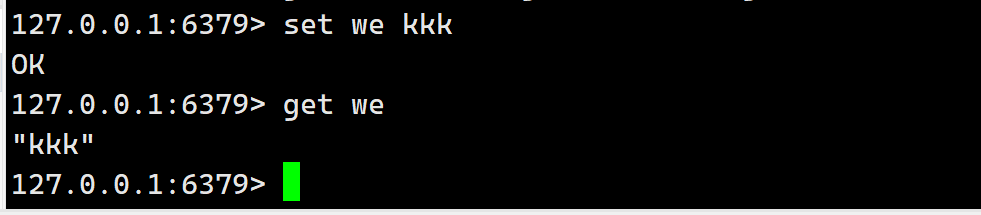
6.3 从节点查看没有同步,达到我们的效果

7. 主从复制故障恢复
当 slave 节点故障时,将Redis Client指向另一个 slave 节点即可,并及时修复故障从节点
当 master 节点故障时,需要提升slave为新的master
master故障后,当前还只能手动提升一个slave为新master,不能自动切换。
主从复制故障恢复实现
假设当前主节点10.0.0.101故障,提升10.0.0.102为新的master
#查看当前10.0.0.102节点的状态为slave,master指向10.0.0.101
127.0.0.1:6379> INFO replication
# Replication
role:slave
master_host:10.0.0.101
master_port:6379
master_link_status:up
master_last_io_seconds_ago:1
master_sync_in_progress:0
slave_repl_offset:3794
slave_priority:100
slave_read_only:1
connected_slaves:0
master_replid:8e8279e461fdf0f1a3464ef768675149ad4b54a3
master_replid2:0000000000000000000000000000000000000000
master_repl_offset:3794
second_repl_offset:-1
repl_backlog_active:1
repl_backlog_size:1048576
repl_backlog_first_byte_offset:3781
repl_backlog_histlen:14
127.0.0.1:6379>
停止slave同步并提升为新的master
#将当前 slave 节点提升为 master 角色
127.0.0.1:6379> REPLICAOF NO ONE   #旧版使用SLAVEOF no one
OK
(5.04s)
127.0.0.1:6379> info replication
# Replication
role:master
connected_slaves:0
master_replid:94901d6b8ff812ec4a4b3ac6bb33faa11e55c274
master_replid2:0083e5a9c96aa4f2196934e10b910937d82b4e19
master_repl_offset:3514
second_repl_offset:3515
repl_backlog_active:1
repl_backlog_size:1048576
repl_backlog_first_byte_offset:3431
repl_backlog_histlen:84
127.0.0.1:6379>
测试能否写入数据:
127.0.0.1:6379> set keytest1 vtest1
OK
修改所有slave 指向新的master节点
#修改10.0.0.103节点指向新的master节点10.0.0.102
127.0.0.1:6379> SLAVEOF 10.0.0.102 6379
OK
127.0.0.1:6379> set key100 v100
(error) READONLY You can't write against a read only replica.
#查看日志
[root@ubuntu2404 ~]#tail -f /apps/redis/log/redis.log
1762:S 20 Feb 2020 13:28:21.943 # Connection with master lost.
1762:S 20 Feb 2020 13:28:21.943 * Caching the disconnected master state.
1762:S 20 Feb 2020 13:28:21.943 * REPLICAOF 10.0.0.102:6379 enabled (user
request from 'id=5 addr=127.0.0.1:59668 fd=9 name= age=149 idle=0 flags=N db=0
sub=0 psub=0 multi=-1 qbuf=41 qbuf-free=32727 obl=0 oll=0 omem=0 events=r
cmd=slaveof')
1762:S 20 Feb 2020 13:28:21.966 * Connecting to MASTER 10.0.0.102:6379
1762:S 20 Feb 2020 13:28:21.966 * MASTER <-> REPLICA sync started
1762:S 20 Feb 2020 13:28:21.967 * Non blocking connect for SYNC fired the event.
1762:S 20 Feb 2020 13:28:21.968 * Master replied to PING, replication can
continue...
1762:S 20 Feb 2020 13:28:21.968 * Trying a partial resynchronization (request
8e8279e461fdf0f1a3464ef768675149ad4b54a3:3991).
1762:S 20 Feb 2020 13:28:21.969 * Successful partial resynchronization with
master.
1762:S 20 Feb 2020 13:28:21.969 * MASTER <-> REPLICA sync: Master accepted a
Partial Resynchronization.
在新master可看到slave
#在新master节点10.0.0.102上查看状态
127.0.0.1:6379> INFO replication
# Replication
role:master
connected_slaves:1
slave0:ip=10.0.0.103,port=6379,state=online,offset=4606,lag=0
master_replid:8e8279e461fdf0f1a3464ef768675149ad4b54a3
master_replid2:0000000000000000000000000000000000000000
master_repl_offset:4606
second_repl_offset:-1
repl_backlog_active:1
repl_backlog_size:1048576
repl_backlog_first_byte_offset:1
repl_backlog_histlen:4606
127.0.0.1:6379>
8 Redis的哨兵Sentinel
Redis 集群介绍
主从架构和MySQL的主从复制一样,无法实现master和slave角色的自动切换,即当master出现故障时,不能实现自动的将一个slave 节点提升为新的master节点,即主从复制无法实现自动的故障转移功能,如果想实现转移,则需要手动修改配置,才能将 slave 服务器提升新的master节点.此外只有一个主节点支持写操作,所以业务量很大时会导致Redis服务性能达到瓶颈.
需要解决的主从复制以下存在的问题:
-
master和slave角色的自动切换,且不能影响业务
-
提升Redis服务整体性能,支持更高并发访问
哨兵需要先实现主从复制
注意:包括master和slave在内的所有节点的masterauth和requirepassslave密码都必须相同
示例
#在所有主从节点执行
#所有节点的masterauth和requirepass必须相同
[root@ubuntu2404 ~]#vim /apps/redis/etc/redis.conf
bind 0.0.0.0
masterauth "123456"
requirepass "123456"
#或者非交互执行
[root@ubuntu2404 ~]#sed -i -e 's/bind 127.0.0.1/bind 0.0.0.0/' -e 's/^#
masterauth .*/masterauth 123456/' -e 's/^# requirepass .*/requirepass 123456/'
/apps/redis/etc/redis.conf
#在所有从节点执行
[root@ubuntu2404 ~]#echo "replicaof 10.0.0.101 6379" >>
/apps/redis/etc/redis.conf
#在所有主从节点执行
[root@ubuntu2404 ~]#systemctl enable --now redis
master 服务器状态
[root@redis-master ~]#redis-cli -a 123456
Warning: Using a password with '-a' or '-u' option on the command line interface
may not
127.0.0.1:6379> INFO replication
# Replication
role:master
connected_slaves:2
slave0:ip=10.0.0.103,port=6379,state=online,offset=112,lag=1
slave1:ip=10.0.0.102,port=6379,state=online,offset=112,lag=0
master_replid:8fdca730a2ae48fb9c8b7e739dcd2efcc76794f3
master_replid2:0000000000000000000000000000000000000000
master_repl_offset:112
second_repl_offset:-1
repl_backlog_active:1
repl_backlog_size:1048576
repl_backlog_first_byte_offset:1
repl_backlog_histlen:112
127.0.0.1:6379>
配置 slave1
[root@redis-slave1 ~]#redis-cli -a 123456
Warning: Using a password with '-a' or '-u' option on the command line interface
may not be safe.
127.0.0.1:6379> REPLICAOF 10.0.0.101 6379
OK
127.0.0.1:6379> CONFIG SET masterauth "123456"
OK
127.0.0.1:6379> INFO replication
# Replication
role:slave
master_host:10.0.0.101
master_port:6379
master_link_status:up
master_last_io_seconds_ago:4
master_sync_in_progress:0
slave_repl_offset:140
slave_priority:100
slave_read_only:1
connected_slaves:0
master_replid:8fdca730a2ae48fb9c8b7e739dcd2efcc76794f3
master_replid2:0000000000000000000000000000000000000000
master_repl_offset:140
second_repl_offset:-1
repl_backlog_active:1
repl_backlog_size:1048576
repl_backlog_first_byte_offset:99
repl_backlog_histlen:42
[root@redis-slave2 ~]#redis-cli -a 123456
Warning: Using a password with '-a' or '-u' option on the command line interface
may not be safe.
127.0.0.1:6379> REPLICAOF 10.0.0.101 6379
OK
127.0.0.1:6379> CONFIG SET masterauth "123456"
OK
127.0.0.1:6379> INFO replication
# Replication
role:slave
master_host:10.0.0.101
master_port:6379
master_link_status:up
master_last_io_seconds_ago:3
master_sync_in_progress:0
slave_repl_offset:182
slave_priority:100
slave_read_only:1
connected_slaves:0
master_replid:8fdca730a2ae48fb9c8b7e739dcd2efcc76794f3
master_replid2:0000000000000000000000000000000000000000
master_repl_offset:182
second_repl_offset:-1
repl_backlog_active:1
repl_backlog_size:1048576
repl_backlog_first_byte_offset:15
repl_backlog_histlen:168
127.0.0.1:6379>
编辑哨兵配置
sentinel 配置
所有redis节点使用相同的以下示例的配置文件
#如果是编译安装,在源码目录有sentinel.conf,复制到安装目录即可,
如:/apps/redis/etc/sentinel.conf
[root@ubuntu2404 ~]#cp redis-8.4.0/sentinel.conf /apps/redis/etc/sentinel.conf
[root@ubuntu2404 ~]#chown redis.redis /apps/redis/etc/sentinel.conf
#在所有节点上编译安装修改配置文件
[root@ubuntu2404 ~]#vim /apps/redis/etc/sentinel.conf
[root@ubuntu2404 ~]#grep -Ev "#|^$" /apps/redis/etc/sentinel.conf
protected-mode no #包安装时默认为yes,此处要修改为no,编译安装保留默认值no
pidfile "/apps/redis/run/redis-sentinel.pid" #修改此行
logfile "/apps/redis/log/redis-sentinel.log" #修改此行
dir "/tmp" #默认值不变
sentinel monitor mymaster 10.0.0.101 6379 2
#mymaster是集群的名称,此行指定当前mymaster集群中master服务器的地址和端口
#2为法定人数限制(quorum),即有几个sentinel认为master down了就进行故障转移,一般此值是所有
sentinel节点(一般总数是>=3的 奇数,如:3,5,7等)的一半以上的整数值,比如,总数是3,即3/2=1.5,
取整为2,是master的ODOWN客观下线的依据
sentinel auth-pass mymaster 123456
#mymaster集群中master的密码,注意此行要在上面行的下面,注意:要求这组redis主从复制所有节点的密
码是一样的
sentinel down-after-milliseconds mymaster 3000
#判断mymaster集群中所有节点的主观下线(SDOWN)的时间,单位:毫秒,建议3000
acllog-max-len 128
sentinel deny-scripts-reconfig yes
sentinel resolve-hostnames no
sentinel announce-hostnames no
#包安装修改配置文件
[root@ubuntu2404 ~]#vim /apps/redis/etc/sentinel.conf
bind 0.0.0.0
port 26379
daemonize yes
pidfile "redis-sentinel.pid"
logfile "sentinel_26379.log"
dir "/tmp"  #工作目录
sentinel monitor mymaster 10.0.0.101 6379 2
#mymaster是集群的名称,此行指定当前mymaster集群中master服务器的地址和端口
#2为法定人数限制(quorum),即有几个sentinel认为master down了就进行故障转移,一般此值是所有
sentinel节点(一般总数是>=3的 奇数,如:3,5,7等)的一半以上的整数值,比如,总数是3,即3/2=1.5,
取整为2,是master的ODOWN客观下线的依据
sentinel auth-pass mymaster 123456
#mymaster集群中master的密码,注意此行要在上面行的下面,注意:要求这组redis主从复制所有节点的密
码是一样的
sentinel down-after-milliseconds mymaster 30000
#判断mymaster集群中所有节点的主观下线(SDOWN)的时间,单位:毫秒,建议3000
sentinel parallel-syncs mymaster 1
#发生故障转移后,可以同时向新master同步数据的slave的数量,数字越小总同步时间越长,但可以减轻新
master的负载压力
sentinel failover-timeout mymaster 180000
#所有slaves指向新的master所需的超时时间,单位:毫秒
sentinel deny-scripts-reconfig yes #禁止修改脚本
logfile /apps/redis/log/sentinel.log
#编译安装在源码目录有sentinel.conf,复制到安装目录即可,如:/apps/redis/etc/sentinel.conf
[root@ubuntu2404 ~]#cp /usr/local/src/redis-8.4.2/sentinel.conf /apps/redis/etc/
[root@ubuntu2404 ~]#ll /apps/redis/etc/sentinel.conf
-rw-r--r-- 1 root root 14835 Jan 19 14:12 /apps/redis/etc/sentinel.conf
[root@ubuntu2404 ~]#chown redis:redis /apps/redis/etc/sentinel.conf
[root@ubuntu2404 ~]#ll /apps/redis/etc/sentinel.conf
-rw-r--r-- 1 redis redis 14835 Jan 19 14:12 /apps/redis/etc/sentinel.conf
#在所有节点进行修改配置文件
[root@ubuntu2404 ~]#vim /apps/redis/etc/sentinel.conf
protected-mode no #此处要确保为为no
pidfile "/apps/redis/run/redis-sentinel.pid" #修改此行
logfile "/apps/redis/log/redis-sentinel.log" #修改此行
sentinel monitor mymaster 10.0.0.101 6379 2 #修改此行
sentinel auth-pass mymaster 123456  #修改此行
sentinel down-after-milliseconds mymaster 3000 #修改此行
[root@ubuntu2404 ~]#grep -Ev '#|^$' /apps/redis/etc/sentinel.conf
protected-mode no
port 26379
daemonize no
pidfile /apps/redis/run/redis-sentinel.pid
loglevel notice
logfile "/apps/redis/log/redis-sentinel.log"
dir /tmp
sentinel monitor mymaster 10.0.0.101 6379 2
sentinel auth-pass mymaster 123456
sentinel down-after-milliseconds mymaster 3000
acllog-max-len 128
sentinel parallel-syncs mymaster 1
sentinel failover-timeout mymaster 180000
sentinel deny-scripts-reconfig yes
SENTINEL resolve-hostnames no
SENTINEL announce-hostnames no
SENTINEL master-reboot-down-after-period mymaster 0
#所有节点配置是一样的,注意:保留所有者所属组
[root@ubuntu2404 ~]#rsync -a /apps/redis/etc/sentinel.conf
10.0.0.102:/apps/redis/etc/sentinel.conf
[root@ubuntu2404 ~]#rsync -a /apps/redis/etc/sentinel.conf
10.0.0.103:/apps/redis/etc/sentinel.conf
启动哨兵服务
#在所有节点生成新的service文件
[root@redis-master ~]#cat /lib/systemd/system/redis-sentinel.service
[Unit]
Description=Redis Sentinel
After=network.target
[Service]
ExecStart=/apps/redis/bin/redis-sentinel /apps/redis/etc/sentinel.conf --
supervised systemd
ExecStop=/bin/kill -s QUIT $MAINPID
User=redis
Group=redis
RuntimeDirectory=redis
Mode=0755
[Install]
WantedBy=multi-user.target
#注意所有节点的目录权限,否则无法启动服务
[root@redis-master ~]#chown -R redis:redis /apps/redis/
[root@redis-master ~]#systemctl daemon-reload
[root@redis-master ~]#systemctl enable --now redis-sentinel.service
验证哨兵服务
#确认服务启动
[root@redis-master ~]#systemctl status redis-sentinel.service
● redis-sentinel.service - Redis Sentinel
     Loaded: loaded (/usr/lib/systemd/system/redis-sentinel.service; enabled;
preset: enabled)
     Active: active (running) since Mon 2026-01-19 14:35:52 CST; 8s ago
   Main PID: 30381 (redis-sentinel)
     Tasks: 6 (limit: 2216)
     Memory: 2.6M (peak: 3.0M)
       CPU: 43ms
     CGroup: /system.slice/redis-sentinel.service
             └─30381 "/apps/redis/bin/redis-sentinel *:26379 [sentinel]"
Jan 19 14:35:52 ubuntu2404.wang.org systemd[1]: Started redis-sentinel.service -
Redis Sentinel.
[root@redis-master ~]#ss -ntl
State   Recv-Q Send-Q Local Address:Port Peer Address:Port
LISTEN  0       128          0.0.0.0:22         0.0.0.0:*
LISTEN  0       128          0.0.0.0:26379      0.0.0.0:*
LISTEN  0       128          0.0.0.0:6379       0.0.0.0:*
LISTEN  0       128             [::]:22           [::]:*
LISTEN  0       128             [::]:26379         [::]:*
LISTEN  0       128             [::]:6379         [::]:*
当前sentinel状态
在sentinel状态中尤其是最后一行,涉及到masterIP是多少,有几个slave,有几个sentinels,必须是符合全部服务器数量
[root@redis-master ~]#redis-cli -p 26379
127.0.0.1:26379> INFO sentinel
# Sentinel
sentinel_masters:1
sentinel_tilt:0
sentinel_running_scripts:0
sentinel_scripts_queue_length:0
sentinel_simulate_failure_flags:0
master0:name=mymaster,status=ok,address=10.0.0.101:6379,slaves=2,sentinels=3 #两个slave,三个sentinel服务器,如果sentinels值不符合,检查myid可能冲突
停止 Master 节点实现故障转移
停止 Master 节点
[root@redis-master ~]#killall redis-server
查看各节点上哨兵信息:
[root@redis-master ~]#redis-cli -p 26379
Warning: Using a password with '-a' or '-u' option on the command line interface
may not be safe.
127.0.0.1:26379> INFO sentinel
# Sentinel
sentinel_masters:1
sentinel_tilt:0
sentinel_running_scripts:0
sentinel_scripts_queue_length:0
sentinel_simulate_failure_flags:0
master0:name=mymaster,status=ok,address=10.0.0.102:6379,slaves=2,sentinels=3
故障转移时sentinel的信息:
[root@redis-master ~]#tail -f /apps/redis/log/sentinel.log
38028:X 20 Feb 2020 17:42:27.362 # +sdown master mymaster 10.0.0.101 6379
38028:X 20 Feb 2020 17:42:27.418 # +odown master mymaster 10.0.0.101 6379
#quorum 2/2
38028:X 20 Feb 2020 17:42:27.418 # +new-epoch 1
38028:X 20 Feb 2020 17:42:27.418 # +try-failover master mymaster 10.0.0.101 6379
38028:X 20 Feb 2020 17:42:27.419 # +vote-for-leader
50547f34ed71fd48c197924969937e738a39975b 1
38028:X 20 Feb 2020 17:42:27.422 # 50547f34ed71fd48c197924969937e738a39975d
voted for 50547f34ed71fd48c197924969937e738a39975b 1
38028:X 20 Feb 2020 17:42:27.475 # +elected-leader master mymaster 10.0.0.101 6379
验证故障转移
故障转移后redis.conf中的replicaof行的master IP会被修改
[root@redis-slave2 ~]#grep ^replicaof /apps/redis/etc/redis.conf
replicaof 10.0.0.102 6379
哨兵配置文件的sentinel monitor IP 同样也会被修改
[root@redis-slave1 ~]#grep "^[a-Z]" /apps/redis/etc/sentinel.conf
port 26379
daemonize no
.....
sentinel monitor mymaster 10.0.0.102 6379 2  #自动修改此行
sentinel down-after-milliseconds mymaster 3000
sentinel auth-pass mymaster 123456
sentinel config-epoch mymaster 1
protected-mode no
supervised systemd
sentinel leader-epoch mymaster 1
sentinel known-replica mymaster 10.0.0.101 6379
sentinel known-replica mymaster 10.0.0.103 6379
sentinel known-sentinel mymaster 10.0.0.103 26379
50547f34ed71fd48c197924969937e738a39975d
sentinel current-epoch 1
[root@redis-slave2 ~]#grep "^[a-Z]" /apps/redis/etc/sentinel.conf
port 26379
daemonize no
......
sentinel myid 50547f34ed71fd48c197924969937e738a39975d
sentinel deny-scripts-reconfig yes
sentinel monitor mymaster 10.0.0.102 6379 2  #自动修改此行
sentinel down-after-milliseconds mymaster 3000
sentinel auth-pass mymaster 123456
sentinel config-epoch mymaster 1
protected-mode no
supervised systemd
sentinel leader-epoch mymaster 1
sentinel known-replica mymaster 10.0.0.103 6379
sentinel known-replica mymaster 10.0.0.101 6379
sentinel known-sentinel mymaster 10.0.0.101 26379
50547f34ed71fd48c197924969937e738a39975b
sentinel current-epoch 1
验证 Redis 各节点状态
新的master 状态
[root@redis-slave1 ~]#redis-cli -a 123456
Warning: Using a password with '-a' or '-u' option on the command line interface
may not be safe.
127.0.0.1:6379> INFO replication
# Replication
role:master   #提升为master
connected_slaves:1
slave0:ip=10.0.0.103,port=6379,state=online,offset=56225,lag=1
master_replid:75e3f205082c5a10824fbe6580b6ad4437140b94
master_replid2:b2fb4653bdf498691e5f88519ded65b6c000e25c
master_repl_offset:56490
second_repl_offset:46451
repl_backlog_active:1
repl_backlog_size:1048576
repl_backlog_first_byte_offset:287
repl_backlog_histlen:56204
另一个slave指向新的master
[root@redis-slave2 ~]#redis-cli -a 123456
Warning: Using a password with '-a' or '-u' option on the command line interface
may not be safe.
127.0.0.1:6379> INFO replication
# Replication
role:slave
master_host:10.0.0.102  #指向新的master
master_port:6379
master_link_status:up
master_last_io_seconds_ago:0
master_sync_in_progress:0
slave_repl_offset:61029
slave_priority:100
slave_read_only:1
connected_slaves:0
master_replid:75e3f205082c5a10824fbe6580b6ad4437140b94
master_replid2:b2fb4653bdf498691e5f88519ded65b6c000e25c
master_repl_offset:61029
second_repl_offset:46451
repl_backlog_active:1
repl_backlog_size:1048576
repl_backlog_first_byte_offset:1
repl_backlog_histlen:61029

汇聚全球AI编程工具,助力开发者即刻编程。
更多推荐

 10
10 0
0- 0


 已为社区贡献2条内容

所有评论(0)