
Linux 运维实战笔记(二):SSH 安全加固与 CentOS 7 初始化配置
·
window 终端工具使用秘钥登录Linux
- 生成密钥对(私钥和公钥)
- 将公钥复制给Linux服务器
- 测试
1.生成密钥对(私钥和公钥)
xshell 为例: 工具-用户秘钥管理者-生成,打开界面基本上是下一步即可。
找到私钥-属性-公钥标签,复制公钥。
[7854zx@c001 ~]$ ssh-keygen -t rsa -P '' -f ~/.ssh/id_rsa
Generating public/private rsa key pair.
Your identification has been saved in /home/7854zx/.ssh/id_rsa.
Your public key has been saved in /home/7854zx/.ssh/id_rsa.pub.
The key fingerprint is:
6c:af:d7:f0:c9:d5:9e:cf:03:0e:c9:33:6d:1f:08:42 7854zx@c001
The key's randomart image is:
+--[ RSA 2048]----+
|                 |
|         E       |
|        .        |
|       . . .     |
|        S o + .. |
|       . ..* =...|
|          .=*oo.o|
|         .. =. =.|
|        ..      =|
+-----------------+
ssh-rsa AAAAB3NzaC1yc2EAAAADAQABAAABAQDgqC4mVv4H/NpZz4233TA4puZGUkUiJEnolcd27b9iGjtocd3tAOr9PrCYvqKlcsS+KTCJj9R5QBEKWx++JD+1whQKxYah9z7OQeTmdwWdhP4mppYKJcdycxmc8qXAP//EwdGqiqovGhHioNN3/GGHl4VCnnG2Bb/Kc7CNrYFHkDM38kGg9vs7b5fizQCQS7EmZoxEdswpt5k70cuvWNdq15z2tWZjD36vQ+/HzyRkJmEF2JPbbBHVS0RKuiyhUfA+Iy9KTLZ4r/LnvcaM+g1/bFTWva7xCKW8ZiVMbAnwFXRqJ/t3+6aCXXqiNynVljD24Gxwvrqh2Mse8o4LA/GH 7854zx@c001
2.写入对方文件~/.ssh/authorized_keys
[7854zx@c001 ~]$ vim .ssh/authorized_keys
[7854zx@c001 ~]$ ll .ssh/authorized_keys
-rw-r--r--. 1 root root 1567 4月   3 10:23 .ssh/authorized_keys
[7854zx@c001 ~]$ chmod 600 .ssh/authorized_keys
3.登录时候,选择验证方式:公钥,并指定对应公钥。
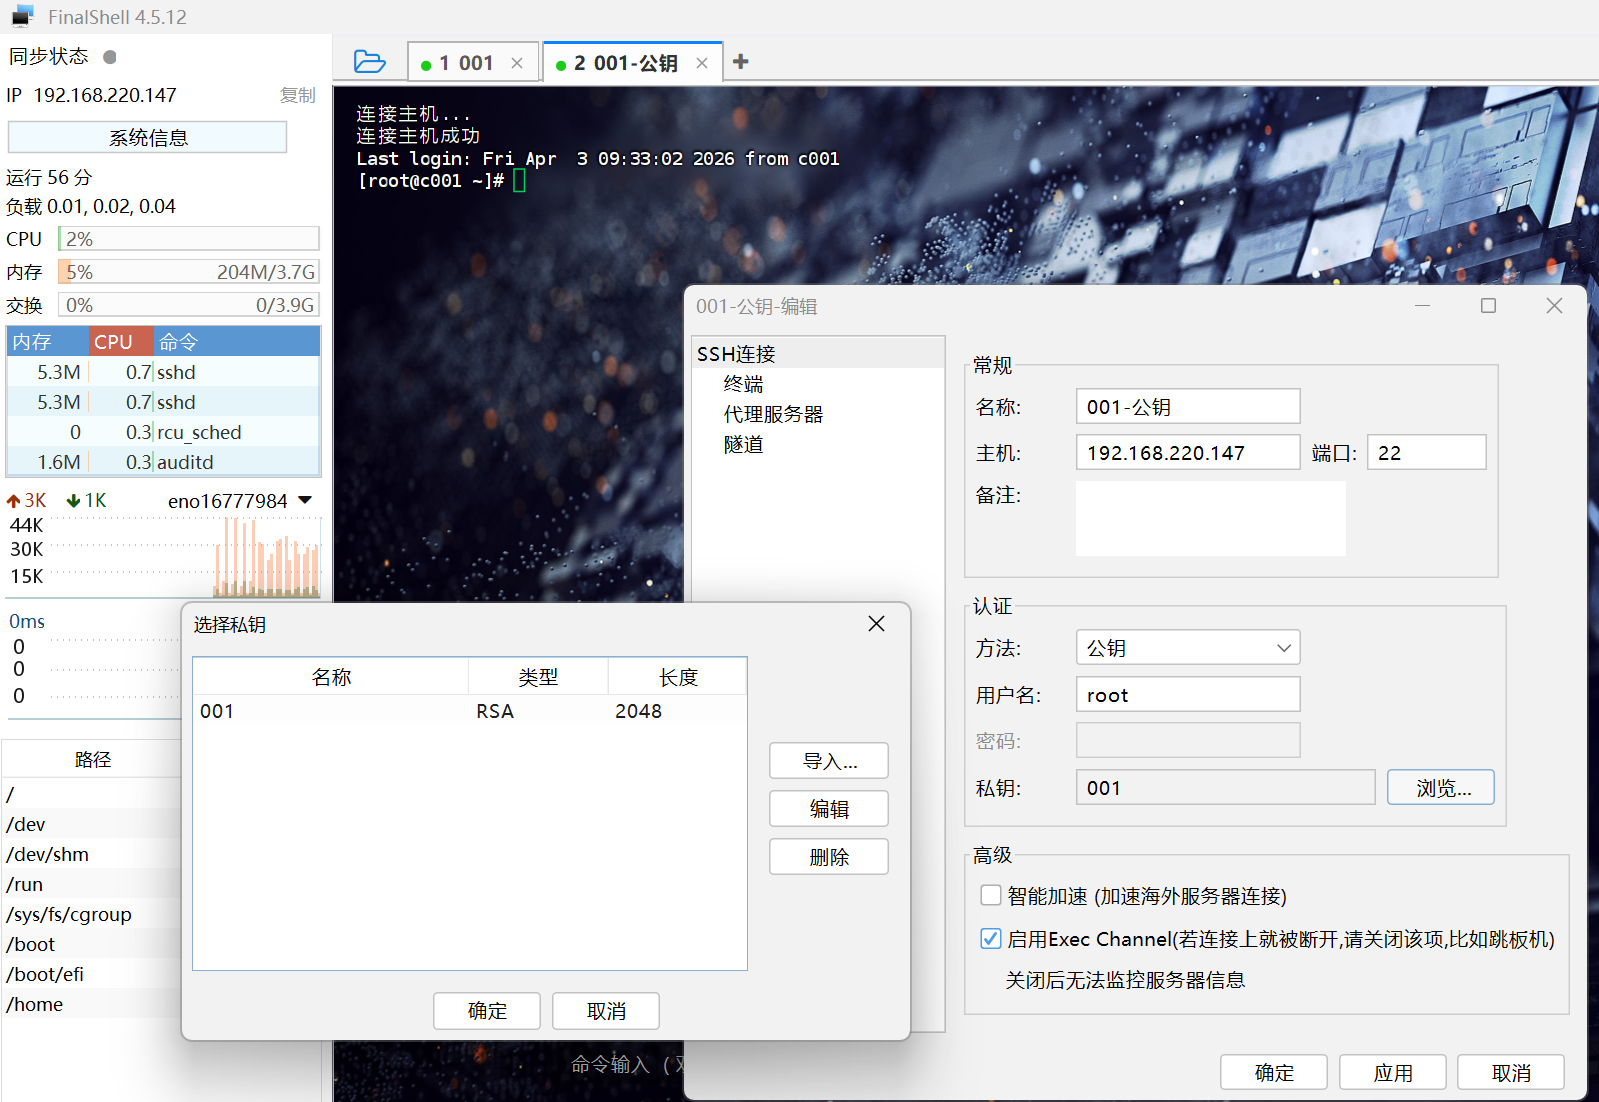
刚刚实现 windows 使用 laoma 用户秘钥登录 centos7
思考:如何实现 windows 使用 root 用户秘钥登录 centos7?
[7854zx@c001 ~]# cat /home/7854zx/.ssh/authorized_keys >> /root/.ssh/authorized_keys
ssh配置
ssh 工具配置文件
~/.ssh/config,用户级别,给用户自己定制,优先级更高
/etc/ssh/ssh_config,系统(全局)级别,默认设置,针对系统中所有用户生效
sshd 服务配置文件
/etc/ssh/sshd_config,针对sshd服务生效。
控制root用户登录
因为所有Linux系统管理员都是root,防止暴力破解。
PermitRootLogin no 禁止登录
PermitRootLogin prohibit-password 禁止使用密码登录
[root@c001 ~]# cp /etc/ssh/sshd_config /etc/ssh/sshd_config.20260403
[root@c001 ~]# vim /etc/ssh/sshd_config
1. /Root,定位。如果第一个搜索到的内容不是需要的,使用n(next)查找下一个。
2. yy 复制对应行,p 粘贴到下一行。(保留原有行)
3. 自行删除第一#
4. w 跳转到yes位置,cw 替换一个单词,输入no,按esc
5. ZZ 保存退出。
6. 重新加载服务
[root@centos7 ~ 10:34:57]# systemctl reload sshd
7. 验证
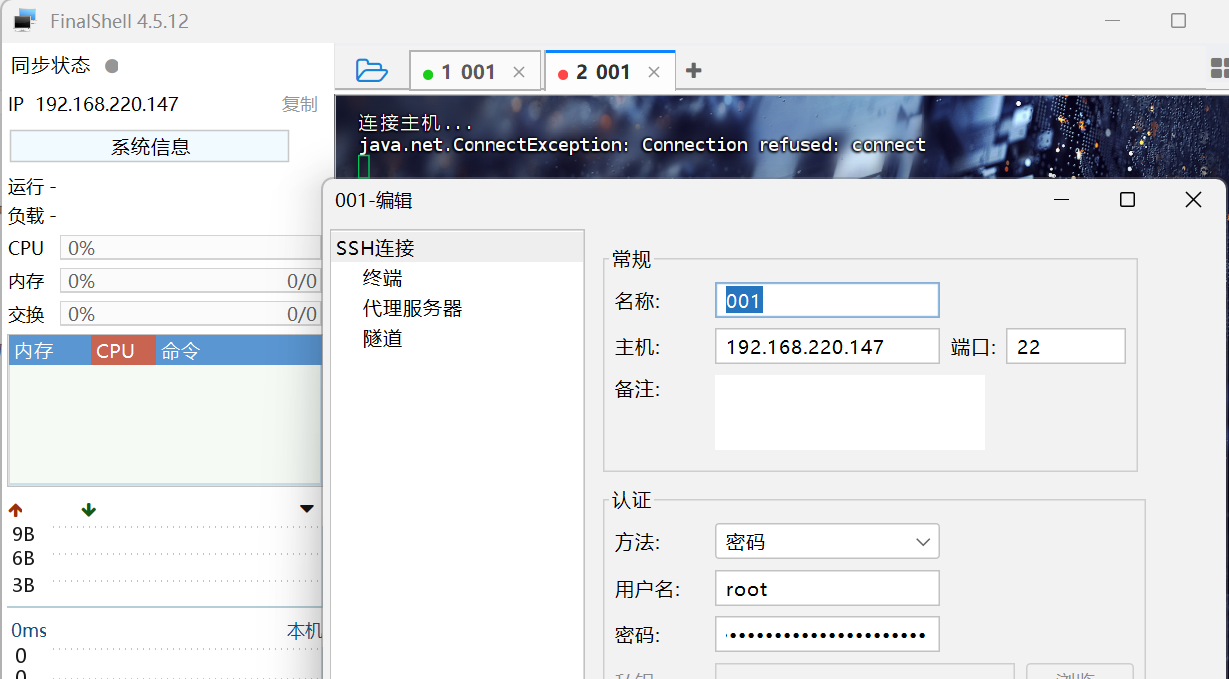
## 禁止密码登录。
PasswordAuthentication no

# 验证
DenyUsers, AllowUsers, DenyGroups,AllowGroups
例如,AllowUsers laoma
man 帮助
=============== man 帮助 ==================
man 帮助
命令 --help 查询命令
如果查询配置文件如何写?
man 配置文件名,例如man sshd_config
搜索 Root(/Root)
=============== man 帮助 ==================
软件包升级
=============== 软件包升级 ==================
# 查询软件包版本
[root@CentOS ~]# rpm -q openssh-server
openssh-server-7.4p1-22.el7_9.x86_64

# 查询可用版本
[root@CentOS ~]# yum list openssh-server --showduplicates
已加载插件:fastestmirror, langpacks
Loading mirror speeds from cached hostfile
 * base: mirrors.aliyun.com
 * extras: mirrors.aliyun.com
 * updates: mirrors.aliyun.com
已安装的软件包
openssh-server.x86_64                  7.4p1-22.el7_9                          @anaconda
可安装的软件包
openssh-server.x86 _64                  7.4p1-21.el7                            base
openssh-server.x86_64                  7.4p1-22.el7_9                          updates
openssh-server.x86_64                  7.4p1-23.el7_9                          updates

# 升级到最新版本
[root@CentOS ~]# yum update -y openssh-server
# 测试 参数 /etc/ssh/sshd_config 中参数 PermitRootLogin prohibit-password

=============== 软件包升级 ==================
CentOS 7 初始化配置
1 命令提示符
2 关闭 selinux
3 关闭防火墙
4 配置本地仓库
5 安装基础软件包
6 配置密钥登录自己
# 1 配置命令提示符和历史命令格式
cat >> /etc/bashrc <<'EOF'
PS1='[\[\e[91m\]\u\[\e[93m\]@\[\e[92;1m\]\h\[\e[0m\] \[\e[94m\]\W\[\e[0m\] \[\e[35m\]\t\[\e[0m\]]\[\e[93m\]\$\[\e[0m\] '
HISTTIMEFORMAT="%F %T "
EOF


# 2 关闭 selinux
sed -i '/^SELINUX=/cSELINUX=disabled' /etc/selinux/config

# 3 关闭防火墙
systemctl disable firewalld --now

# 4 配置仓库
curl -s -o /etc/yum.repos.d/CentOS-Base.repo http://mirrors.aliyun.com/repo/Centos-7.repo
curl -s -o /etc/yum.repos.d/epel.repo http://mirrors.aliyun.com/repo/epel-7.repo

# 5 安装基础软件包
yum install -y bash-completion vim open-vm-tools lrzsz unzip rsync sshpass

# 6 配置密钥登录自己
echo 'StrictHostKeyChecking no' >> /etc/ssh/ssh_config
echo 'UseDNS no' >> /etc/ssh/sshd_config
[ -d .ssh ] || mkdir -p 700 .ssh
ssh-keygen -t rsa -N '' -f .ssh/id_rsa
sshpass -p redhat ssh-copy-id localhost

# 7 关机打快照
init 0
日志查看
============================================
日志:
1. systemd-journal (systemd子系统)
2. rsyslog 服务对应

==============
故障1
rsyslog 将日志记录到对应的文件中:
   | /var/log/messages | 大多数系统日志(排除认证、邮件、定时任务、调试日志) |
   | /var/log/secure   | 安全/认证相关日志(如ssh登录、用户验证)             |
   | /var/log/maillog  | 邮件服务相关日志(如sendmail/postfix)               |
   | /var/log/cron     | 定时任务执行日志(crontab/anacron)                  |
   | /var/log/boot.log | 系统启动过程中的非syslog控制台消息                   |

[root@CentOS ~ 15:31:38]# tail -f /var/log/secure
新增加一个ssh连接,日志更新内容如下:
Apr  3 15:30:28 CentOS sshd[1513]: Accepted password for tz from 10.1.8.1 port 9724 ssh2
Apr  3 15:30:28 CentOS sshd[1513]: pam_unix(sshd:session): session opened for user tz by (uid=0)


断开连接,日志更新内容如下:
Apr  3 15:31:31 CentOS sshd[1513]: pam_unix(sshd:session): session closed for user tz

模拟sshd故障,并排故。
模拟:
[root@CentOS ~ 15:32:07]# cp /etc/ssh/sshd_config{,.0403}
[root@CentOS ~ 15:32:26]# echo hello world >> /etc/ssh/sshd_config
[root@CentOS ~ 15:32:32]# systemctl restart sshd
Job for sshd.service failed because the control process exited with error code. See "systemctl status sshd.service" and "journalctl -xe" for details.

# 根据提示 查看状态
[root@CentOS ~ 15:32:38]# systemctl status sshd.service
● sshd.service - OpenSSH server daemon
   Loaded: loaded (/usr/lib/systemd/system/sshd.service; enabled; vendor preset: enabled)
   Active: activating (auto-restart) (Result: exit-code) since 五 2026-04-03 15:32:38 CST; 13s ago
     Docs: man:sshd(8)
           man:sshd_config(5)
  Process: 5696 ExecStart=/usr/sbin/sshd -D $OPTIONS (code=exited, status=255)
 Main PID: 5696 (code=exited, status=255)

4月 03 15:32:38 CentOS.tz.cloud systemd[1]: sshd.service: main process exited...a
4月 03 15:32:38 CentOS.tz.cloud systemd[1]: Failed to start OpenSSH server da....
4月 03 15:32:38 CentOS.tz.cloud systemd[1]: Unit sshd.service entered failed ....
4月 03 15:32:38 CentOS.tz.cloud systemd[1]: sshd.service failed.
Hint: Some lines were ellipsized, use -l to show in full.

# 状态日志没有对应提示信息

# 继续查看message日志
[root@CentOS ~ 15:32:51]# tail /var/log/messages
Apr  3 15:32:09 CentOS systemd: Started Session 3 of user tz.
Apr  3 15:32:38 CentOS systemd: Stopping OpenSSH server daemon...
Apr  3 15:32:38 CentOS systemd: Stopped OpenSSH server daemon.
Apr  3 15:32:38 CentOS systemd: Starting OpenSSH server daemon...
Apr  3 15:32:38 CentOS sshd: /etc/ssh/sshd_config: line 141: Bad configuration option: hello
Apr  3 15:32:38 CentOS sshd: /etc/ssh/sshd_config: terminating, 1 bad configuration options
Apr  3 15:32:38 CentOS systemd: sshd.service: main process exited, code=exited, status=255/n/a
Apr  3 15:32:38 CentOS systemd: Failed to start OpenSSH server daemon.
Apr  3 15:32:38 CentOS systemd: Unit sshd.service entered failed state.
Apr  3 15:32:38 CentOS systemd: sshd.service failed.

# 发现 141 行有问题。
# 根据提示修复。

[root@CentOS ~ 15:33:16]# vim /etc/ssh/sshd_config

# 注释最后一行
#hello world

[root@CentOS ssh 15:35:43]# systemctl restart sshd
[root@CentOS ssh 15:35:54]#  systemctl is-active sshd
active

===========================================================
[root@CentOS ssh 15:37:53]# echo /etc/ssh/sshd_config-{1,2}
/etc/ssh/sshd_config-1 /etc/ssh/sshd_config-2
[root@CentOS ssh 15:37:59]# echo /etc/ssh/sshd_config-{,2}
/etc/ssh/sshd_config- /etc/ssh/sshd_config-2
[root@CentOS ssh 15:38:31]# echo /etc/ssh/sshd_config{,.0403}
/etc/ssh/sshd_config /etc/ssh/sshd_config.0403
===========================================================
故障2
[root@CentOS ssh 16:05:19]# systemctl restart sshd
Job for sshd.service failed because the control process exited with error code. See "systemctl status sshd.service" and "journalctl -xe" for details.
[root@CentOS ssh 16:06:04]# journalctl -e -u sshd
... ...
4月 03 15:35:27 CentOS.tz.cloud systemd[1]: Failed to start OpenSSH server daemon.
4月 03 15:35:27 CentOS.tz.cloud systemd[1]: Unit sshd.service entered failed state
4月 03 15:35:27 CentOS.tz.cloud systemd[1]: sshd.service failed.
4月 03 15:35:54 CentOS.tz.cloud systemd[1]: Stopped OpenSSH server daemon.
4月 03 15:35:54 CentOS.tz.cloud systemd[1]: Starting OpenSSH server daemon...
4月 03 15:35:54 CentOS.tz.cloud sshd[13253]: Server listening on 0.0.0.0 port 22.
4月 03 15:35:54 CentOS.tz.cloud sshd[13253]: Server listening on :: port 22.
4月 03 15:35:54 CentOS.tz.cloud systemd[1]: Started OpenSSH server daemon.
4月 03 16:03:28 CentOS.tz.cloud systemd[1]: Stopping OpenSSH server daemon...
4月 03 16:03:28 CentOS.tz.cloud systemd[1]: Stopped OpenSSH server daemon.
4月 03 16:03:28 CentOS.tz.cloud systemd[1]: Starting OpenSSH server daemon...
4月 03 16:03:28 CentOS.tz.cloud sshd[76623]: Server listening on 0.0.0.0 port 22.
4月 03 16:03:28 CentOS.tz.cloud sshd[76623]: Server listening on :: port 22.
4月 03 16:03:28 CentOS.tz.cloud systemd[1]: Started OpenSSH server daemon.
4月 03 16:06:04 CentOS.tz.cloud systemd[1]: Stopping OpenSSH server daemon...
4月 03 16:06:04 CentOS.tz.cloud systemd[1]: Stopped OpenSSH server daemon.
4月 03 16:06:04 CentOS.tz.cloud systemd[1]: Starting OpenSSH server daemon...
4月 03 16:06:04 CentOS.tz.cloud sshd[82629]: /etc/ssh/sshd_config: No such file or
4月 03 16:06:04 CentOS.tz.cloud systemd[1]: sshd.service: main process exited, cod
4月 03 16:06:04 CentOS.tz.cloud systemd[1]: Failed to start OpenSSH server daemon.
4月 03 16:06:04 CentOS.tz.cloud systemd[1]: Unit sshd.service entered failed state
4月 03 16:06:04 CentOS.tz.cloud systemd[1]: sshd.service failed.


# 发现 /etc/ssh/sshd_config: No such file or directory

# 查询文件哪个软件包提供
[[root@CentOS ssh 16:19:19]# yum provides /etc/ssh/sshd_config
已加载插件:fastestmirror
Loading mirror speeds from cached hostfile
openssh-server-7.4p1-22.el7_9.x86_64 : An open source SSH server daemon
源    :@anaconda
匹配来源:
文件名    :/etc/ssh/sshd_config


# yum-utils提供yumdownloader,用于下载软件包
[root@CentOS ~ 16:29:10]# yum install -y yum-utils
[root@CentOS ~ 23:54:13]# yumdownloader openssh-server
已加载插件:fastestmirror
Loading mirror speeds from cached hostfile
 * base: mirrors.aliyun.com
 * extras: mirrors.aliyun.com
 * updates: mirrors.aliyun.com
openssh-server-7.4p1-23.el7_9.x86_64.rpm                   | 459 kB  00:00:00
[root@CentOS ~ 23:54:22]# ls openssh*
openssh-server-7.4p1-23.el7_9.x86_64.rpm
# rpm是一个特殊格式的文件,里面文件通过 cpio 压缩。

# 查看软件包中文件               to
[root@CentOS ~ 23:54:38]# rpm2cpio openssh-server-7.4p1-23.el7_9.x86_64.rpm | cpio -t
./etc/pam.d/sshd
./etc/ssh/sshd_config
./etc/sysconfig/sshd
./usr/lib/systemd/system/sshd-keygen.service
./usr/lib/systemd/system/sshd.service
./usr/lib/systemd/system/sshd.socket
./usr/lib/systemd/system/sshd@.service
./usr/lib64/fipscheck/sshd.hmac
./usr/libexec/openssh/sftp-server
./usr/sbin/sshd
./usr/sbin/sshd-keygen
./usr/share/man/man5/moduli.5.gz
./usr/share/man/man5/sshd_config.5.gz
./usr/share/man/man8/sftp-server.8.gz
./usr/share/man/man8/sshd.8.gz
./var/empty/sshd
1946 块


# 直接提取对应文件
[root@CentOS ~ 23:55:00]# rpm2cpio openssh-server-7.4p1-23.el7_9.x86_64.rpm | cpio -id ./etc/ssh/sshd_config
1946 块

# 验证
[root@CentOS ~ 23:55:17]# yum install -y tree
[root@CentOS ~ 23:55:36]# tree etc
etc
└── ssh
    └── sshd_config

1 directory, 1 file
[root@CentOS ~ 23:55:57]# mv /etc/ssh/sshd_config .
[root@CentOS ~ 23:56:10]# systemctl restart sshd


#  补充 命令行快捷键 ctrl+r 搜索历史命令,回车执行。
4p1-23.el7_9.x86_64.rpm | cpio -id ./etc/ssh/sshd_config
1946 块

# 验证
[root@CentOS ~ 23:55:17]# yum install -y tree
[root@CentOS ~ 23:55:36]# tree etc
etc
└── ssh
    └── sshd_config

1 directory, 1 file
[root@CentOS ~ 23:55:57]# mv /etc/ssh/sshd_config .
[root@CentOS ~ 23:56:10]# systemctl restart sshd


#  补充 命令行快捷键 ctrl+r 搜索历史命令,回车执行。

汇聚全球AI编程工具,助力开发者即刻编程。
更多推荐

 8
8 0
0- 0


 已为社区贡献6条内容

所有评论(0)