
20-生产环境 Kubernetes 集群部署
20-生产环境 Kubernetes 集群部署
高可用概述
Kubernetes中的业务系统,通过控制器实现业务的负载均衡和高可用。
Kubernetes集群采用单节点Master架构存在的问题:
- 一旦Master故障,将导致整个集群不可用。
- 单节点Master工作负载能力有限。
为了实现没有单点故障的目标,需要为以下几个组件建立高可用方案:
- etcd
- kube-apiserver
- kube-controller-manager与kube-scheduler
- kube-dns
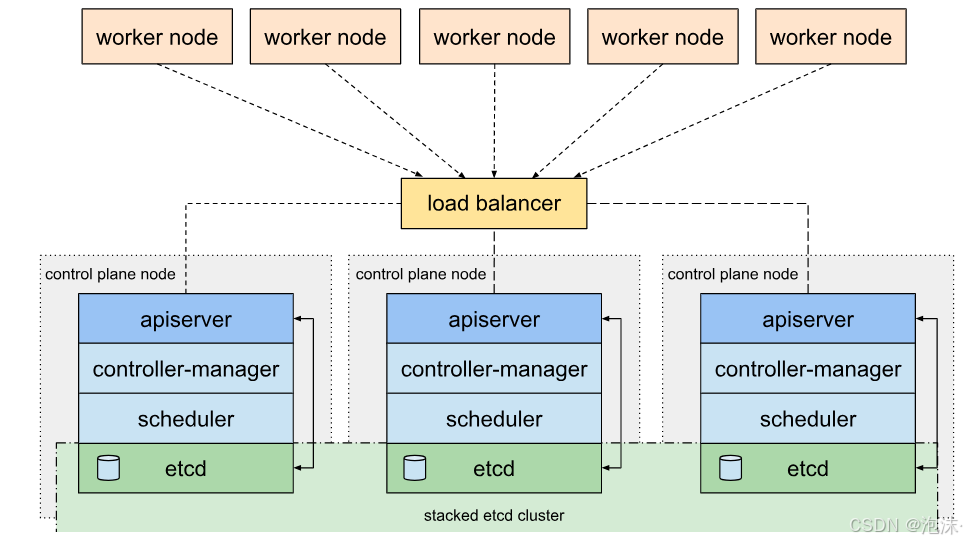
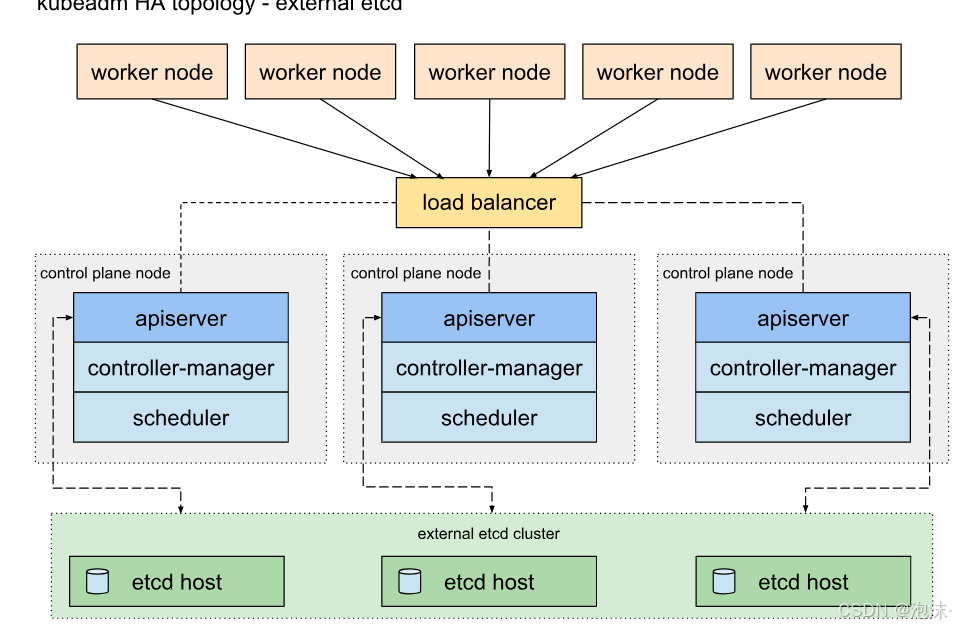
Etcd 集群高可用
Etcd集群高可用方案:
-
独立的etcd集群,使用3台或者5台服务器运行etcd集群。采用这项策略的主要动机是etcd集群的节点增减都需要显式的通知集群,保证etcd集群节点稳定可以更方便的用程序完成集群滚动升级,减轻维护负担。如果此时在etcd集群前构建一套高可用+负载均衡服务器,则etcd集群的节点增减将不用通知Kubernetes集群。
-
Kubernetes中运行etcd集群,在Kubernetes Master上用static pod的形式来运行etcd,并将多台Kubernetes Master上的etcd组成集群。在这一模式下,各个服务器的etcd实例被注册进了Kubernetes当中,虽然无法直接使用kubectl来管理这部分实例,但是监控以及日志搜集组件均可正常工作。在这一模式运行下的etcd可管理性更强。
-
self-hosted etcd集群,使用CoreOS提出的self-hosted etcd方案,将本应在底层为Kubernetes提供服务的etcd运行在Kubernetes之上。实现Kubernetes对自身依赖组件的管理。在这一模式下的etcd集群可以直接使用etcd-operator来自动化运维,最符合Kubernetes的使用习惯。
这三种思路均可以实现etcd高可用的目标,但是在选择过程中却要根据实际情况做出一些判断:
- 预算充足但保守的项目选方案一
- 想一步到位并愿意承担一定风险的项目选方案三
- 折中一点选方案二
kube-apiserver 高可用
apiserver本身是一个无状态服务,要实现其高可用,在于如何将运行在多台服务器上的apiserver用一个统一的外部入口暴露给所有Node节点和客户端。
对于这种无状态服务的高可用,有两种方案:
-
使用外部负载均衡器,不管是使用公有云提供的负载均衡器服务或是在私有云中使用LVS或者HaProxy自建负载均衡器都可以归到这一类。如何保证负载均衡器的高可用,则是选择这一方案需要考虑的新问题。
-
在网络层做负载均衡,比如在Master节点上用BGP做ECMP,或者在Node节点上用iptables做NAT都可以实现。采用这一方案不需要额外的外部服务,但是对网络配置有一定的要求。
这两种思路均可以实现 kube-apiserver 高可用的目标,但要根据实际情况做出选择:
- 建议在公有云上的集群多考虑方案一
- 建议在私有云上的集群多考虑方案二,因为私有云环境中需要额外维护负载均衡器
kube-controller-manager与kube-scheduler
这两项服务是Master节点的一部分,他们的高可用相对容易,仅需要运行多份实例即可。
目前在多个Master节点上采用static pod模式部署这两项服务的方案比较常见。
kube-dns
严格来说kube-dns并不算是Master组件的一部分,因为它是可以跑在Node节点上,并用Service向集群内部提供服务的。
为了避免单点故障,请将kube-dns的replicas值设为2或者更多,并用anti-affinity将他们部署在不同的Node节点上。
高可用架构
高可用实践
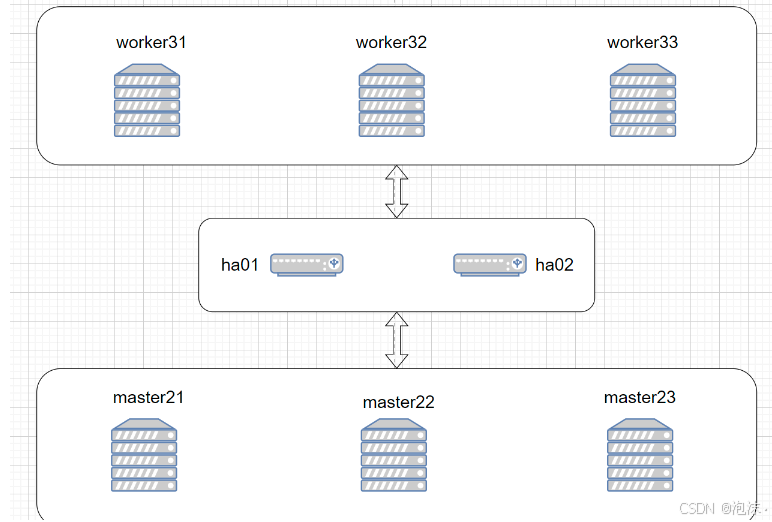
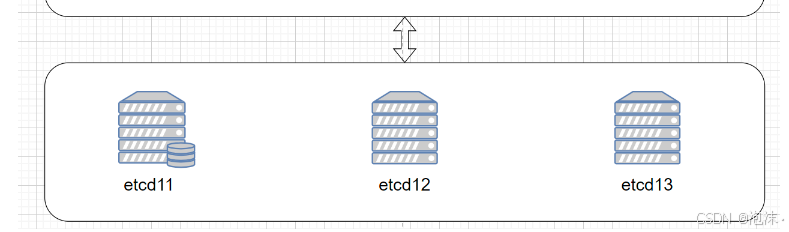
主机清单
| 集群 | 节点 | 地址 |
|---|---|---|
| 高可用 | ha01.zhang.cloud | 10.1.8.101 |
| 高可用 | ha02.zhang.cloud | 10.1.8.102 |
| etcd | etcd11.zhang.cloud | 10.1.8.111 |
| etcd | etcd12.zhang.cloud | 10.1.8.112 |
| etcd | etcd13.zhang.cloud | 10.1.8.113 |
| Kubernetes | master21.zhang.cloud | 10.1.8.121 |
| Kubernetes | master22.zhang.cloud | 10.1.8.122 |
| Kubernetes | master23.zhang.cloud | 10.1.8.123 |
| Kubernetes | worker31.zhang.cloud | 10.1.8.131 |
| Kubernetes | worker32.zhang.cloud | 10.1.8.132 |
| Kubernetes | worker33.zhang.cloud | 10.1.8.133 |
10.1.8.100 k8s.zhang.cloud k8s
10.1.8.101 ha01.zhang.cloud ha01
10.1.8.102 ha02.zhang.cloud ha02
10.1.8.111 etcd11.zhang.cloud etcd11
10.1.8.112 etcd12.zhang.cloud etcd12
10.1.8.113 etcd13.zhang.cloud etcd13
10.1.8.121 master21.zhang.cloud master21
10.1.8.122 master22.zhang.cloud master22
10.1.8.123 master23.zhang.cloud master23
10.1.8.131 worker31.zhang.cloud worker31
10.1.8.132 worker32.zhang.cloud worker32
10.1.8.133 worker33.zhang.cloud worker33
部署过程
准备虚拟机-base 模版
安装系统
Ubuntu 2404 系统安装
最小化安装系统,不需要swap分区,按以下要求分区。
- /boot 2G
- / 90G
安装基础软件包
root@ubuntu2404:~# apt update && apt install -y vim bash-completion open-vm-tools apt-transport-https lrzsz unzip
配置仓库源
操作系统仓库
操作系统仓库换成华为云的仓库,速度更快。
root@ubuntu2404:~# cat /etc/apt/sources.list.d/ubuntu.sources
Types: deb
URIs: http://mirrors.huaweicloud.com/ubuntu/
Suites: noble noble-updates noble-backports
Components: main restricted universe multiverse
Signed-By: /usr/share/keyrings/ubuntu-archive-keyring.gpg

#Types: deb
#URIs: http://security.ubuntu.com/ubuntu/
#Suites: noble-security
#Components: main restricted universe multiverse
#Signed-By: /usr/share/keyrings/ubuntu-archive-keyring.gpg
containerd 仓库
# 导入 containerd 仓库 key
root@ubuntu2404:~# curl -fsSL https://mirrors.huaweicloud.com/docker-ce/linux/ubuntu/gpg | gpg --dearmour -o /etc/apt/trusted.gpg.d/containerd.gpg

# 添加 containerd 仓库
root@ubuntu2404:~# cat << 'EOF' > /etc/apt/sources.list.d/docker-ce.list
deb [arch=amd64] https://mirrors.huaweicloud.com/docker-ce/linux/ubuntu noble stable
EOF
kubernetes 仓库
由于 Kubernetes 官方变更了仓库的存储路径以及使用方式,使用 1.28 及以上版本,需按照新版配置方法进行配置。
该文档示例为配置 1.30 版本,如需其他版本请在对应位置字符串替换即可。比如需要安装 1.29 版本,则需要将如下配置中的 v1.30 替换成 v1.29。
目前该源支持 v1.24 - v1.30 版本,后续版本会持续更新。
# 添加 kubernetes 仓库 key
root@ubuntu2404:~# curl -fsSL https://mirrors.aliyun.com/kubernetes-new/core/stable/v1.30/deb/Release.key | gpg --dearmor -o /etc/apt/keyrings/kubernetes-apt-keyring.gpg

# 添加 kubernetes 仓库
root@ubuntu2404:~# echo "deb [signed-by=/etc/apt/keyrings/kubernetes-apt-keyring.gpg] https://mirrors.aliyun.com/kubernetes-new/core/stable/v1.30/deb/ /" > /etc/apt/sources.list.d/kubernetes.list

# 更新仓库源
root@ubuntu2404:~# apt update
设置 IP
root@ubuntu2404:~# mkdir /etc/netplan/origin
root@ubuntu2404:~# mv /etc/netplan/*yaml /etc/netplan/origin
root@ubuntu2404:~# cat > /etc/netplan/00-static.yaml <<EOF
network:
  ethernets:
    ens32:
      dhcp4: no
      addresses:
        - 10.1.8.10/24
      routes:
        - to: default
          via: 10.1.8.2
      nameservers:
        addresses:
          - 10.1.8.2
          - 223.5.5.5
  version: 2
EOF
root@ubuntu2404:~# chmod 600 /etc/netplan/00-static.yaml
root@ubuntu2404:~# netplan apply
设置 /etc/hosts
root@ubuntu2404:~# cat << 'EOF' >> /etc/hosts

######## kubernetes #####
10.1.8.100 k8s.zhang.cloud k8s
10.1.8.101 ha01.zhang.cloud ha01
10.1.8.102 ha02.zhang.cloud ha02
10.1.8.111 etcd11.zhang.cloud etcd11
10.1.8.112 etcd12.zhang.cloud etcd12
10.1.8.113 etcd13.zhang.cloud etcd13
10.1.8.121 master21.zhang.cloud master21
10.1.8.122 master22.zhang.cloud master22
10.1.8.123 master23.zhang.cloud master23
10.1.8.131 worker31.zhang.cloud worker31
10.1.8.132 worker32.zhang.cloud worker32
10.1.8.133 worker33.zhang.cloud worker33
EOF
配置对时
root@ubuntu2404:~# apt-get install -y chrony
# 以下步骤可以省略
root@ubuntu2404:~# systemctl enable chrony --now
设置 ssh
# 避免ssh服务器对客户端IP进行反向解析为域名,客户端可以快速与服务器建立连接
root@ubuntu2404:~# echo 'UseDNS no' >> /etc/ssh/sshd_config
# 避免ssh客户端校验服务器公钥,否则首次连接需要交互输入yes
root@ubuntu2404:~# echo 'StrictHostKeyChecking no' >> /etc/ssh/ssh_config
# 生成秘钥
root@ubuntu2404:~# ssh-keygen -N '' -f ~/.ssh/id_rsa -t rsa
# 配置免密登录自己
root@ubuntu2404:~# ssh-copy-id root@localhost
设置脚本
root@ubuntu2404:~# cat > /usr/local/bin/sethost <<'EOF'
#!/bin/bash

# 以 root 身份运行
[ $UID -ne 0 ] && echo 'Please run as root.' && exit 1

# 指定接口名称
net_config=/etc/netplan/00-installer-config.yaml

# 指定域名称
domain=zhang.cloud

# 脚本使用说明
usage (){
  echo "Usage: $0 101-102 | 111-113 | 121-123 | 131-133"
  exit 1
}

# 设置 IP 地址
function set_ip () {
  # 修改网卡配置文件IP
  IP=10.1.8.$1
  sed -ri "s#10.1.8.[0-9]{,3}/#$IP/#g" ${net_config}
  # 设置网卡文件权限
  chmod 600 ${net_config}
  # 激活IP
  netplan apply
}

# 设置主机名
function set_hostname () {
  HOSTNAME_END=$[ $1 - 100 ].$domain
  # 获取主机名
  case $1 in
    10[1-2])
      HOSTNAME=ha0${HOSTNAME_END}
      ;;
    11[1-3])
      HOSTNAME=etcd${HOSTNAME_END}
      ;;
    12[1-3])
      HOSTNAME=master${HOSTNAME_END}
      ;;
    13[1-3])
      HOSTNAME=worker${HOSTNAME_END}
      ;;
    *)
      usage
      ;;
  esac
  # 设置主机名
  hostnamectl hostname $HOSTNAME
}

# 定义 main 函数调用功能函数
function main() {
  # 设置主机名
  set_hostname $1

  # 设置 IP
  set_ip $1

  # 显示修改结果
  bash -c 'clear;hostname;echo;ip -br a;echo'

  # 关机打快照
  while true
  do
    echo -ne "Press the \033[1;31mEnter\033[0;39m key, and the system will shut down in 5 seconds.";read
    echo -e "Press \033[1;35mCTRL+C\033[0;39m to cancel the shutdown."
    for i in {5..1}
    do
      echo "The system will shut down in $i seconds."
      sleep 1
    done
    echo "Shutdown system Now." && init 0
  done
}

# 执行 main 函数
main $*
EOF
root@ubuntu2404:~# chmod +x /usr/local/bin/sethost
打快照-base
关闭虚拟机,打快照,名称base。
root@ubuntu2404:~# init 0
准备虚拟机-k8s 模版
提示:基于上个虚拟机原有快照base继续配置系统。
关闭 swap
如果有 swap 分区,需要关闭。kubernetes不需要swap分区。
root@ubuntu2404:~# swapoff -a && sed -i '/^.*swap/d' /etc/fstab
root@ubuntu2404:~# rm -f /swap.img
配置 containerd
root@ubuntu2404:~# apt-get install -y containerd=1.7.12-0ubuntu4 cri-tools

# 设置crictl的runtime-endpoint
root@ubuntu2204:~# crictl config runtime-endpoint unix:///var/run/containerd/containerd.sock

root@ubuntu2404:~# mkdir /etc/containerd
root@ubuntu2404:~# containerd config default > /etc/containerd/config.toml
root@ubuntu2404:~# vim /etc/containerd/config.toml
... ...
# 修改sandbox镜像为阿里云3.9版本
    sandbox_image = "registry.aliyuncs.com/google_containers/pause:3.9"
... ...
      [plugins."io.containerd.grpc.v1.cri".registry.mirrors]
        # 添加如下四行记录,注意缩进
        [plugins."io.containerd.grpc.v1.cri".registry.mirrors."docker.io"]
          endpoint = ["https://09def58152000fc00ff0c00057bad7e0.mirror.swr.myhuaweicloud.com"]
        [plugins."io.containerd.grpc.v1.cri".registry.mirrors."registry.k8s.io"]
          endpoint = ["https://09def58152000fc00ff0c00057bad7e0.mirror.swr.myhuaweicloud.com"]

... ...

# 修改SystemdCgroup值为true
            SystemdCgroup = true
... ...
# 重启服务
root@ubuntu2404:~# systemctl restart containerd.service
# containerd 服务,默认已经设置开机启动,并启动
华为加速服务器:https://09def58152000fc00ff0c00057bad7e0.mirror.swr.myhuaweicloud.com
安装 nerdctl 和 cni plugin
nerdctl 项目地址:https://github.com/containerd/nerdctl/releases
cni 插件项目地址:https://github.com/containernetworking/plugins/releases
# 下载并安装
root@ubuntu2404:~# wget https://github.com/containerd/nerdctl/releases/download/v1.7.6/nerdctl-1.7.6-linux-amd64.tar.gz
root@ubuntu2404:~# tar -xf nerdctl-1.7.6-linux-amd64.tar.gz -C /usr/bin/

# 下载 nerdctl 所需要的 cni 插件
root@ubuntu2404:~# wget https://github.com/containernetworking/plugins/releases/download/v1.5.0/cni-plugins-linux-amd64-v1.5.0.tgz
root@ubuntu2404:~# mkdir -p /opt/cni/bin
root@ubuntu2404:~# tar -xf cni-plugins-linux-amd64-v1.5.0.tgz -C /opt/cni/bin
配置内核参数
# 加载overlay和br_netfilter模块
root@ubuntu2404:~# modprobe -a overlay br_netfilter

# 设置开机自动加载overlay和br_netfilter模块
root@ubuntu2404:~# cat << 'EOF' > /etc/modules-load.d/containerd.conf
overlay
br_netfilter
EOF

# 配置内核参数,将桥接的IPv4流量传递到iptables的链
root@ubuntu2404:~# cat << 'EOF' > /etc/sysctl.d/k8s.conf
net.bridge.bridge-nf-call-ip6tables = 1
net.bridge.bridge-nf-call-iptables = 1
net.ipv4.ip_forward = 1
EOF
# 内核参数立刻生效
root@ubuntu2404:~# sysctl -p /etc/sysctl.d/k8s.conf
安装 kubernetes 软件包
# 查看版本
root@ubuntu2404:~# apt list kubeadm -a|head

WARNING: apt does not have a stable CLI interface. Use with caution in scripts.

Listing...
kubeadm/unknown 1.30.2-1.1 amd64
kubeadm/unknown 1.30.1-1.1 amd64
kubeadm/unknown 1.30.0-1.1 amd64

kubeadm/unknown 1.30.2-1.1 arm64
kubeadm/unknown 1.30.1-1.1 arm64
kubeadm/unknown 1.30.0-1.1 arm64

kubeadm/unknown 1.30.2-1.1 ppc64el

root@ubuntu2404:~# apt install -y kubeadm=1.30.2-1.1 kubelet=1.30.2-1.1 kubectl=1.30.2-1.1

# 设置 kubelet 服务
root@ubuntu2404:~# systemctl enable kubelet --now
此时kubelet服务处于activating,等 kubernetes 安装完成后状态变更为active。
配置相关命令补全
# 配置 crictl 命令自动补全
root@ubuntu2404:~# mkdir /etc/bash_completion.d
root@ubuntu2404:~# crictl completion bash > /etc/bash_completion.d/crictl
root@ubuntu2404:~# source /etc/bash_completion.d/crictl

# 配置 nerdctl 命令自动补全
root@ubuntu2404:~# nerdctl completion bash > /etc/bash_completion.d/nerdctl
root@ubuntu2404:~# echo 'export CONTAINERD_NAMESPACE=k8s.io' >> /etc/bash_completion.d/nerdctl
root@ubuntu2404:~# source /etc/bash_completion.d/nerdctl
注意:此处必须设置变量 CONTAINERD_NAMESPACE,否则 nerdctl 默认将镜像导入到 default 命名空间,导致 k8s 无法使用镜像。k8s 默认使用 k8s.io 命名空间中镜像。
# 配置 kubectl 命令补全
root@ubuntu2404:~# kubectl completion bash > /etc/bash_completion.d/kubectl
root@ubuntu2404:~# source /etc/bash_completion.d/kubectl

# 配置 kubeadm 命令补全
root@ubuntu2404:~# kubeadm completion bash > /etc/bash_completion.d/kubeadm
root@ubuntu2404:~# source /etc/bash_completion.d/kubeadm
打快照-k8s
关闭虚拟机,打快照,名称k8s。
root@ubuntu2404:~# init 0
准备集群节点
通过 base 快照克隆ha节点和etcd节点机器。
通过 k8s 快照克隆 k8s 节点机器。
使用sethost脚本设置主机名和IP地址。
root@ubuntu2404:~# sethost
Usage: /usr/local/bin/sethost 101-102 | 111-113 | 121-123 | 131-133

root@ubuntu2404:~# sethost 101
部署 Etcd 集群
# 所有etcd节点配置
root@etcdN:~# apt update && apt install -y etcd-server etcd-client
root@etcdN:~# systemctl stop etcd.service
root@etcdN:~# rm -fr /var/lib/etcd/default

# etcd11节点配置
root@etcd11:~# cp /etc/default/etcd /etc/default/etcd.ori
root@etcd11:~# cat > /etc/default/etcd <<'EOF'
ETCD_NAME="etcd11"
ETCD_DATA_DIR="/var/lib/etcd/default"
ETCD_LISTEN_PEER_URLS="http://localhost:2380,http://10.1.8.111:2380"
ETCD_LISTEN_CLIENT_URLS="http://localhost:2379,http://10.1.8.111:2379"
ETCD_INITIAL_ADVERTISE_PEER_URLS="http://10.1.8.111:2380"
ETCD_ADVERTISE_CLIENT_URLS="http://localhost:2379,http://10.1.8.111:2379"
ETCD_INITIAL_CLUSTER="etcd11=http://10.1.8.111:2380,etcd12=http://10.1.8.112:2380,etcd13=http://10.1.8.113:2380"
ETCD_INITIAL_CLUSTER_TOKEN="etcd-cluster"
ETCD_INITIAL_CLUSTER_STATE="new"
EOF

# etcd12节点配置
root@etcd12:~# cp /etc/default/etcd /etc/default/etcd.ori
root@etcd12:~# cat > /etc/default/etcd <<'EOF'
ETCD_NAME="etcd12"
ETCD_DATA_DIR="/var/lib/etcd/default"
ETCD_LISTEN_PEER_URLS="http://localhost:2380,http://10.1.8.112:2380"
ETCD_LISTEN_CLIENT_URLS="http://localhost:2379,http://10.1.8.112:2379"
ETCD_INITIAL_ADVERTISE_PEER_URLS="http://10.1.8.112:2380"
ETCD_ADVERTISE_CLIENT_URLS="http://localhost:2379,http://10.1.8.112:2379"
ETCD_INITIAL_CLUSTER="etcd11=http://10.1.8.111:2380,etcd12=http://10.1.8.112:2380,etcd13=http://10.1.8.113:2380"
ETCD_INITIAL_CLUSTER_TOKEN="etcd-cluster"
ETCD_INITIAL_CLUSTER_STATE="new"
EOF

# etcd3节点配置
root@etcd13:~# cp /etc/default/etcd /etc/default/etcd.ori
root@etcd13:~# cat > /etc/default/etcd <<'EOF'
ETCD_NAME="etcd13"
ETCD_DATA_DIR="/var/lib/etcd/default"
ETCD_LISTEN_PEER_URLS="http://localhost:2380,http://10.1.8.113:2380"
ETCD_LISTEN_CLIENT_URLS="http://localhost:2379,http://10.1.8.113:2379"
ETCD_INITIAL_ADVERTISE_PEER_URLS="http://10.1.8.113:2380"
ETCD_ADVERTISE_CLIENT_URLS="http://localhost:2379,http://10.1.8.113:2379"
ETCD_INITIAL_CLUSTER="etcd11=http://10.1.8.111:2380,etcd12=http://10.1.8.112:2380,etcd13=http://10.1.8.113:2380"
ETCD_INITIAL_CLUSTER_TOKEN="etcd-cluster"
ETCD_INITIAL_CLUSTER_STATE="new"
EOF

# 所有节点启用并启动服务
root@etcdN:~# systemctl enable etcd
root@etcdN:~# systemctl start etcd

# 验证集群状态
root@etcd11:~# etcdctl member list
56ee9a8b1143f1f6, started, etcd12, http://10.1.8.112:2380, http://10.1.8.112:2379,http://localhost:2379, false
b09f448fe279511f, started, etcd11, http://10.1.8.111:2380, http://10.1.8.111:2379,http://localhost:2379, false
b83c09e0fc6318a6, started, etcd13, http://10.1.8.113:2380, http://10.1.8.113:2379,http://localhost:2379, false
配置补全
root@etcdN:~# mkdir /etc/bash_completion.d
root@etcdN:~# etcdctl completion bash > /etc/bash_completion.d/etcdctl
root@etcdN:~# source /etc/bash_completion.d/etcdctl
部署 Keepalived 集群
# 所有 HA 节点安装keepalived
root@haN:~# apt install -y keepalived

# ha2修改配置文件
root@ha02:~# cp /etc/keepalived/keepalived.conf{.sample,}
root@ha02:~# vim /etc/keepalived/keepalived.conf
! Configuration File for keepalived

global_defs {
   router_id ha02
}

vrrp_instance k8s {
    state BACKUP
    interface ens33
    virtual_router_id 51
    priority 100
    advert_int 1
    authentication {
        auth_type PASS
        auth_pass 1111
    }
    virtual_ipaddress {
        10.1.8.100/24
    }
}

# 启用并启动安装keepalived服务
root@ha02:~# systemctl enable keepalived.service
root@ha02:~# systemctl restart keepalived.service
root@ha02:~# ip -br a
lo               UNKNOWN        127.0.0.1/8 ::1/128
ens32            UP             10.1.8.102/24 fe80::20c:29ff:fea5:36a1/64

# ha1修改配置文件
root@ha01:~# cp /etc/keepalived/keepalived.conf{.sample,}
root@ha01:~# vim /etc/keepalived/keepalived.conf
! Configuration File for keepalived

global_defs {
   router_id ha01
}

vrrp_instance k8s {
    state MASTER
    interface ens33
    virtual_router_id 51
    priority 200
    advert_int 1
    authentication {
        auth_type PASS
        auth_pass 1111
    }
    virtual_ipaddress {
        10.1.8.100/24
    }
}

# 启用并启动安装keepalived服务
root@ha01:~# systemctl enable keepalived.service
root@ha01:~# systemctl restart keepalived.service
root@ha01:~# ip -br a
lo               UNKNOWN        127.0.0.1/8 ::1/128
ens32            UP             10.1.8.101/24 10.1.8.100/24 fe80::20c:29ff:fe39:b65c/64
部署 Haproxy 集群
提示:所有 HA 节点都部署Haproxy 集群
# 安装软件包
root@haN:~# apt install -y haproxy

# 更改haproxy.cfg
root@haN:~# cat >> /etc/haproxy/haproxy.cfg <<'EOF'
# 新增统计面板配置
listen stats
    bind *:1080  # 监听 1080 端口(可自定义,如 8080)
    mode http
    stats enable  # 启用统计面板
    stats uri /haproxy-stats  # 访问路径(如 http://HA节点IP:1080/haproxy-stats)
    stats refresh 3s  # 页面自动刷新间隔
    stats auth admin:123456  # 登录账号密码(生产环境务必修改)
    stats hide-version  # 隐藏 HAProxy 版本(安全)

# 新增 k8s 面板配置
listen k8s
  mode tcp
  bind *:6443
  balance  roundrobin
  server  master21 10.1.8.121:6443 check inter 3000ms fall 3 rise 2
  server  master22 10.1.8.122:6443 check inter 3000ms fall 3 rise 2
  server  master23 10.1.8.123:6443 check inter 3000ms fall 3 rise 2
EOF
root@haN:~# systemctl enable haproxy
root@haN:~# systemctl restart haproxy.service
部署 Kubernetes 集群
初始化集群
# 准备集群配置文件,在现有集群命令执行命令获得:kubeadm config view
[root@master1 ~]# vim kubeadm-config.yaml
apiServer:
  extraArgs:
    authorization-mode: Node,RBAC
apiVersion: kubeadm.k8s.io/v1beta3
certificatesDir: /etc/kubernetes/pki
clusterName: kubernetes
controllerManager: {}
dns: {}

# 新增controlPlaneEndpoint,该地址为Keepalived的VIP
controlPlaneEndpoint: "10.1.8.100:6443"

# 修改etcd
etcd:
  external:
    endpoints:
    - "http://10.1.8.111:2379"
    - "http://10.1.8.112:2379"
    - "http://10.1.8.113:2379"

imageRepository: registry.aliyuncs.com/google_containers
kind: ClusterConfiguration
kubernetesVersion: v1.30.2
networking:
  dnsDomain: cluster.local
  podSubnet: 10.224.0.0/16
  serviceSubnet: 10.96.0.0/12
scheduler: {}
# 初始化集群
[root@master1 ~]# kubeadm init --config kubeadm-config.yaml
[init] Using Kubernetes version: v1.30.2
[preflight] Running pre-flight checks
[preflight] Pulling images required for setting up a Kubernetes cluster
[preflight] This might take a minute or two, depending on the speed of your internet connection
[preflight] You can also perform this action in beforehand using 'kubeadm config images pull'
[certs] Using certificateDir folder "/etc/kubernetes/pki"
[certs] Generating "ca" certificate and key
[certs] Generating "apiserver" certificate and key
[certs] apiserver serving cert is signed for DNS names [kubernetes kubernetes.default kubernetes.default.svc kubernetes.default.svc.cluster.local master21.zhang.cloud] and IPs [10.96.0.1 10.1.8.121 10.1.8.100]
[certs] Generating "apiserver-kubelet-client" certificate and key
[certs] Generating "front-proxy-ca" certificate and key
[certs] Generating "front-proxy-client" certificate and key
[certs] External etcd mode: Skipping etcd/ca certificate authority generation
[certs] External etcd mode: Skipping etcd/server certificate generation
[certs] External etcd mode: Skipping etcd/peer certificate generation
[certs] External etcd mode: Skipping etcd/healthcheck-client certificate generation
[certs] External etcd mode: Skipping apiserver-etcd-client certificate generation
[certs] Generating "sa" key and public key
[kubeconfig] Using kubeconfig folder "/etc/kubernetes"
[kubeconfig] Writing "admin.conf" kubeconfig file
[kubeconfig] Writing "super-admin.conf" kubeconfig file
[kubeconfig] Writing "kubelet.conf" kubeconfig file
[kubeconfig] Writing "controller-manager.conf" kubeconfig file
[kubeconfig] Writing "scheduler.conf" kubeconfig file
[control-plane] Using manifest folder "/etc/kubernetes/manifests"
[control-plane] Creating static Pod manifest for "kube-apiserver"
[control-plane] Creating static Pod manifest for "kube-controller-manager"
[control-plane] Creating static Pod manifest for "kube-scheduler"
[kubelet-start] Writing kubelet environment file with flags to file "/var/lib/kubelet/kubeadm-flags.env"
[kubelet-start] Writing kubelet configuration to file "/var/lib/kubelet/config.yaml"
[kubelet-start] Starting the kubelet
[wait-control-plane] Waiting for the kubelet to boot up the control plane as static Pods from directory "/etc/kubernetes/manifests"
[kubelet-check] Waiting for a healthy kubelet. This can take up to 4m0s
[kubelet-check] The kubelet is healthy after 502.28234ms
[api-check] Waiting for a healthy API server. This can take up to 4m0s
[api-check] The API server is healthy after 5.043608027s
[upload-config] Storing the configuration used in ConfigMap "kubeadm-config" in the "kube-system" Namespace
[kubelet] Creating a ConfigMap "kubelet-config" in namespace kube-system with the configuration for the kubelets in the cluster
[upload-certs] Skipping phase. Please see --upload-certs
[mark-control-plane] Marking the node master21.zhang.cloud as control-plane by adding the labels: [node-role.kubernetes.io/control-plane node.kubernetes.io/exclude-from-external-load-balancers]
[mark-control-plane] Marking the node master21.zhang.cloud as control-plane by adding the taints [node-role.kubernetes.io/control-plane:NoSchedule]
[bootstrap-token] Using token: b0pnwt.1o94h2j82okh7gzt
[bootstrap-token] Configuring bootstrap tokens, cluster-info ConfigMap, RBAC Roles
[bootstrap-token] Configured RBAC rules to allow Node Bootstrap tokens to get nodes
[bootstrap-token] Configured RBAC rules to allow Node Bootstrap tokens to post CSRs in order for nodes to get long term certificate credentials
[bootstrap-token] Configured RBAC rules to allow the csrapprover controller automatically approve CSRs from a Node Bootstrap Token
[bootstrap-token] Configured RBAC rules to allow certificate rotation for all node client certificates in the cluster
[bootstrap-token] Creating the "cluster-info" ConfigMap in the "kube-public" namespace
[kubelet-finalize] Updating "/etc/kubernetes/kubelet.conf" to point to a rotatable kubelet client certificate and key
[addons] Applied essential addon: CoreDNS
[addons] Applied essential addon: kube-proxy

Your Kubernetes control-plane has initialized successfully!

To start using your cluster, you need to run the following as a regular user:

  mkdir -p $HOME/.kube
  sudo cp -i /etc/kubernetes/admin.conf $HOME/.kube/config
  sudo chown $(id -u):$(id -g) $HOME/.kube/config

Alternatively, if you are the root user, you can run:

  export KUBECONFIG=/etc/kubernetes/admin.conf

You should now deploy a pod network to the cluster.
Run "kubectl apply -f [podnetwork].yaml" with one of the options listed at:
  https://kubernetes.io/docs/concepts/cluster-administration/addons/

You can now join any number of control-plane nodes by copying certificate authorities
and service account keys on each node and then running the following as root:

  kubeadm join 10.1.8.100:6443 --token b0pnwt.1o94h2j82okh7gzt \
	--discovery-token-ca-cert-hash sha256:0bd96f3415a5913f0fe28e6ad29c6bdfd487f4f7f46aa2dcfdf13f3bca00464f \
	--control-plane

Then you can join any number of worker nodes by running the following on each as root:

kubeadm join 10.1.8.100:6443 --token b0pnwt.1o94h2j82okh7gzt \
	--discovery-token-ca-cert-hash sha256:0bd96f3415a5913f0fe28e6ad29c6bdfd487f4f7f46aa2dcfdf13f3bca00464f
其他 master 节点加入集群
# 将master21节点目录/etc/kubernetes/pki/中以下文件拷贝过来到其他master节点
- ca.crt
- ca.key
- sa.key
- sa.pub
- front-proxy-ca.crt
- front-proxy-ca.key

root@master22:~# mkdir -p /etc/kubernetes/pki
root@master22:~# scp master21:/etc/kubernetes/pki/{ca.crt,ca.key,front-proxy-ca.crt,front-proxy-ca.key,sa.key,sa.pub} /etc/kubernetes/pki/

# 其他master节点加入集群
root@master22:~# kubeadm join 10.1.8.100:6443 --token eqkieg.atiw2xodkfj2n3q3 \
> --discovery-token-ca-cert-hash sha256:e6de958978c9ada049a895921c992429772bff85a45d3698567eb6232720c34c \
> --control-plane

# 准备凭据文件
root@master22:~# mkdir -p $HOME/.kube
root@master22:~# sudo cp -i /etc/kubernetes/admin.conf $HOME/.kube/config
root@master22:~# sudo chown $(id -u):$(id -g) $HOME/.kube/config

root@master23:~# mkdir -p /etc/kubernetes/pki
root@master23:~# scp master21:/etc/kubernetes/pki/{ca.crt,ca.key,front-proxy-ca.crt,front-proxy-ca.key,sa.key,sa.pub} /etc/kubernetes/pki/

# 其他master节点加入集群
root@master23:~# kubeadm join 10.1.8.100:6443 --token eqkieg.atiw2xodkfj2n3q3 \
> --discovery-token-ca-cert-hash sha256:e6de958978c9ada049a895921c992429772bff85a45d3698567eb6232720c34c \
> --control-plane

# 准备凭据文件
root@master23:~# mkdir -p $HOME/.kube
root@master23:~# sudo cp -i /etc/kubernetes/admin.conf $HOME/.kube/config
root@master23:~# sudo chown $(id -u):$(id -g) $HOME/.kube/config
worker 节点加入集群
# worker31节点加入集群
root@worker31:~# kubeadm join 10.1.8.100:6443 --token eqkieg.atiw2xodkfj2n3q3 \
> --discovery-token-ca-cert-hash sha256:e6de958978c9ada049a895921c992429772bff85a45d3698567eb6232720c34c
[preflight] Running pre-flight checks
[preflight] Reading configuration from the cluster...
[preflight] FYI: You can look at this config file with 'kubectl -n kube-system get cm kubeadm-config -o yaml'
[kubelet-start] Writing kubelet configuration to file "/var/lib/kubelet/config.yaml"
[kubelet-start] Writing kubelet environment file with flags to file "/var/lib/kubelet/kubeadm-flags.env"
[kubelet-start] Starting the kubelet
[kubelet-start] Waiting for the kubelet to perform the TLS Bootstrap...

This node has joined the cluster:
* Certificate signing request was sent to apiserver and a response was received.
* The Kubelet was informed of the new secure connection details.

Run 'kubectl get nodes' on the control-plane to see this node join the cluster.

# worker32节点加入集群
root@worker31:~#  kubeadm join 10.1.8.100:6443 --token eqkieg.atiw2xodkfj2n3q3 \
> --discovery-token-ca-cert-hash sha256:e6de958978c9ada049a895921c992429772bff85a45d3698567eb6232720c34c

# worker33节点加入集群
root@worker33:~#  kubeadm join 10.1.8.100:6443 --token eqkieg.atiw2xodkfj2n3q3 \
> --discovery-token-ca-cert-hash sha256:e6de958978c9ada049a895921c992429772bff85a45d3698567eb6232720c34c

# 确认当前集群节点状态
[root@master1 ~]# kubectl get nodes
NAME                 STATUS     ROLES                  AGE   VERSION
master1.zhang.cloud   NotReady   control-plane,master   58m   v1.21.2
master2.zhang.cloud   NotReady   control-plane,master   30m   v1.21.2
worker1.zhang.cloud   NotReady   <none>                 42m   v1.21.2
worker2.zhang.cloud   NotReady   <none>                 42m   v1.21.2
部署网络
这里采用calico网络。
下载calico网络配置
root@master30:~# wget https://docs.projectcalico.org/archive/v3.14/manifests/calico.yaml
该配置使用以下镜像:
- calico/cni:v3.14.2
- calico/kube-controllers:v3.14.2
- calico/node:v3.14.2
- calico/pod2daemon-flexvol:v3.14.2
建议:提前下载镜像。
查看集群pod网络范围
root@master30:~# kubeadm config view|grep podSubnet
Command "view" is deprecated, This command is deprecated and will be removed in a future release, please use 'kubectl get cm -o yaml -n kube-system kubeadm-config' to get the kubeadm config directly.
  podSubnet: 10.224.0.0/16
更改calico.yml,确保CALICO_IPV4POOL_CIDR与集群初始化的pod网络一致。
            - name: CALICO_IPV4POOL_CIDR
              value: "10.224.0.0/16"
注意:原先这两行是注释行,注意对齐。
创建网络
root@master30:~# kubectl apply -f calico.yaml
configmap/calico-config created
Warning: apiextensions.k8s.io/v1beta1 CustomResourceDefinition is deprecated in v1.16+, unavailable in v1.22+; use apiextensions.k8s.io/v1 CustomResourceDefinition
customresourcedefinition.apiextensions.k8s.io/bgpconfigurations.crd.projectcalico.org created
customresourcedefinition.apiextensions.k8s.io/bgppeers.crd.projectcalico.org created
customresourcedefinition.apiextensions.k8s.io/blockaffinities.crd.projectcalico.org created
customresourcedefinition.apiextensions.k8s.io/clusterinformations.crd.projectcalico.org created
customresourcedefinition.apiextensions.k8s.io/felixconfigurations.crd.projectcalico.org created
customresourcedefinition.apiextensions.k8s.io/globalnetworkpolicies.crd.projectcalico.org created
customresourcedefinition.apiextensions.k8s.io/globalnetworksets.crd.projectcalico.org created
customresourcedefinition.apiextensions.k8s.io/hostendpoints.crd.projectcalico.org created
customresourcedefinition.apiextensions.k8s.io/ipamblocks.crd.projectcalico.org created
customresourcedefinition.apiextensions.k8s.io/ipamconfigs.crd.projectcalico.org created
customresourcedefinition.apiextensions.k8s.io/ipamhandles.crd.projectcalico.org created
customresourcedefinition.apiextensions.k8s.io/ippools.crd.projectcalico.org created
customresourcedefinition.apiextensions.k8s.io/kubecontrollersconfigurations.crd.projectcalico.org created
customresourcedefinition.apiextensions.k8s.io/networkpolicies.crd.projectcalico.org created
customresourcedefinition.apiextensions.k8s.io/networksets.crd.projectcalico.org created
clusterrole.rbac.authorization.k8s.io/calico-kube-controllers created
clusterrolebinding.rbac.authorization.k8s.io/calico-kube-controllers created
clusterrole.rbac.authorization.k8s.io/calico-node created
clusterrolebinding.rbac.authorization.k8s.io/calico-node created
daemonset.apps/calico-node created
serviceaccount/calico-node created
deployment.apps/calico-kube-controllers created
serviceaccount/calico-kube-controllers created
验证安装结果
# 确认节点状态
[root@master1 ~]# kubectl get node
NAME                 STATUS   ROLES                  AGE   VERSION
master1.zhang.cloud   Ready    control-plane,master   62m   v1.21.2
master2.zhang.cloud   Ready    control-plane,master   34m   v1.21.2
worker1.zhang.cloud   Ready    <none>                 47m   v1.21.2
worker2.zhang.cloud   Ready    <none>                 46m   v1.21.2

# 确认pod状态
[root@master1 ~]# kubectl get pod -A
NAMESPACE     NAME                                         READY   STATUS    RESTARTS   AGE
kube-system   calico-kube-controllers-7676785684-bcn4p     1/1     Running   0          2m40s
kube-system   calico-node-5f6ms                            1/1     Running   0          2m41s
kube-system   calico-node-kslg7                            1/1     Running   0          2m41s
kube-system   calico-node-lfzmk                            1/1     Running   0          2m41s
kube-system   calico-node-qfgrw                            1/1     Running   0          2m41s
kube-system   coredns-59d64cd4d4-7vthm                     1/1     Running   0          63m
kube-system   coredns-59d64cd4d4-ktkcc                     1/1     Running   0          63m
kube-system   kube-apiserver-master1.zhang.cloud            1/1     Running   0          63m
kube-system   kube-apiserver-master2.zhang.cloud            1/1     Running   0          35m
kube-system   kube-controller-manager-master1.zhang.cloud   1/1     Running   0          63m
kube-system   kube-controller-manager-master2.zhang.cloud   1/1     Running   0          35m
kube-system   kube-proxy-r5b7q                             1/1     Running   0          47m
kube-system   kube-proxy-r8vk2                             1/1     Running   0          63m
kube-system   kube-proxy-st9mx                             1/1     Running   0          35m
kube-system   kube-proxy-tkwj9                             1/1     Running   0          47m
kube-system   kube-scheduler-master1.zhang.cloud            1/1     Running   0          63m
kube-system   kube-scheduler-master2.zhang.cloud            1/1     Running   0          35m

# master1创建资源,master2上查看
[root@master1 ~]# kubectl create ns zhang
namespace/zhang created
root@master22:~# kubectl get ns zhang
NAME    STATUS   AGE
zhang   Active   14s

# master2删除资源,master1上查看
root@master22:~# kubectl delete ns zhang
namespace "zhang" deleted
[root@master1 ~]# kubectl get ns zhang
Error from server (NotFound): namespaces "zhang" not found

# master1或master2关机,验证集群是否正常
# ha1或ha2关机,验证集群是否正常
aster2.zhang.cloud 1/1 Running 0 35m
kube-system kube-proxy-r5b7q 1/1 Running 0 47m
kube-system kube-proxy-r8vk2 1/1 Running 0 63m
kube-system kube-proxy-st9mx 1/1 Running 0 35m
kube-system kube-proxy-tkwj9 1/1 Running 0 47m
kube-system kube-scheduler-master1.zhang.cloud 1/1 Running 0 63m
kube-system kube-scheduler-master2.zhang.cloud 1/1 Running 0 35m
master1创建资源,master2上查看
[root@master1 ~]# kubectl create ns zhang
namespace/zhang created
root@master22:~# kubectl get ns zhang
NAME STATUS AGE
zhang Active 14s
master2删除资源,master1上查看
root@master22:~# kubectl delete ns zhang
namespace “zhang” deleted
[root@master1 ~]# kubectl get ns zhang
Error from server (NotFound): namespaces “zhang” not found
master1或master2关机,验证集群是否正常
ha1或ha2关机,验证集群是否正常

汇聚全球AI编程工具,助力开发者即刻编程。
更多推荐

 17
17 0
0- 0


 已为社区贡献2条内容

所有评论(0)