
[JavaEE] Mybatis操作数据库
目录
1. JDBC操作数据库
之前都是使用的JDBC来操作数据库,操作流程如下:
- 1. 创建数据库连接池DataSource
- 2. 通过DataSource获取数据库连接Connection
- 3. 编写要执行带?占位符的SQL语句
- 4. 通过Connection及SQL创建操作命令对象Statement
- 5. 替换占位符:指定要替换的数据库字段类型,占位符索引及要替换的值
- 6. 使用Statement执行SQL语句
- 7. 查询操作:返回结果集ResultSet,更新操作:返回更新的数量
- 8. 处理结果集
- 9. 释放资源
我们会发现上面操作数据库的步骤非常繁琐,每次进行数据库的操作时候,都需要进行上面的过程,还要释放资源,后来就有了Mybatis框架来操作数据库。
2. 什么是Mybatis
Mybatis是一个持久层框架,用来简化JDBC的开发的,持久层就是持续化操作的层,这里指的是数据操作层(Dao),本质就是更简单的去操作数据库。
3. Mybatis入门
我们需要创建一个Spring Boot项目,添加下面的依赖:
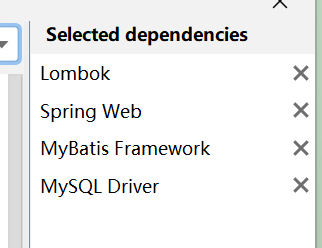
MySQL Driver是数据库的驱动,Mybatis是用来操作数据库驱动的,数据库驱动再访问数据库。
访问数据库配置文件:
这里我们需要在数据库里面添加数据库的配置文件,用来确定访问的是哪个数据库:
#数据库连接配置
spring:
  datasource:
    url: jdbc:mysql://127.0.0.1:3306/mybatis_test?characterEncoding=utf8&useSSL=false
    username: root
    password: 123456
    driver-class-name: com.mysql.cj.jdbc.Driver
我们需要在数据库里面创建一个名为mybatis_test的数据库:
-- 创建数据库
DROP DATABASE IF EXISTS mybatis_test;

CREATE DATABASE mybatis_test DEFAULT CHARACTER SET utf8mb4;

-- 使用数据数据
USE mybatis_test;

-- 创建表[用户表]
DROP TABLE IF EXISTS user_info;
CREATE TABLE `user_info` (
        `id` INT ( 11 ) NOT NULL AUTO_INCREMENT,
        `username` VARCHAR ( 127 ) NOT NULL,
        `password` VARCHAR ( 127 ) NOT NULL,
        `age` TINYINT ( 4 ) NOT NULL,
        `gender` TINYINT ( 4 ) DEFAULT '0' COMMENT '1-男 2-女 0-默认',
        `phone` VARCHAR ( 15 ) DEFAULT NULL,
        `delete_flag` TINYINT ( 4 ) DEFAULT 0 COMMENT '0-正常, 1-删除',
        `create_time` DATETIME DEFAULT now(),
        `update_time` DATETIME DEFAULT now() ON UPDATE now(),
        PRIMARY KEY ( `id` )
) ENGINE = INNODB DEFAULT CHARSET = utf8mb4;

-- 添加用户信息
INSERT INTO mybatis_test.user_info( username, `password`, age, gender, phone )
VALUES ( 'admin', 'admin', 18, 1, '18612340001' );
INSERT INTO mybatis_test.user_info( username, `password`, age, gender, phone )
VALUES ( 'zhangsan', 'zhangsan', 18, 1, '18612340002' );
INSERT INTO mybatis_test.user_info( username, `password`, age, gender, phone )
VALUES ( 'lisi', 'lisi', 18, 1, '18612340003' );
INSERT INTO mybatis_test.user_info( username, `password`, age, gender, phone )
VALUES ( 'wangwu', 'wangwu', 18, 1, '18612340004' );


-- 创建文章表
DROP TABLE IF EXISTS article_info;

CREATE TABLE article_info (
        id INT PRIMARY KEY auto_increment,
        title VARCHAR ( 100 ) NOT NULL,
        content TEXT NOT NULL,
        uid INT NOT NULL,
        delete_flag TINYINT ( 4 ) DEFAULT 0 COMMENT '0-正常, 1-删除',
        create_time DATETIME DEFAULT now(),
        update_time DATETIME DEFAULT now()
) DEFAULT charset 'utf8mb4';

-- 插入测试数据
INSERT INTO article_info ( title, content, uid ) VALUES ( 'Java', 'Java正文', 1 );
我们需要创建一个用户类,里面的数据跟查询到的数据库的属性应该一一对应。
package com.sias.mybatis.model;

import lombok.Data;
import java.util.Date;

@Data
public class UserInfo {
    private Integer id;
    private String username;
    private String password;
    private Integer age;
    private Integer gender;
    private String phone;
    private Integer deleteFlag;
    private Date createTime;
    private Date updateTime;
}
此时就可以编写查询代码了:
这里我们创建一个抽象类:
这里的@Mapper注解是将该类交给spring管理的,使用@Select注解来编写SQL语句。
package com.sias.mybatis.mapper;

import com.sias.mybatis.model.UserInfo;
import org.apache.ibatis.annotations.Mapper;
import org.apache.ibatis.annotations.Select;

import java.util.List;

@Mapper
public interface UserInfoMapper {

    @Select("select * from user_info")
    List<UserInfo> selectAll();
}
通过自己生成的测试类来测试:

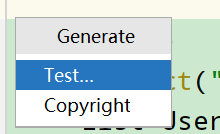
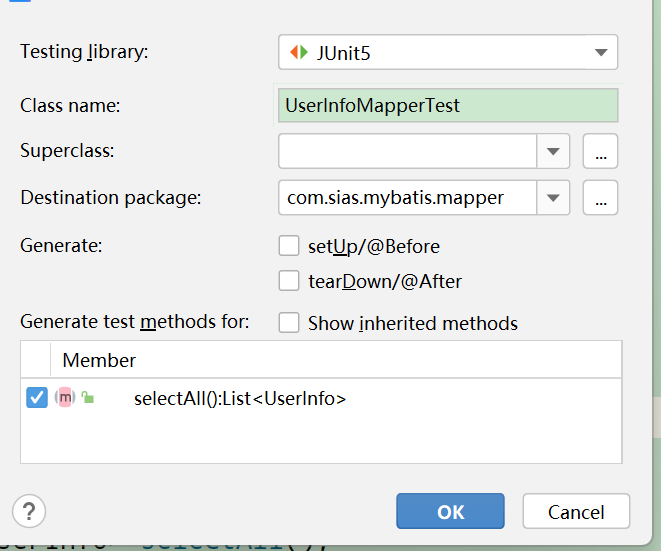
生成的测试类代码如下:
这里的@SpringBootTest注解是加载spring的运行环境。
package com.sias.mybatis.mapper;

import org.junit.jupiter.api.Test;
import org.springframework.beans.factory.annotation.Autowired;
import org.springframework.boot.test.context.SpringBootTest;

import static org.junit.jupiter.api.Assertions.*;

@SpringBootTest
class UserInfoMapperTest {

    @Autowired
    private UserInfoMapper userInfoMapper;
    @Test
    void selectAll() {
        System.out.println(userInfoMapper.selectAll());
    }
}
此时运行测试代码,就可以显示查询的结果了。
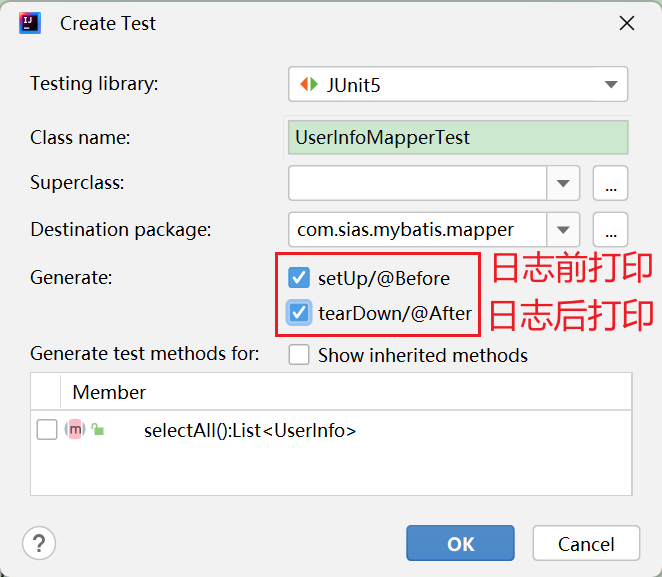
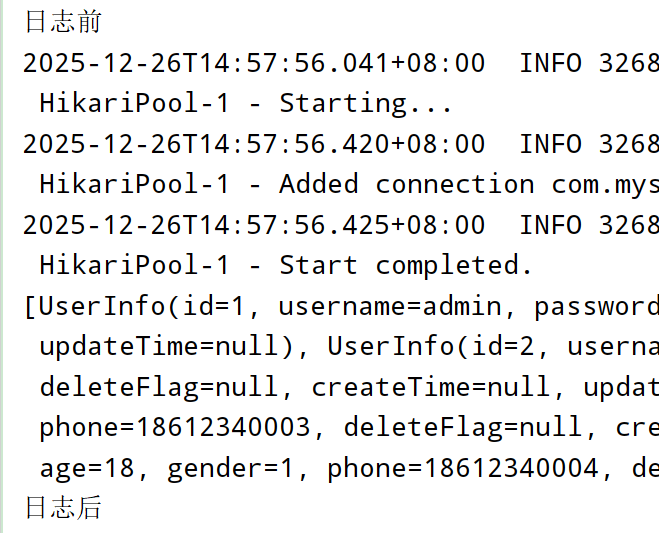
这里会生成两个方法,一个方法的内容是在日志前打印的,一个日志的内容是在日志后打印的。
@SpringBootTest
class UserInfoMapperTest {

    @Autowired
    private UserInfoMapper userInfoMapper;
    @Test
    void selectAll() {
        System.out.println(userInfoMapper.selectAll());
    }

    @BeforeEach
    void setUp() {
        System.out.println("日志前");
    }

    @AfterEach
    void tearDown() {
        System.out.println("日志后");
    }

}
打印结果:
使用系统提供的测试类来测试:
package com.sias.mybatis;

import com.sias.mybatis.mapper.UserInfoMapper;
import org.junit.jupiter.api.Test;
import org.springframework.beans.factory.annotation.Autowired;
import org.springframework.boot.test.context.SpringBootTest;
import org.springframework.context.ApplicationContext;

@SpringBootTest
class MybatisDemoApplicationTests {

	@Autowired
	private ApplicationContext applicationContext;
	@Test
	void contextLoads() {
		UserInfoMapper bean = applicationContext.getBean(UserInfoMapper.class);
		bean.selectAll().stream().forEach(x -> System.out.println(x));
	}

}
通过URL来访问数据:
controller层代码:
@RequestMapping("/user")
@RestController
public class UserInfoController {
    @Autowired
    private UserService userService;

    @RequestMapping("getAllUser")
    public List<UserInfo> getAllUser() {
        return userService.getAllUser();
    }
}
service层代码:
@Service
public class UserService {
    @Autowired
    private UserInfoMapper userInfoMapper;
    public List<UserInfo> getAllUser() {
        return userInfoMapper.selectAll();
    }
}
mapper层代码:
@Mapper
public interface UserInfoMapper {

    @Select("select * from user_info")
    List<UserInfo> selectAll();
}
这样就可以通过http://127.0.0.1:8080/user/getAllUser来访问数据库的数据了。
4. Mybatis的基础操作
4.1 打印日志
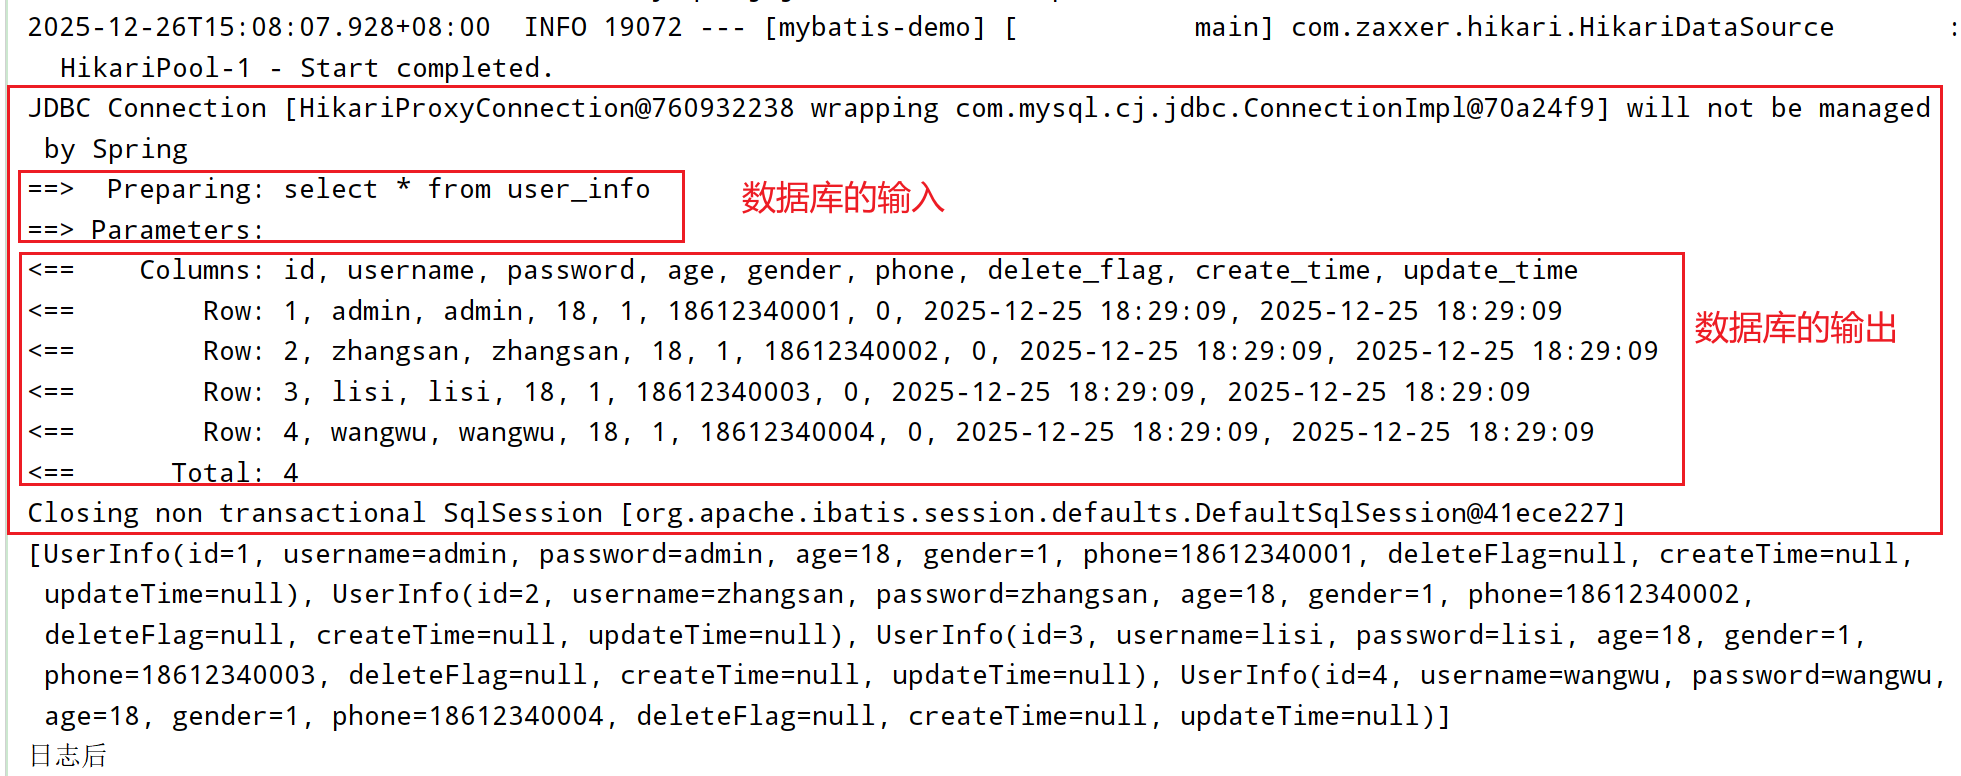
我们可以通过添加下面的配置来打印数据库的日志,在yml文件里面:
mybatis:
 configuration: # 配置打印 MyBatis⽇志
 log-impl: org.apache.ibatis.logging.stdout.StdOutImpl
此时我们再运行上面的代码,打印出来的日志就会多出一部分:
4.2 参数传递
传递一个参数:
我们在编写SQL语句时候,会存在一个条件判断的查询语句,此时我们想要给SQL语句传递参数来查找指定的数据,此时我们就可以编写下面代码,此时查询结果就是id = 1 的数据:
    @Select("select * from user_info where id = #{id}")
    UserInfo selectAllById(Integer id);
传递多个参数:
我们也可以传递多个参数给SQL语句:
    @Select("select * from user_info where username = #{username} and `password` = #{password}")
    List<UserInfo> selectByNameAndPassword(String username, String password);
注意:
当我们传递一个参数时候,SQL语句名字和参数名字可以不相同。
传递多个参数的时候,SQL语句的名字需要相同,mybatis会生成参数名字的参数,还会按照参数顺序生成对应的参数名字,param1和param2等名字也是可以使用的。
4.3 增加(传递对象)
我们可以传递一个对象,将对象里面的属性作为参数传递。
    @Insert("insert into user_info(username, password, age) values (#{username}, #{password}, #{age})")
Integer insertUser(UserInfo userInfo);我们可以获取到数据库的自增id,通过下面的注解:
这里就相当于是将自增id的值放到了对象的id属性中:
    @Options(useGeneratedKeys = true, keyProperty = "id")
    @Insert("insert into user_info(username, password, age) values (#{username}, #{password}, #{age})")
    Integer insertUser(UserInfo userInfo);
我们可以使用@Param注解来对参数进行重命名:
    @Select("select * from user_info where username = #{userName} and `password` = #{password}")
    List<UserInfo> selectByNameAndPassword(@Param("userName") String username, String password);
如果是对对象参数重命名:
此时SQL里面的参数就需要使用重命名的名字.的方式来获取:
    @Options(useGeneratedKeys = true, keyProperty = "id")
    @Insert("insert into user_info(username, password, age) " +
            "values (#{userInfo.username}, #{userInfo.password}, #{userInfo.age})")
    Integer insertUser(@Param("userInfo")UserInfo userInfo);
4.4 查询
解决数据库查询结果和对象之间的映射不同的问题:
我们通过SQL语句查询数据库时候,会发现数据库的字段和对象的属性字段名字对应不上,这是因为数据库字段的命名要求和属性的命名要求不相同,此时属性就映射不到数据库中字段的数据,结果如下:
    @Select("select * from user_info")
    List<UserInfo> selectAll();
此时有下面三种解决方法:
方法一:
在SQL语句中起别名进行查询:
将查询的SQL语句改成下面的语句就可以正常查询了:
    @Select("select id, username, password, age, gender, phone, delete_flag as deleteFlag, " +
            "create_time as createTime, update_time as updateTime from user_info")
    List<UserInfo> selectAll();
方法二:
使用@Results注解:
这里就可以将数据库的字段名和属性名对应上了。
    @Results(value = {
            @Result(column = "delete_flag", property = "deleteFlag"),
            @Result(column = "create_time", property = "createTime"),
            @Result(column = "update_time", property = "updateTime"),
    })
    @Select("select * from user_info")
    List<UserInfo> selectAll();
如果后续的查询语句也需要匹配名字,我们可以将第一个@Results注解内容添加一个id属性就可以直接使用,后续使用@ResultMap注解来调用:
    @Results(id = "aaa", value = {
            @Result(column = "delete_flag", property = "deleteFlag"),
            @Result(column = "create_time", property = "createTime"),
            @Result(column = "update_time", property = "updateTime"),
    })
    @Select("select * from user_info")
    List<UserInfo> selectAll();

    @ResultMap(value = "aaa")
    @Select("select * from user_info where id = #{id}")
    UserInfo selectAllById(Integer id);
方法三:
添加驼峰转换配置文件,可以自动实现字段和属性匹配:
mybatis:
  configuration:
    map-underscore-to-camel-case: true #配置驼峰⾃动转换
此时就可以成功匹配了。
4.5 删除
    //删除
    @Delete("delete from user_info where id = #{id}")
    Integer deleteUser(Integer id);
测试代码:
    @Test
    void deleteUser() {
        System.out.println(userInfoMapper.deleteUser(7));
    }
4.6 修改
    //修改
    @Update("update user_info set age = #{age}, phone = #{phone} where id = #{id}")
    Integer updateUser(UserInfo userInfo);
测试代码:
    @Test
    void updateUser() {
        UserInfo userInfo = new UserInfo();
        userInfo.setId(6);
        userInfo.setAge(30);
        userInfo.setPhone("666666666");
        System.out.println(userInfoMapper.updateUser(userInfo));
    }
5. Mybatis XML配置文件
5.1 配置数据库连接和mybatis
# 数据库连接配置
spring:
  datasource:
    url: jdbc:mysql://127.0.0.1:3306/mybatis_test?characterEncoding=utf8&useSSL=false
    username: root
    password: root
    driver-class-name: com.mysql.cj.jdbc.Driver
# 配置 mybatis xml 的⽂件路径,在 resources/mapper 创建所有表的 xml ⽂件
mybatis:
  mapper-locations: classpath:mapper/**Mapper.xml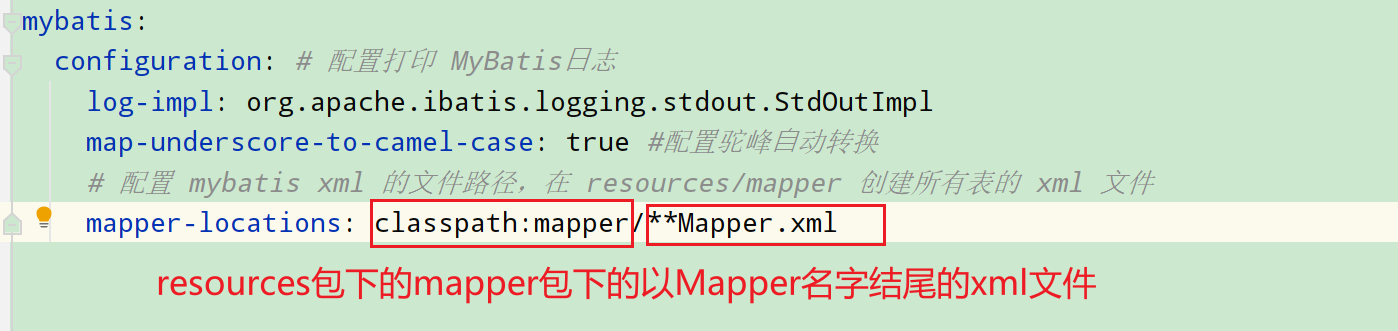
5.2 编写代码
创建一个接口:
public interface UserInfoMapperXML {
    List<UserInfo> selectAll();
}
创建一个xml文件:
添加下面代码:
<?xml version="1.0" encoding="UTF-8"?>
        <!DOCTYPE mapper PUBLIC "-//mybatis.org//DTD Mapper 3.0//EN"
        "http://mybatis.org/dtd/mybatis-3-mapper.dtd">
<mapper namespace="com.sias.mybatis.mapper.UserInfoMapperXML">

        <select id="selectAll" resultType="com.sias.mybatis.model.UserInfo">
                select * from user_info
        </select>
</mapper>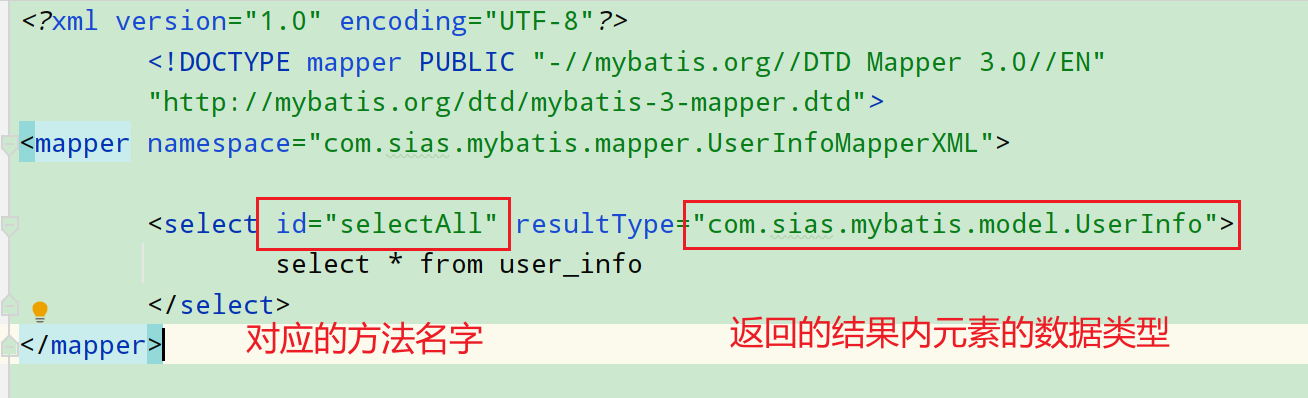
这里可以安装一个插件,可以看到接口类和对应的XML文件对应起来进行跳转:

接着运行测试代码,就可以正常运行了:
@SpringBootTest
class UserInfoMapperXMLTest {

    @Autowired
    private UserInfoMapperXML userInfoMapperXML;
    @Test
    void selectAll() {
        System.out.println(userInfoMapperXML.selectAll());
    }
}
5.3 解决数据库查询结果和对象之间的映射不同的问题
方法一:
在SQL语句中使用别名,跟上面类似。
方法二:
使用配置文件,配置驼峰自动转换。
mybatis:
  configuration:
    map-underscore-to-camel-case: true #配置驼峰⾃动转换
方法三:
在xml文件里面添加配置:
<?xml version="1.0" encoding="UTF-8"?>
        <!DOCTYPE mapper PUBLIC "-//mybatis.org//DTD Mapper 3.0//EN"
        "http://mybatis.org/dtd/mybatis-3-mapper.dtd">
<mapper namespace="com.sias.mybatis.mapper.UserInfoMapperXML">
        <resultMap id="111" type="com.sias.mybatis.model.UserInfo">
                <id property="id" column="id"></id>
                <result property="deleteFlag" column="delete_flag"></result>
                <result property="createTime" column="create_time"></result>
                <result property="updateTime" column="update_time"></result>
        </resultMap>
        <select id="selectAll" resultMap="111">
                select * from user_info
        </select>
</mapper>
5.4 增加
这里使用对象来作为参数。
接口代码:
Integer insertUser(UserInfo userInfo);XML文件的代码:
        <insert id="insertUser">
                insert into user_info (username, password, age) values (#{username}, #{password}, #{age})
        </insert>
测试代码:
    @Test
    void insertUser() {
        UserInfo userInfo = new UserInfo();
        userInfo.setUsername("bbb");
        userInfo.setPassword("123");
        userInfo.setAge(66);
        Integer result = userInfoMapperXML.insertUser(userInfo);
        System.out.println(result);
    }
运行上面的代码就可以成功的在数据库里面插入数据了。
这里我们也可以使用@Param注解来对参数进行重命名:
接口代码:
Integer insertUser2(@Param("userinfo") UserInfo userInfo);XML代码:
此时就需要使用对象的重名.的形式来获取属性。
        <insert id="insertUser2">
                insert into user_info (username, password, age) values
                (#{userinfo.username}, #{userinfo.password}, #{userinfo.age})
        </insert>
如果我们想要获取到数据库中数据的主键的话,可以修改XML的代码:
        <insert id="insertUser2" useGeneratedKeys="true" keyProperty="id">
                insert into user_info (username, password, age) values
                (#{userinfo.username}, #{userinfo.password}, #{userinfo.age})
        </insert>
5.5 修改
接口代码:
Integer updateUser(String password, Integer age, Integer id);XML代码:
        <update id="updateUser">
                update user_info set password = #{password}, age = #{age} where id = #{id}
        </update>
测试代码:
    @Test
    void updateUser() {
        Integer result = userInfoMapperXML.updateUser("13579", 77, 10);
        System.out.println(result);
    }
5.6 删除
接口代码:
Integer deleteUser(Integer id);XML代码:
        <delete id="deleteUser">
                delete from user_info where id = #{id}
        </delete>
测试代码:
    @Test
    void deleteUser() {
        Integer result = userInfoMapperXML.deleteUser(10);
        System.out.println(result);
    }
6. 其他查询方式
6.1 多表查询
我们根据上面的SQL语句,已经创建了两个表,就可以使用这两个表进行多表查询。
创建一个ArticleInfo的实体类,对应article_info表的字段:
@Data
public class ArticleInfo {
    private Integer id;
    private String title;
    private String content;
    private Integer uid;
    private Integer deleteFlag;
    private Date createTime;
    private Date updateTime;
    private String userName;
    private Integer age;
}
创建一个接口:
@Mapper
public interface ArticleInfoMapper {

    ArticleInfo selectAll(Integer id);
}
测试类进行测试:
@SpringBootTest
class ArticleInfoMapperTest {

    @Autowired
    private ArticleInfoMapper articleInfoMapper;
    @Test
    void selectAll() {
        System.out.println(articleInfoMapper.selectAll(1));
    }
}
这里需要注意的是ArticleInfo类里面本来没有userName和age属性的,但是使用了多表查询,查询了两个表,此时查询结果就会多一些属性,为了多余的属性能够映射,我们可以在ArticleInfo类里面添多的两个属性,就可以映射到多表查询的结果了。
此时,我们需要在ArticleInfo类里面添加多余的属性:
@Data
public class ArticleInfo {
    private Integer id;
    private String title;
    private String content;
    private Integer uid;
    private Integer deleteFlag;
    private Date createTime;
    private Date updateTime;
    //用户的属性
    private String userName;
    private Integer age;
}
查询结果如下:

6.2 #{}和${}的区别
我们在使用SQL语句查询时候,传递SQL语句里面的参数时候,不仅可以使用#{},还可以使用${}。
传递Integer类型参数的SQL语句:
使用#{}来传递参数:
    @Select("select * from user_info where id = #{id}")
    UserInfo selectAllById(Integer id);
运行结果:

使用${}来传递参数:
    @Select("select * from user_info where id = ${id}")
    UserInfo selectAllById(Integer id);
运行结果:

这里我们可以发现,使用#{}来传递参数时候,会使用?占位符来将参数传递,这种SQL被称为 “预编译SQL”。
使用${}来传递参数时候,直接将参数拼接到SQL语句里面,这种SQL叫做 “即时SQL”。
传递String类型的参数:
使用#{}来传递参数:
    @Select("select * from user_info where username = #{userName} and `password` = #{password}")
    List<UserInfo> selectByNameAndPassword(@Param("userName") String username, String password);
运行结果:

使用${}来传递参数:
    @Select("select * from user_info where username = ${userName} and `password` = ${password}")
    List<UserInfo> selectByNameAndPassword(@Param("userName") String username, String password);
此时就会报错:

我们从错误日志中可以看出,使用${}会将字符串参数拼接到SQL语句中,此时SQL语句中字符串就没有单引号,此时就会报错。
SQL语句的执行流程是:
语法解析,SQL优化,SQL编译,SQL执行。
我们在使用#{}时候,因为是将参数传递给占位符的,此时前面三个步骤同一个SQL语句都是一样的,此时只需要在SQL执行时候,将参数传递给SQL语句中执行。
使用${}时候,是直接将参数拼接到SQL语句中,然后开始执行上面四个步骤。
对于字符串参数,#{}会自动添加单引号。而${}不会自动添加,只会拼接参数,需要我们手动添加单引号。
6.3 SQL注入问题
当我们使用${}来传递参数时候,就有可能出现SQL注入的问题。
SQL注入问题:通过操作输入的数据来修改原来的SQL语句。
SQL注入问题示例:
    @Select("select * from user_info where username = '${userName}'")
    List<UserInfo> selectUserByName(String userName);
测试代码:
    @Test
    void selectUserByName() {
        userInfoMapper.selectUserByName("zhangsan' or 1 = '1' -- ")
                .stream().forEach(x -> System.out.println(x));
    }
我们本来要查询username为张三的用户信息,但是使用的是${}注入,此时就会存在SQL注入问题,我们编写上面的代码,就会查询到所有用户的信息。
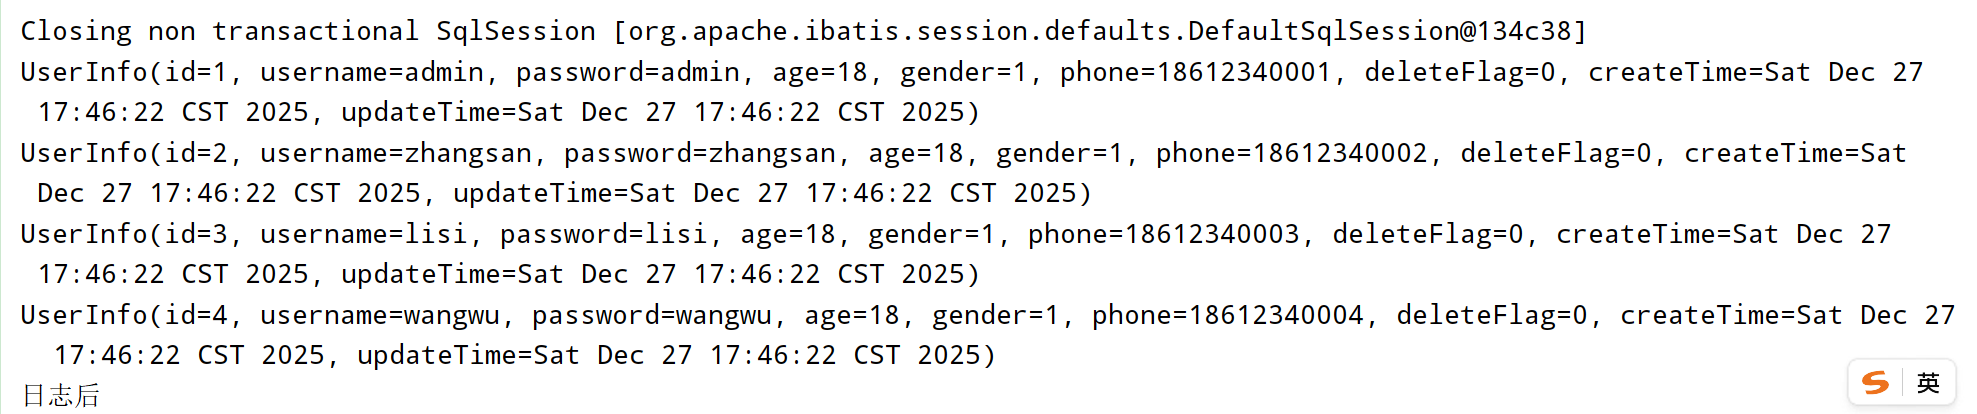
如何避免上面的SQL注入问题?
一般我们都使用#{}来进行参数注入,如果遇到必须使用${}来注入的情况,我们可以在controller层增加一些约束条件,来约束参数的注入。
6.4 排序功能
我们编写一个排序的SQL语句:
    @Select("select * from user_info order by id ${order}")
    List<UserInfo> selectUserByOrder(String order);
这里我们应该使用${}来传递参数,直接将排序的规则拼接到SQL语句中。
测试代码
    @Test
    void selectUserByOrder() {
        userInfoMapper.selectUserByOrder("desc")
                .stream().forEach(x -> System.out.println(x));
    }
此时,就可以通过降序来查询所有的数据。
我们对于SQL注入问题,可以在controller层添加约束条件,或者使用枚举只能数据desc或者asc,或者网页只提供按钮来操作。
6.5 like查询
我们使用模糊查询时候,也是要用到${}来传递参数的。
此时将传入的参数和%拼接,来进行模糊查询。
    @Select("select * from user_info where username like '${name}%'")
    List<UserInfo> selectUserByLike(String name);
测试代码:
    @Test
    void selectUserByLike() {
        userInfoMapper.selectUserByLike("zhangsan")
                .stream().forEach(x -> System.out.println(x));
    }
此时会存在SQL注入的风险,我们可以使用MySQL里面自带的concat方法来拼接字符串,直接通过SQL语句来拼接。
    @Select("select * from user_info where username like concat(#{name}, '%')")
    List<UserInfo> selectUserByLike(String name);
7. 数据库连接池
数据库连接池是用来分配,管理和释放数据库连接的,使用数据库连接池不用频繁的创建和销毁数据库连接。
spring Boot自带的数据连接池是HiKari,常用的数据库连接池还有Druib,如果我们想要切换Spring Boot默认的数据库连接池,我们可以添加依赖:
		<dependency>
			<groupId>com.alibaba</groupId>
			<artifactId>druid-spring-boot-3-starter</artifactId>
			<version>1.2.21</version>
		</dependency>
8. 动态SQL
官方文档:链接
8.1 <if>标签
我们在平时遇到填写个人信息时候,有时候有些字段是必须要填的,有些字段是不用填的,这时候,我们就需要根据用户的数据来拼接不同的SQL语句,此时就可以使用<if>标签。
接口代码:
Integer insertUser3(UserInfo userInfo);XML代码:
    <insert id="insertUser3">
        insert into user_info(username, password, age,
        <if test="gender!=null">
            gender,
        </if>
        phone) values
        (#{username}, #{password}, #{age},
        <if test="gender!=null">
            #{gender},
        </if>
        #{phone})
    </insert>
测试代码:
    @Test
    void insertUser3() {
        UserInfo userInfo = new UserInfo();
        userInfo.setUsername("user1");
        userInfo.setPassword("user1");
        userInfo.setAge(11);
//        userInfo.setGender(1);
        userInfo.setPhone("123456");
        Integer result = userInfoMapperXML.insertUser3(userInfo);
        System.out.println(result);
    }
通过上面的测试代码,我们可以发现当我们插入的对象中gender属性没有赋值时候,此时插入的数据中gender字段的值为默认值,如果gender属性有值,此时gender字段的值就是属性的值,通过<if>标签实现了根据判断条件来决定是否添加某些语句拼接成新的SQL语句。
8.2 <trim>标签
上面的代码存在一些问题,如果把XML里面的代码改成下面:
    <insert id="insertUser3">
        insert into user_info(username, password, age,
        <if test="gender!=null">
            gender,
        </if>
        phone) values
        (#{username}, #{password}, #{age},
        <if test="gender!=null">
            #{gender},
        </if>
        <if test="phone!=null">
            #{phone}
        </if>
        )
    </insert>
此时如果phone传的属性值是空的,gender传的属性值不是空的,此时拼接成的SQL语句就存在问题,此时就会报错,这时候就需要使用<trim>标签来进行修改。
<trim>标签存在四个属性:
prefix:表示整个语句块,以prefix的值作为前缀
suffix:表示整个语句块,以suffix的值作为后缀
prefixOverrides:表示整个语句块要去除掉的前缀
suffixOverrides:表示整个语句块要去除掉的后缀
此时我们就可以使用sufferOverrides属性来去除后面的,:
    <insert id="insertUser3">
        insert into user_info(
        <trim suffixOverrides=",">
            username, password, age,
            <if test="gender!=null">
                gender,
            </if>
            <if test="phone!=null">
                phone
            </if>
        </trim>
        ) values (
        <trim suffixOverrides=",">
            #{username}, #{password}, #{age},
            <if test="gender!=null">
                #{gender},
            </if>
            <if test="phone!=null">
                #{phone}
            </if>
        </trim>
        )
    </insert>
我们也可以修改上面的XML代码为:
    <insert id="insertUser3">
        insert into user_info
        <trim suffixOverrides="," prefix="(" suffix=")">
            username, password, age,
            <if test="gender!=null">
                gender,
            </if>
            <if test="phone!=null">
                phone
            </if>
        </trim>
         values
        <trim suffixOverrides="," prefix="(" suffix=")">
            #{username}, #{password}, #{age},
            <if test="gender!=null">
                #{gender},
            </if>
            <if test="phone!=null">
                #{phone}
            </if>
        </trim>
    </insert>
8.3 <where>标签
当我们使用where条件查询时候,我们拼接查询SQL语句时候,如果后面where的条件全为空就会报错:
    <select id="selectUser" resultType="com.sias.mybatis.model.UserInfo">
        select * from user_info
        where
        <trim prefixOverrides="and">
            <if test="password!=null">
                password = #{password}
            </if>
            <if test="deleteFlag!=null">
                and delete_flag = #{deleteFlag}
            </if>
        </trim>
    </select>
此时我们就可以使用<where>标签,该标签作用是:
当后面条件为空时,不会添加where,条件不为空时,会把开头的and删除。
    <select id="selectUser" resultType="com.sias.mybatis.model.UserInfo">
        select * from user_info
        <where>
            <if test="password!=null">
                and password = #{password}
            </if>
            <if test="deleteFlag!=null">
                and delete_flag = #{deleteFlag}
            </if>
        </where>
    </select>
或者我们可以添加一个 1=1 的条件在前面,这样也可以正常运行:
    <select id="selectUser" resultType="com.sias.mybatis.model.UserInfo">
        select * from user_info
        where 1=1
        <if test="password!=null">
            and password = #{password}
        </if>
        <if test="deleteFlag!=null">
            and delete_flag = #{deleteFlag}
        </if>
    </select>
8..4 <set>标签
当我们进行查询时候,set后面必须存在修改的值,我们可以编写下面XML代码:
    <update id="updateUser1">
        update user_info
        set
        <trim suffixOverrides=",">
            <if test="password!=null">
                password = #{password},
            </if>
            <if test="age!=null">
                age = #{age}
            </if>
        </trim>
        where id = #{id}
    </update>
这里我们也还是可以使用<set>标签来代替上面的set 和 <trim>标签的作用的:
    <update id="updateUser1">
        update user_info
        <set>
            <if test="password!=null">
                password = #{password},
            </if>
            <if test="age!=null">
                age = #{age}
            </if>
        </set>
        where id = #{id}
    </update>
8.5 <foreach>标签
我们平时在使用SQL语句时候,可能会遇到下面类似的SQL语句:
select * from user_info where id in (6,9,10);
update user_info set password = "1357" where id in (6,9,10);
insert into user_info (username, password) values ("zhangsan1", "p1"), ("zhangsan2", "p2"), ("zhangsan3", "p3");
delete from user_info where id in (6,9,10);
此时我们想要拼接上面的SQL语句,就需要使用<foreach>标签,该标签里面包含下面属性:
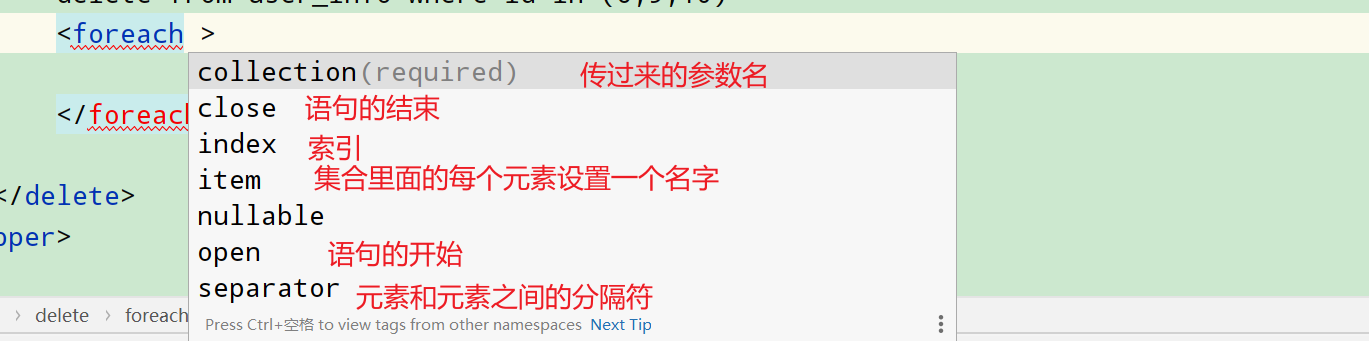
此时我们编写删除SQL语句的XML代码:
    <delete id="deleteUser1">
        delete from user_info where id in
<!--        (6,9,10)-->
        <foreach collection="ids" open="(" close=")" item="id" separator=",">
            #{id}
        </foreach>
    </delete>
编写添加行的XML代码:
    <insert id="insertUser4">
        insert into user_info (username, password) values
<!--        ("zhangsan1", "p1"), ("zhangsan2", "p2"), ("zhangsan3", "p3")-->
        <foreach collection="users" separator="," item="user">
            (#{user.username}, #{user.password})
        </foreach>
    </insert>
8.6 <include>和<sql>标签
我们在编写XML里面的SQL代码时候,发现里面会有很多相同的SQL部分语句,比如:
select * from user_info 之类的,此时我们就可以使用上面两个标签来简写:
    <sql id="sql">
        select * from user_info
    </sql>

    <select id="selectUser" resultType="com.sias.mybatis.model.UserInfo">

<!--        select * from user_info-->
        <include refid="sql"></include>

        where 1=1
        <if test="password!=null">
            and password = #{password}
        </if>
        <if test="deleteFlag!=null">
            and delete_flag = #{deleteFlag}
        </if>
    </select>
9. MyBatis Generator
MyBatisGenerator是一个为MyBatis框架设计的代码生成工具,它可以根据数据库表结构自动生成相应的Java中的Model,Mapper接口以及SQL映射文件,简化数据访问层的编码工作,使得开发者可以更专注于业务逻辑的实现。
9.1 引入插件
在Java项目中的pom.xml文件里面添加下面插件:
官网:链接
			<plugin>
				<groupId>org.mybatis.generator</groupId>
				<artifactId>mybatis-generator-maven-plugin</artifactId>
				<version>1.3.6</version>
				<executions>
					<execution>
						<id>Generate MyBatis Artifacts</id>
						<phase>deploy</phase>
						<goals>
							<goal>generate</goal>
						</goals>
					</execution>
				</executions>
				<configuration>
					<!--generator配置文件所在位置-->
					<configurationFile>src/main/resources/mybatisGenerator/generatorConfig.xml</configurationFile>
					<!-- 允许覆盖生成的文件, mapxml不会覆盖, 采用追加的方式-->
					<overwrite>true</overwrite>
					<verbose>true</verbose>
					<!--将当前pom的依赖项添加到生成器的类路径中-->
					<includeCompileDependencies>true</includeCompileDependencies>
				</configuration>
				<dependencies>
					<dependency>
						<groupId>mysql</groupId>
						<artifactId>mysql-connector-java</artifactId>
						<version>8.0.33</version>
					</dependency>
				</dependencies>
			</plugin>
9.2 添加genertor配置文件

xml代码如下:
<?xml version="1.0" encoding="UTF-8"?>
<!DOCTYPE generatorConfiguration
PUBLIC "-//mybatis.org//DTD MyBatis Generator Configuration 1.0//EN"
"http://mybatis.org/dtd/mybatis-generator-config_1_0.dtd">
<!-- 配置生成器 -->
<generatorConfiguration>
<!-- 一个数据库一个context -->
<context id="MysqlTables" targetRuntime="MyBatis3Simple" defaultModelType="flat">
<!--去除注释-->
<commentGenerator>
<property name="suppressDate" value="true"/>
<property name="suppressAllComments" value="true" />
</commentGenerator>
<!--数据库链接信息-->
<jdbcConnection driverClass="com.mysql.jdbc.Driver"
connectionURL="jdbc:mysql://127.0.0.1:3306/java_blog_spring?serverTimezone=Asia/Shanghai&nullCatalogMeansCurrent=true"
userId="root"
password="root">
</jdbcConnection>
<!-- 生成实体类 -->
<javaModelGenerator targetPackage="com.example.demo.model" targetProject="src/main/java" >
<property name="enableSubPackages" value="false"/>
<property name="trimStrings" value="true"/>
</javaModelGenerator>
<!-- 生成mapxml文件 -->
<sqlMapGenerator targetPackage="mapper" targetProject="src/main/resources" >
<property name="enableSubPackages" value="false" />
</sqlMapGenerator>
<!-- 生成mapxml对应client,也就是接口dao -->
<javaClientGenerator targetPackage="com.example.demo.mapper" targetProject="src/main/java" type="XMLMAPPER" >
<property name="enableSubPackages" value="false" />
</javaClientGenerator>
<!-- table可以有多个,每个数据库中的表都可以写一个table,tableName表示要匹配的数据库表,也可以在tableName属性中通过使用%通配符来匹配所有数据库表,只有匹配的表才会自动生成文件 -->
<table tableName="user">
<property name="useActualColumnNames" value="false" />
<!-- 数据库表主键 -->
<generatedKey column="id" sqlStatement="Mysql" identity="true" />
</table>
</context>
</generatorConfiguration>
我们需要根据自己的项目修改里面的对应的代码。
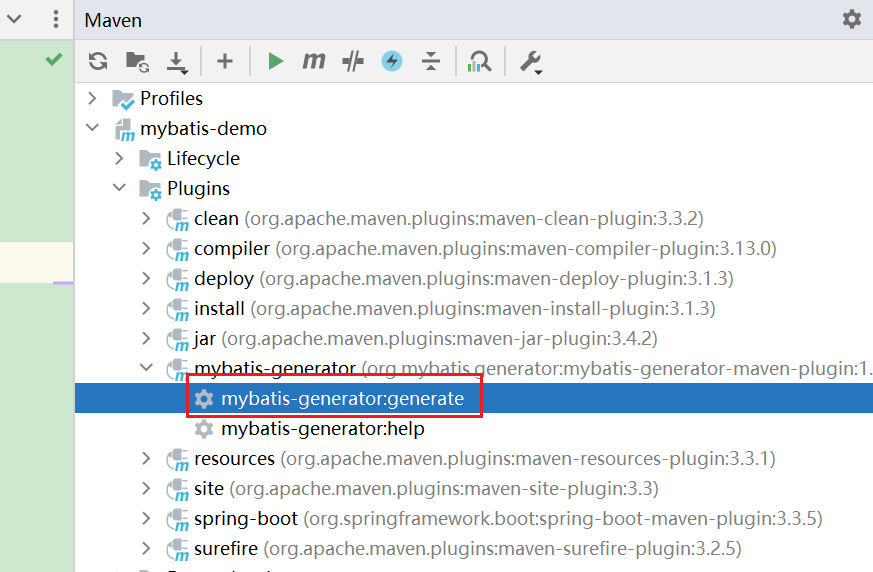
然后点击下面按钮:

汇聚全球AI编程工具,助力开发者即刻编程。
更多推荐

 17
17 0
0- 0


 已为社区贡献2条内容

所有评论(0)