
Nginx 实验(七)
·
29、Nginx 的四层负载均衡代理
1. 实验环境准备(Mysql)
在两台后端服务器(RS1, RS2)上安装 MariaDB 并配置不同的 server-id 以区分后端节点。
# 安装 MariaDB 服务器
[root@RS1 ~]# dnf install mariadb-server -y
[root@RS2 ~]# dnf install mariadb-server -y

# 配置 MariaDB server-id,用于区分不同的数据库实例
[root@RS1 ~]# vim /etc/my.cnf.d/mariadb-server.cnf
server-id=10

[root@RS2 ~]# vim /etc/my.cnf.d/mariadb-server.cnf
server-id=20

# 启动并设置开机自启 MariaDB 服务
[root@RS1 ~]# systemctl enable --now mariadb
[root@RS2 ~]# systemctl enable --now mariadb

# 登录数据库,创建用户 lee 并授权所有权限,允许远程连接
[root@RS1 ~]# mysql
MariaDB [(none)]> CREATE USER lee@'%' IDENTIFIED BY 'lee';
MariaDB [(none)]> GRANT ALL ON *.* TO lee@'%';

# RS2 执行相同的数据库用户创建操作
[root@RS2 ~]# mysql
MariaDB [(none)]> CREATE USER lee@'%' IDENTIFIED BY 'lee';
MariaDB [(none)]> GRANT ALL ON *.* TO lee@'%';
2. 实验环境准备(DNS)
在两台后端服务器上安装 BIND 服务,配置主域名解析区域。
# 安装 BIND DNS 服务
[root@RS1 ~]# dnf install bind -y
[root@RS2 ~]# dnf install bind -y

# 配置 named.conf,开启监听并关闭 dnssec 验证
[root@RS1 ~]# vim /etc/named.conf
# 关键配置项:
# listen-on port 53 { any; }; (注释掉 localhost 限制)
# allow-query { any; }; (注释掉 localhost 限制)
# dnssec-validation no;

# 配置区域文件引用
[root@RS1 ~]# vim /etc/named.rfc1912.zones
zone "timinglee.org" IN {
    type master;
    file "timinglee.org.zone";
    allow-update { none; };
};

# 复制区域模板文件
[root@RS1 ~]# cd /var/named/
[root@RS1 named]# cp -p named.localhost timinglee.org.zone

# 编辑区域数据文件,配置 DNS 记录
[root@RS1 named]# vim timinglee.org.zone
# 配置 SOA 记录和 A 记录,RS1 IP 为 172.25.254.10
dns     A       172.25.254.10

# RS2 执行类似操作,注意 A 记录指向 RS2 IP
[root@RS2 named]# vim timinglee.org.zone
dns     A       172.25.254.20

# 启动 DNS 服务
[root@RS2 named]# systemctl enable --now named

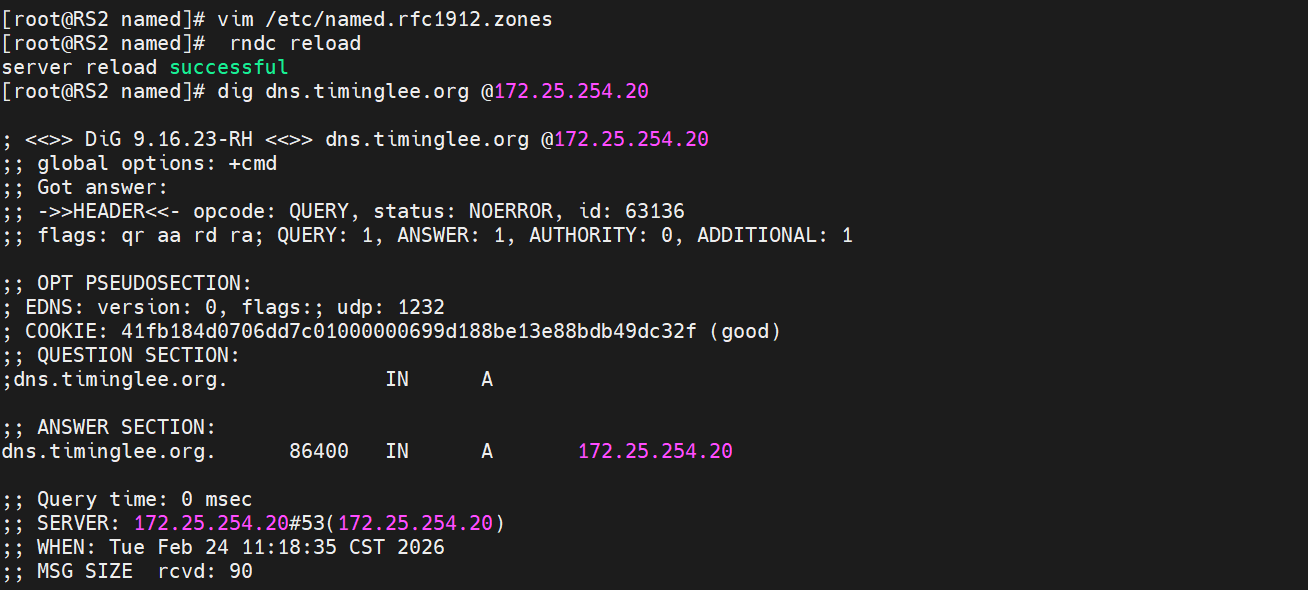
# 测试 DNS 解析是否正常
[root@RS1 named]# dig dns.timinglee.org @172.25.254.10
[root@RS2 named]# dig dns.timinglee.org @172.25.254.20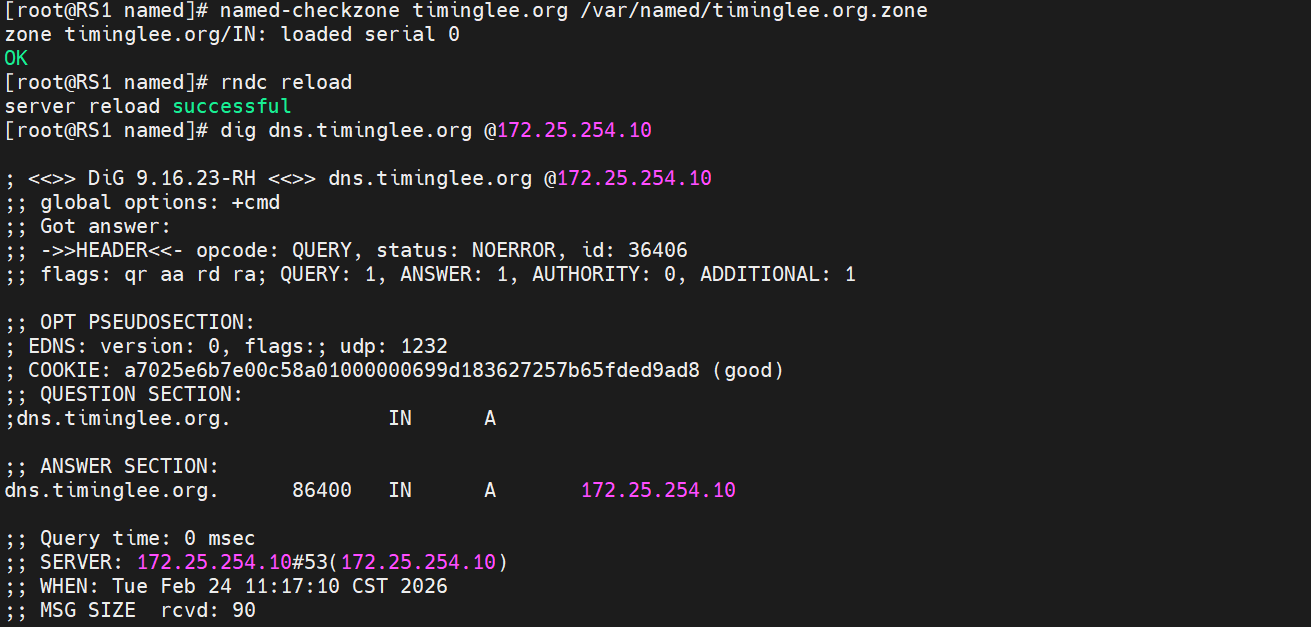
3. TCP 四层负载均衡配置
配置 Nginx 的 stream 模块代理 MySQL 流量(TCP 协议)。
# 创建 TCP 和 UDP 配置目录
[root@Nginx conf]# mkdir /usr/local/nginx/conf/tcp -p
[root@Nginx conf]# mkdir /usr/local/nginx/conf/udp -p

# 在主配置文件中包含 tcp 配置目录
[root@Nginx conf]# vim /usr/local/nginx/conf/nginx.conf
include "/usr/local/nginx/conf/tcp/*.conf";

# 编写 MySQL 负载均衡配置
[root@Nginx conf]# vim /usr/local/nginx/conf/tcp/mariadb.conf
stream {
  upstream mysql_server {
    # 定义后端 MySQL 服务器池
    server 172.25.254.10:3306 max_fails=3 fail_timeout=30s;
    server 172.25.254.20:3306 max_fails=3 fail_timeout=30s;
  }

  server {
    # 监听 VIP 的 3306 端口
    listen 172.25.254.100:3306;
    # 代理转发到 upstream 定义的服务器池
    proxy_pass mysql_server;
    proxy_connect_timeout 30s;
    proxy_timeout 300s;
  }
}

# 重载 Nginx 配置
[root@Nginx conf]# nginx -s reload

# 测试连接,通过 VIP 连接数据库并查看 server_id 验证负载均衡效果
[root@Nginx ~]# mysql -ulee -plee -h172.25.254.100
MariaDB [(none)]> SELECT @@server_id;
# 多次连接应看到 server_id 在 10 和 20 之间切换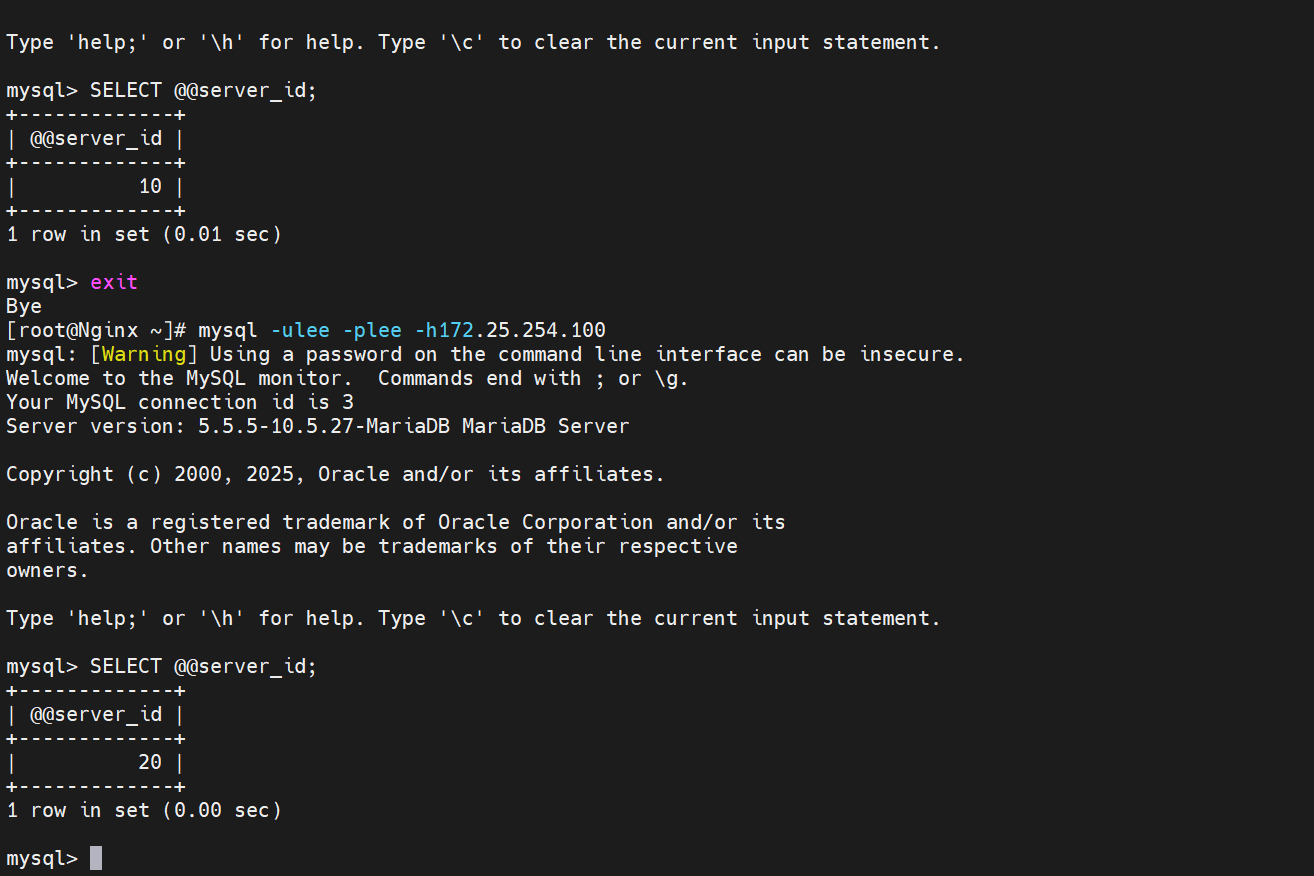
4. UDP 四层负载均衡配置
在原有配置基础上增加 DNS 服务(UDP 协议)的负载均衡。
# 编辑 stream 配置文件,增加 DNS upstream 和 server 块
[root@Nginx ~]# vim /usr/local/nginx/conf/tcp/mariadb.conf
stream {
  # MySQL 上游配置保持不变
  upstream mysql_server {
    server 172.25.254.10:3306 max_fails=3 fail_timeout=30s;
    server 172.25.254.20:3306 max_fails=3 fail_timeout=30s;
  }

  # 新增 DNS 上游配置
  upstream dns_server {
    server 172.25.254.10:53 max_fails=3 fail_timeout=30s;
    server 172.25.254.20:53 max_fails=3 fail_timeout=30s;
  }

  # MySQL 代理配置保持不变
  server {
    listen 172.25.254.100:3306;
    proxy_pass mysql_server;
    proxy_connect_timeout 30s;
    proxy_timeout 300s;
  }

  # 新增 DNS 代理配置,指定 udp 协议
  server {
    listen 172.25.254.100:53 udp;
    proxy_pass dns_server;
    proxy_timeout 1s;
    proxy_responses 1;
    error_log logs/dns.log;
  }
}

# 重载 Nginx 配置
[root@Nginx ~]# nginx -s reload

# 测试 DNS 解析,通过 VIP 进行查询
[root@Nginx ~]# dig dns.timinglee.org @172.25.254.100
# 多次查询应看到 ANSWER SECTION 中的 IP 在 172.25.254.10 和 20 之间切换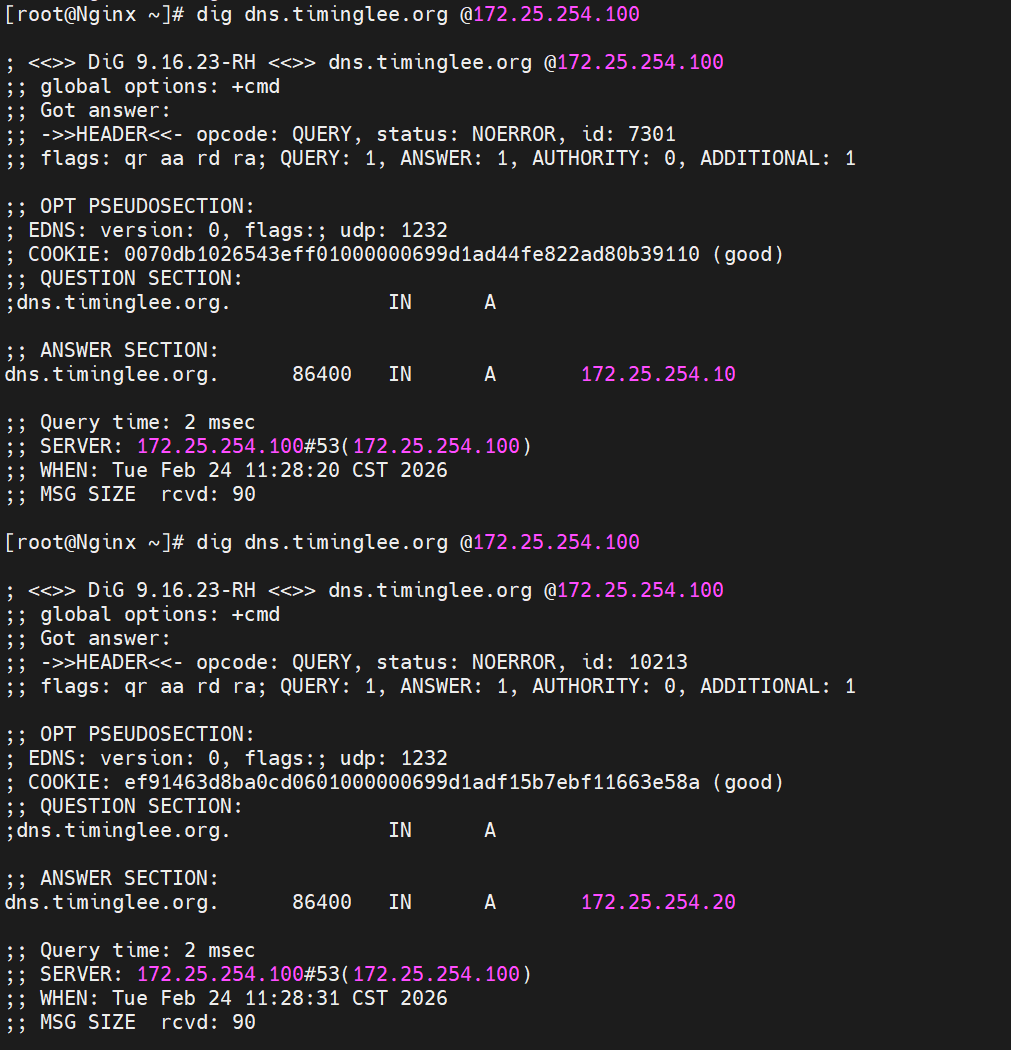
30、编译安装 openresty
本实验演示如何从源码编译安装 OpenResty(基于 Nginx 的 Web 平台)。
1. 下载与依赖安装
# 下载 OpenResty 源码包
[root@Nginx src]# wget https://openresty.org/download/openresty-1.27.1.2.tar.gz

# 安装编译所需的依赖包 (gcc, pcre, openssl, zlib 等)
[root@Nginx ~]# dnf -yq install gcc pcre-devel openssl-devel perl zlib-devel

# 创建运行 Nginx 的系统用户,禁止登录
[root@Nginx ~]# useradd -r -s /sbin/nologin nginx
2. 解压与编译配置
# 解压源码包
[root@Nginx ~]# tar zxf openresty-1.27.1.2
[root@Nginx ~]# cd openresty-1.27.1.2/

# 配置编译选项
# --prefix: 安装路径
# --user/--group: 运行用户
# --with-xxx_module: 启用特定模块 (ssl, http2, stream 等)
[root@Nginx openresty-1.27.1.2]# ./configure \
--prefix=/apps/openresty \
--user=nginx --group=nginx \
--with-http_ssl_module \
--with-http_v2_module \
--with-http_stub_status_module \
--with-http_gzip_static_module \
--with-pcre --with-stream \
--with-stream_ssl_module \
--with-stream_realip_module
3. 编译与安装
# 编译并安装 (gmake 即 make)
[root@Nginx openresty-1.27.1.2]# gmake && gmake install
4. 环境变量配置与验证
# 配置环境变量,将 openresty 命令加入 PATH
# 注意:此处原文配置路径为 /usr/local/openresty/bin,但编译 prefix 为 /apps/openresty,实际使用时需根据真实安装路径调整
[root@webserver ~]# vim ~/.bash_profile
export PATH=$PATH:/usr/local/openresty/bin

# 使环境变量生效
[root@webserver ~]# source ~/.bash_profile

# 验证版本信息
[root@Nginx ~]# openresty -v
nginx version: openresty/1.17.8.2

# 启动 OpenResty
[root@Nginx ~]# openresty

# 检查进程是否运行
[root@Nginx ~]# ps -ef | grep nginx

# 创建测试页面
[root@webserver ~]# echo hello test > /usr/local/openresty/nginx/html/index.html

# 使用 curl 测试访问 (假设本机 IP 为 172.25.254.200)
[root@webserver ~]# curl 172.25.254.200
hello test
汇聚全球AI编程工具,助力开发者即刻编程。
 3
3 0
0- 0


 已为社区贡献5条内容

所有评论(0)