
【MQ】RabbitMQ 快速入门(上篇)
目录
参考视频:MQ入门-01.MQ课程介绍_哔哩哔哩_bilibili
1.简介
1.1.定义
RabbitMQ 是一个功能强大、应用广泛的开源消息代理和队列服务器。它实现了 AMQP 协议标准,是消息中间件领域的标杆之一
1.2.优点
应用解耦
- 问题:系统 A 需要直接调用系统 B 和 C 的接口。如果 B 挂了,A 会受影响;如果要新增一个系统 D,A 的代码需要修改。
- 解决:A 只需把消息发送给 RabbitMQ,B、C、D 自己去 RabbitMQ 取消息。系统之间不直接依赖,耦合度大大降低。
异步处理
- 问题:用户注册后,需要同步执行“写数据库”、“发邮件”、“发短信”三个步骤,用户等待时间长。
- 解决:注册成功后,只需把“注册成功”这个消息扔给 RabbitMQ,就可以立即响应给用户。发邮件、发短信等耗时操作由后面的消费者异步完成,提升系统响应速度。
流量削峰(削峰填谷)
- 问题:秒杀活动时,瞬时流量巨大,后台数据库和处理服务可能被压垮。
- 解决:将瞬时涌入的请求放入 RabbitMQ 队列中,后台服务按照自身处理能力,从容不迫地从队列中取出请求进行处理。避免了流量洪峰直接冲击系统,起到了“蓄水池”或“缓冲层”的作用。
1.3.基础概念
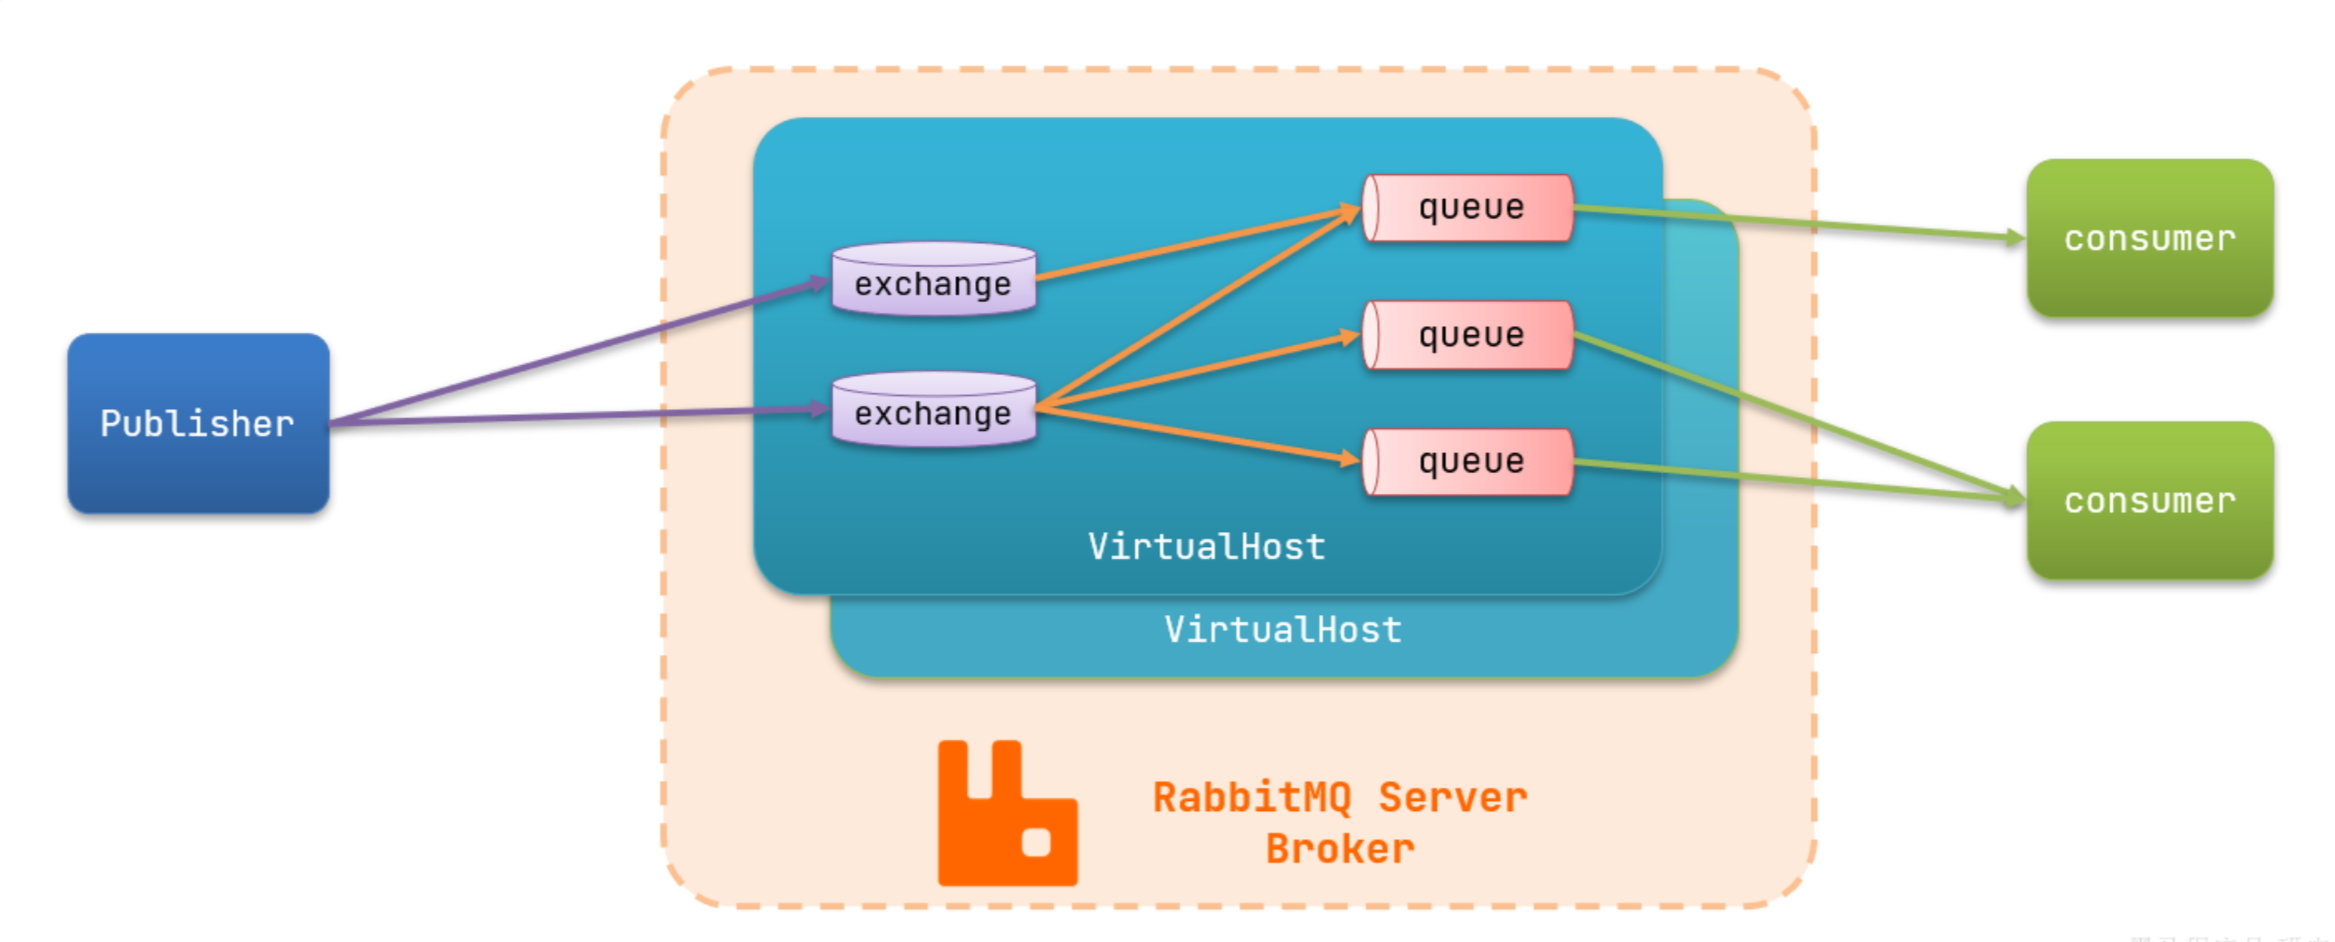
1)Producer(生产者): 发送消息的程序。
2)Consumer(消费者): 接收消息的程序。
3)Queue(队列): 存储消息的缓冲区,位于 RabbitMQ 内部。消息只能存储在队列中。生产者投递消息到队列,消费者从队列获取消息。队列是 FIFO 的。
4)Exchange(交换器): 消息到达 Broker 的第一站。生产者将消息发送到 Exchange,而不是直接到队列。Exchange 根据特定的规则(绑定和路由键)将消息分发到一个或多个队列中。有四种类型:
Direct(直连): 精确匹配。消息的
routing key必须和队列的binding key完全一致,才能路由到该队列。Fanout(扇出): 广播。将消息路由到所有绑定到该 Exchange 的队列,忽略
routing key。Topic(主题): 模式匹配。
routing key和binding key可以使用通配符(*匹配一个单词,#匹配零个或多个单词)进行匹配,非常灵活。Headers(头): 通过匹配消息的 Header 属性来路由,不常用。
5)Binding(绑定): Exchange 和 Queue 之间的连接规则。可以理解为“队列对某个交换器的消息感兴趣”。
6)Connection / Channel(连接 / 信道):
- Connection: 一个 TCP 连接。生产者/消费者与 RabbitMQ 建立的双向通信链路。
- Channel: 在 Connection 内部建立的虚拟连接。几乎所有操作都在 Channel 中进行。复用 TCP 连接,避免频繁创建销毁 TCP 的开销。
7)Virtual Host(虚拟主机): 一个 RabbitMQ 服务器可以划分出多个相互隔离的“小服务器”,每个 vhost 有自己的 Exchange、Queue 和权限系统。用于多租户隔离。
1.4.工作流程示例
生产者连接到 RabbitMQ,创建一个 Channel。
生产者将消息发送到指定的 Exchange,并附带一个
routing key。Exchange 根据其类型和与队列的 Binding 规则,将消息投递到一个或多个队列中。
消费者连接到 RabbitMQ,创建一个 Channel,并监听某个队列。
当队列有消息时,RabbitMQ 将消息推送给消费者(或消费者主动拉取)。
消费者处理完消息后,可以发送一个确认回执给 RabbitMQ,RabbitMQ 才会将消息从队列中删除。
1.5.应用场景示例
后台任务队列
场景:用户上传视频后,需要转码、生成缩略图、进行内容分析。
实现:前端上传完成后,发送一个“视频已上传(video_id=xxx)”的消息到 RabbitMQ。后台的多个转码 worker(消费者)从队列中获取任务并并行处理。
微服务间通信
场景:订单服务创建订单后,需要通知库存服务扣减库存、通知用户服务更新用户订单列表。
实现:订单服务发布一个“订单已创建”事件到 Topic Exchange。库存服务和用户服务各自用自己的队列订阅感兴趣的主题(如
order.created),实现松耦合的事件驱动通信。数据同步
场景:将 MySQL 数据库的变更同步到 Elasticsearch 以提供全文搜索。
实现:使用 Canal 等工具监听 MySQL 的 binlog,将数据变更作为消息发送到 RabbitMQ。Elasticsearch 的消费者从队列获取消息并更新索引。
2.安装
使用linux安装mq
docker run \
 -e RABBITMQ_DEFAULT_USER=itheima \
 -e RABBITMQ_DEFAULT_PASS=123321 \
 -v mq-plugins:/plugins \
 --name mq \
 --hostname mq \
 -p 15672:15672 \
 -p 5672:5672 \
 --network hm-net\
 -d \
 rabbitmq:3.8-management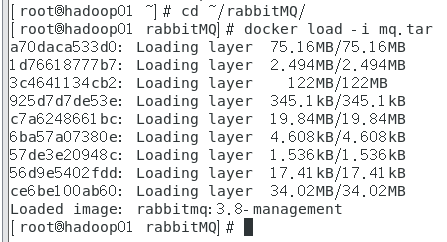
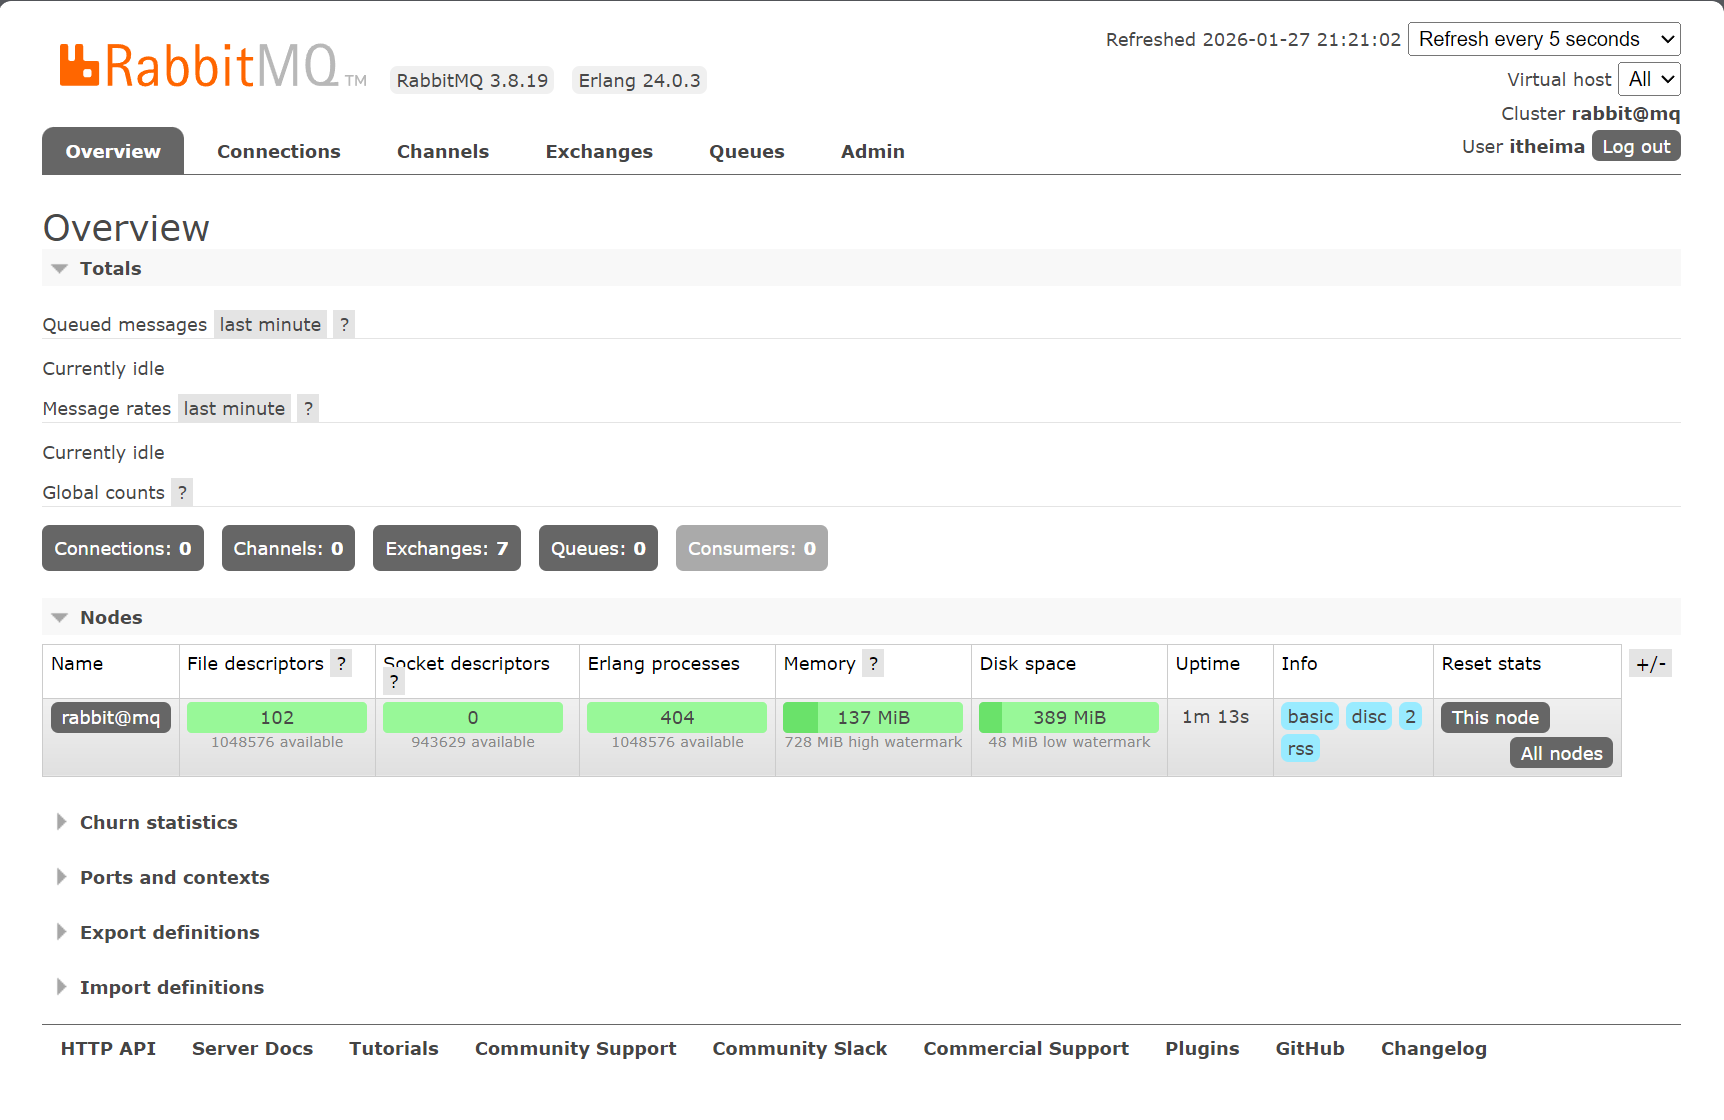
安装完成后,我们访问 http://xxx:15672即可看到管理控制台。首次访问需要登录,默认的用户名和密码在配置文件中已经指定了。

3.管理控制台操作(了解)
...
4.SpringAMQP
由于RabbitMQ采用了AMQP协议,因此它具备跨语言的特性。任何语言只要遵循AMQP协议收发消息,都可以与RabbitMQ交互。
Spring AMQP 是 Spring 生态系统对 AMQP 协议的实现,它基于 Spring 的核心概念,提供了与 RabbitMQ 交互的简化抽象。
SpringAmqp的官方地址:https://spring.io/projects/spring-amqp/
SpringAMQP提供了三个功能:
自动声明队列、交换机及其绑定关系
基于注解的监听器模式,异步接收消息
封装了RabbitTemplate工具,用于发送消息
4.1.快速入门
导入demo工程,包括三部分:
-
mq-demo:父工程,管理项目依赖
-
publisher:消息的发送者
-
consumer:消息的消费者
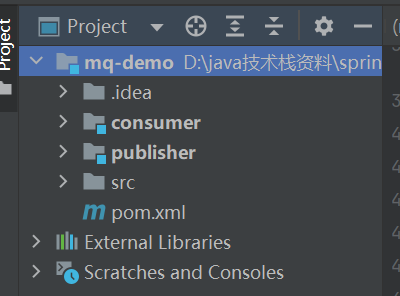
在mq-demo这个父工程中,已经配置好了SpringAMQP相关的依赖:
<?xml version="1.0" encoding="UTF-8"?>
<project xmlns="http://maven.apache.org/POM/4.0.0"
         xmlns:xsi="http://www.w3.org/2001/XMLSchema-instance"
         xsi:schemaLocation="http://maven.apache.org/POM/4.0.0 http://maven.apache.org/xsd/maven-4.0.0.xsd">
    <modelVersion>4.0.0</modelVersion>

    <groupId>cn.itcast.demo</groupId>
    <artifactId>mq-demo</artifactId>
    <version>1.0-SNAPSHOT</version>
    <modules>
        <module>publisher</module>
        <module>consumer</module>
    </modules>
    <packaging>pom</packaging>

    <parent>
        <groupId>org.springframework.boot</groupId>
        <artifactId>spring-boot-starter-parent</artifactId>
        <version>2.7.12</version>
        <relativePath/>
    </parent>

    <properties>
        <maven.compiler.source>8</maven.compiler.source>
        <maven.compiler.target>8</maven.compiler.target>
    </properties>

    <dependencies>
        <dependency>
            <groupId>org.projectlombok</groupId>
            <artifactId>lombok</artifactId>
        </dependency>
        <!--AMQP依赖,包含RabbitMQ-->
        <dependency>
            <groupId>org.springframework.boot</groupId>
            <artifactId>spring-boot-starter-amqp</artifactId>
        </dependency>
        <!--单元测试-->
        <dependency>
            <groupId>org.springframework.boot</groupId>
            <artifactId>spring-boot-starter-test</artifactId>
        </dependency>
    </dependencies>
</project>
为了测试方便,我们也可以直接向队列发送消息,跳过交换机。

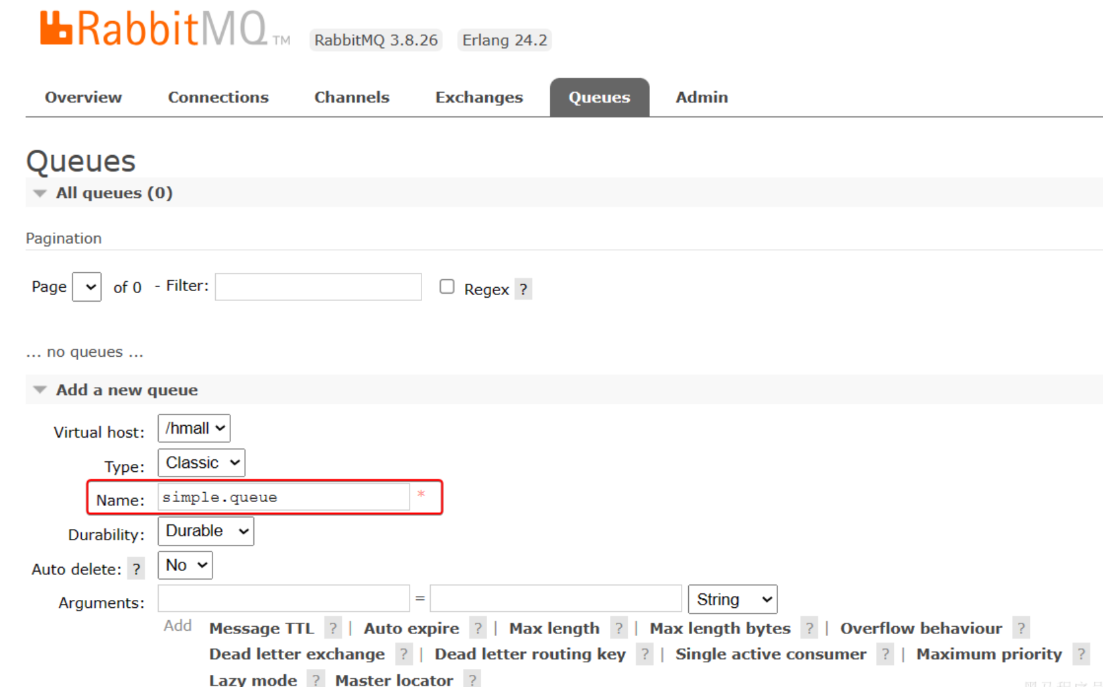
为了方便测试,我们现在控制台新建一个队列:simple.queue
1)消息发送
首先配置MQ地址,在publisher服务的application.yml中添加配置:
spring:
  rabbitmq:
    host: 192.168.150.101 # 你的虚拟机IP
    port: 5672 # 端口
    virtual-host: /hmall # 虚拟主机
    username: hmall # 用户名
password: 123456 # 密码然后在publisher服务中编写测试类SpringAmqpTest,并利用RabbitTemplate实现消息发送:
@SpringBootTest
public class SpringAmqpTest {

    @Autowired
    private RabbitTemplate rabbitTemplate;

    @Test
    public void testSimpleQueue() {
        // 队列名称
        String queueName = "simple.queue";
        // 消息
        String message = "hello, world";
        // 发送消息
        rabbitTemplate.convertAndSend(queueName, message);
    }
}
2)消息接收
首先配置MQ地址,在consumer服务的application.yml中添加配置:
spring:
  rabbitmq:
    host: 192.168.150.101 # 你的虚拟机IP
    port: 5672 # 端口
    virtual-host: /hmall # 虚拟主机
    username: hmall # 用户名
password: 123456 # 密码然后在consumer服务的com.itheima.consumer.listener包中新建一个类SpringRabbitListener,代码如下:
@Component
public class SpringRabbitListener {
        // 利用RabbitListener来声明要监听的队列信息
    // 将来一旦监听的队列中有了消息,就会推送给当前服务,调用当前方法,处理消息。
    // 可以看到方法体中接收的就是消息体的内容
    @RabbitListener(queues = "simple.queue")
    public void listenSimpleQueueMessage(String msg) throws InterruptedException {
        System.out.println("spring 消费者接收到消息:【" + msg + "】");
    }
}
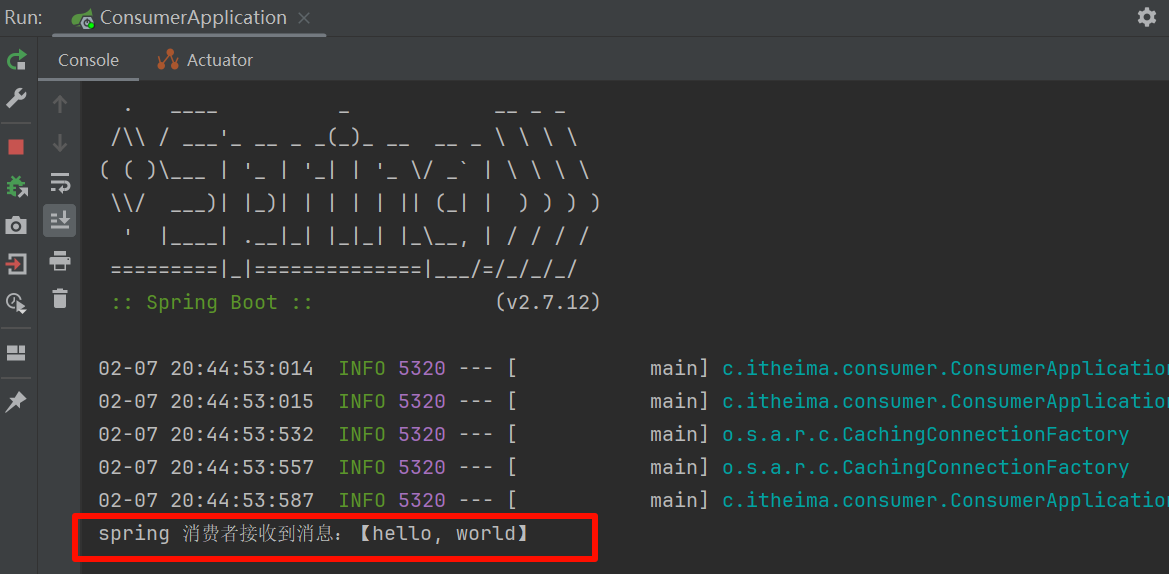
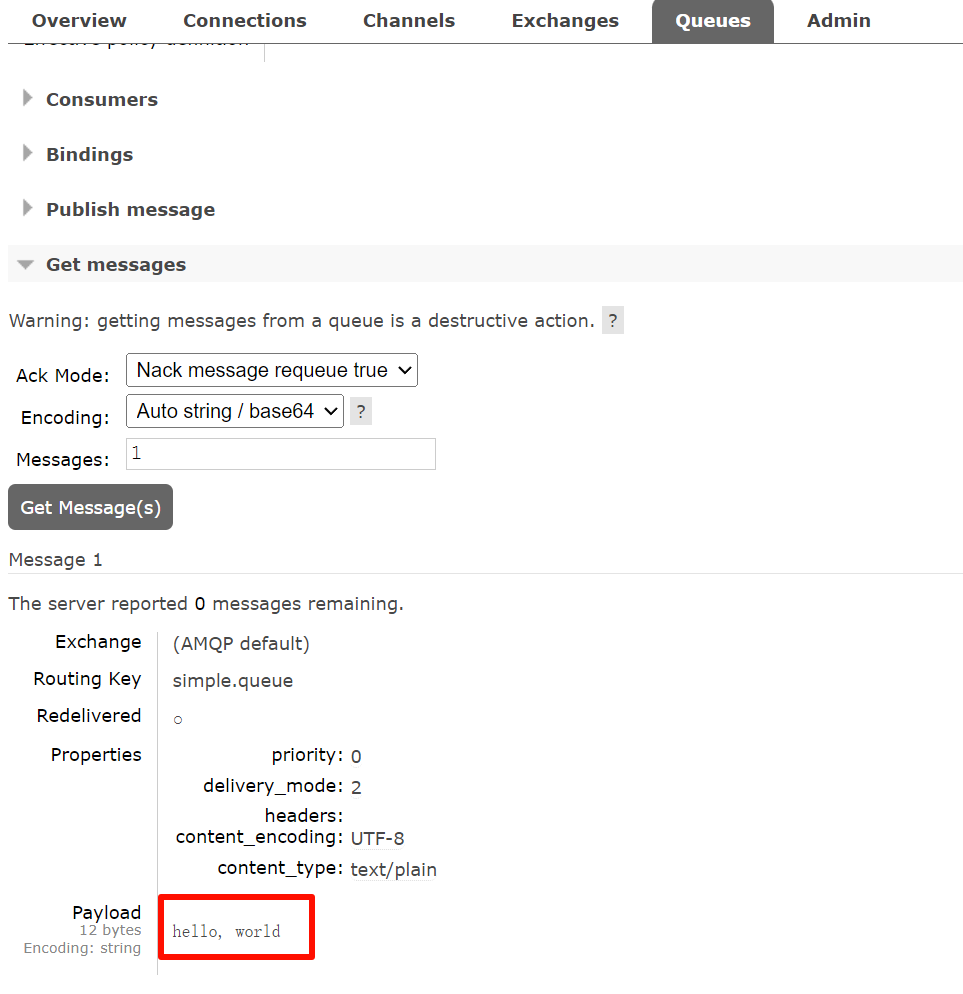
启动consumer服务,然后在publisher服务中运行测试代码,发送MQ消息。最终consumer收到消息:
4.2.WorkQueue模型
Work queues,任务模型。简单来说就是让多个消费者绑定到一个队列,共同消费队列中的消息。
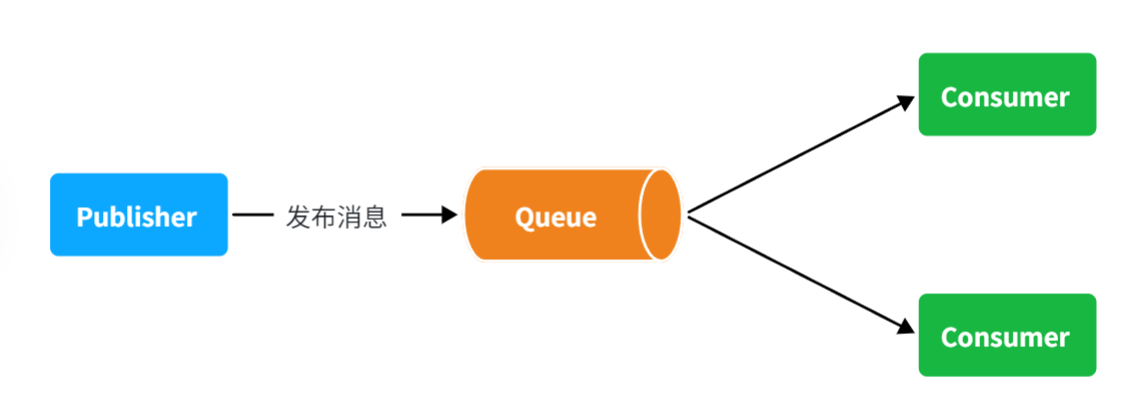
当消息处理比较耗时的时候,可能生产消息的速度会远远大于消息的消费速度。长此以往,消息就会堆积越来越多,无法及时处理。此时就可以使用work 模型,多个消费者共同处理消息处理,消息处理的速度就能大大提高了。
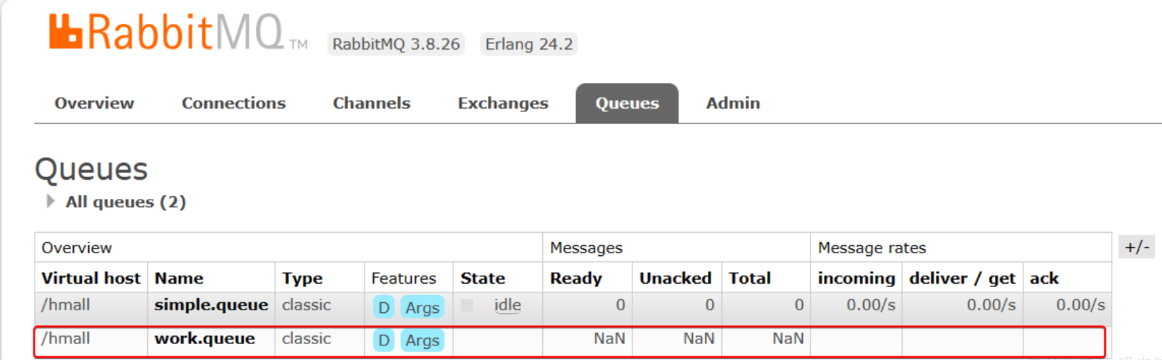
我们在控制台创建一个新的队列,命名为work.queue:
1)消息发送
在publisher服务中的SpringAmqpTest类中添加一个测试方法:
// 测试工作队列
@Test
void testWorkQueue() throws InterruptedException {
    String queueName = "work.queue";
    String message = "hello, world";
    for (int i = 0; i < 50; i++) {
        rabbitTemplate.convertAndSend(queueName, message + " " + i);
        Thread.sleep(20);
    }
}
2)消息接收
要模拟多个消费者绑定同一个队列,我们在consumer服务的SpringRabbitListener中添加2个新的方法:
@RabbitListener(queues = "work.queue")
public void listenWorkQueueMessage(String msg) throws InterruptedException {
    System.out.println("消费者1接收到消息:【" + msg + "】" + LocalTime.now());
    Thread.sleep(20);
}

@RabbitListener(queues = "work.queue")
public void listenWorkQueueMessage2(String msg) throws InterruptedException {
    System.out.println("消费者2接收到消息:【" + msg + "】" + LocalTime.now());
    Thread.sleep(200);
}注意到这两消费者,都设置了Thead.sleep,模拟任务耗时:
-
消费者1 sleep了20毫秒,相当于每秒钟处理50个消息
-
消费者2 sleep了200毫秒,相当于每秒处理5个消息
启动ConsumerApplication后,在执行publisher服务中刚刚编写的发送测试方法testWorkQueue。
最终结果如下:
消费者2接收到消息:【hello, world 0】22:28:45.171870200
消费者1接收到消息:【hello, world 1】22:28:45.195665400
消费者1接收到消息:【hello, world 3】22:28:45.257302300
消费者1接收到消息:【hello, world 5】22:28:45.320058600
消费者2接收到消息:【hello, world 2】22:28:45.381303500
消费者1接收到消息:【hello, world 7】22:28:45.383013700
消费者1接收到消息:【hello, world 9】22:28:45.444297
消费者1接收到消息:【hello, world 11】22:28:45.505344
消费者1接收到消息:【hello, world 13】22:28:45.568661600
消费者2接收到消息:【hello, world 4】22:28:45.582926500
消费者1接收到消息:【hello, world 15】22:28:45.631658300
消费者1接收到消息:【hello, world 17】22:28:45.692701200
消费者1接收到消息:【hello, world 19】22:28:45.753987800
消费者2接收到消息:【hello, world 6】22:28:45.784033700
消费者1接收到消息:【hello, world 21】22:28:45.817070700
消费者1接收到消息:【hello, world 23】22:28:45.878855100
消费者1接收到消息:【hello, world 25】22:28:45.940165800
消费者2接收到消息:【hello, world 8】22:28:45.985018900
消费者1接收到消息:【hello, world 27】22:28:46.001881900
消费者1接收到消息:【hello, world 29】22:28:46.064307200
消费者1接收到消息:【hello, world 31】22:28:46.126876500
消费者2接收到消息:【hello, world 10】22:28:46.188049600
消费者1接收到消息:【hello, world 33】22:28:46.189188
消费者1接收到消息:【hello, world 35】22:28:46.251264300
消费者1接收到消息:【hello, world 37】22:28:46.311506600
消费者1接收到消息:【hello, world 39】22:28:46.373090600
消费者2接收到消息:【hello, world 12】22:28:46.403576700
消费者1接收到消息:【hello, world 41】22:28:46.434759200
消费者1接收到消息:【hello, world 43】22:28:46.496507500
消费者1接收到消息:【hello, world 45】22:28:46.558915300
消费者2接收到消息:【hello, world 14】22:28:46.604745300
消费者1接收到消息:【hello, world 47】22:28:46.620012200
消费者1接收到消息:【hello, world 49】22:28:46.682159400
消费者2接收到消息:【hello, world 16】22:28:46.806845200
消费者2接收到消息:【hello, world 18】22:28:47.019770200
消费者2接收到消息:【hello, world 20】22:28:47.222564800
消费者2接收到消息:【hello, world 22】22:28:47.424667300
消费者2接收到消息:【hello, world 24】22:28:47.627302700
消费者2接收到消息:【hello, world 26】22:28:47.844145800
消费者2接收到消息:【hello, world 28】22:28:48.045398900
消费者2接收到消息:【hello, world 30】22:28:48.260633100
消费者2接收到消息:【hello, world 32】22:28:48.462049600
消费者2接收到消息:【hello, world 34】22:28:48.675985500
消费者2接收到消息:【hello, world 36】22:28:48.877849
消费者2接收到消息:【hello, world 38】22:28:49.080995600
消费者2接收到消息:【hello, world 40】22:28:49.282893100
消费者2接收到消息:【hello, world 42】22:28:49.485646700
消费者2接收到消息:【hello, world 44】22:28:49.687029200
消费者2接收到消息:【hello, world 46】22:28:49.887697300
消费者2接收到消息:【hello, world 48】22:28:50.089965100
可以看到消费者1和消费者2竟然每人消费了25条消息:
-
消费者1很快完成了自己的25条消息
-
消费者2却在缓慢的处理自己的25条消息。
也就是说消息是平均分配给每个消费者,并没有考虑到消费者的处理能力。导致1个消费者空闲,另一个消费者忙的不可开交。没有充分利用每一个消费者的能力,最终消息处理的耗时远远超过了1秒。这样显然是有问题的。
3)优化
在spring中有一个简单的配置,可以解决这个问题。我们修改consumer服务的application.yml文件,添加配置:
spring:
  rabbitmq:
    listener:
      simple:
        prefetch: 1 # 每次只能获取一条消息,处理完成才能获取下一个消息
也就是说同一时间只能消费一条消息,谁空闲就给谁消费
测试:
消费者1接收到消息:【hello, world 0】22:42:04.041403200
消费者2接收到消息:【hello, world 1】22:42:04.060033300
消费者1接收到消息:【hello, world 2】22:42:04.090654200
消费者1接收到消息:【hello, world 3】22:42:04.121077700
消费者1接收到消息:【hello, world 4】22:42:04.153003100
消费者1接收到消息:【hello, world 5】22:42:04.184580800
消费者1接收到消息:【hello, world 6】22:42:04.215425600
消费者1接收到消息:【hello, world 7】22:42:04.246555100
消费者1接收到消息:【hello, world 8】22:42:04.277547700
消费者2接收到消息:【hello, world 9】22:42:04.308558100
消费者1接收到消息:【hello, world 10】22:42:04.338590300
消费者1接收到消息:【hello, world 11】22:42:04.370729700
消费者1接收到消息:【hello, world 12】22:42:04.402429600
消费者1接收到消息:【hello, world 13】22:42:04.432999900
消费者1接收到消息:【hello, world 14】22:42:04.465282
消费者1接收到消息:【hello, world 15】22:42:04.494901800
消费者1接收到消息:【hello, world 16】22:42:04.526443800
消费者2接收到消息:【hello, world 17】22:42:04.557141
消费者1接收到消息:【hello, world 18】22:42:04.588056900
消费者1接收到消息:【hello, world 19】22:42:04.618747100
消费者1接收到消息:【hello, world 20】22:42:04.649554600
消费者1接收到消息:【hello, world 21】22:42:04.682226700
消费者1接收到消息:【hello, world 22】22:42:04.713421800
消费者1接收到消息:【hello, world 23】22:42:04.743564100
消费者1接收到消息:【hello, world 24】22:42:04.773995600
消费者2接收到消息:【hello, world 25】22:42:04.804574700
消费者1接收到消息:【hello, world 26】22:42:04.835299800
消费者1接收到消息:【hello, world 27】22:42:04.866357
消费者1接收到消息:【hello, world 28】22:42:04.897206600
消费者1接收到消息:【hello, world 29】22:42:04.927758800
消费者1接收到消息:【hello, world 30】22:42:04.958690100
消费者1接收到消息:【hello, world 31】22:42:04.989760100
消费者1接收到消息:【hello, world 32】22:42:05.020286600
消费者2接收到消息:【hello, world 33】22:42:05.051860800
消费者1接收到消息:【hello, world 34】22:42:05.082920500
消费者1接收到消息:【hello, world 35】22:42:05.114673100
消费者1接收到消息:【hello, world 36】22:42:05.145724100
消费者1接收到消息:【hello, world 37】22:42:05.175229400
消费者1接收到消息:【hello, world 38】22:42:05.207555100
消费者1接收到消息:【hello, world 39】22:42:05.237733
消费者1接收到消息:【hello, world 40】22:42:05.270134600
消费者2接收到消息:【hello, world 41】22:42:05.300180500
消费者1接收到消息:【hello, world 42】22:42:05.330637900
消费者1接收到消息:【hello, world 43】22:42:05.362088200
消费者1接收到消息:【hello, world 44】22:42:05.392557900
消费者1接收到消息:【hello, world 45】22:42:05.423798
消费者1接收到消息:【hello, world 46】22:42:05.454103500
消费者1接收到消息:【hello, world 47】22:42:05.483780700
消费者1接收到消息:【hello, world 48】22:42:05.515507800
消费者2接收到消息:【hello, world 49】22:42:05.545812500可以发现,由于消费者1处理速度较快,所以处理了更多的消息;消费者2处理速度较慢,只处理了6条消息。而最终总的执行耗时也在1秒左右,大大提升。
正所谓能者多劳,这样充分利用了每一个消费者的处理能力,可以有效避免消息积压问题。
4.3.交换机 Exchange
交换机(Exchange)是消息路由的核心,它接收来自生产者的消息,并根据特定的规则将消息路由到一个或多个队列中。
Exchange(交换机)只负责转发消息,不具备存储消息的能力,因此如果没有任何队列与Exchange绑定,或者没有符合路由规则的队列,那么消息会丢失!
交换机的类型有四种:
Fanout:广播,将消息交给所有绑定到交换机的队列。我们最早在控制台使用的正是Fanout交换机
Direct:订阅,基于RoutingKey(路由key)发送给订阅了消息的队列
Topic:通配符订阅,与Direct类似,只不过RoutingKey可以使用通配符
Headers:头匹配,基于MQ的消息头匹配,用的较少。
4.3.1.Fanout交换机
路由规则:广播到所有绑定的队列,忽略路由键
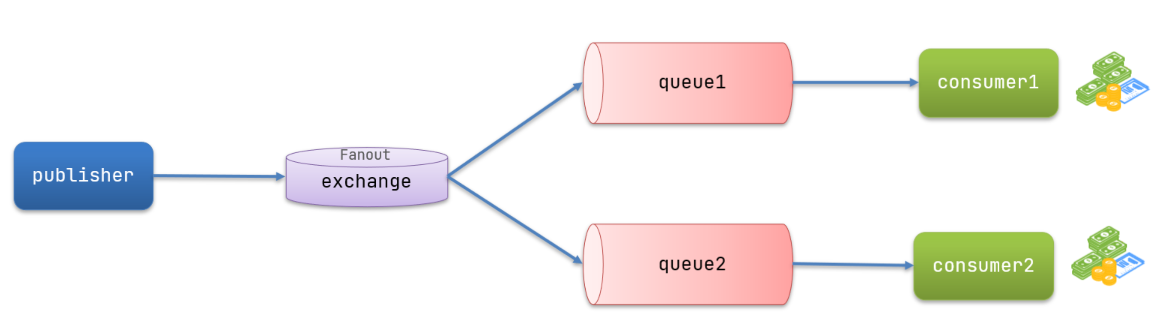
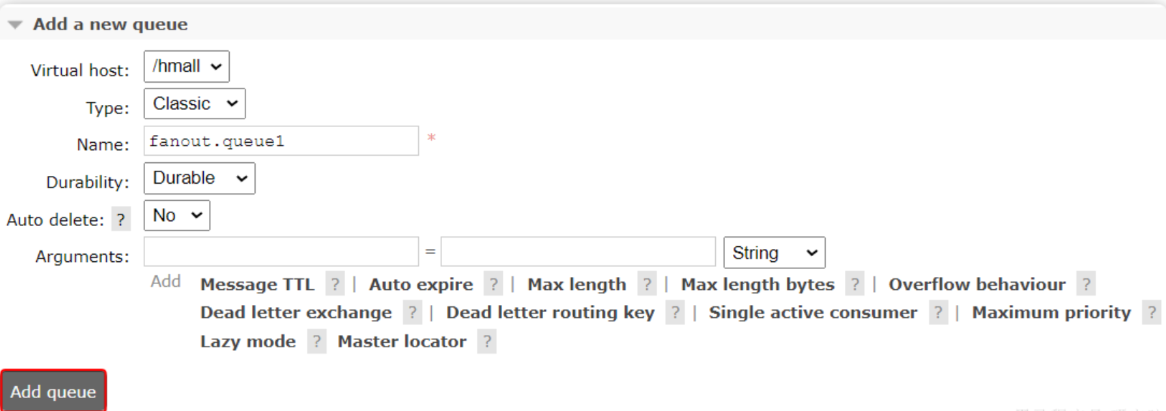
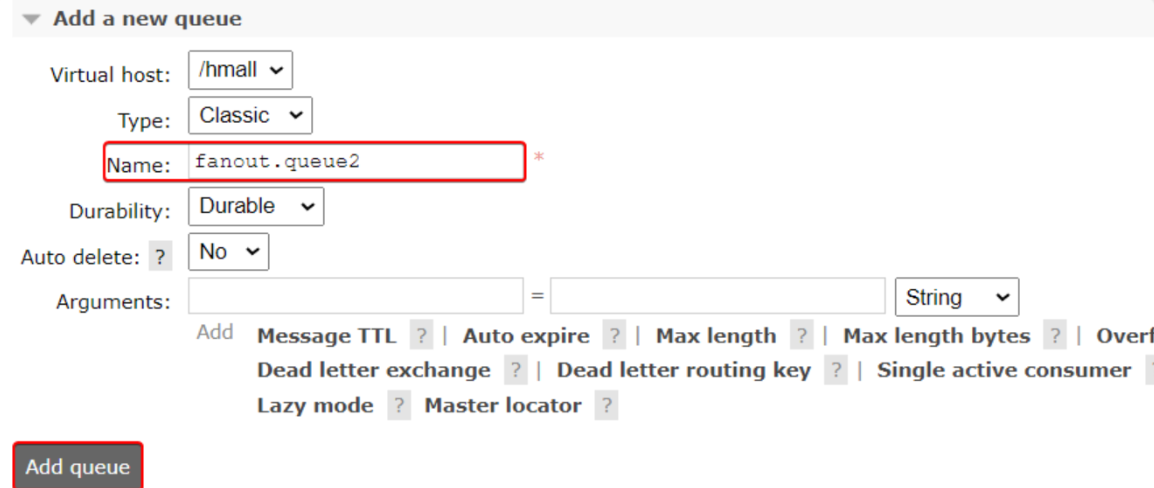
在控制台创建队列fanout.queue1和2:
然后再创建一个交换机:
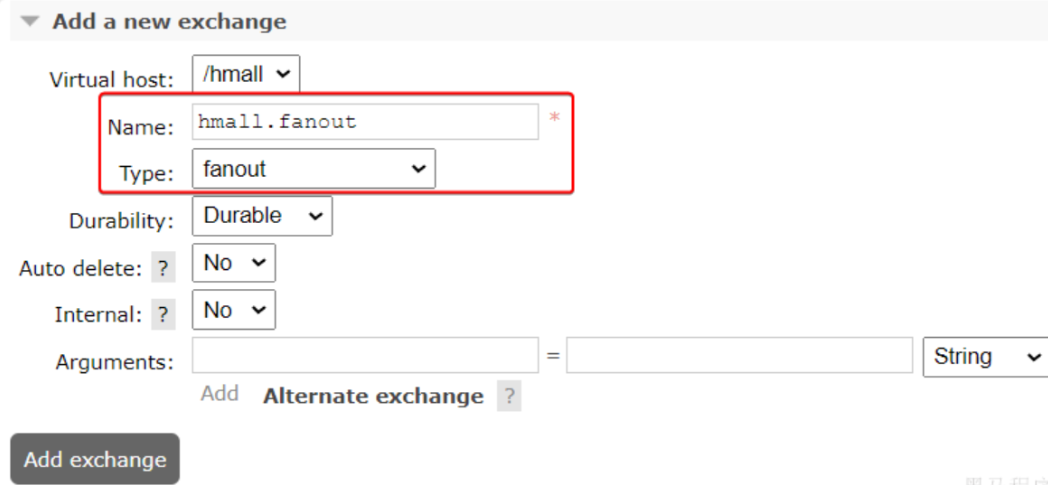
然后绑定两个队列到交换机:
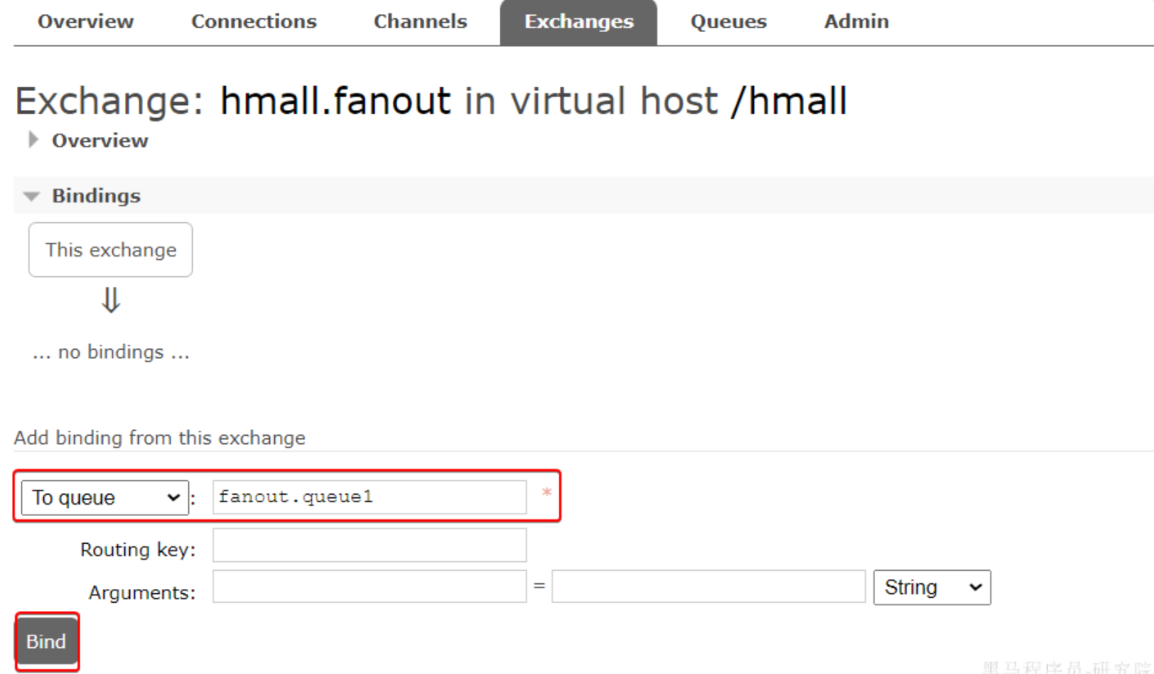
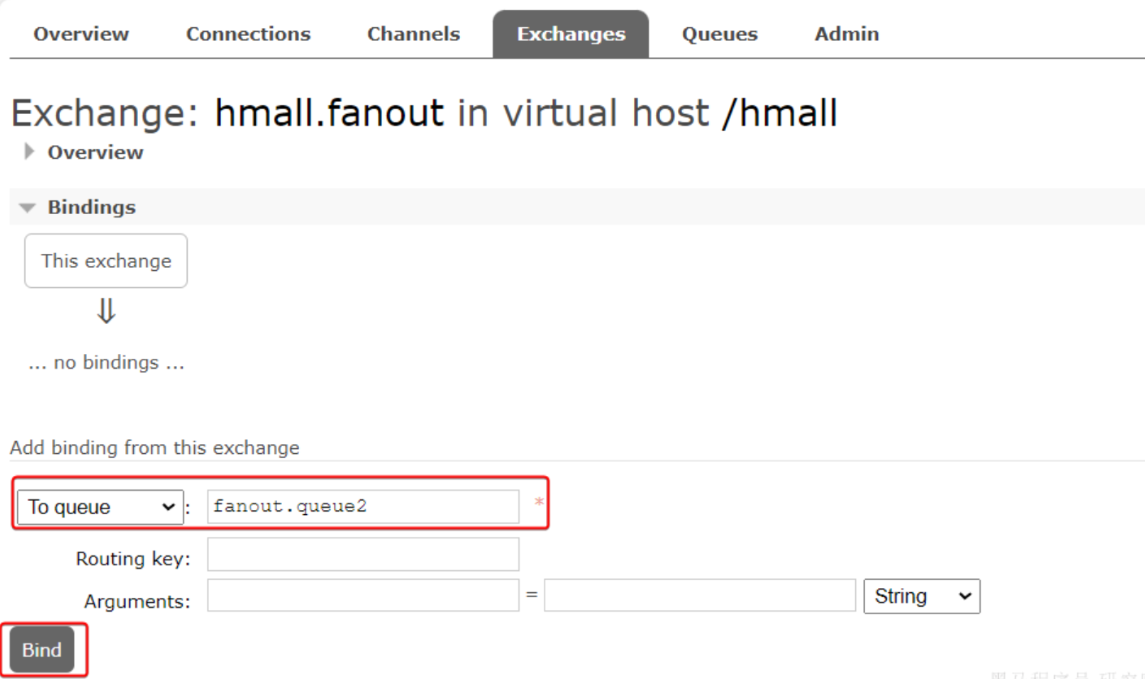
1)消息发送
@Test
public void testFanoutExchange() {
    // 交换机名称
    String exchangeName = "hmall.fanout";
    // 消息
    String message = "hello, everyone!";
    rabbitTemplate.convertAndSend(exchangeName, "", message);
}
2)消息接收
在consumer服务的SpringRabbitListener中添加两个方法,作为消费者:
@RabbitListener(queues = "fanout.queue1")
public void listenFanoutQueue1(String msg) {
    System.out.println("消费者1接收到Fanout消息:【" + msg + "】");
}

@RabbitListener(queues = "fanout.queue2")
public void listenFanoutQueue2(String msg) {
    System.out.println("消费者2接收到Fanout消息:【" + msg + "】");
}
测试:
消费者1接收到Fanout消息:【hello, everyone!】
消费者2接收到Fanout消息:【hello, everyone!】
4.3.2.Direct交换机
路由规则:基于路由键(Routing Key)的精确匹配
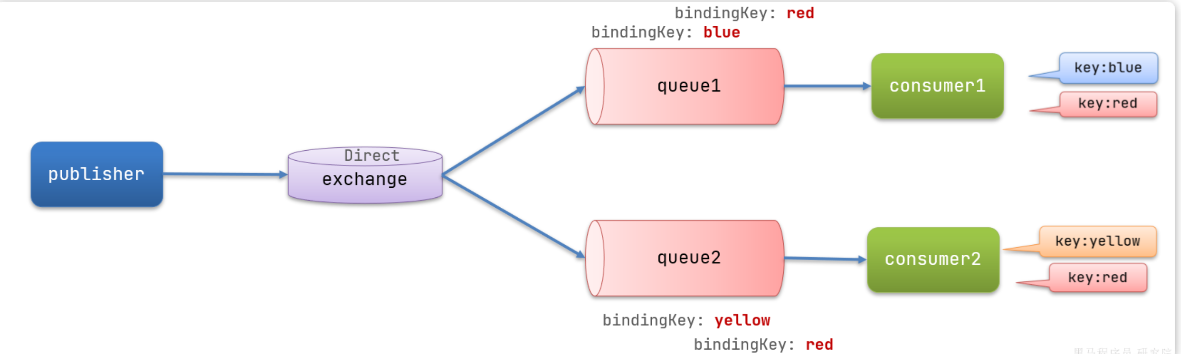
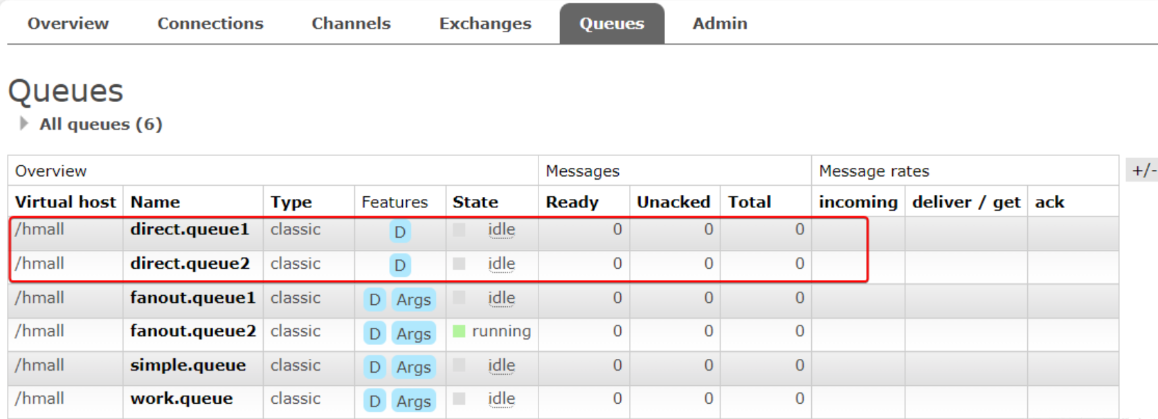
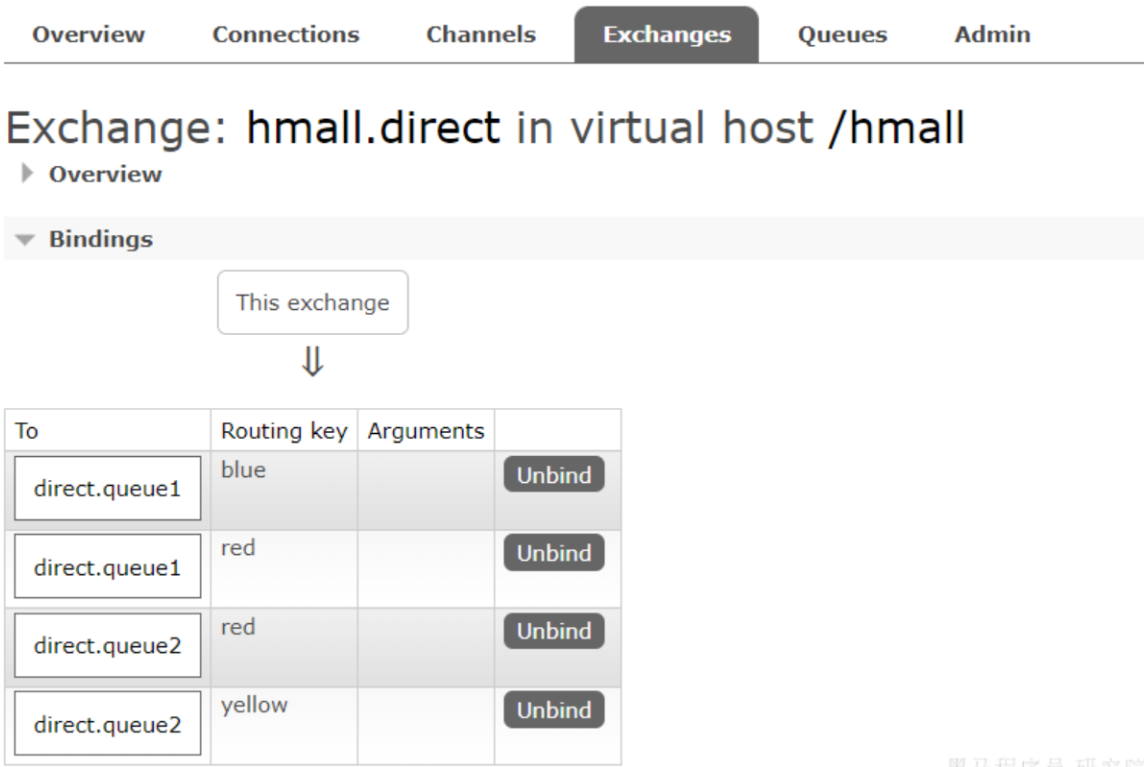
首先在控制台声明两个队列direct.queue1和direct.queue2,这里不再展示过程:
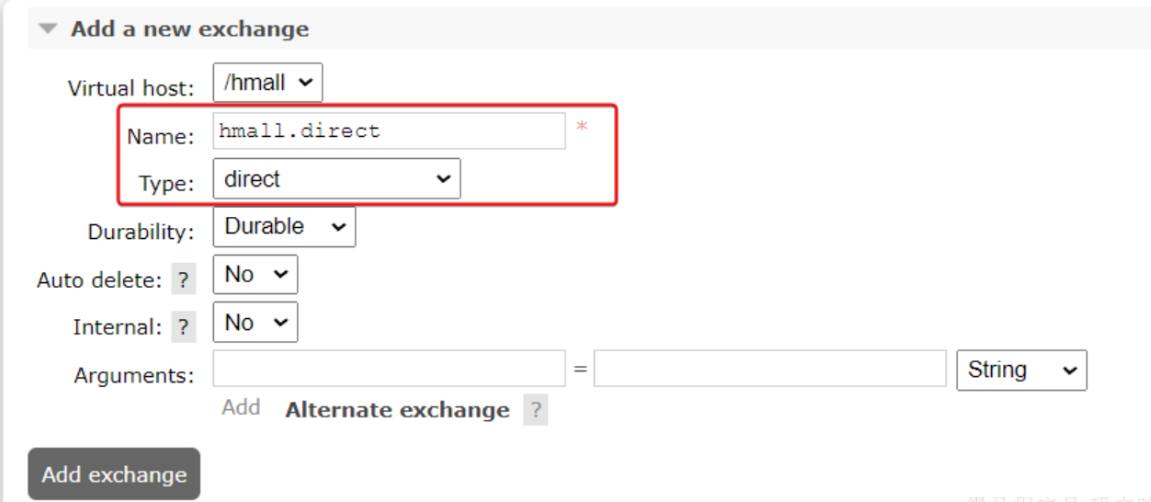
然后声明一个direct类型的交换机,命名为hmall.direct:
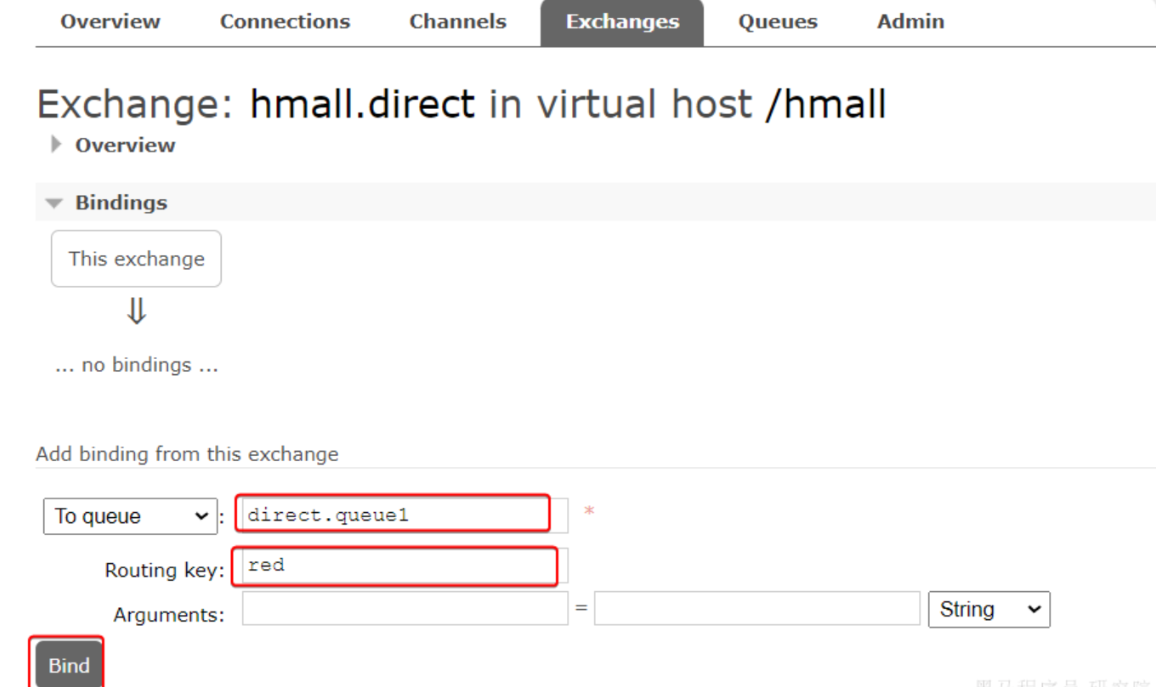
然后使用red和blue作为key,绑定direct.queue1到hmall.direct:
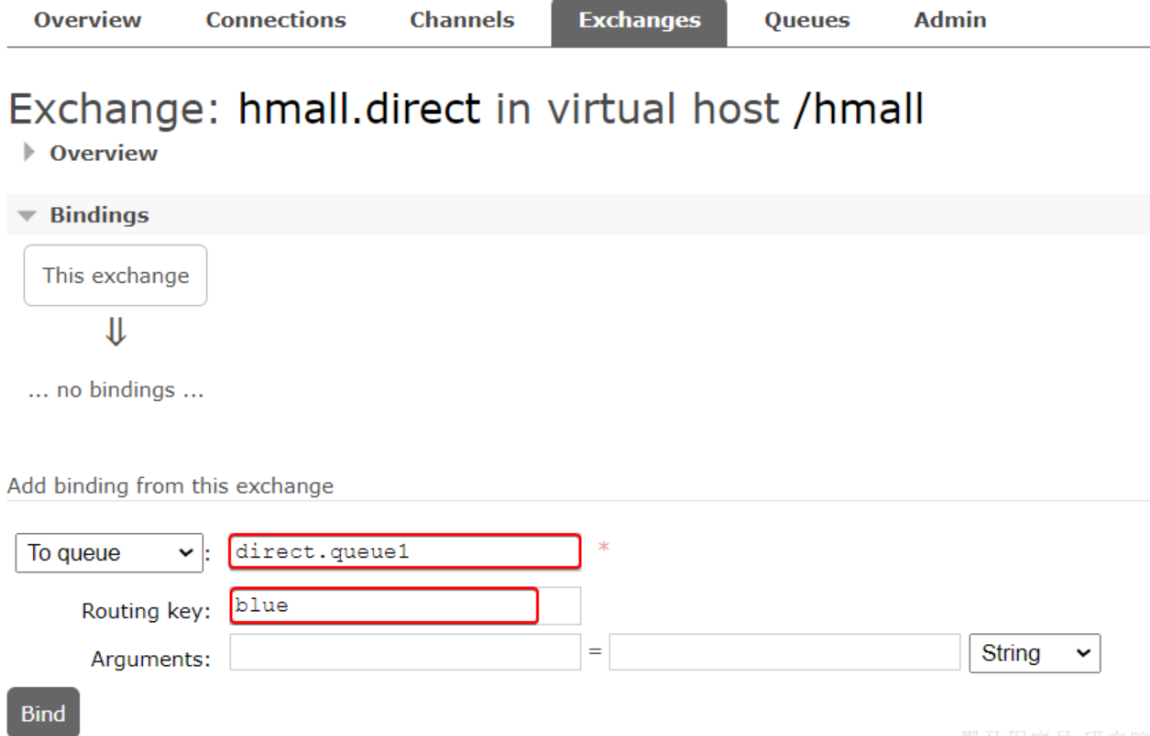
同理,使用red和yellow作为key,绑定direct.queue2到hmall.direct,步骤略,最终结果:
1)消息发送
@Test
public void testSendDirectExchange() {
    // 交换机名称
    String exchangeName = "hmall.direct";
    // 消息
    String message = "红色警报!日本乱排核废水,导致海洋生物变异,惊现哥斯拉!";
    // 发送消息
    rabbitTemplate.convertAndSend(exchangeName, "red", message);
}

@Test
public void testSendDirectExchange2() {
    // 交换机名称
    String exchangeName = "hmall.direct";
    // 消息
    String message = "最新报道,哥斯拉是居民自治巨型气球,虚惊一场!";
    // 发送消息
    rabbitTemplate.convertAndSend(exchangeName, "blue", message);
}
2)消息接收
@RabbitListener(queues = "direct.queue1")
public void listenDirectQueue1(String msg) {
    System.out.println("消费者1接收到direct.queue1的消息:【" + msg + "】");
}

@RabbitListener(queues = "direct.queue2")
public void listenDirectQueue2(String msg) {
    System.out.println("消费者2接收到direct.queue2的消息:【" + msg + "】");
}
测试,两个队列的key都有red,所以第一次测试都能收到消息,而第二次的消息key是blue,所以只有queue1能收到:
消费者1接收到direct.queue1的消息:【红色警报!日本乱排核废水,导致海洋生物变异,惊现哥斯拉!】
消费者2接收到direct.queue2的消息:【红色警报!日本乱排核废水,导致海洋生物变异,惊现哥斯拉!】
消费者1接收到direct.queue1的消息:【最新报道,哥斯拉是居民自治巨型气球,虚惊一场!】
4.3.3.Topic交换机
路由规则:基于路由键的模式匹配
通配符:
-
*:匹配一个单词 -
#:匹配零个或多个单词
举例:
-
item.#:能够匹配item.spu.insert或者item.spu -
item.*:只能匹配item.spu
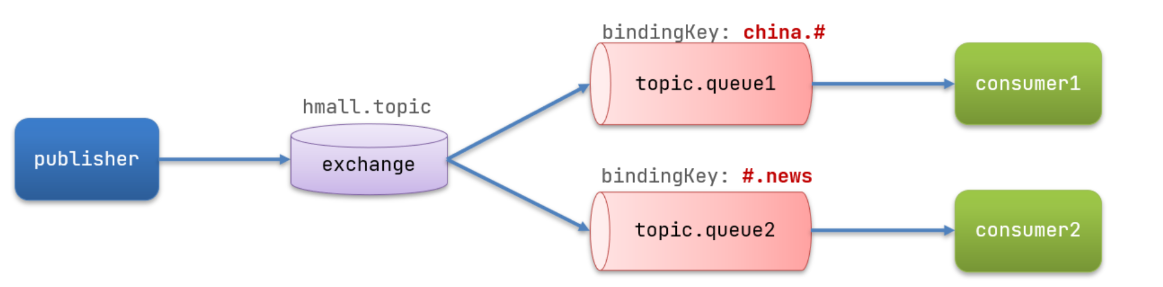
接下来,我们就按照上图所示,来演示一下Topic交换机的用法。
首先,在控制台按照图示例子创建队列、交换机,并利用通配符绑定队列和交换机。此处步骤略。最终结果如下:
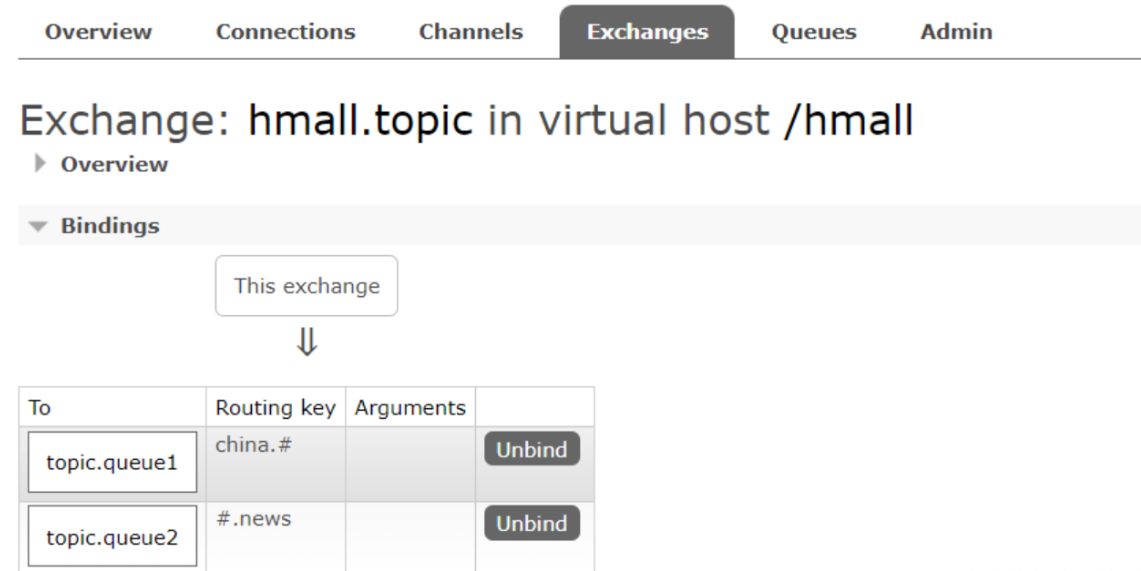
-
topic.queue1:绑定的是china.#,凡是以china.开头的routing key都会被匹配到,包括:-
china.news -
china.weather
-
-
topic.queue2:绑定的是#.news,凡是以.news结尾的routing key都会被匹配。包括:-
china.news -
japan.news
-
1)消息发送
// 测试通配符模式
@Test
public void testSendTopicExchange() {
    // 交换机名称
    String exchangeName = "hmall.topic";
    // 消息
    String message = "喜报!孙悟空大战哥斯拉,胜!";
    // 发送消息
    rabbitTemplate.convertAndSend(exchangeName, "china.news", message);
}
2)消息接收
@RabbitListener(queues = "topic.queue1")
public void listenTopicQueue1(String msg){
    System.out.println("消费者1接收到topic.queue1的消息:【" + msg + "】");
}

@RabbitListener(queues = "topic.queue2")
public void listenTopicQueue2(String msg){
    System.out.println("消费者2接收到topic.queue2的消息:【" + msg + "】");
}
测试:
消费者1接收到topic.queue1的消息:【喜报!孙悟空大战哥斯拉,胜!】
消费者2接收到topic.queue2的消息:【喜报!孙悟空大战哥斯拉,胜!】
4.4.声明队列和交换机
在之前我们都是基于RabbitMQ控制台来创建队列、交换机。但是在实际开发时,队列和交换机是程序员定义的,将来项目上线,又要交给运维去创建。那么程序员就需要把程序中运行的所有队列和交换机都写下来,交给运维。在这个过程中是很容易出现错误的。
因此推荐的做法是由程序启动时检查队列和交换机是否存在,如果不存在自动创建。
4.4.1.基本API
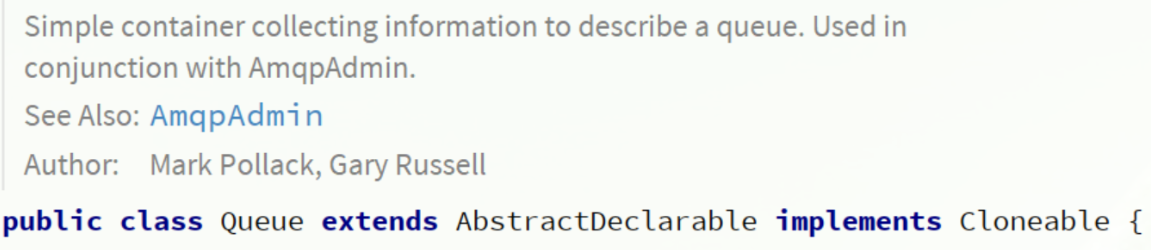
SpringAMQP提供了一个Queue类,用来创建队列:
SpringAMQP还提供了一个Exchange接口,来表示所有不同类型的交换机:
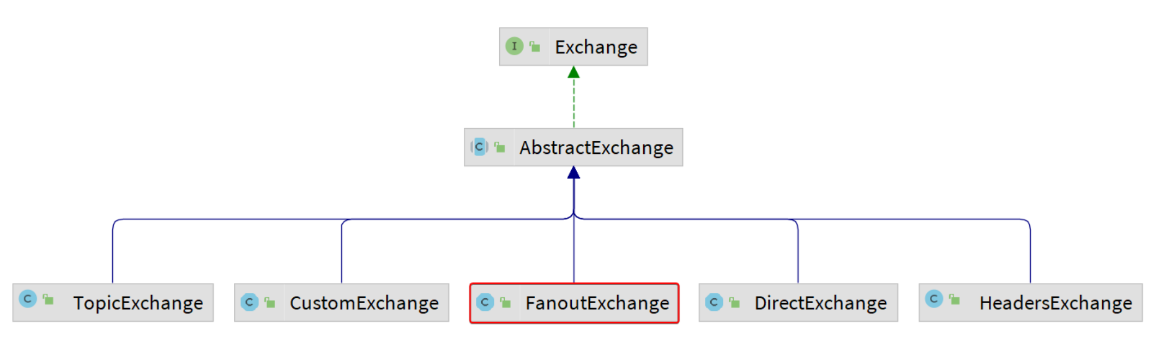
我们可以自己创建队列和交换机,不过SpringAMQP还提供了ExchangeBuilder来简化这个过程:
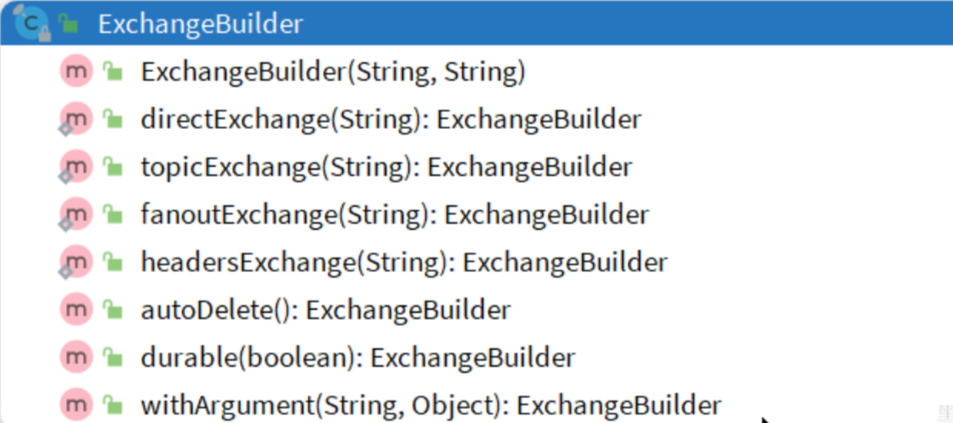
而在绑定队列和交换机时,则需要使用BindingBuilder来创建Binding对象:

4.4.2.通过配置类声明
1)fanout示例
在consumer中创建一个config包,声明队列和交换机:
@Configuration
public class FanoutConfig {
    /**
     * 声明交换机
     * @return Fanout类型交换机
     */
    @Bean
    public FanoutExchange fanoutExchange(){
        return new FanoutExchange("hmall.fanout");
    }

    /**
     * 第1个队列
     */
    @Bean
    public Queue fanoutQueue1(){
        return new Queue("fanout.queue1");
    }

    /**
     * 绑定队列和交换机
     */
    @Bean
    public Binding bindingQueue1(Queue fanoutQueue1, FanoutExchange fanoutExchange){
        return BindingBuilder.bind(fanoutQueue1).to(fanoutExchange);
    }

    /**
     * 第2个队列
     */
    @Bean
    public Queue fanoutQueue2(){
        return new Queue("fanout.queue2");
    }

    /**
     * 绑定队列和交换机
     */
    @Bean
    public Binding bindingQueue2(Queue fanoutQueue2, FanoutExchange fanoutExchange){
        return BindingBuilder.bind(fanoutQueue2).to(fanoutExchange);
    }
}
4.4.3.通过注解声明(推荐)
当要绑定多个KEY,如direct,基于@Bean的方式声明队列和交换机比较麻烦,Spring还提供了基于注解方式来声明。
1)fanout示例
@RabbitListener(bindings = @QueueBinding(
        value = @Queue(name = "fanout.queue1"),
        exchange = @Exchange(name = "hmall.fanout", type = "fanout")
))
public void listenFanoutQueue1(String message) {
    System.out.println("消费者接收到fanout.queue1的消息:【" + message + "】");
}

@RabbitListener(bindings = @QueueBinding(
        value = @Queue(name = "fanout.queue2"),
        exchange = @Exchange(name = "hmall.fanout", type = "fanout")
))
public void listenFanoutQueue2(String message) {
    System.out.println("消费者接收到fanout.queue2的消息:【" + message + "】");
}
2)direct示例
@RabbitListener(bindings = @QueueBinding(
    value = @Queue(name = "direct.queue1"),
    exchange = @Exchange(name = "hmall.direct", type = ExchangeTypes.DIRECT),
    key = {"red", "blue"}
))
public void listenDirectQueue1(String msg){
    System.out.println("消费者1接收到direct.queue1的消息:【" + msg + "】");
}

@RabbitListener(bindings = @QueueBinding(
    value = @Queue(name = "direct.queue2"),
    exchange = @Exchange(name = "hmall.direct", type = ExchangeTypes.DIRECT),
    key = {"red", "yellow"}
))
public void listenDirectQueue2(String msg){
    System.out.println("消费者2接收到direct.queue2的消息:【" + msg + "】");
}
3)topic示例
@RabbitListener(bindings = @QueueBinding(
    value = @Queue(name = "topic.queue1"),
    exchange = @Exchange(name = "hmall.topic", type = ExchangeTypes.TOPIC),
    key = "china.#"
))
public void listenTopicQueue1(String msg){
    System.out.println("消费者1接收到topic.queue1的消息:【" + msg + "】");
}

@RabbitListener(bindings = @QueueBinding(
    value = @Queue(name = "topic.queue2"),
    exchange = @Exchange(name = "hmall.topic", type = ExchangeTypes.TOPIC),
    key = "#.news"
))
public void listenTopicQueue2(String msg){
    System.out.println("消费者2接收到topic.queue2的消息:【" + msg + "】");
}
4.5.消息转换器
Spring的消息发送代码接收的消息体是一个Object:
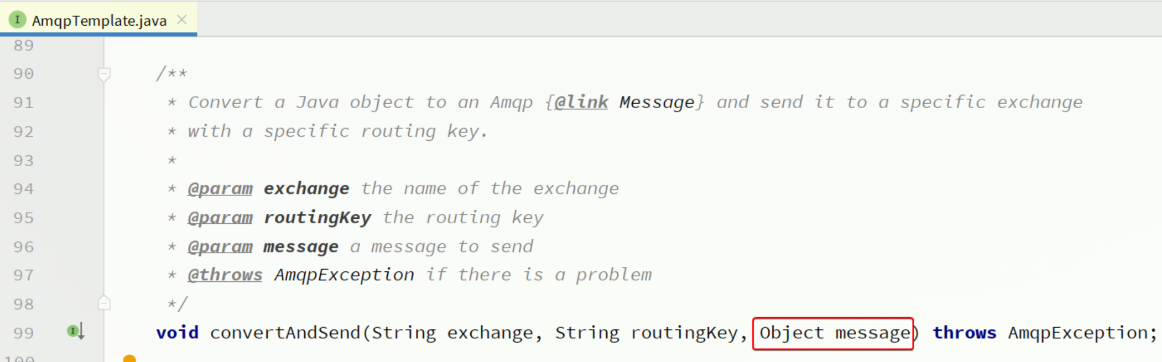
而在数据传输时,它会把你发送的消息序列化为字节发送给MQ,接收消息的时候,还会把字节反序列化为Java对象。
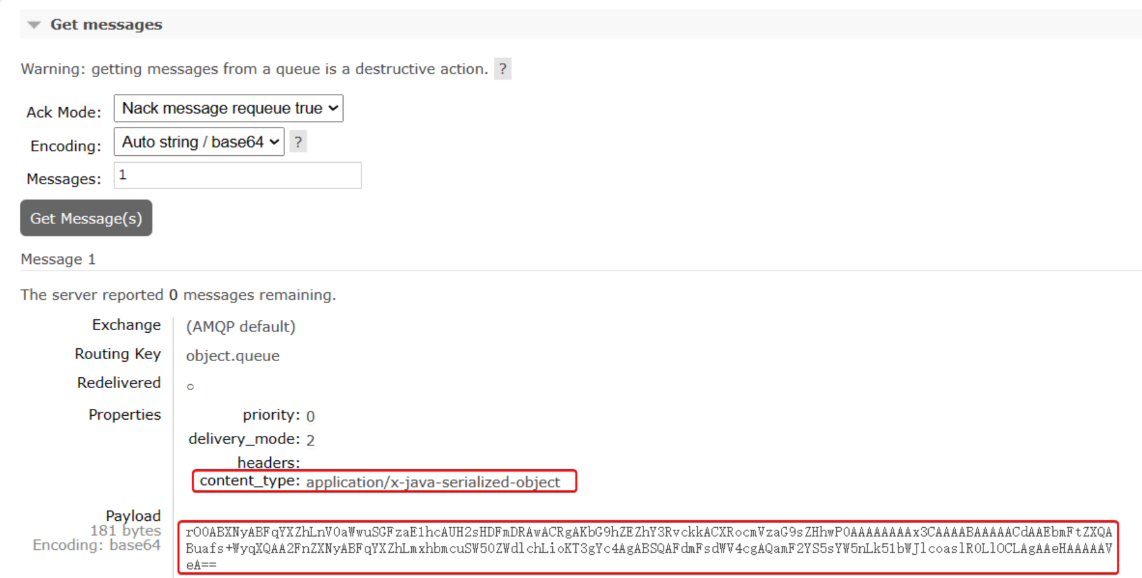
只不过,默认情况下Spring采用的序列化方式是JDK序列化。众所周知,JDK序列化存在下列问题:
-
数据体积过大
-
有安全漏洞
-
可读性差
4.5.1.使用jdk序列化
在consumer利用@Bean的方式创建一个队列:
@Configuration
public class MessageConfig {

    @Bean
    public Queue objectQueue() {
        return new Queue("object.queue");
    }
}
我们在publisher模块的SpringAmqpTest中新增一个消息发送的代码,发送一个Map对象:
@Test
public void testSendMap() throws InterruptedException {
    // 准备消息
    Map<String,Object> msg = new HashMap<>();
    msg.put("name", "柳岩");
    msg.put("age", 21);
    // 发送消息
    rabbitTemplate.convertAndSend("object.queue", msg);
}
发送消息后查看控制台,可以看到消息格式非常不友好。:
4.5.2.使用json序列化(推荐)
显然,JDK序列化方式并不合适。我们希望消息体的体积更小、可读性更高,因此可以使用JSON方式来做序列化和反序列化。
在publisher和consumer两个服务中都引入依赖:
<dependency>
    <groupId>com.fasterxml.jackson.dataformat</groupId>
    <artifactId>jackson-dataformat-xml</artifactId>
    <version>2.9.10</version>
</dependency>注意,如果项目中引入了spring-boot-starter-web依赖,则无需再次引入Jackson依赖。
配置消息转换器,在publisher和consumer两个服务的启动类中添加一个Bean即可:
@Bean
public MessageConverter messageConverter(){
    // 1.定义消息转换器
    Jackson2JsonMessageConverter jackson2JsonMessageConverter = new Jackson2JsonMessageConverter();
    // 2.配置自动创建消息id,用于识别不同消息,也可以在业务中基于ID判断是否是重复消息
    jackson2JsonMessageConverter.setCreateMessageIds(true);
    return jackson2JsonMessageConverter;
}
消息转换器中添加的messageId可以便于我们将来做幂等性判断。
我们在consumer服务中定义一个新的消费者,publisher是用Map发送,那么消费者也一定要用Map接收,为了方便,跳过交换机,格式如下:
@RabbitListener(queues = "object.queue")
public void listenSimpleQueueMessage(Map<String, Object> msg) throws InterruptedException {
    System.out.println("消费者接收到object.queue消息:【" + msg + "】");
}此时,我们到MQ控制台删除object.queue中的旧的消息。然后再次执行刚才的消息发送的代码,到MQ的控制台查看消息结构:
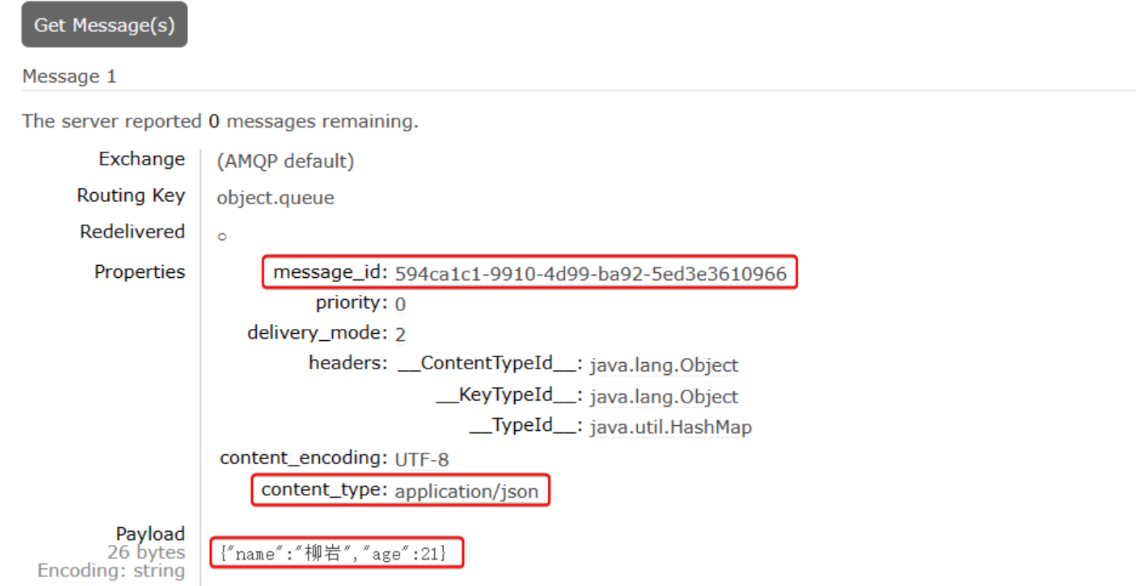
消费者接收到object.queue消息:【{name=柳岩, age=21}】5.业务改造
案例需求:改造余额支付功能,将支付成功后基于OpenFeign的交易服务的更新订单状态接口的同步调用,改为基于RabbitMQ的异步通知。
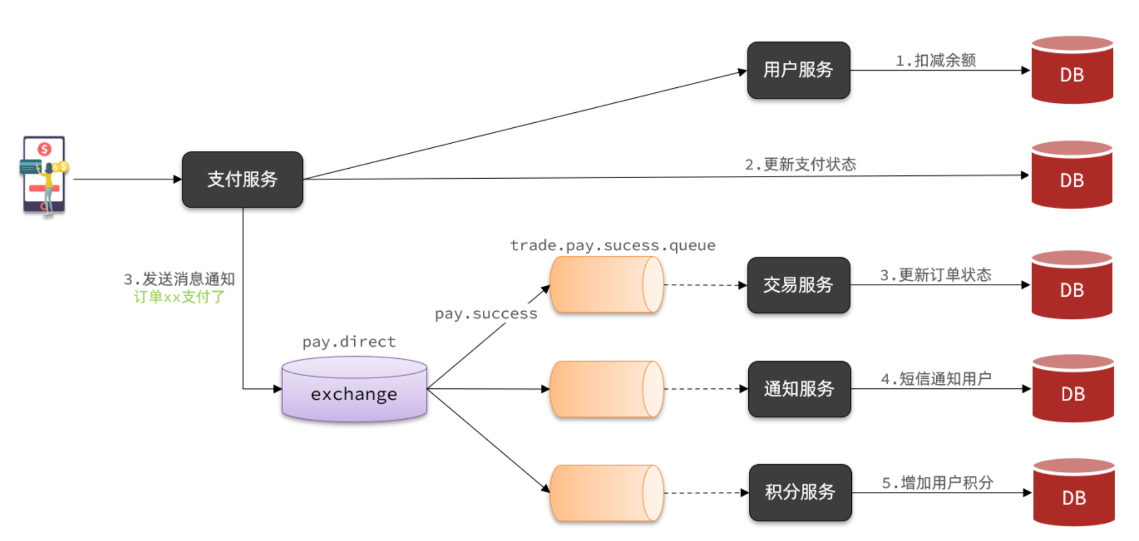
说明:目前没有通知服务和积分服务,因此我们只关注交易服务,步骤如下:
-
定义
direct类型交换机,命名为pay.direct -
定义消息队列,命名为
trade.pay.success.queue -
将
trade.pay.success.queue与pay.direct绑定,BindingKey为pay.success -
支付成功时不再调用交易服务更新订单状态的接口,而是发送一条消息到
pay.direct,发送消息的RoutingKey为pay.success,消息内容是订单id -
交易服务监听
trade.pay.success.queue队列,接收到消息后更新订单状态为已支付
5.1.配置MQ
不管是生产者还是消费者,都需要配置MQ的基本信息。分为两步:
1)添加依赖:
  <!--消息发送-->
  <dependency>
      <groupId>org.springframework.boot</groupId>
      <artifactId>spring-boot-starter-amqp</artifactId>
  </dependency>
2)配置MQ地址:
spring:
  rabbitmq:
    host: 192.168.150.101 # 你的虚拟机IP
    port: 5672 # 端口
    virtual-host: /hmall # 虚拟主机
    username: hmall # 用户名
    password: 123456 # 密码
5.2.接收消息
在trade-service服务中定义一个消息监听类:
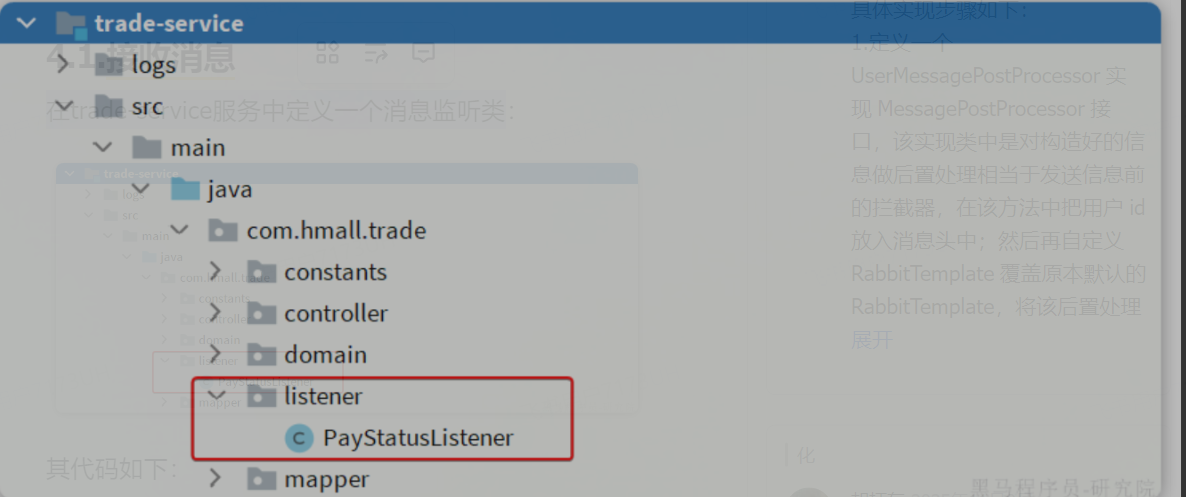
其代码如下:
@Component
@RequiredArgsConstructor
public class PayStatusListener {

    private final IOrderService orderService;

    @RabbitListener(bindings = @QueueBinding(
            value = @Queue(name = "trade.pay.success.queue", durable = "true"),
            exchange = @Exchange(name = "pay.direct"),
            key = "pay.success"
    ))
    public void listenPaySuccess(Long orderId){
        orderService.markOrderPaySuccess(orderId);
    }
}
5.3.消费消息
修改pay-service服务下的com.hmall.pay.service.impl.PayOrderServiceImpl类中的tryPayOrderByBalance方法:
private final RabbitTemplate rabbitTemplate;

@Override
@Transactional
public void tryPayOrderByBalance(PayOrderDTO payOrderDTO) {
    // 1.查询支付单
    PayOrder po = getById(payOrderDTO.getId());
    // 2.判断状态
    if(!PayStatus.WAIT_BUYER_PAY.equalsValue(po.getStatus())){
        // 订单不是未支付,状态异常
        throw new BizIllegalException("交易已支付或关闭!");
    }
    // 3.尝试扣减余额
    userClient.deductMoney(payOrderDTO.getPw(), po.getAmount());
    // 4.修改支付单状态
    boolean success = markPayOrderSuccess(payOrderDTO.getId(), LocalDateTime.now());
    if (!success) {
        throw new BizIllegalException("交易已支付或关闭!");
    }
    // 5.修改订单状态
    // tradeClient.markOrderPaySuccess(po.getBizOrderNo());
    try {
        rabbitTemplate.convertAndSend("pay.direct", "pay.success", po.getBizOrderNo());
    } catch (Exception e) {
        log.error("支付成功的消息发送失败,支付单id:{}, 交易单id:{}", po.getId(), po.getBizOrderNo(), e);
    }
}
5.4.练习
5.4.1.抽取共享的MQ配置
将MQ配置抽取到Nacos中管理,微服务中直接使用共享配置。
5.4.2.改造下单功能
改造下单功能,将基于OpenFeign的清理购物车同步调用,改为基于RabbitMQ的异步通知:
-
定义topic类型交换机,命名为
trade.topic -
定义消息队列,命名为
cart.clear.queue -
将
cart.clear.queue与trade.topic绑定,BindingKey为order.create -
下单成功时不再调用清理购物车接口,而是发送一条消息到
trade.topic,发送消息的RoutingKey为order.create,消息内容是下单的具体商品、当前登录用户信息 -
购物车服务监听
cart.clear.queue队列,接收到消息后清理指定用户的购物车中的指定商品
5.4.3.登录信息传递优化
某些业务中,需要根据登录用户信息处理业务,而基于MQ的异步调用并不会传递登录用户信息。前面我们的做法比较麻烦,至少要做两件事:
-
消息发送者在消息体中传递登录用户
-
消费者获取消息体中的登录用户,处理业务
这样做不仅麻烦,而且编程体验也不统一,毕竟我们之前都是使用UserContext来获取用户。
大家思考一下:有没有更优雅的办法传输登录用户信息,让使用MQ的人无感知,依然采用UserContext来随时获取用户。
本文到此结束,如果对你有帮助,可以点个赞,下篇在主页里~

汇聚全球AI编程工具,助力开发者即刻编程。
更多推荐

 8
8 0
0- 0


 已为社区贡献3条内容

所有评论(0)