
【Linux】深入理解重定向

个人主页:矢望
个人专栏:C++、Linux、C语言、数据结构、Coze-AI
一、如何理解重定向
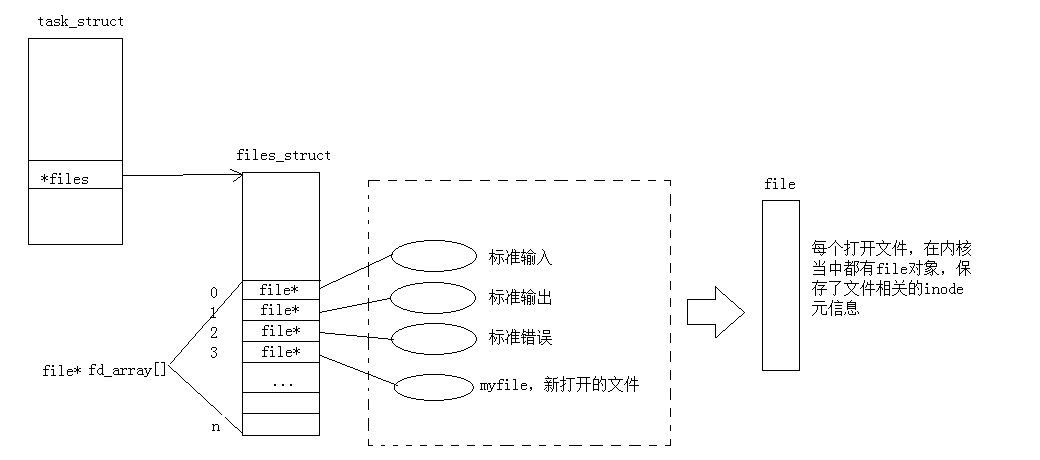
如上图,上期博客我们了解到进程PCB中文件信息的结构体中有一张文件描述符表fd_array。每个文件都有一个特定的文件描述符fd,那么文件描述符的分配规则是什么样子的呢?
我们首先写一个程序。
#include <stdio.h>
#include <sys/types.h>
#include <sys/wait.h>
#include <fcntl.h>

int main()
{
	// 写文件,文件不存在就创建,并且清空文件内容
    int fd1 = open("log1.txt", O_WRONLY | O_CREAT | O_TRUNC, 0666);
    printf("fd1: %d\n", fd1);

    int fd2 = open("log2.txt", O_WRONLY | O_CREAT | O_TRUNC, 0666);
    printf("fd2: %d\n", fd2);

    int fd3 = open("log3.txt", O_WRONLY | O_CREAT | O_TRUNC, 0666);
    printf("fd3: %d\n", fd3);

    return 0;
}
运行结果: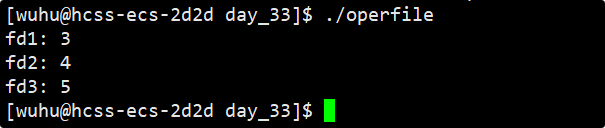
这和我们预期的一样,毕竟0、1、2被占用了。那么现在我们使用close关闭一下它们,再创建新文件试一下。
#include <stdio.h>
#include <sys/types.h>
#include <sys/wait.h>
#include <fcntl.h>
#include <unistd.h>

int main()
{
    close(0);
    // 写文件,文件不存在就创建,并且清空文件内容
    int fd1 = open("log1.txt", O_WRONLY | O_CREAT | O_TRUNC, 0666);
    printf("fd1: %d\n", fd1);

    int fd2 = open("log2.txt", O_WRONLY | O_CREAT | O_TRUNC, 0666);
    printf("fd2: %d\n", fd2);

    int fd3 = open("log3.txt", O_WRONLY | O_CREAT | O_TRUNC, 0666);
    printf("fd3: %d\n", fd3);

    return 0;
}
运行结果: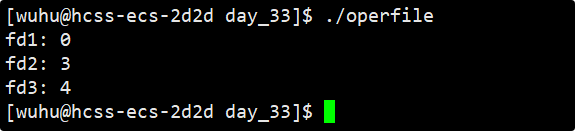
诶,运行结果变化了,我们在关闭2试一下。
close(2);
运行结果:
噢,我们发现了文件描述符的分配规则。分配规则:给文件分配文件描述符表数组中值最小的并且没有被使用的fd。
我们关闭过0、2,但1还没有被关闭过,我们试一下关闭它,看看有什么现象,预期现象是1、3、4。
close(1);
运行结果:
它竟然没有打印!
我们思考一下1是什么? 它对应的是标准输出。当我们将1号文件描述符对应的文件关闭,那么它指向的就是NULL,此时我们又创建了三个文件,那么log1.txt现在的文件描述符就是1,我们看看log1.txt。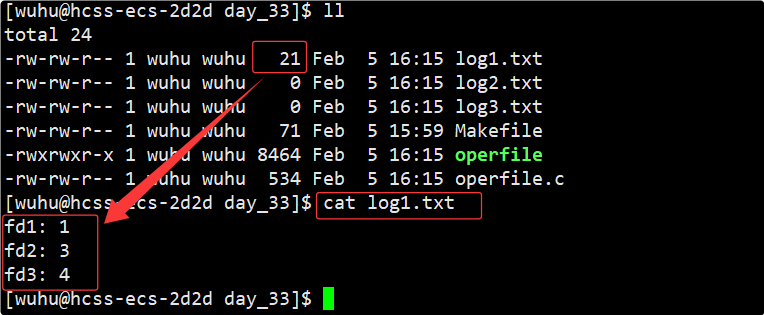
如上图,log1.txt里面有内容,并且内容就是我们预期的输出!这不就是输出重定向吗!
现象解释:printf是C标准库中的函数,它默认往stdout打印,我们调用系统调用让OS更改了文件描述符1的指向,语言层是不知道这件事的,stdout结构体对象中的文件描述符变量是1,所以printf就往1中打印。
所以重定向的本质就是更改数组特定下标内的内容!
我们再写一个程序,这个程序是获取键盘输入的内容并打印的。
#include <stdio.h>
#include <sys/types.h>
#include <sys/wait.h>
#include <fcntl.h>
#include <unistd.h>

int main()
{
    //close(0);
    //int fd = open("log1.txt", O_RDONLY); // 只读
    //printf("fd: %d\n\n", fd);
    char buff[32];
    fgets(buff, sizeof buff, stdin);
    printf("%s", buff);

    return 0;
}
运行结果:
好,现在我们把程序注释掉的内容放开再次运行: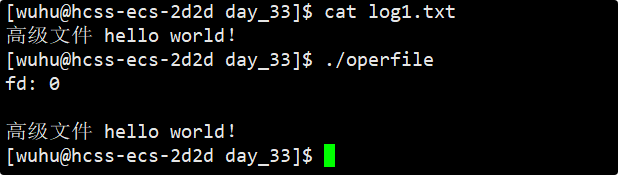
如上,这就是输入重定向。
- 系统调用
dup2
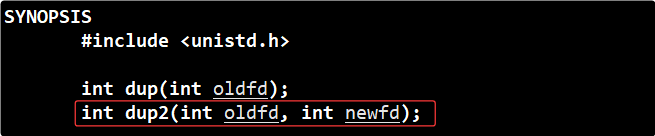
作用:复制oldfd到newfd。其实就是将oldfd所指向的内容拷贝到newfd里面。假如你的新创建文件的文件描述符是fd,那么dup2(fd, 1);就是让文件描述符1指向的内容是fd对应的文件。dup2是一个复制文件描述符的系统调用,使用dup2就可以实现重定向的效果。
输出重定向:
#include <stdio.h>
#include <sys/types.h>
#include <sys/wait.h>
#include <fcntl.h>
#include <unistd.h>

int main()
{
	// 写文件,文件不存在就创建,并且清空文件内容
    int fd = open("log.txt", O_WRONLY | O_CREAT | O_TRUNC, 0666);
    printf("fd: %d\n", fd);
    dup2(fd, 1);
    printf("hello world!\n");
    printf("hello world!\n");
    printf("hello world!\n");
    printf("hello world!\n");
    printf("hello world!\n");
    printf("hello world!\n");

    return 0;
}
运行结果: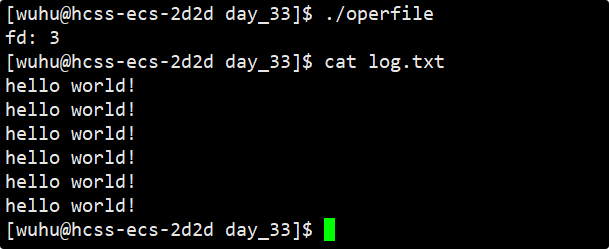
追加重定向:
#include <stdio.h>
#include <sys/types.h>
#include <sys/wait.h>
#include <fcntl.h>
#include <unistd.h>

int main()
{
    int fd = open("log.txt", O_WRONLY | O_CREAT | O_APPEND, 0666); // 写文件,文件不存在就创建,并且追加写
    printf("fd: %d\n", fd);
    dup2(fd, 1);

    printf("hello world!\n");

    return 0;
}
运行结果: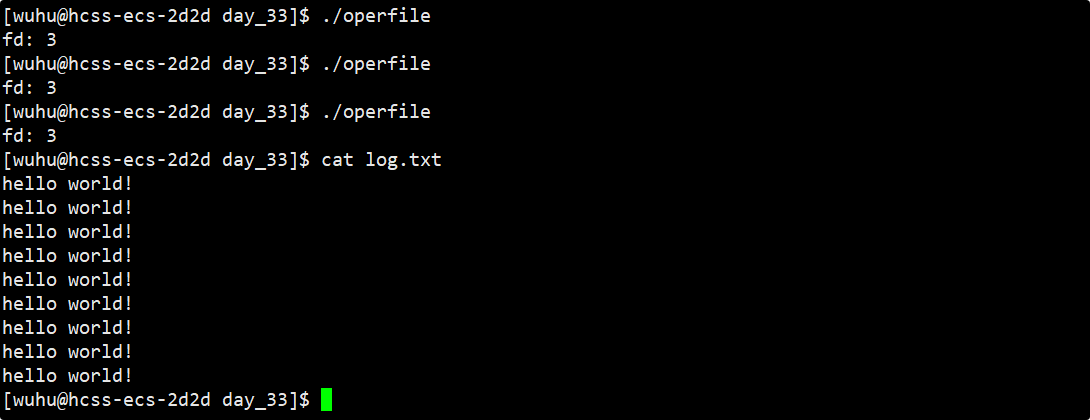
输入重定向:
#include <stdio.h>
#include <sys/types.h>
#include <sys/wait.h>
#include <fcntl.h>
#include <unistd.h>

int main()
{
    int fd = open("log.txt", O_RDONLY); // 只读
    printf("fd: %d\n", fd);

    dup2(fd, 0);

    char buff[32];
    fgets(buff, sizeof buff, stdin);
    printf("%s", buff);

    return 0;
}
运行结果: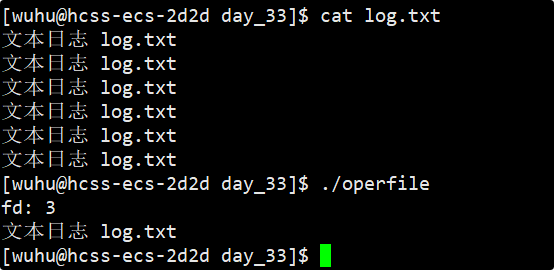
二、更改我们实现的 Shell
我们要在我们之前实现的Shell命令行解释器上添加重定向功能,相关博客:【Linux】实现 Shell 命令行解释器。
回忆一下我们之前Shell实现的流程,我们获取用户输入之后,直接就进行解析字符串了,今天,在这两步之间还要有一个解析是否有重定向操作。
修改之后的核心代码:
#include <stdio.h>
#include <stdlib.h>
#include <unistd.h>
#include <string.h>
#include <sys/types.h>
#include <sys/wait.h>
#include <iostream>
#include <string>

// 重定向宏定义
#define None_Redir   0 // 没有重定向
#define Input_Redir  1 // 输入重定向
#define App_Redir    2 // 追加重定向
#define Output_Redir 3 // 输出重定向

int redir_type = None_Redir; // 记录重定向方式
char* filename = NULL; // 进行重定向的目标文件

// 去除标识符之后可能出现的空格
#define Remove_Space(start) do{\
    while(*start == ' ') start++;\
}while(0)

// 解析是否有重定向操作
// Command > XX.txt || Command > XX.txt || Command < XX.txt || Command
void ParseRedir(char Commandline[])
{
   // 清除之前的重定向有关数据
   redir_type = None_Redir;
   filename = NULL;
   // 定义首尾指针 [start, end)
   char* start = Commandline;
   char* end = Commandline + strlen(Commandline);

   // 找到重定向标志符后,直接将重定向标识符直接改成 '\0'
   // 这样Commandline里面就是可执行的指令了
   // 再将重定向标识符后面的目标文件提取出来,给 filename
   // 可能要去除重定向标识符之后的空格
   while(start < end)
   {
       if(*start == '>')
       {
           if(*(start + 1) == '>')
           {
               // 追加重定向
               *start = '\0';
               start++;
               *start = '\0';

               start++;
               Remove_Space(start); // 去除标识符之后可能存在的空格
               redir_type = App_Redir;
               filename = start;

               break;
           }
           // 输出重定向
           *start = '\0';

           start++;
           Remove_Space(start); // 去除标识符之后可能存在的空格
           redir_type = Output_Redir;
           filename = start;

           break;
       }
       else if(*start == '<')
       {
           // 输入重定向
           *start = '\0';

           start++;
           Remove_Space(start);
           redir_type = Input_Redir;
           filename = start;

           break;
       }
       else start++;
   }
}

int main()
{
    // ...
    while(1)
    {
        // 2、获取用户输入

        // 3、解析是否有重定向操作
        ParseRedir(Command_line);
        printf("Command_line: %s\n", Command_line);
        printf("redir_type: %d\n", redir_type);
        printf("filename: %s\n", filename);

        // ...
    }

    return 0;
}
如上,void ParseRedir(char Commandline[])的作用是解析用户输入的命令中是否有重定向的相关操作,如果有就获取记录重定向的类型(也就是上面的宏定义),获取要重定向的目标文件,并让Commandline中的内容是可被正常解析执行的字符串命令。
上面有一个跳过空格的宏定义展开操作,如果我们使用函数实现这个操作,这个函数就需要使用二级指针,但使用宏替换就不需要了。
// 去除标识符之后可能出现的空格
#define Remove_Space(start) do{\
    while(*start == ' ') start++;\
}while(0)
do {...} while(0)这是C/C++编程中的一个经典技巧,理解它有助于编写更安全、更健壮的宏代码,它的主要优势是语法完整性:确保宏展开后是一条完整的语句;作用域控制:允许在宏中定义局部变量;错误预防:避免if-else和分号相关的陷阱;一致性:无论在哪里使用,行为都像函数调用。并且将错误控制在了这一句Remove_Space(start);中,如果宏内部有错误,编译器报错位置就在这一行,而不是宏展开后的复杂代码中。
接下来,我们看看它解析重定义的情况: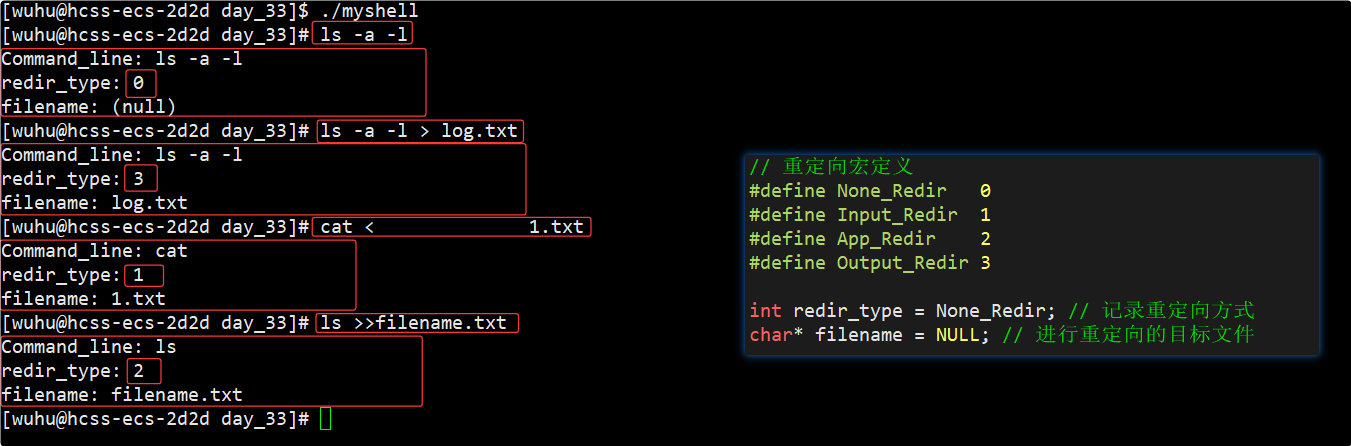
如上,解析情况符合我们的预期。
接下来,修改子进程执行中的代码,这里不再考虑内建命令:
int ExecuteCommand()
{
    // 创建一个子进程,执行这个命令
    pid_t id = fork();

    if(id < 0) return -1;
    else if(id == 0)
    {
        int fd = -1;

        if(redir_type == Output_Redir)
        {
            // 输出重定向
            fd = open(filename, O_WRONLY | O_CREAT | O_TRUNC, 0666);
            dup2(fd, 1);
        }
        else if(redir_type == App_Redir)
        {
            // 追加重定向
            fd = open(filename, O_WRONLY | O_CREAT | O_APPEND, 0666);
            dup2(fd, 1);
        }
        else if(redir_type == Input_Redir)
        {
            // 输入重定向
            fd = open(filename, O_RDONLY);
            dup2(fd, 0);
        }

        // 子进程
        //execvp(gargv[0], gargv);
        execvpe(gargv[0], gargv, genv);
        exit(1); // 子进程执行到这一行时,程序替换就失败了,退出码设为 1
    }

    // 父进程
    // ...
    return 0;
}
运行测试: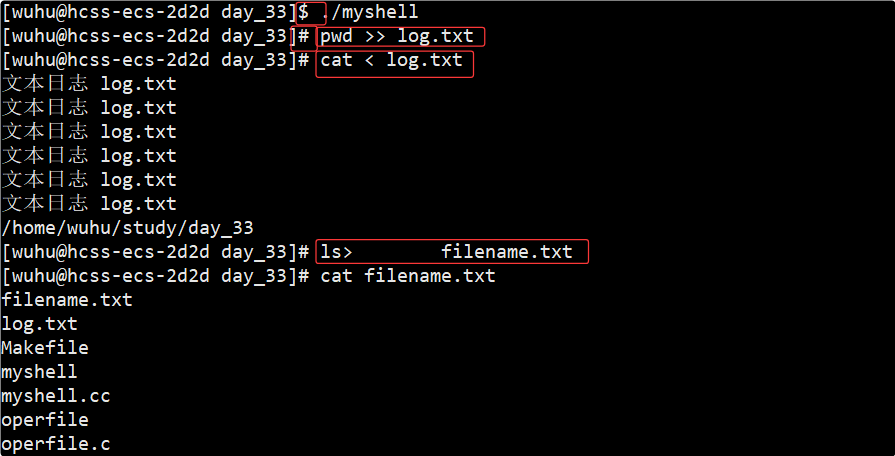
结果符合我们的预期。
现在我们就可以知道cat log.txt和cat < log.txt的区别了:cat log.txt是cat 进程自己调用 open("log.txt"),log.txt 作为命令行参数传给 cat,cat 决定如何打开、读取文件;而cat < log.txt是Shell 先打开 log.txt,之后Shell 将文件描述符0(stdin)重定向到文件,也就是Shell把cat进程的标准输入更改成了log.txt,cat 只看到标准输入,不知道数据来自文件log.txt。
三、初步理解一切皆文件
我们的电脑上有很多的硬件,如键盘,显示器,网卡等,这些底层硬件都是外部设备,对外部设备做操作无非就是做IO,读或写。
这些外部设备它们底层的读写驱动肯定是不同的,描述它们属性的结构体也是不同的。那么它们的差异这么大,OS要对每一件设备都进行区别处理吗?那样成本太大了吧,操作系统可以这样处理: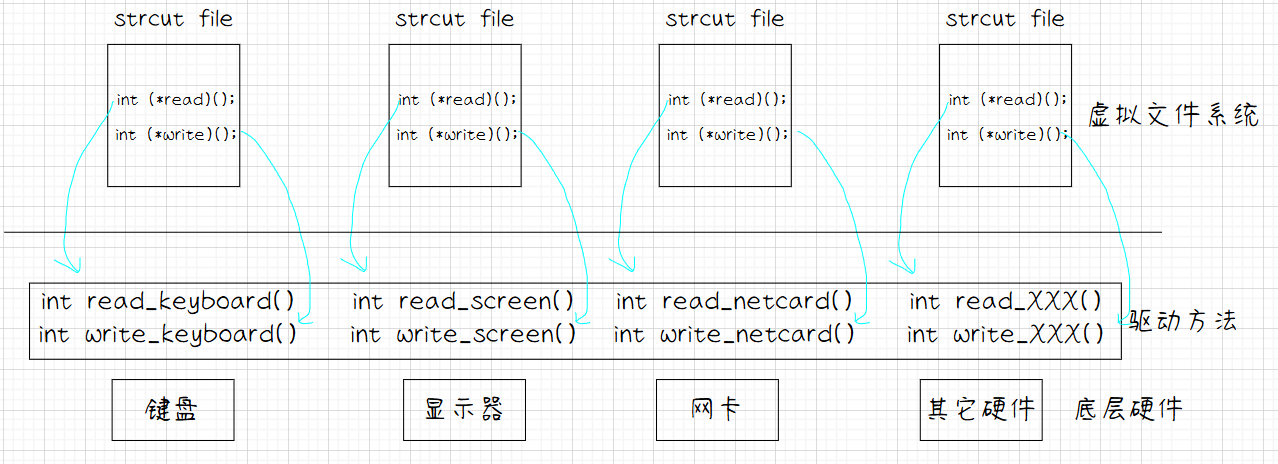
如上图,struct file不允许有具体的实现方式,但允许有统一的接口,这样对不同的硬件做管理,在上层看来就是对相同的函数指针做操作,这样使用的接口就统一了,就实现了一切皆文件!在进程视角也就是用户视角看到的就是一切皆struct file!
在C++程序员看来虚拟文件系统就是基类,而设备驱动层就是子类,基类都是相同的,而子类的实现不同,这不就是多态吗!
Linux2.6.18内核中的真实源码:
/*
 * 这是Linux 2.6.18内核中struct file的实际定义
 * 注意:为清晰起见,我移除了一些条件编译和注释
 */

struct file {
    struct list_head        f_list;        /* 文件链表 */
    struct dentry           *f_dentry;     /* 关联的目录项 */
    struct vfsmount         *f_vfsmnt;     /* 挂载信息 */
    struct file_operations  *f_op;         /* 文件操作函数表 -> 关键! */
    atomic_t                f_count;       /* 引用计数 */
    unsigned int            f_flags;       /* 打开标志 */
    mode_t                  f_mode;        /* 文件模式 */
    loff_t                  f_pos;         /* 文件位置指针 */
    struct fown_struct      f_owner;       /* 文件所有者(用于信号) */
    unsigned int            f_uid, f_gid;  /* 用户ID和组ID */
    struct file_ra_state    f_ra;          /* 预读状态 */

    unsigned long           f_version;

    /* 私有数据,可由文件系统或驱动使用 */
    void                    *private_data;

    /* 其他字段... */
#ifdef CONFIG_EPOLL
    struct list_head        f_ep_links;
    spinlock_t              f_ep_lock;
#endif
    struct address_space    *f_mapping;    /* 地址空间映射 */
};

/*
 * 文件操作函数表 - 这就是"虚函数表"!- 对应的函数指针
 */

struct file_operations {
    struct module *owner;
    loff_t (*llseek) (struct file *, loff_t, int);
    ssize_t (*read) (struct file *, char __user *, size_t, loff_t *);
    ssize_t (*aio_read) (struct kiocb *, char __user *, size_t, loff_t);
    ssize_t (*write) (struct file *, const char __user *, size_t, loff_t *);
    ssize_t (*aio_write) (struct kiocb *, const char __user *, size_t, loff_t);
    int (*readdir) (struct file *, void *, filldir_t);
    unsigned int (*poll) (struct file *, struct poll_table_struct *);
    int (*ioctl) (struct inode *, struct file *, unsigned int, unsigned long);
    int (*mmap) (struct file *, struct vm_area_struct *);
    int (*open) (struct inode *, struct file *);
    int (*flush) (struct file *);
    int (*release) (struct inode *, struct file *);
    int (*fsync) (struct file *, struct dentry *, int datasync);
    int (*aio_fsync) (struct kiocb *, int datasync);
    int (*fasync) (int, struct file *, int);
    int (*lock) (struct file *, int, struct file_lock *);
    ssize_t (*readv) (struct file *, const struct iovec *, unsigned long, loff_t *);
    ssize_t (*writev) (struct file *, const struct iovec *, unsigned long, loff_t *);
    ssize_t (*sendfile) (struct file *, loff_t *, size_t, read_actor_t, void *);
    ssize_t (*sendpage) (struct file *, struct page *, int, size_t, loff_t *, int);
    unsigned long (*get_unmapped_area)(struct file *, unsigned long, unsigned long, unsigned long, unsigned long);
    int (*check_flags)(int);
    int (*dir_notify)(struct file *filp, unsigned long arg);
    int (*flock) (struct file *, int, struct file_lock *);
};
总结:
以上就是本期博客分享的全部内容啦!如果觉得文章还不错的话可以三连支持一下,你的支持就是我前进最大的动力!
技术的探索永无止境! 道阻且长,行则将至!后续我会给大家带来更多优质博客内容,欢迎关注我的CSDN账号,我们一同成长!
(~ ̄▽ ̄)~

汇聚全球AI编程工具,助力开发者即刻编程。
更多推荐


 16
16 0
0- 0


 已为社区贡献19条内容

所有评论(0)