
Spring Boot(一)配置文件
一、热部署
引入依赖
<dependency>
<groupId>org.springframework.boot</groupId>
<artifactId>spring-boot-devtools</artifactId>
<optional>true</optional>
</dependency>
修改java代码或者配置文件模板后可以通过ctrl+f9来实施热部署,无需重启
二、YAML语法
1.配置文件
SpringBoot使用一个全局的配置文件,配置文件名是固定的;
•application.properties
•application.yml
这两个文件是互补的,properties的优先级更高。
2.基本语法
k:(空格)v:表示一对键值对(空格必须有);以空格的缩进来控制层级关系;只要是左对齐的一列数据,都是同一个层级的,属性和值也是大小写敏感;
2.1普通值的写法
- k: v:字面直接来写; 字符串默认不用加上单引号或者双引号;
- “”:双引号;不会转义字符串里面的特殊字符;特殊字符会作为本身想表示的意思 例如name: “zhangsan \n lisi”:输出;zhangsan 换行 lisi
- ‘’:单引号;会转义特殊字符,特殊字符最终只是一个普通的字符串数据 例如name: ‘zhangsan \n lisi’:输出;zhangsan \n lisi
2.2数组和List/Set集合的写法
有两种
第一种:中括号
hobby: [篮球,足球,乒乓球]
第二种:英文的短横线+空格+内容
  hobby:
    - 篮球
    - 乒乓球
    - 足球
    - 羽毛球
2.3Map集合的写法
第一种:花括号+k: v(冒号后面有空格)
maps: {k1: value1,k2: value2}
第二种:map名是一级,k: v是下一级
maps:
	k1: v1
	k2: v2
2.4对象的写法
对象是一级,他的属性是下一级
  dog:
    age: 2
    name: 花花
完整yml文件
server:
  port: 8085
person:
  id: 1
  name: "张三"
  address: 河北省
  boss: true
  birth: 2026/01/18
  hobby:
    - 篮球
    - 乒乓球
    - 足球
    - 羽毛球
  maps: {k1: value1,k2: value2}
  dog:
    age: 2
    name: 花花
  lastName: 1@qq.com
3.配置文件的值注入
方式一:@ConfigurationProperties
- 支持复杂类型和验证
package com.qcby.springBootDemo.model;

import jakarta.validation.constraints.Email;
import org.springframework.boot.context.properties.ConfigurationProperties;
import org.springframework.stereotype.Component;
import org.springframework.validation.annotation.Validated;
import java.util.Date;
import java.util.List;
import java.util.Map;

@Component
@ConfigurationProperties(prefix = "person")
//验证的注解
@Validated
public class Person {
    private Integer id;
    private String name;
    private String address;
    private Boolean boss;
    private Date birth;
    private List<String> hobby;
    private Map<String, String> maps;
    private Dog dog;

    @Email
    private String lastName;

    public Person() {
    }

    public Person(Integer id, String name, String address, Boolean boss, Date birth, List<String> hobby, Map<String, String> maps, Dog dog) {
        this.id = id;
        this.name = name;
        this.address = address;
        this.boss = boss;
        this.birth = birth;
        this.hobby = hobby;
        this.maps = maps;
        this.dog = dog;
    }

    // getter 和 setter 方法保持不变...
    public Integer getId() {
        return id;
    }

    public void setId(Integer id) {
        this.id = id;
    }

    public String getName() {
        return name;
    }

    public void setName(String name) {
        this.name = name;
    }

    public String getAddress() {
        return address;
    }

    public void setAddress(String address) {
        this.address = address;
    }

    public Boolean getBoss() {
        return boss;
    }

    public void setBoss(Boolean boss) {
        this.boss = boss;
    }

    public Date getBirth() {
        return birth;
    }

    public void setBirth(Date birth) {
        this.birth = birth;
    }

    public List<String> getHobby() {
        return hobby;
    }

    public void setHobby(List<String> hobby) {
        this.hobby = hobby;
    }

    public Map<String, String> getMaps() {
        return maps;
    }

    public void setMaps(Map<String, String> maps) {
        this.maps = maps;
    }

    public Dog getDog() {
        return dog;
    }

    public void setDog(Dog dog) {
        this.dog = dog;
    }

    public String getLastName() {
        return lastName;
    }

    public void setLastName(String lastName) {
        this.lastName = lastName;
    }

    @Override
    public String toString() {
        return "Person{" +
                "id=" + id +
                ", name='" + name + '\'' +
                ", address='" + address + '\'' +
                ", boss=" + boss +
                ", birth=" + birth +
                ", hobby=" + hobby +
                ", maps=" + maps +
                ", dog=" + dog +
                ", lastName='" + lastName + '\'' +
                '}';
    }
}
- 支持嵌套
@Component
@ConfigurationProperties(prefix = "app")
public class AppConfig {
    private Server server;
    private Database database;
    private Security security;

    // 静态内部类
    public static class Server {
        private String host;
        private Integer port;
        // getter/setter
    }

    public static class Database {
        private String url;
        private String username;
        private String password;
        // getter/setter
    }

    // getter/setter
}
app:
  server:
    host: localhost
    port: 8080
  database:
    url: jdbc:mysql://localhost:3306/test
    username: root
    password: 123456
  security:
    enabled: true
    roles: ["ADMIN", "USER"]
- 松散绑定支持
# yaml 中的各种写法
person:
  first-name: "张"      # 对应 firstName
  first_name: "张"      # 对应 firstName
  firstName: "张"       # 对应 firstName
  FIRST_NAME: "张"      # 对应 firstName
方式二:@Value 注解
@Component
public class MyService {
    // 基本值注入
    @Value("${app.name}")
    private String appName;

    // 默认值
    @Value("${app.version:1.0.0}")
    private String version;

    // 系统属性
    @Value("${java.home}")
    private String javaHome;

    // 表达式
    @Value("#{systemProperties['user.name']}")
    private String userName;

    // 静态值
    @Value("静态文本")
    private String staticText;
}
两种方式对比
| 特性 | @ConfigurationProperties |
@Value |
|---|---|---|
| 松散绑定 | ✅ 支持 | ❌ 不支持 |
| 类型安全 | ✅ 强类型检查 | ❌ 弱类型 |
| 验证支持 | ✅ 支持JSR-303验证 | ❌ 不支持 |
| 复杂类型 | ✅ 支持对象、列表、Map | ❌ 需要SpEL支持 |
| 批量注入 | ✅ 一次注入多个属性 | ❌ 逐个注入 |
| SpEL表达式 | ❌ 不支持 | ✅ 支持 |
| 默认值 | ❌ 不支持 | ✅ 支持 |
| 性能 | 启动时一次性绑定 | 每次使用时解析 |
| 适用场景 | 复杂配置、多个属性 | 简单值、单个属性 |
三、加载配置文件
1.@PropertySource:加载指定的配置文件
@ConfigurationProperties(prefix = “person”)默认从全局配置文件中获取值,使用@PropertySource可以更换获取值的位置。
//指定加载配置文件的位置
@PropertySource(value = {"classpath:person.properties"})
@ConfigurationProperties(prefix = "person")
@Validated
public class Person {
    private Integer id;
    private String name;
    private String address;
    private Boolean boss;
    private Date birth;
    private List<String> hobby;
    private Map<String, String> maps;
    private Dog dog;

    @Email
    private String lastName;
    }
2.@ImportResource
想让Spring的配置文件生效,加载进来;@ImportResource标注在一个配置类上
- 在启动类上加@ImportResource
//在启动类上加@ImportResource
@SpringBootApplication
@ImportResource(locations = {"classpath:person.xml"})

public class SpringBootDemo
{
    public static void main(String[] args) {
        SpringApplication.run(SpringBootDemo.class, args);
    }
}
- 移除person和dog的注解,依靠xml配置
- 编写xml
<?xml version="1.0" encoding="UTF-8"?>
<beans xmlns="http://www.springframework.org/schema/beans"
       xmlns:xsi="http://www.w3.org/2001/XMLSchema-instance"
       xmlns:util="http://www.springframework.org/schema/util"
       xsi:schemaLocation="http://www.springframework.org/schema/beans
                           http://www.springframework.org/schema/beans/spring-beans.xsd
                           http://www.springframework.org/schema/util
                           http://www.springframework.org/schema/util/spring-util.xsd">

    <!-- Dog Bean 定义 -->
    <bean id="dog" class="com.qcby.springBootDemo.model.Dog">
        <property name="name" value="花花"/>
        <property name="age" value="3"/>
    </bean>

    <!-- Person Bean 定义 -->
    <bean id="person" class="com.qcby.springBootDemo.model.Person">

        <property name="id" value="1"/>
        <property name="name" value="张三"/>
        <property name="address" value="河北省"/>
        <property name="boss" value="true"/>
        <property name="lastName" value="zhangsan@example.com"/>


        <property name="birth">
            <bean class="java.util.Date">

                <constructor-arg value="#{T(java.util.Date).parse('2024/01/01')}"/>
            </bean>
        </property>


        <property name="hobby">
            <list>
                <value>篮球</value>
                <value>音乐</value>
                <value>阅读</value>
            </list>
        </property>


        <property name="maps">
            <map>
                <entry key="key1" value="value1"/>
                <entry key="key2" value="value2"/>
                <entry key="email" value="test@example.com"/>
            </map>
        </property>


        <property name="dog" ref="dog"/>
    </bean>

</beans>
3.使用@Bean给容器中添加组件
先创建一个HelloService
public class HelloService {

    public String sayHello() {
        return "Hello, World!";
    }
}
再创建一个config类,将方法的返回值添加到容器中;容器中这个组件默认的id就是方法名
@Configuration
public class MyAppConfig {
    //将方法的返回值添加到容器中;容器中这个组件默认的id就是方法名
    @Bean
    public HelloService helloService02(){
        System.out.println("配置类@Bean给容器中添加组件了...");
        return new HelloService();
    }
}
四、配置文件占位符
1.获取值
占位符的格式是 ${key:defaultValue}
person.last‐name=张三${random.uuid}
person.age=${random.int}
person.birth=2017/12/15
person.boss=false
person.maps.k1=v1
person.maps.k2=14
person.lists=a,b,c
//person.hello存在就使用person.hello,不存在,使用hello
person.dog.name=${person.hello:hello}_dog
person.dog.age=15
2.运算
随机数
${random.value}、${random.int}、${random.long}
${random.int(10)}、${random.int[1024,65536]}
除了 random.∗这种Spring专属内置扩展外,{random.*} 这种 Spring 专属内置扩展 外,random.∗这种Spring专属内置扩展外,{} 占位符本身完全不支持任何形式的运算
Spring 原生 KaTeX parse error: Expected 'EOF', got '#' at position 19: …占位符不支持直接运算,但可通过#̲{}实现 核心语法:#{{占位符key} + 运算逻辑},支持数值、字符串、条件运算等场景。
server:
  base-port: 8080
  port: #{${server.base-port} + 100} # 最终值 8180
//在@Value里面使用运算
@Value(#{11*2})
五、多配置环境
主配置文档块的配置依然会生效,且遵循「主配置为基础,环境配置做覆盖 / 补充」的规则:
- 主配置(无 spring.profiles 的文档块)是全局基础配置,无论激活哪个环境都会生效;
- 环境配置(指定 spring.profiles 的文档块)是环境专属配置,仅在激活对应环境时生效;
- 若主配置和环境配置有相同的 key,环境配置会覆盖主配置;若 key 不重复,则两者合并生效。
1.方式一:写多个配置文件
我们在主配置文件编写的时候,文件名可以是 application-{profile}.properties/yml
默认使用application.properties的配置;
- 写两个配置文件,application-dev.properties和application-prod.properties,分别设置端口
- 在主配置文件application.properties,使用spring.profiles.active=prod进行激活
2.方式二:yml多文档块
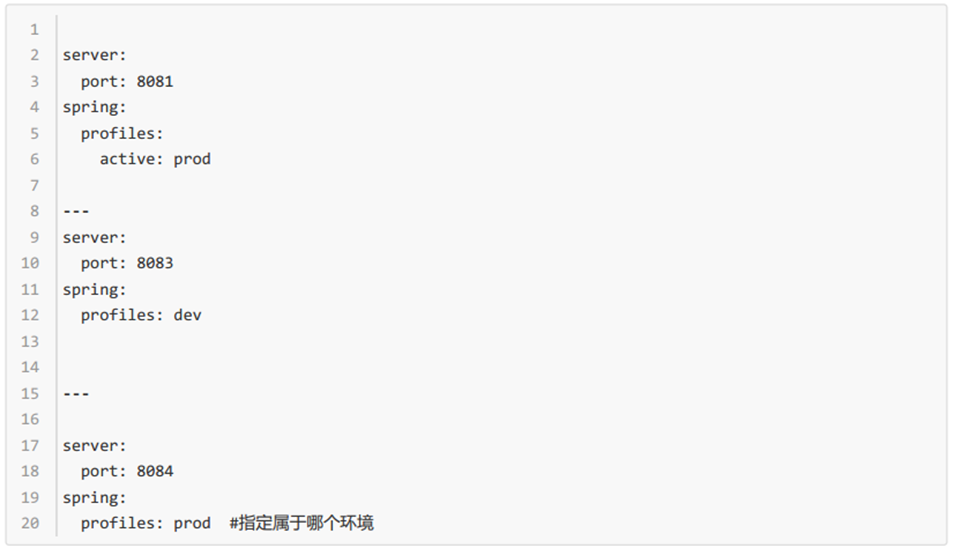
使用英文三个短横线—进行分割,每个文档块使用spring.profiles指定环境,在总文档块使用spring.profiles.active激活对应的环境
3.方式三:命令行激活
3、 java -jar spring-boot-02-config-0.0.1-SNAPSHOT.jar --spring.profiles.active=dev;
虚拟机参数
-Dspring.profiles.active=dev
六、配置文件的加载位置
1.默认配置文件
springboot 启动会扫描以下位置的application.properties或者application.yml文件作为Spring boot的默认配置文件
–file:./config/
–file:./
–classpath:/config/
–classpath:/
优先级由高到底,高优先级的配置会覆盖低优先级的配置;
SpringBoot会从这四个位置全部加载主配置文件;互补配置;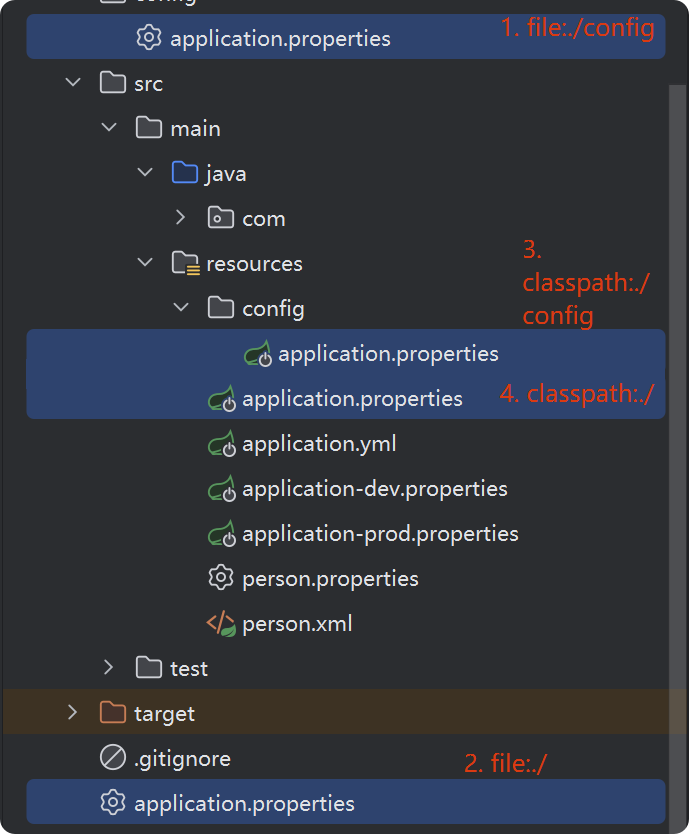
2.配置加载顺序
SpringBoot也可以从以下位置加载配置; 优先级从高到低;高优先级的配置覆盖低优先级的配置,所有的配置会形成互补配置
1.命令行参数
所有的配置都可以在命令行上进行指定
java -jar spring-boot-02-config-02-0.0.1-SNAPSHOT.jar --server.port=8087 --server.context-path=/abc
java -jar spring-boot-02-config-02-0.0.1-SNAPSHOT.jar --spring.config.location=C:/appliction.properties
多个配置用空格分开; --配置项=值
2.来自java:comp/env的JNDI属性
3.Java系统属性(System.getProperties())
4.操作系统环境变量
5.RandomValuePropertySource配置的random.属性值
由jar包外向jar包内进行寻找;
优先加载带profile
6.jar包外部的application-{profile}.properties或application.yml(带spring.profile)配置文件
7.jar包内部的application-{profile}.properties或application.yml(带spring.profile)配置文件
再来加载不带profile
8.jar包外部的application.properties或application.yml(不带spring.profile)配置文件
9.jar包内部的application.properties或application.yml(不带spring.profile)配置文件
10.@Configuration注解类上的*@PropertySource**
11.通过SpringApplication.setDefaultProperties指定的默认属性

汇聚全球AI编程工具,助力开发者即刻编程。
更多推荐



 8
8 0
0- 0


 已为社区贡献15条内容

所有评论(0)