
若依免密登录,外部项目无感跳转
若依免密登录,外部项目跳转到若依
一、问题
最近写的项目要合并,还是两个框架,我真的***花花草草 真美丽
可以借鉴一下若依官方的:https://doc.ruoyi.vip/ruoyi-vue/document/cjjc.html#集成just-auth实现第三方授权登录
SM2+SM4加密解密文件下载:https://wways.lanzouu.com/b009ht0zna密码:1234
这里没有用第三方授权登录,因为是两个项目之间的跳转,所以使用账号之间做了一个映射关系。


二、代码
这里是三方平台,传给本地加密数据,
本地将加密数据进行解密,然后将解密的数据进行校验比对(数据库这些),成功后让用户进行无痛切换,失败则报错返回
1、java部分
SM2定义私钥公钥,公钥用户给三方平台进行加密使用,私钥用于数据解密使用(确保数据安全)。
本地给三方提供SM2的公钥
三方给本地提供加密后的密文C和密文D
String paramC=“”; // 秘钥B+信息=密文C (SM4算法)
String paramD=“”; // 公钥A+秘钥B=密文D (SM2算法)
1.1 通用参数配置
我这里在
UserConstants下定义了一个私钥PRIVATE_SM2
// 这里使用 SM2Util.createKeyPair 的方法即可生成
public static final String PRIVATE_SM2 = "";
导入pom
<!--Bouncy Castle-->
<dependency>
    <groupId>org.bouncycastle</groupId>
    <artifactId>bcprov-jdk15on</artifactId>
    <version>1.70</version>
</dependency>
1.2 自定义AuthenticationProvider
这里自定义
AuthenticationProviderConfig实现了AuthenticationProvider接口用于身份验证,判断为账号密码登录还是三方跳转登录(这里使用UserConstants.PRIVATE_SM2私钥,密码定义概率小)
package com.safety.framework.config;

import com.safety.common.constant.UserConstants;
import com.safety.common.exception.user.UserPasswordNotMatchException;
import com.safety.framework.web.service.UserDetailsServiceImpl;
import org.springframework.beans.factory.annotation.Autowired;
import org.springframework.security.authentication.AuthenticationProvider;
import org.springframework.security.authentication.UsernamePasswordAuthenticationToken;
import org.springframework.security.core.Authentication;
import org.springframework.security.core.userdetails.UserDetails;
import org.springframework.security.crypto.bcrypt.BCryptPasswordEncoder;
import org.springframework.stereotype.Component;

@Component
public class AuthenticationProviderConfig implements AuthenticationProvider {

    @Autowired
    private UserDetailsServiceImpl userDetailsService;

    @Autowired
    private BCryptPasswordEncoder bCryptPasswordEncoder;

    @Override
    public Authentication authenticate(Authentication authentication) throws UserPasswordNotMatchException {
        String userName = authentication.getName();
        String password = (String) authentication.getCredentials();
        //这里直接判断异常
        UserDetails user = userDetailsService.loadUserByUsername(userName);
        // 数据库账号密码的校验
        if (bCryptPasswordEncoder.matches(password, user.getPassword())) {
            String encoderPassword = bCryptPasswordEncoder.encode(password);
            return new UsernamePasswordAuthenticationToken(user, encoderPassword);
        }
        // 第三方登录
        else if (UserConstants.PRIVATE_SM2.equals(password)) {
            return new UsernamePasswordAuthenticationToken(user, password);
        }
        throw new UserPasswordNotMatchException();
    }

    @Override
    public boolean supports(Class<?> aClass) {
        return true;
    }

}
1.3 SecurityConfig配置
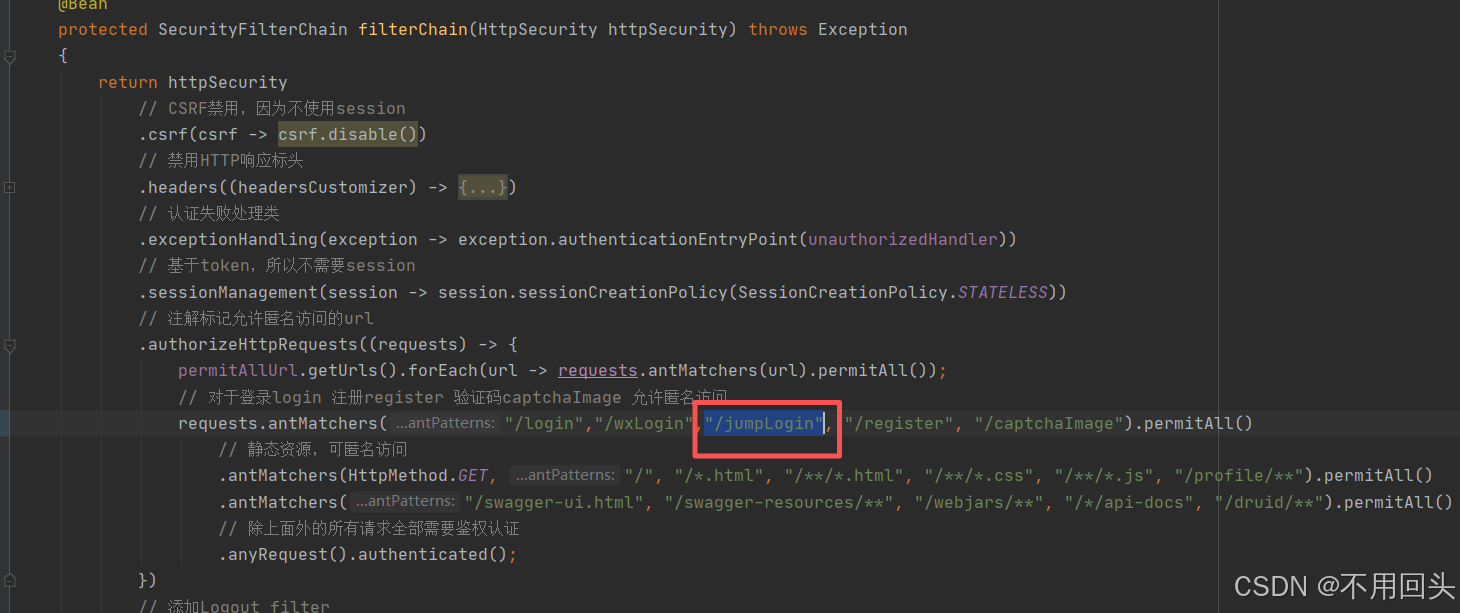
SecurityConfig文件下
需要将后台自定义的接口加入白名单==》在filterChain下修改(配置接口白名单)。
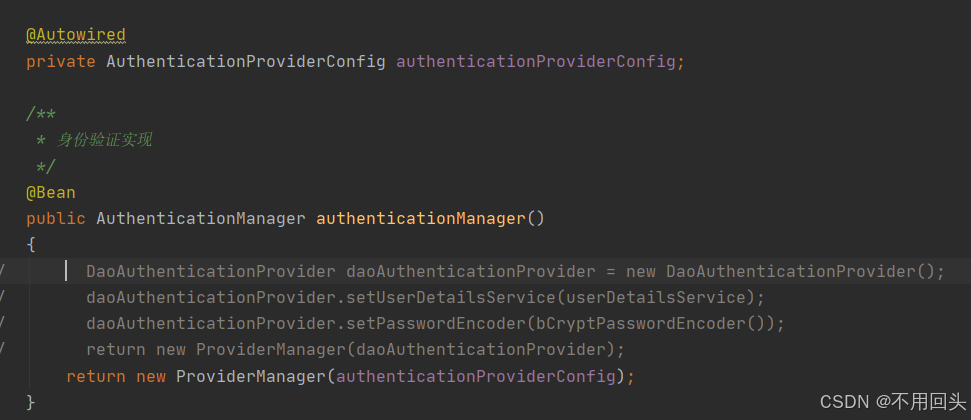
然后authenticationManager方法是验证身份的,需要配修改一下(AuthenticationProviderConfig是自定义的身份认证配置)
@Autowired
private AuthenticationProviderConfig authenticationProviderConfig;

@Bean
public AuthenticationManager authenticationManager()
{
    return new ProviderManager(authenticationProviderConfig);
}
1.4 Controller
// 平台跳转
    @GetMapping("/jumpLogin")
    public AjaxResult jumpLogin(
            @RequestParam("paramC")String paramC,
            @RequestParam("paramD")String paramD)
    {
        AjaxResult ajax = AjaxResult.success();
        JSONObject json = loginService.getDecrypt(paramC,paramD);
        // 菜单路径
        String routePath = json.getString("route_path");
        // 手机号
        String jumpPhone = json.getString("mobile");
        // 生成令牌
        String token = loginService.jumpLogin(jumpPhone);
        ajax.put(Constants.TOKEN, token);
        ajax.put("routePath", routePath);
        return ajax;
    }
1.5 SysLoginService
@Autowired
private ISysUserJumpService userJumpService;

public JSONObject getDecrypt(String paramC, String paramD){
    // 解密得到秘钥B
    String PRIVATE_B = SM2Util.decrypt(UserConstants.PRIVATE_SM2,paramD);
    SM4Utils sm4 = new SM4Utils(PRIVATE_B, "");
    String str = sm4.decryptData_CBC(paramC);
    ////// 注意,这里获取的数据要根据实际的来,我这里是对象,所以我使用JSONObject 进行获取的
    JSONObject jsonObject;
    try {
        jsonObject = JSONObject.parseObject(str);
    } catch (Exception e) {
        throw new ServiceException("JSON字符串解析失败:" + e.getMessage());
    }
    ////// 注意,这里获取的数据要根据实际的来
    // 菜单路径
    String routePath = jsonObject.getString("routePath");
    // 时间翟
    long timeStamp = jsonObject.getLong("time_stamp");
    // 手机号
    String jumpPhone = jsonObject.getString("mobile");
    // 计算时间差绝对值,判断是否在5分钟内
    boolean isInRange = Math.abs(System.currentTimeMillis() - timeStamp) <= (5 * 60 * 1000L);
    if (!isInRange){
        throw new ServiceException("跳转超时,请返回重新跳转");
    }
    return jsonObject;
}
然后调用的
jumpLogin方法有两种写法
1.5.1
需要修改一下
loginVerify和loginPreCheck校验,就加入了两个if (!UserConstants.PRIVATE_SM2.equals(password))验证
// 平台跳转
public String jumpLogin(String jumpPhone)
{
    // 查询用户存在信息
    SysUserJump userJump = userJumpService.selectUserJumpByJumpPhone(jumpPhone);
    return loginVerify(userJump.getUserName(), UserConstants.PRIVATE_SM2);
}

/**
 * 登录验证-通用
 * @param username 用户名
 * @param password 密码
 * @return 结果
 */
public String loginVerify(String username, String password)
{
    // 登录前置校验
    loginPreCheck(username, password);
    // 用户验证
    Authentication authentication = null;
    try
    {
        UsernamePasswordAuthenticationToken authenticationToken = new UsernamePasswordAuthenticationToken(username, password);
				//////// 修改了这里↓↓↓ 加入了验证
        if (!UserConstants.PRIVATE_SM2.equals(password)){
            AuthenticationContextHolder.setContext(authenticationToken);
        }
        // 该方法会去调用UserDetailsServiceImpl.loadUserByUsername
        authentication = authenticationManager.authenticate(authenticationToken);
    }
    catch (Exception e)
    {
        if (e instanceof BadCredentialsException)
        {
            AsyncManager.me().execute(AsyncFactory.recordLogininfor(username, Constants.LOGIN_FAIL, MessageUtils.message("user.password.not.match")));
            throw new UserPasswordNotMatchException();
        }
        else
        {
            AsyncManager.me().execute(AsyncFactory.recordLogininfor(username, Constants.LOGIN_FAIL, e.getMessage()));
            throw new ServiceException(e.getMessage());
        }
    }
    finally
    {
        AuthenticationContextHolder.clearContext();
    }
    AsyncManager.me().execute(AsyncFactory.recordLogininfor(username, Constants.LOGIN_SUCCESS, MessageUtils.message("user.login.success")));
    LoginUser loginUser = (LoginUser) authentication.getPrincipal();
    recordLoginInfo(loginUser.getUserId());
    // 生成token
    return tokenService.createToken(loginUser);
}

/**
 * 登录前置校验
 * @param username 用户名
 * @param password 用户密码
 */
public void loginPreCheck(String username, String password)
{
    // 用户名或密码为空 错误
    if (StringUtils.isEmpty(username) || StringUtils.isEmpty(password))
    {
        AsyncManager.me().execute(AsyncFactory.recordLogininfor(username, Constants.LOGIN_FAIL, MessageUtils.message("not.null")));
        throw new UserNotExistsException();
    }
    //////// 修改了这里↓↓↓ 加入了验证
    if (!UserConstants.PRIVATE_SM2.equals(password)){
    	// 密码如果不在指定范围内 错误
        if (password.length() < UserConstants.PASSWORD_MIN_LENGTH
                || password.length() > UserConstants.PASSWORD_MAX_LENGTH)
        {
            AsyncManager.me().execute(AsyncFactory.recordLogininfor(username, Constants.LOGIN_FAIL, MessageUtils.message("user.password.not.match")));
            throw new UserPasswordNotMatchException();
        }
    }
    // 用户名不在指定范围内 错误
    if (username.length() < UserConstants.USERNAME_MIN_LENGTH
            || username.length() > UserConstants.USERNAME_MAX_LENGTH)
    {
        AsyncManager.me().execute(AsyncFactory.recordLogininfor(username, Constants.LOGIN_FAIL, MessageUtils.message("user.password.not.match")));
        throw new UserPasswordNotMatchException();
    }
    // IP黑名单校验
    String blackStr = configService.selectConfigByKey("sys.login.blackIPList");
    if (IpUtils.isMatchedIp(blackStr, IpUtils.getIpAddr()))
    {
        AsyncManager.me().execute(AsyncFactory.recordLogininfor(username, Constants.LOGIN_FAIL, MessageUtils.message("login.blocked")));
        throw new BlackListException();
    }
}
1.5.2
需要修改一下
loginPreCheck校验,就加入了个if (!UserConstants.PRIVATE_SM2.equals(password))验证,也可以不用这个校验,看自己需求
public String jumpLogin(String jumpPhone)
{
    // 查询用户存在信息 自己根据需求进行写就可以了,就查询语句,可以代码生成一下
    SysUserJump userJump = userJumpService.selectUserJumpByJumpPhone(jumpPhone);
    String username = userJump.getUserName();
    // 用户验证
    Authentication authentication = null;
    try
    {
        UsernamePasswordAuthenticationToken authenticationToken = new UsernamePasswordAuthenticationToken(username, UserConstants.PRIVATE_SM2);
        // 该方法会去调用UserDetailsServiceImpl.loadUserByUsername
        authentication = authenticationManager.authenticate(authenticationToken);
    }
    catch (Exception e)
    {
        if (e instanceof BadCredentialsException)
        {
            AsyncManager.me().execute(AsyncFactory.recordLogininfor(username, Constants.LOGIN_FAIL, MessageUtils.message("user.password.not.match")));
            throw new UserPasswordNotMatchException();
        }
        else
        {
            AsyncManager.me().execute(AsyncFactory.recordLogininfor(username, Constants.LOGIN_FAIL, e.getMessage()));
            throw new ServiceException(e.getMessage());
        }
    }
    AsyncManager.me().execute(AsyncFactory.recordLogininfor(username, Constants.LOGIN_SUCCESS, MessageUtils.message("user.login.success")));
    LoginUser loginUser = (LoginUser) authentication.getPrincipal();
    recordLoginInfo(loginUser.getUserId());
    // 生成token
    return tokenService.createToken(loginUser);
}

/**
 * 登录前置校验
 * @param username 用户名
 * @param password 用户密码
 */
public void loginPreCheck(String username, String password)
{
    // 用户名或密码为空 错误
    if (StringUtils.isEmpty(username) || StringUtils.isEmpty(password))
    {
        AsyncManager.me().execute(AsyncFactory.recordLogininfor(username, Constants.LOGIN_FAIL, MessageUtils.message("not.null")));
        throw new UserNotExistsException();
    }
    //////// 修改了这里↓↓↓ 加入了验证
    if (!UserConstants.PRIVATE_SM2.equals(password)){
    	// 密码如果不在指定范围内 错误
        if (password.length() < UserConstants.PASSWORD_MIN_LENGTH
                || password.length() > UserConstants.PASSWORD_MAX_LENGTH)
        {
            AsyncManager.me().execute(AsyncFactory.recordLogininfor(username, Constants.LOGIN_FAIL, MessageUtils.message("user.password.not.match")));
            throw new UserPasswordNotMatchException();
        }
    }
    // 用户名不在指定范围内 错误
    if (username.length() < UserConstants.USERNAME_MIN_LENGTH
            || username.length() > UserConstants.USERNAME_MAX_LENGTH)
    {
        AsyncManager.me().execute(AsyncFactory.recordLogininfor(username, Constants.LOGIN_FAIL, MessageUtils.message("user.password.not.match")));
        throw new UserPasswordNotMatchException();
    }
    // IP黑名单校验
    String blackStr = configService.selectConfigByKey("sys.login.blackIPList");
    if (IpUtils.isMatchedIp(blackStr, IpUtils.getIpAddr()))
    {
        AsyncManager.me().execute(AsyncFactory.recordLogininfor(username, Constants.LOGIN_FAIL, MessageUtils.message("login.blocked")));
        throw new BlackListException();
    }
}
1.6 SysPasswordService
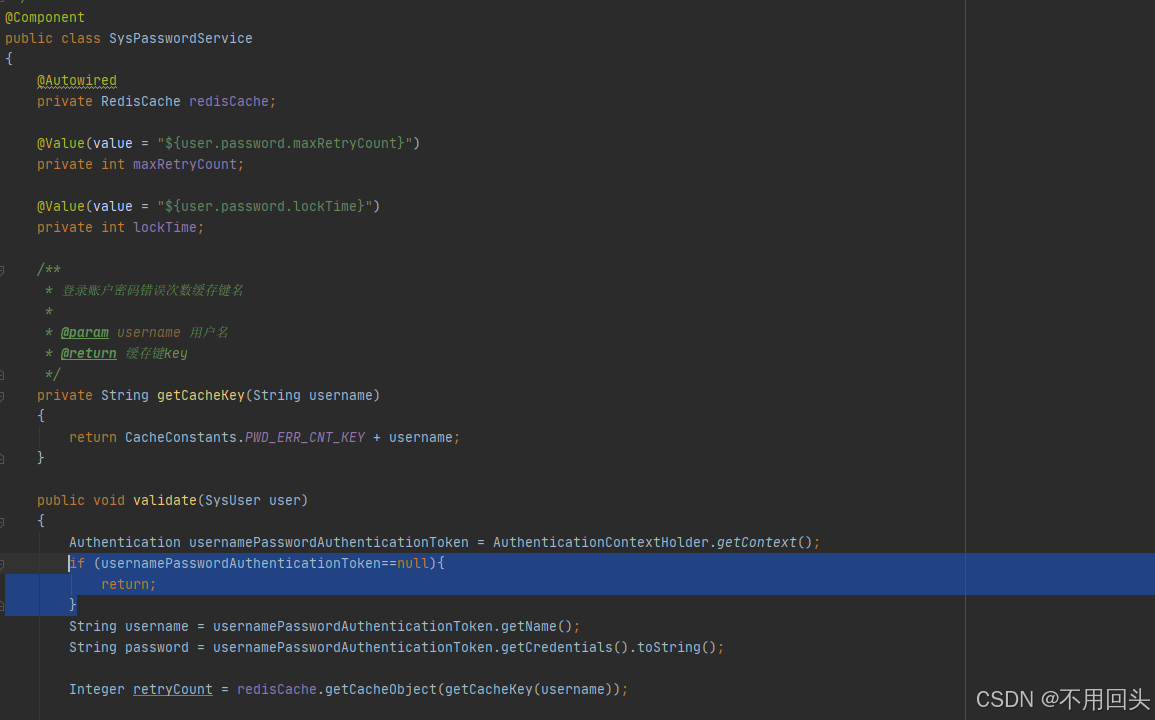
上述配置之后,有时候上下文没有进行传入,导致为空报错,加入
if进行判断一下
在validate方法下
if (usernamePasswordAuthenticationToken==null){
    return;
}
2、vue部分
2.1 api/login.js接口
// 获取token+路径
export function jumpLogin(paramC,paramD) {
  return request({
    url: '/jumpLogin',
    method: 'get',
    params: {
      paramC: paramC,
      paramD: paramD
    }
  })
}
2.2 jumpLogin.vue页面
创建了一个中转页面进行跳转
用户访问例如http://127.0.0.1:8080/jumpLogin?paramC=123¶mD=456
<template>
  <div class="free-login">
    <div v-if="loading" class="loading-container">
      <el-empty description="正在免密登录中..."></el-empty>
    </div>

    <div v-else-if="errorMsg" class="error-container">
      <el-empty :description="`登录失败:${errorMsg}`">
        <!-- 添加再次尝试按钮 -->
        <el-button
          type="primary"
          @click="handleRetryLogin"
          :loading="retryLoading"
          class="retry-btn"
        >
          再次尝试跳转
        </el-button>
      </el-empty>
    </div>

    <div v-else class="success-container">
      <el-empty description="登录成功,正在跳转..."></el-empty>
    </div>
  </div>
</template>

<script>
 	// 自己需要定义的后台接口
  import {jumpLogin} from "@/api/login";
  // 框架自带的赋值token的方法
  import {setToken} from '@/utils/auth'

  export default {
    name: "jumpLogin",
    data() {
      return {
        loading: true,
        errorMsg: "",
        retryLoading: false
      };
    },
    created() {
      this.handleFreeLogin();
    },
    methods: {
      async handleFreeLogin() {
        try {
          const paramC = this.$route.query.paramC;
          const paramD = this.$route.query.paramD;
          if (!paramC || !paramD) {
            throw new Error("参数不能为空");
          }
          const res = await jumpLogin(paramC, paramD);
          setToken(res.token)
          this.loading = false; // 登录成功后关闭加载状态
          this.$router.push(res.routePath).catch(() => {
          });
        } catch (error) {
          this.loading = false;
          this.retryLoading = false; // 失败后重置重试按钮加载状态
          console.log(error)
          this.errorMsg = error.message || "登录失败"; // 优化:取error的message属性更准确
        }
      },
      // 重试登录方法
      async handleRetryLogin() {
        this.retryLoading = true; // 点击后立即显示加载状态
        this.errorMsg = ""; // 清空之前的错误信息
        this.loading = true; // 恢复全局加载状态
        await this.handleFreeLogin(); // 重新执行登录逻辑
      }
    },
  };
</script>

<style scoped>
  .error-container {
    display: flex;
    flex-direction: column;
    align-items: center;
    justify-content: center;
    height: 100%;
  }

  .retry-btn {
    margin-top: 20px;
  }
</style>
2.3 router/index配置路径
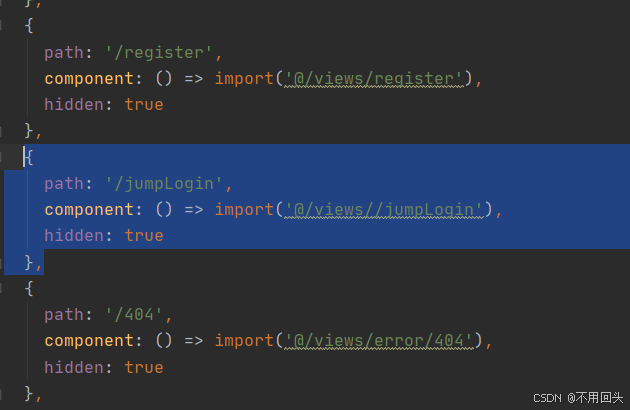
配置
2.2文件的路径
{
  path: '/jumpLogin',
  component: () => import('@/views//jumpLogin'),
  hidden: true
},
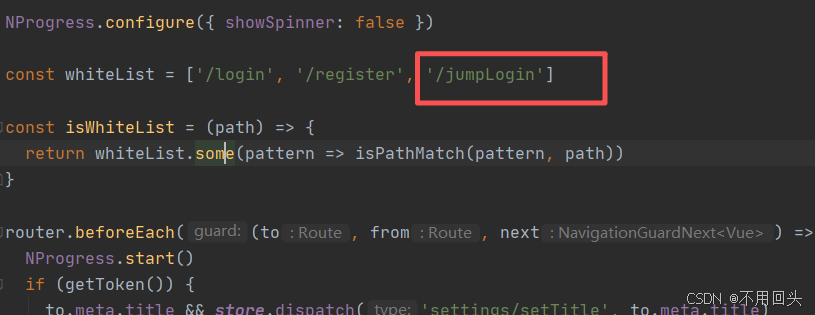
2.4 permission.js配置白名单
配置
2.3路径的白名单,在whiteList中加入
三、加密解密
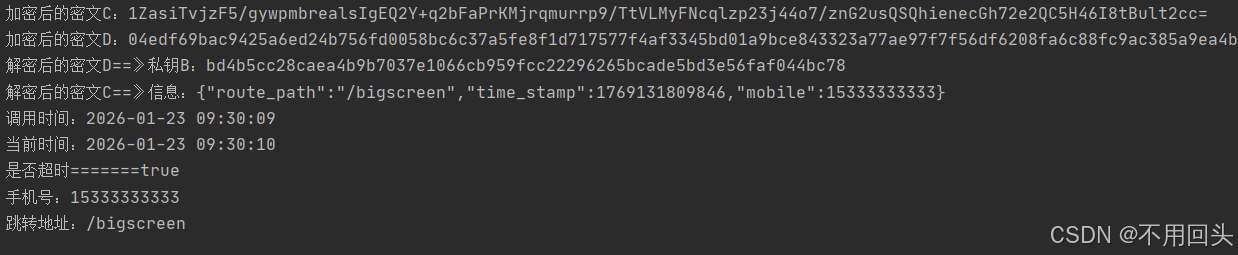
三方平台调用本地的信息传输,代码需要再包中下载导入(这里只是一个逻辑,具体实现方法有很多种,找一种适合两个平台跳转的就好)
SM2+SM4加密解密文件下载:https://wways.lanzouu.com/b009ht0zna密码:1234
package com.tools.crypto;

import com.alibaba.fastjson.JSONObject;
import com.tools.crypto.sm2.SM2Util;
import com.tools.crypto.sm4.SM4Utils;

import java.time.Instant;
import java.time.LocalDateTime;
import java.time.ZoneId;
import java.time.format.DateTimeFormatter;

public class CryptoHelper {

    public static void main(String[] args) throws Exception {
//        String paramC=""; // 秘钥B+信息=密文C (SM4算法)
//        String paramD=""; // 公钥A+秘钥B=密文D (SM2算法)
        // 私钥A
        String PRIVATE_SM2A = "3ef95e3a306e58c91bd8397f38a2d86217fab104c3381409e2e487eb1fb486ca";
        // 公钥A
        String PUBLIC_SM2A = "045797e81256dea6e67a6f3b9f12d252c58f509e3eeb9fc7d4c7cd33cfb84b7339bbf7a6c05e6d9a403df26d93a0cf128bb44ca9537000ce06757cd54bbb729965";

        // 私钥B
        String PRIVATE_SM2B = "bd4b5cc28caea4b9b7037e1066cb959fcc22296265bcade5bd3e56faf044bc78";
        // 公钥B
        String PUBLIC_SM2B = "04fc1de0a0291380407ec96d577c1603ae97167df8bdbcfe791857e9e92dd2da35158d999d0e51f63c463e866c73c3f3e9565690b9e8709d208d52ce3f13c96c04";

        /*********************************************调用方:需要接受方提供公钥A*********************************************/
        // 到时候根据需求进行替换
        String jumpInfo = String.format("{\"route_path\":\"/bigscreen\",\"time_stamp\":%d,\"mobile\":15333333333}", System.currentTimeMillis());
        SM4Utils sm4Enc = new SM4Utils(PRIVATE_SM2B, "");
        String paramC = sm4Enc.encryptData_CBC(jumpInfo);
        System.out.println("加密后的密文C:" + paramC);

        String paramD = SM2Util.encrypt(PUBLIC_SM2A, PRIVATE_SM2B);
        System.out.println("加密后的密文D:" + paramD);

        /*********************************************接收方:自己留存私钥A使用*********************************************/
        // 使用私钥A进行解密 私钥B====>这里 解密后PRIVATE_B 的和上面的 PRIVATE_SM2B 是一样的(确保了数据安全和唯一性)
        String PRIVATE_B = SM2Util.decrypt(PRIVATE_SM2A, paramD);
        System.out.println("解密后的密文D==》私钥B:" + PRIVATE_B);
        SM4Utils sm4Dec = new SM4Utils(PRIVATE_B, "");
        String strDec = sm4Dec.decryptData_CBC(paramC);
        System.out.println("解密后的密文C==》信息:" + strDec);
        JSONObject jsonObject;
        try {
            jsonObject = JSONObject.parseObject(strDec);
        } catch (Exception e) {
            throw new Exception("JSON字符串解析失败:" + e.getMessage());
        }
        String routePath = jsonObject.getString("route_path");
        long timeStamp = jsonObject.getLong("time_stamp");
        String mobile = jsonObject.getString("mobile");
        // 计算时间差绝对值,判断是否在5分钟内
        long newTime = System.currentTimeMillis();
        boolean isInRange = Math.abs(newTime - timeStamp) <= (5 * 60 * 1000L);
        DateTimeFormatter formatter = DateTimeFormatter.ofPattern("yyyy-MM-dd HH:mm:ss");
        System.out.println("调用时间:" + LocalDateTime.ofInstant(Instant.ofEpochMilli(timeStamp), ZoneId.systemDefault()).format(formatter));
        System.out.println("当前时间:" + LocalDateTime.ofInstant(Instant.ofEpochMilli(newTime), ZoneId.systemDefault()).format(formatter));
        System.out.println("是否超时=======" + isInRange);
        System.out.println("手机号:" + mobile);
        System.out.println("跳转地址:" + routePath);
    }
}
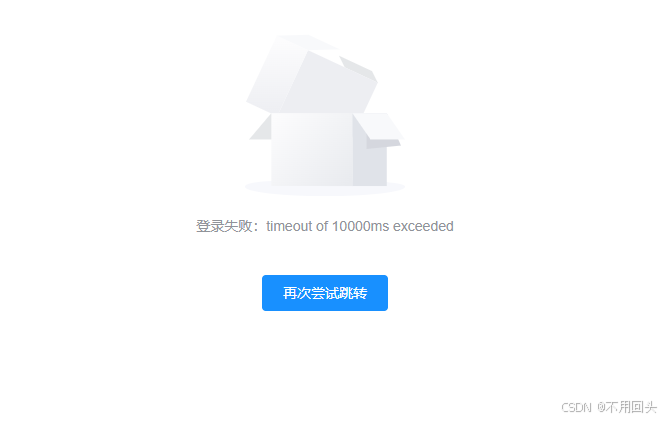
四、测试
跳转成功的就不截图了,都是一样的


汇聚全球AI编程工具,助力开发者即刻编程。
更多推荐
 12
12 0
0- 0


 已为社区贡献2条内容

所有评论(0)