
【Vue2+SpringBoot在线商城】09-Hutool+Redis验证码与前端正则式验证
·
一、Hutool+Redis实现验证码功能
在昨天的开发中,我们实现了基础的验证码功能。今天,在朋友的推荐下,我尝试采用Hutool工具库+Redis的组合重新实现这一功能,既学习了新工具的使用,也让验证码的存储更安全、更高效。
1.1 CaptchaController
我们创建了一个专门的controller来生成验证码,利用Hutool快速生成图形验证码,并使用Redis存储验证码信息,实现验证码校验。
package com.xmut.backend.controller;

import cn.hutool.captcha.CaptchaUtil;
import cn.hutool.captcha.LineCaptcha;
import cn.hutool.captcha.generator.RandomGenerator;
import cn.hutool.core.util.IdUtil;
import com.xmut.backend.utils.Result;
import io.swagger.annotations.Api;
import io.swagger.annotations.ApiOperation;
import org.springframework.beans.factory.annotation.Autowired;
import org.springframework.data.redis.core.RedisTemplate;
import org.springframework.web.bind.annotation.GetMapping;
import org.springframework.web.bind.annotation.RequestMapping;
import org.springframework.web.bind.annotation.RestController;

import java.io.ByteArrayOutputStream;
import java.util.Base64;
import java.util.HashMap;
import java.util.Map;
import java.util.concurrent.TimeUnit;

/**
 * 验证码控制器
 */
@RestController
@RequestMapping("/kmall/captcha")
@Api(tags = "CaptchaController :验证码控制器")
public class CaptchaController {

    @Autowired
    private RedisTemplate redisTemplate;

    @ApiOperation(value = "生成验证码")
    @GetMapping("/generate")
    public Result generate() {
        // 宽、高、字符数、干扰线数
        LineCaptcha lineCaptcha = CaptchaUtil.createLineCaptcha(100, 40, 4, 0);
        // 4位数字
        lineCaptcha.setGenerator(new RandomGenerator("0123456789", 4));

        // 生成一个captchaId(UUID),前端登录时带回来
        String captchaId = IdUtil.simpleUUID();

        String captchaCode = lineCaptcha.getCode();
        String redisKey = "captcha:" + captchaId;
        // 5分钟过期
        redisTemplate.opsForValue().set(redisKey, captchaCode, 5, TimeUnit.MINUTES);

        ByteArrayOutputStream outputStream = new ByteArrayOutputStream();
        // 把图片写到内存里
        lineCaptcha.write(outputStream);
        byte[] imageBytes = outputStream.toByteArray();
        String base64Image = Base64.getEncoder().encodeToString(imageBytes); // 编码成字符串
        // 这里直接按png返回
        String dataUrl = "data:image/png;base64," + base64Image;

        Map<String, Object> data = new HashMap<>();
        data.put("captchaId", captchaId);
        data.put("img", dataUrl);

        Result result = new Result();
        result.success("生成成功");
        result.setData(data);
        return result;
    }
}
1.2 UserController
在用户登录接口中,增加了验证码校验逻辑。
    @PostMapping("/login")
    @ApiOperation(value = "用户登录")
    public Result login(@RequestBody User user) {
        Result result = new Result();

        // 获取用户输入的验证码 + captchaId
        String inputCaptcha = user.getCaptcha();
        String captchaId = user.getCaptchaId();

        // 检查验证码是否为空
        if (inputCaptcha == null || inputCaptcha.trim().isEmpty()) {
            result.fail("请输入验证码");
            return result;
        }
        if (captchaId == null || captchaId.trim().isEmpty()) {
            result.fail("验证码已过期,请刷新");
            return result;
        }

        // 用captchaId从Redis获取验证码(不再依赖session)
        String redisKey = "captcha:" + captchaId.trim();
        String redisCaptcha = (String) redisTemplate.opsForValue().get(redisKey);

        // 检查验证码是否过期
        if (redisCaptcha == null) {
            result.fail("验证码已过期,请刷新");
            return result;
        }

        // 比对验证码
        if (!redisCaptcha.equalsIgnoreCase(inputCaptcha.trim())) {
            result.fail("验证码错误");
            return result;
        }

        // 删除Redis中的验证码
        redisTemplate.delete(redisKey);


        User userExit = userService.getByUsername(user.getUsername());

        if (userExit == null) {
            result.fail("用户不存在");
            return result;
        } else {
            String password = user.getPassword() + userExit.getSalt();
            String md5Password = DigestUtil.md5Hex(password);

            if (!userExit.getPassword().equals(md5Password)) {
                result.fail("密码错误");
            } else {
                String token = JwtUtil.generateTokenByTime(userExit.getId());
                result.setMessage("登录成功");

                // 返回token和用户信息
                Map<String, Object> loginData = new HashMap<>();
                loginData.put("token", token);
                loginData.put("userId", userExit.getId());
                loginData.put("username", userExit.getUsername());
                loginData.put("type", userExit.getType());
                result.setData(loginData);

                // 将userId和token放入redis
                redisTemplate.opsForValue().set(userExit.getId(), token);
            }
        }

        return result;
    }
1.3 User实体类
添加验证码字段。验证码字段现在放在 User 里,但它不是数据库列,所以明确标记不是表字段
为了接收前端传递的验证码信息,在User实体类中添加了两个临时字段。并使用@TableField(exist = false)注解标记这些字段不属于数据库表,避免MyBatis-Plus尝试映射到不存在的列。
    @ApiModelProperty(value = "验证码")
    @TableField(exist = false)
    private String captcha;

    @ApiModelProperty(value = "验证码ID")
    @TableField(exist = false)
    private String captchaId;
1.4 前端登录API,authApi.js
更新前端登录接口,传递验证码和验证码ID。
// 后端:POST /kmall/user/login
export function loginByRequest(username, password, captcha, captchaId) {
  return postJson('/kmall/user/login', {
    username: (username || '').trim(),
    password: (password || '').trim(),
    captcha: (captcha || '').trim(),
    captchaId: (captchaId || '').trim()
  })
}
1.5 Layout.vue
Layout的修改逻辑和之前写的差不多,就不再重新记录了。
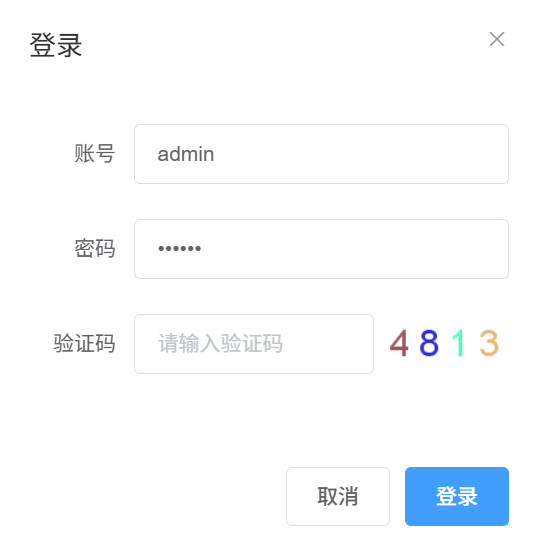
1.6 实现效果
二、前端正则式验证
正则表达式(Regular Expression,简称regex)是一种用于匹配字符串中字符组合的模式。
在前端对用户输入进行即时验证,可以提前发现错误。
2.1 修改Layout.vue
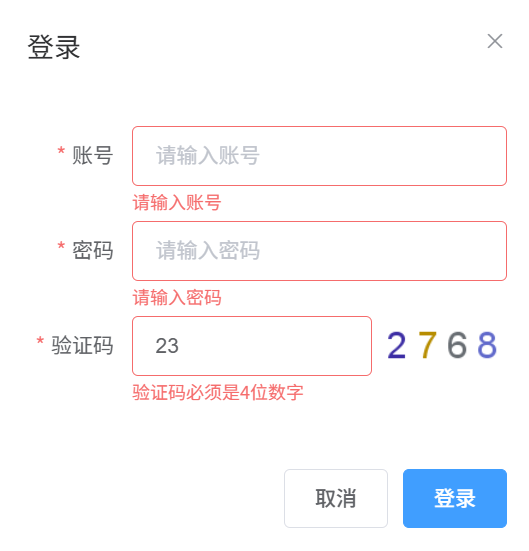
在Vue组件中,我们使用Element UI的表单验证功能,为登录表单添加验证规则。
prop用于关联表单项和验证规则 ,告诉表单验证器这个输入框应该用哪个验证规则。
      <el-form ref="loginForm" :model="loginForm" :rules="loginRules" label-width="70px">
        <el-form-item label="账号" prop="username">
          <el-input v-model.trim="loginForm.username" placeholder="请输入账号" autocomplete="off" />
        </el-form-item>
        <el-form-item label="密码" prop="password">
          <el-input v-model.trim="loginForm.password" type="password" placeholder="请输入密码" autocomplete="off" />
        </el-form-item>
        <el-form-item label="验证码" prop="captcha">
      // 登录表单验证规则
      loginRules: {
        username: [
          { required: true, message: '请输入账号', trigger: 'blur' }
        ],
        password: [
          { required: true, message: '请输入密码', trigger: 'blur' }
        ],
        captcha: [
          { required: true, message: '请输入验证码', trigger: 'blur' },
          { pattern: /^\d{4}$/, message: '验证码必须是4位数字', trigger: 'blur' }
        ]
      },
验证规则说明:
- required: true - 必填字段
- pattern: /^\d{4}$/ - 正则表达式验证,必须是4位数字
- trigger: 'blur' - 触发时机:失去焦点时验证
    handleLogin: function () {
      var self = this
      self.$refs.loginForm.validate(function (valid) {
        if (!valid) {
          return
        }

        var u = (self.loginForm.username || '').trim()
        var p = (self.loginForm.password || '').trim()
        var c = (self.loginForm.captcha || '').trim()
        var t = self.loginForm.captchaId

        self.loginLoading = true
        loginByRequest(u, p, c, t)
          .then(function (result) {
            var data = result && result.data
            if (data) {
              // 使用VueX的action来登录,保存token和用户信息
              self.$store.dispatch('login', {
                token: data.token,
                userInfo: {
                  id: data.userId,
                  username: data.username,
                  type: data.type
                }
              })

              self.loginVisible = false
              self.$message.success((result && result.message) || '登录成功')

            } else {
              self.$message.error((result && result.message) || '登录失败')
              self.refreshCaptcha()
            }
          })
          .catch(function (err) {
            self.$message.error(String(err || '登录失败'))
            self.refreshCaptcha()
          })
          .finally(function () {
            self.loginLoading = false
          })
      })
    },
2.2 实现效果
三、改进亮点
- 使用了Hutool工具库,可以简化验证码相关代码的实现。
- 验证码存储从Session迁移到Redis,且具有自动过期机制(设置了5分钟过期)
- 前端正则验证提前拦截错误输入,减少不必要的网络请求

汇聚全球AI编程工具,助力开发者即刻编程。
更多推荐

 10
10 0
0- 0


 已为社区贡献1条内容

所有评论(0)