
SpringBoot 整合 WireMock
SpringBoot 整合 WireMock
前言
在日常开发中,常常会遇到第三方接口在开发环境中无法访问的问题。如果直接在代码中嵌入环境变量判断并硬编码接口的返回值,不仅会使代码冗长,还会影响可读性与维护性。此时,可以引入 WireMock 来模拟第三方接口,只需修改配置文件中的接口 URL,即可无缝切换至本地模拟服务,从而保障本地开发与测试的顺利进行。
一、pom.xml
Java 11 or 17
对于 SpringBoot 框架,可引入 WireMock 的 SpringBoot 集成包:
        <dependency>
            <groupId>org.wiremock.integrations</groupId>
            <artifactId>wiremock-spring-boot</artifactId>
            <version>4.0.8</version>
        </dependency>
或者仅用标准的 WireMock JAR:
        <dependency>
            <groupId>org.wiremock</groupId>
            <artifactId>wiremock</artifactId>
            <version>3.13.2</version>
        </dependency>
本文使用的是当前最新版本的 wiremock-spring-boot:4.0.8,运行时报错不兼容 httpclient5:5.2.3,因此将 SpringBoot3 也升级到最新版本 3.5.9:
    <parent>
        <groupId>org.springframework.boot</groupId>
        <artifactId>spring-boot-starter-parent</artifactId>
        <version>3.5.9</version>
        <relativePath/> <!-- lookup parent from repository -->
    </parent>
Java 1.8
Java 1.8 需引入 wiremock-jre8:
        <dependency>
            <groupId>com.github.tomakehurst</groupId>
            <artifactId>wiremock-jre8</artifactId>
            <version>2.35.2</version>
        </dependency>
二、配置 WireMock 启动
编写配置类:
package com.example.demo.configuration;

import com.github.tomakehurst.wiremock.WireMockServer;
import org.springframework.context.annotation.Bean;
import org.springframework.context.annotation.Configuration;
import org.springframework.context.annotation.Profile;

import static com.github.tomakehurst.wiremock.core.WireMockConfiguration.options;

@Configuration
@Profile("dev") // 仅在 dev 环境激活
public class WireMockConfig {

    @Bean(destroyMethod = "stop") // Spring 会在容器关闭时调用 stop()
    public WireMockServer wireMockServer() {
        WireMockServer server = new WireMockServer(options().port(2345));
        server.start();
        return server;
    }

}
三、编写 stub JSON 文件
要为符合条件的请求返回预设的 HTTP 响应,可以使用 JSON 文件或 Java 代码来配置,本文采用较为简单的 JSON 方式。
stub 文件的默认路径为 src/test/resources/mappings/,在该目录下新建 wiremock-stub.json(命名任意):
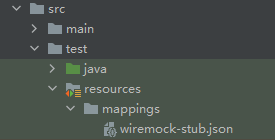
{
  "mappings": [
    {
      "request": {
        "method": "GET",
        "url": "/hello"
      },
      "response": {
        "status": 200,
        "headers": {
          "Content-Type": "application/json"
        },
        "body": "Hello World!"
      }
    },
    {
      "request": {
        "method": "POST",
        "url": "/test",
        "bodyPatterns": [
          {
            "equalToJson": {
              "id": 1,
              "name": "张三"
            },
            "ignoreArrayOrder": true,
            "ignoreExtraElements": true
          }
        ]
      },
      "response": {
        "status": 200,
        "headers": {
          "Content-Type": "application/json"
        },
        "jsonBody": {
          "message": "Hello World!"
        },
        "fixedDelayMilliseconds": 200
      }
    }
  ]
}
stub 编写规范参考 WireMock 官方文档 Stubbing。
四、运行效果
在 Postman 中成功请求:
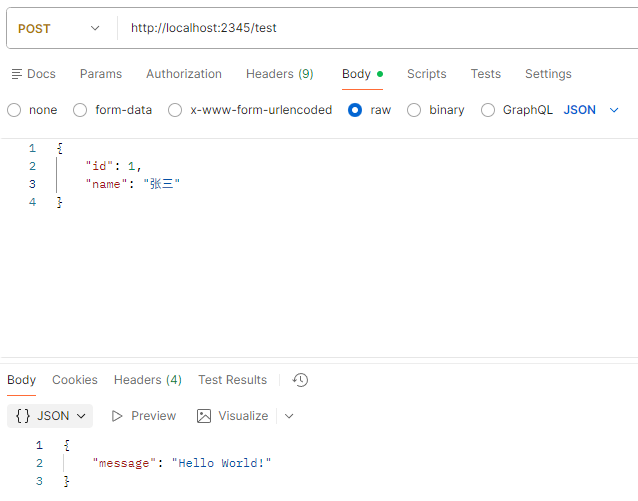
也可以在代码的开发环境(dev)配置文件中使用该 URL,只需调整配置文件,无需改动任何代码,即可实现对第三方接口的模拟。
五、部署环境使用 WireMock(扩展内容)
问题:WireMock 的默认 stub 文件路径位于 src/test/ 之下,导致 stub 文件无法被打进 JAR 包里,因此尝试使用 usingFilesUnderClasspath() 自定义路径,但该方法无法解析 Nested JAR 路径,在部署启动时报错 NoSuchFileException:
Caused by: java.nio.file.NoSuchFileException: nested:/data/docker/java-server/target/demo-0.0.1-SNAPSHOT.jar
        at java.base/sun.nio.fs.UnixException.translateToIOException(UnixException.java:92)
        at java.base/sun.nio.fs.UnixException.rethrowAsIOException(UnixException.java:106)
        at java.base/sun.nio.fs.UnixException.rethrowAsIOException(UnixException.java:111)
        at java.base/sun.nio.fs.UnixFileAttributeViews$Basic.readAttributes(UnixFileAttributeViews.java:55)
        at java.base/sun.nio.fs.UnixFileSystemProvider.readAttributes(UnixFileSystemProvider.java:148)
        at java.base/sun.nio.fs.LinuxFileSystemProvider.readAttributes(LinuxFileSystemProvider.java:99)
        at java.base/java.nio.file.Files.readAttributes(Files.java:1851)
        at java.base/java.util.zip.ZipFile$Source.get(ZipFile.java:1432)
        at java.base/java.util.zip.ZipFile$CleanableResource.<init>(ZipFile.java:717)
        at java.base/java.util.zip.ZipFile.<init>(ZipFile.java:251)
        at java.base/java.util.zip.ZipFile.<init>(ZipFile.java:180)
        at java.base/java.util.zip.ZipFile.<init>(ZipFile.java:194)
        at com.github.tomakehurst.wiremock.common.ClasspathFileSource.<init>(ClasspathFileSource.java:57)
        at com.github.tomakehurst.wiremock.common.ClasspathFileSource.<init>(ClasspathFileSource.java:28)
        at com.github.tomakehurst.wiremock.core.WireMockConfiguration.usingFilesUnderClasspath(WireMockConfiguration.java:357)
        at com.example.demo.configuration.WireMockConfig.wireMockServer(WireMockConfig.java:17)
        at com.example.demo.configuration.WireMockConfig$$SpringCGLIB$$0.CGLIB$wireMockServer$0(<generated>)
        at com.example.demo.configuration.WireMockConfig$$SpringCGLIB$$FastClass$$1.invoke(<generated>)
        at org.springframework.cglib.proxy.MethodProxy.invokeSuper(MethodProxy.java:258)
        at org.springframework.context.annotation.ConfigurationClassEnhancer$BeanMethodInterceptor.intercept(ConfigurationClassEnhancer.java:400)
        at com.example.demo.configuration.WireMockConfig$$SpringCGLIB$$0.wireMockServer(<generated>)
        at java.base/jdk.internal.reflect.NativeMethodAccessorImpl.invoke0(Native Method)
        at java.base/jdk.internal.reflect.NativeMethodAccessorImpl.invoke(NativeMethodAccessorImpl.java:77)
        at java.base/jdk.internal.reflect.DelegatingMethodAccessorImpl.invoke(DelegatingMethodAccessorImpl.java:43)
        at java.base/java.lang.reflect.Method.invoke(Method.java:569)
        at org.springframework.beans.factory.support.SimpleInstantiationStrategy.lambda$instantiate$0(SimpleInstantiationStrategy.java:172)
        ... 31 more
解决方案:保持 stub 的默认路径,并在 JAR 包的同路径下新建 src/test/resources/mappings/wiremock-stub.json。
以下给出 Dockerfile 的命令:
RUN mkdir -p src/test/resources/mappings
COPY src/test/resources/mappings/wiremock-stub.json src/test/resources/mappings/wiremock-stub.json
参考:
[1]:WireMock官方文档:WireMock Spring Boot Integration
[2]:WireMock官方文档:Quick Start: API Mocking with Java and JUnit 4
[3]:WireMock官方文档:Plain Java
[4]:WireMock官方文档:Java configuration
[5]:WireMock官方文档:Stubbing
[6]:Maven 仓库
[7]:WireMock与CI/CD集成:自动化测试中的API模拟

汇聚全球AI编程工具,助力开发者即刻编程。
更多推荐



 20
20 0
0- 0


 已为社区贡献2条内容

所有评论(0)