
Spring:AOP
·
AOP
什么是AOP?
不影响原来的业务实现动态增加
AOP(Aspect Oriented Programming)意味:切面编程,通过预编译方式和运行期动态代理实现程序功能的同意维护的一种技术。AOP是OOP的延续,是软件开发的热点,也是Spring框架中的一个重要内容,是函数式编程的一种衍生范型。利用AOP可以对可以对业务逻辑的各个部分进行隔离,从而使得业务逻辑各部分之间耦合度降低,提高程序的可重用性,同时提高了开发的效率。
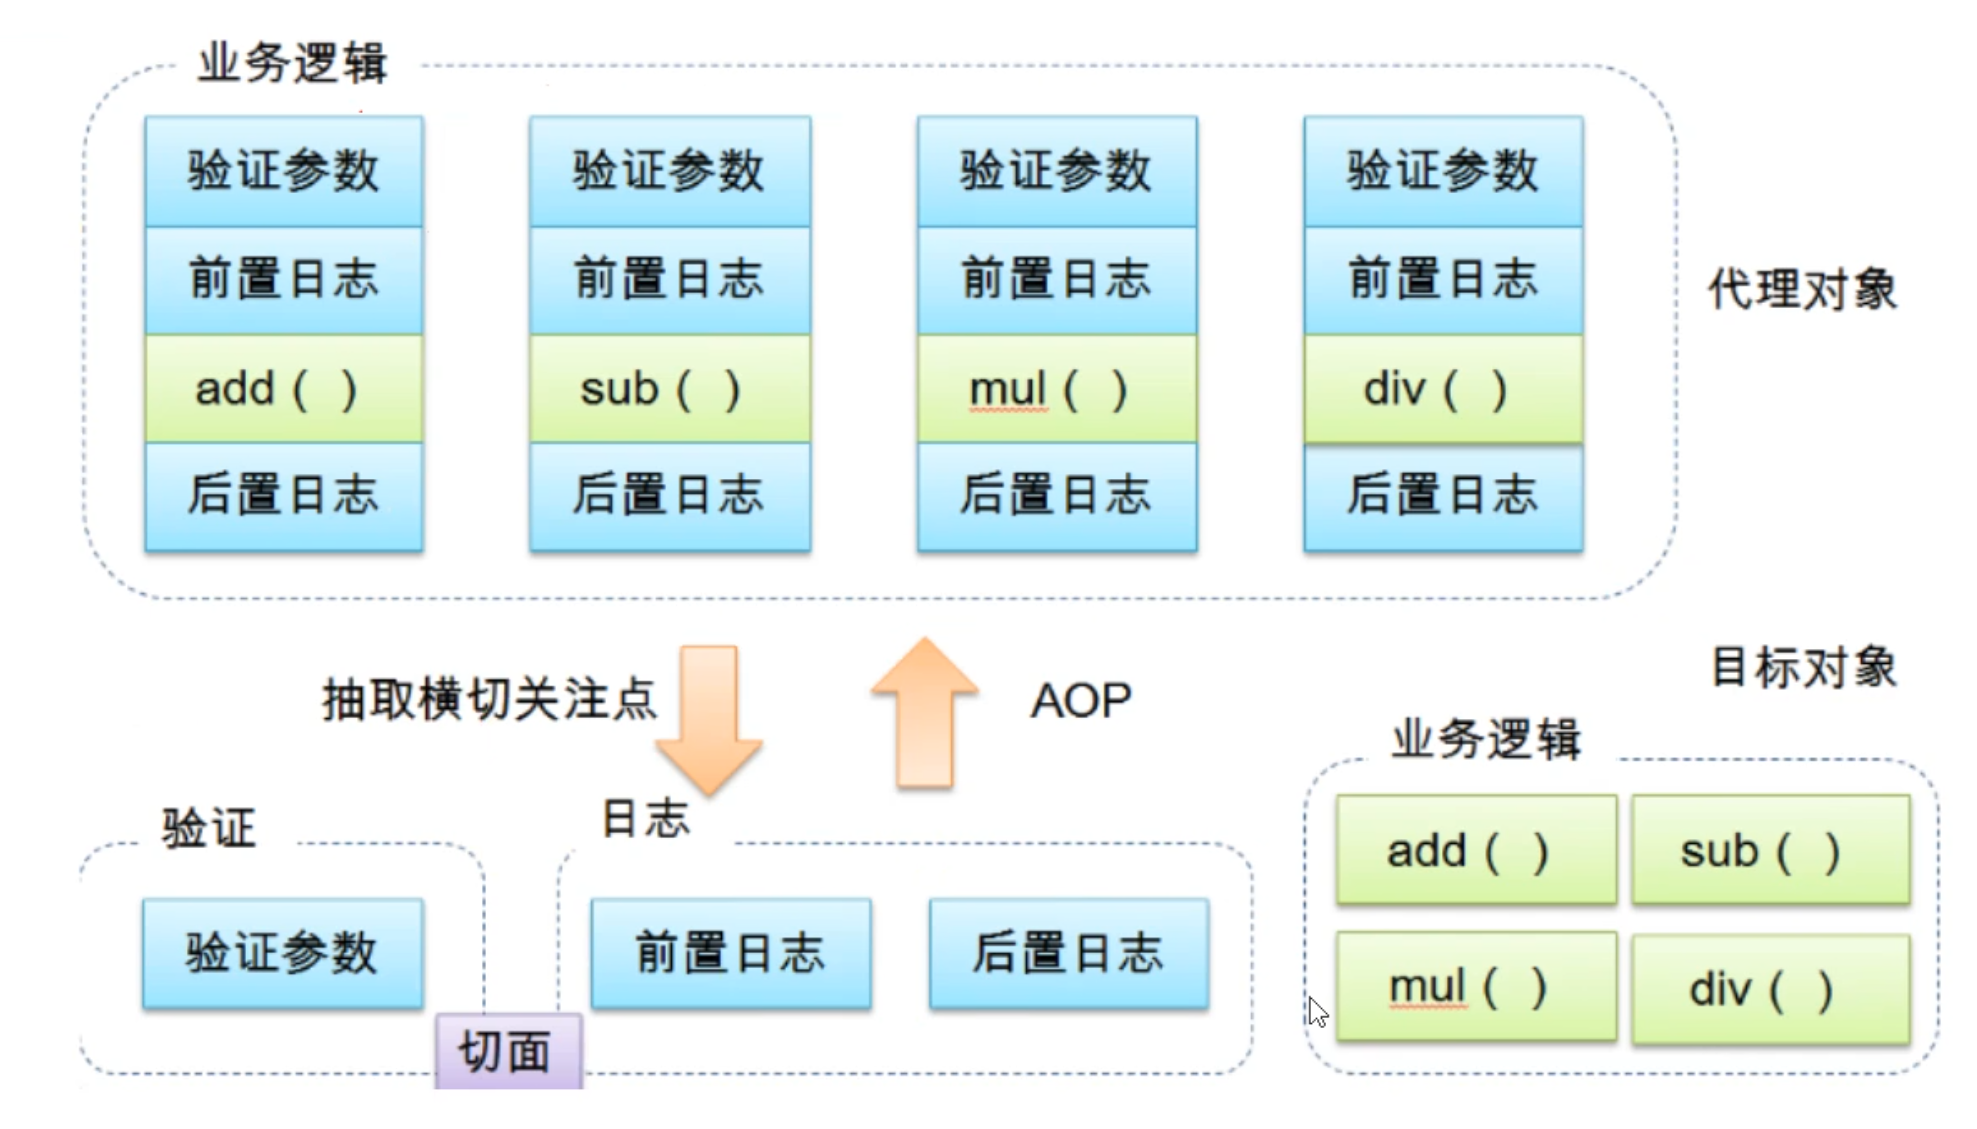
Aop在Spring中的作用
提供声明式事务;允许用户自定义切面
- 横切关注点:跨越应用程序多个模块的方法或功能。即使,与我们业务逻辑无关的,但是我们需要关注的部分,就是横切关注点。如日志、安全、缓存、事务等等……
* (老外的名词很绕,换一种方法了解) - 切面(ASPECT):横切关注点 被模块化 的特殊对象。即,它是一个类(Log)
- 通知(Advice):切面必须要完成的工作。即,它是类中的一个方法。(Log中的方法)
- 目标(Target):被通知对象。 (接口)
- 代理(Proxy):向目标对象应用通知之后创建的对象。 (代理类)
- 切入点(Point Cut):切面通知执行的"地点"的定义
- 连接点(Joint Point):与切入点匹配的执行点。
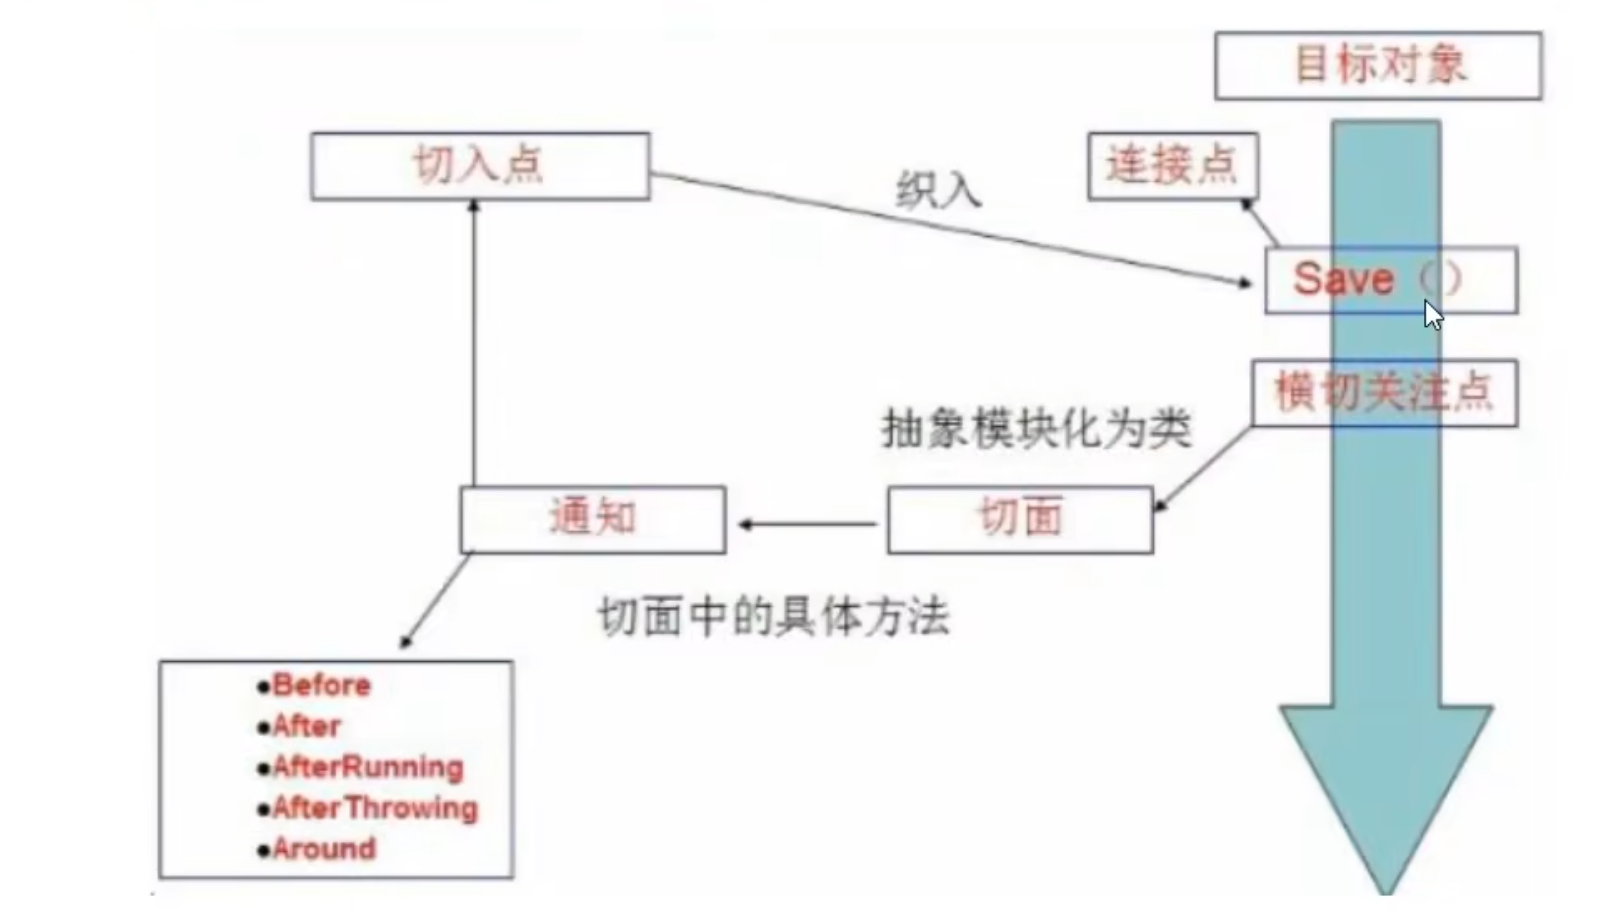
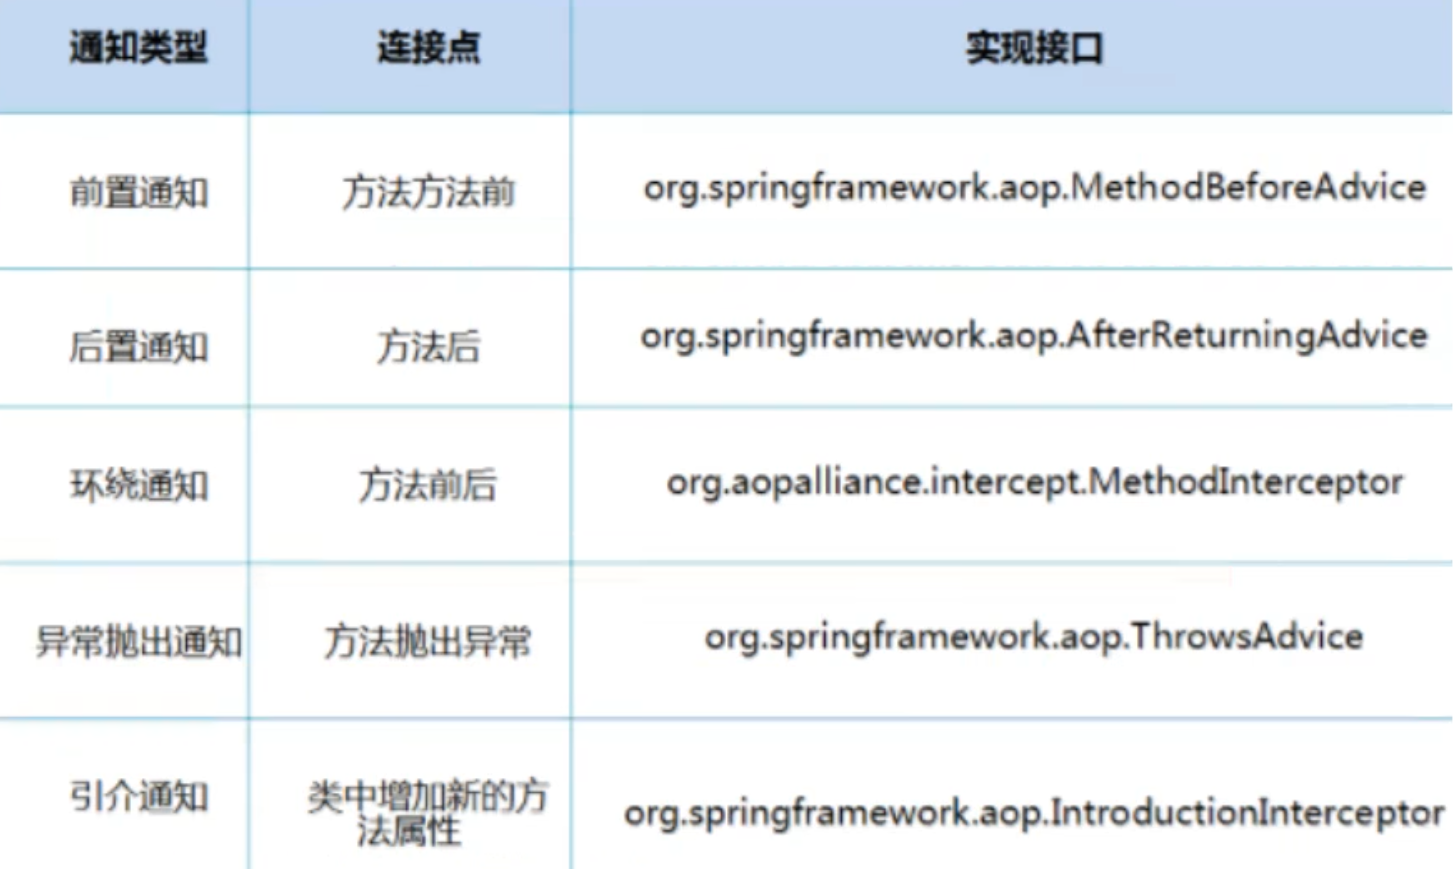
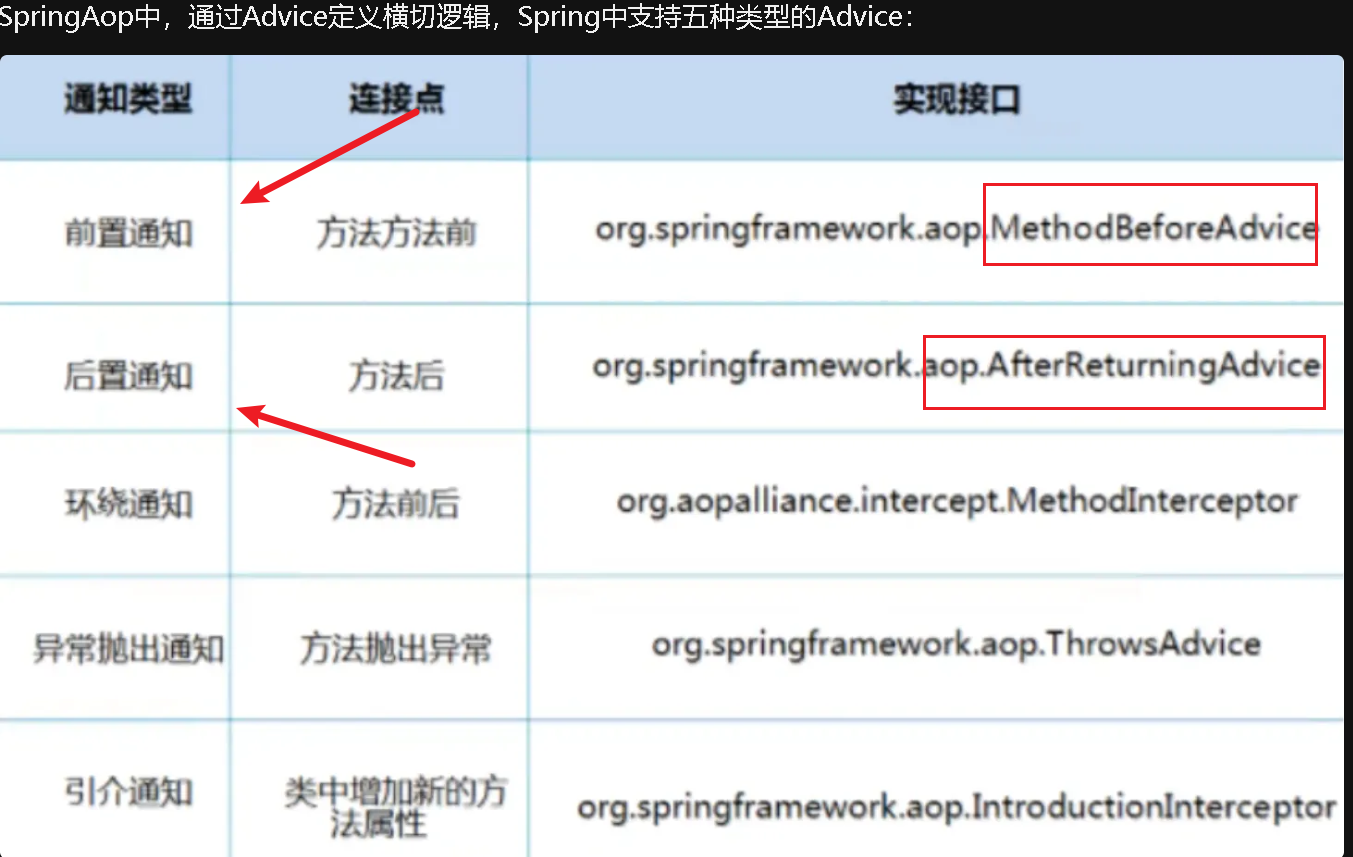
SpringAop中,通过Advice定义横切逻辑,Spring中支持五种类型的Advice:
Aop在不改变原有代码的情况下,去增加新的功能。
使用Spring实现Aop
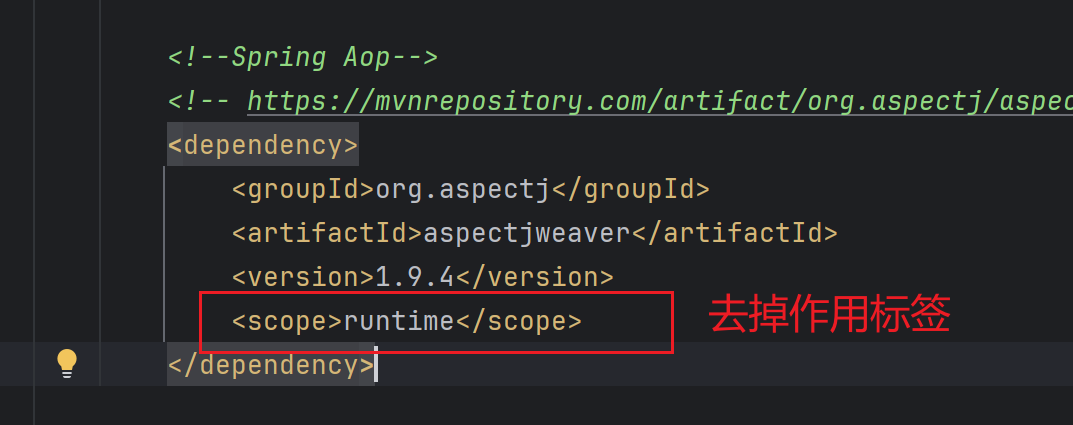
【重点】使用AOP织入,需要导入一个依赖包!叫做织入包
<!-- https://mvnrepository.com/artifact/org.aspectj/aspectjweaver -->
<dependency>
    <groupId>org.aspectj</groupId>
    <artifactId>aspectjweaver</artifactId>
    <version>1.9.4</version>
</dependency>
方式一:使用Spring的Api接口
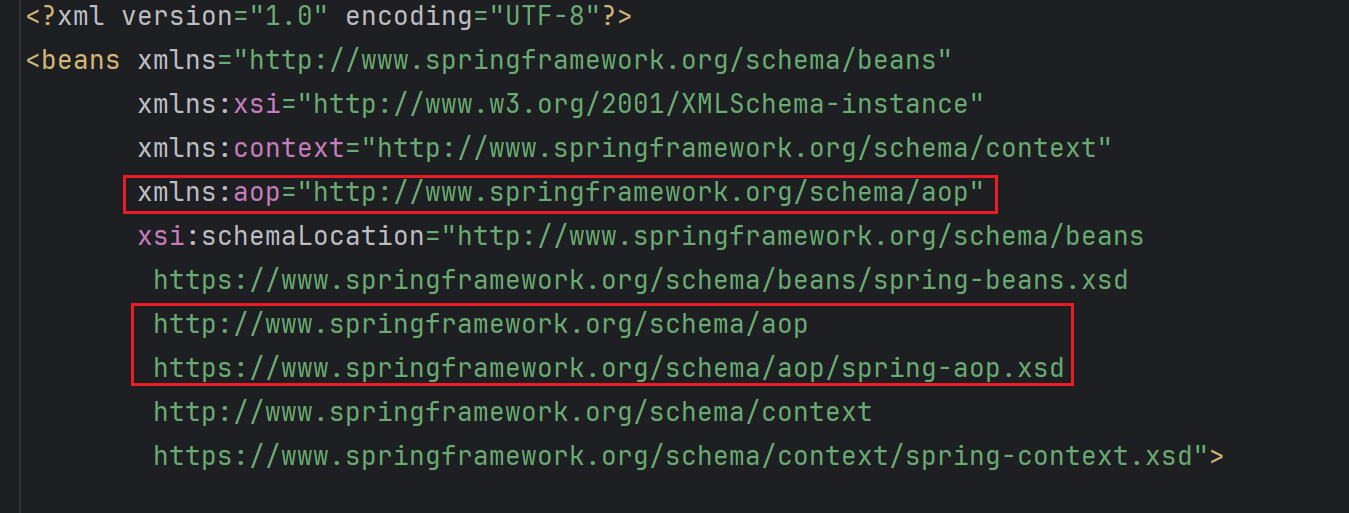
- 配置AOP的约束
<?xml version="1.0" encoding="UTF-8"?>
<beans xmlns="http://www.springframework.org/schema/beans"
       xmlns:xsi="http://www.w3.org/2001/XMLSchema-instance"
       xmlns:context="http://www.springframework.org/schema/context"
       xmlns:aop="http://www.springframework.org/schema/aop"
       xsi:schemaLocation="http://www.springframework.org/schema/beans
		https://www.springframework.org/schema/beans/spring-beans.xsd
		http://www.springframework.org/schema/aop
		https://www.springframework.org/schema/aop/spring-aop.xsd
		http://www.springframework.org/schema/context
		https://www.springframework.org/schema/context/spring-context.xsd">

    <context:annotation-config/>
    <context:component-scan base-package="com.cike9"/>


</beans>
- 配置bean(容器id)
    <bean id="log" class="com.cike9.log.Log"/>
    <bean id="afterLog" class="com.cike9.log.AfterLog"/>
    <bean id="userServiceImpl" class="com.cike9.service.UserServiceImpl"/>
- Spring AOP 的 XML 配置方式
    <aop:config>
        <!--切入点-->
        <aop:pointcut id="pointcut" expression="execution(* com.cike9.service.UserServiceImpl.*(..))"/>

        <!--执行环绕增加!-->
        <aop:advisor advice-ref="log" pointcut-ref="pointcut"/>
        <aop:advisor advice-ref="afterLog" pointcut-ref="pointcut"/>
    </aop:config>
execution(返回值类型 包名.类名/接口名.方法名(任意的参数列表))
(…)可以代表所有参数,()代表一个参数,(,String)代表第一个参数为任何值,第二个参数为String类型.
整体代码
业务类的接口 (UserService)
public interface UserService {
    void add();
    void delete();
    void update();
    void query();
}
实际业务类(UserServiceImpl)
public class UserServiceImpl implements UserService{
    @Override
    public void add() {
        System.out.println("增加了一个用户");

    }

    @Override
    public void delete() {
        System.out.println("删除了一个用户");
    }

    @Override
    public void update() {
        System.out.println("更新用户");
    }

    @Override
    public void query() {
        System.out.println("查询用户");
    }
}
横向扩展业务类(AfterLog)
public class AfterLog implements AfterReturningAdvice {
    // 返回值,方法,参数,目标对象
    public void afterReturning(Object returnValue, Method method, Object[] args, Object target) throws Throwable {
        System.out.println("执行了"+method.getName()+"方法,"+"返回第结果为:"+ returnValue);
    }
}
横向扩展业务类 (Log)
public class Log implements MethodBeforeAdvice {
    // method:要执行的目标对象的方法
    // Objects:参数
    // 他target: 目标对象
    public void before(Method method, Object[] args, Object target) throws Throwable {
        System.out.println(target.getClass().getName()+"的"+method.getName()+"方法被执行了");
    }
}
Spring的XML配置(applicationContext.xml)
<?xml version="1.0" encoding="UTF-8"?>
<beans xmlns="http://www.springframework.org/schema/beans"
       xmlns:xsi="http://www.w3.org/2001/XMLSchema-instance"
       xmlns:context="http://www.springframework.org/schema/context"
       xmlns:aop="http://www.springframework.org/schema/aop"
       xsi:schemaLocation="http://www.springframework.org/schema/beans
		https://www.springframework.org/schema/beans/spring-beans.xsd
		http://www.springframework.org/schema/aop
		https://www.springframework.org/schema/aop/spring-aop.xsd
		http://www.springframework.org/schema/context
		https://www.springframework.org/schema/context/spring-context.xsd">

    <context:annotation-config/>
    <context:component-scan base-package="com.cike9"/>

    <bean id="log" class="com.cike9.log.Log"/>
    <bean id="afterLog" class="com.cike9.log.AfterLog"/>
    <bean id="userServiceImpl" class="com.cike9.service.UserServiceImpl"/>

    <!--
    方式一:使用原生Spring API接口
    配置aop:需要导入aop的约束
    -->
    <aop:config>
        <!--切入点-->
        <aop:pointcut id="pointcut" expression="execution(* com.cike9.service.UserServiceImpl.*(..))"/>

        <!--执行环绕增加!-->
        <aop:advisor advice-ref="log" pointcut-ref="pointcut"/>
        <aop:advisor advice-ref="afterLog" pointcut-ref="pointcut"/>
    </aop:config>

</beans>
测试类
public class spring09_Test {
    @Test
    public void test(){
        ApplicationContext context = new ClassPathXmlApplicationContext("applicationContext.xml");
        // 动态代理的是接口,不应该写实现类这里
        UserService userServiceImpl = (UserService) context.getBean("userServiceImpl");
        userServiceImpl.add();
    }
}
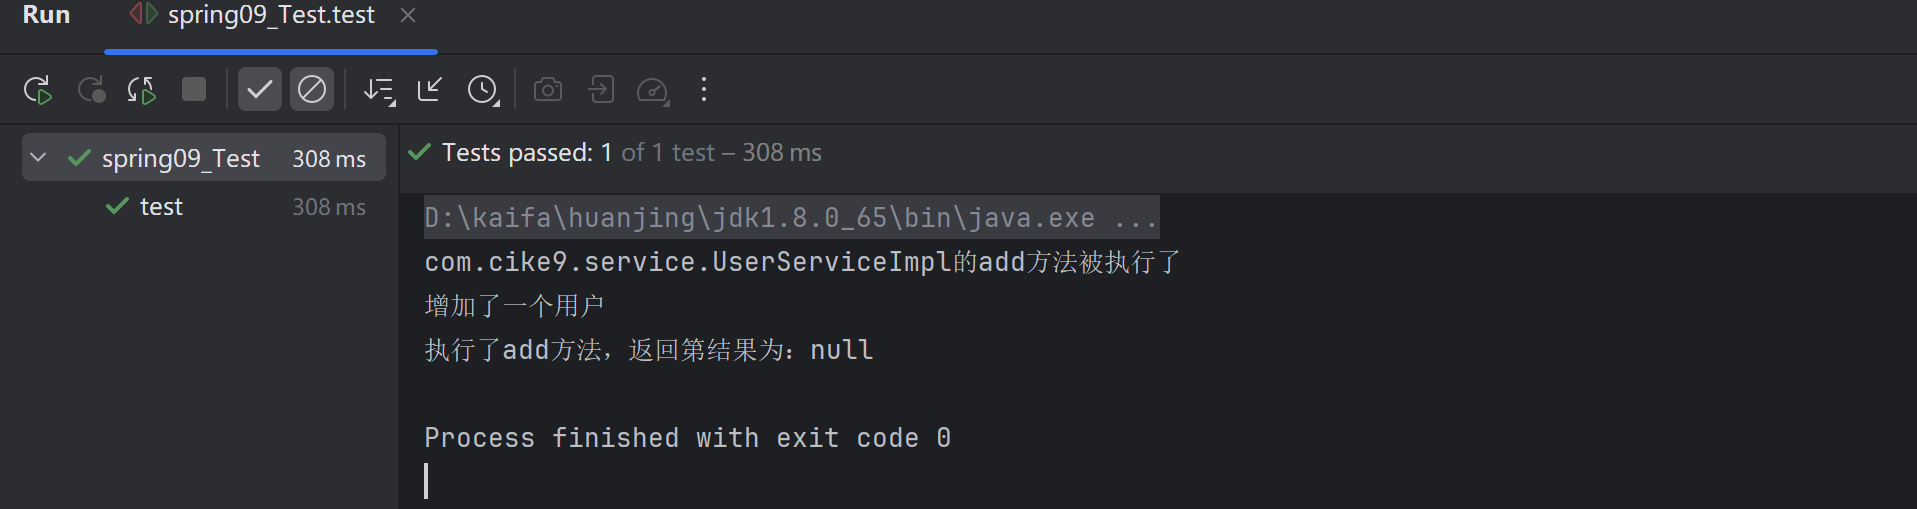
可以发现扩展业务类,市集上调用的就是这两种实现接口(都是通知类型)
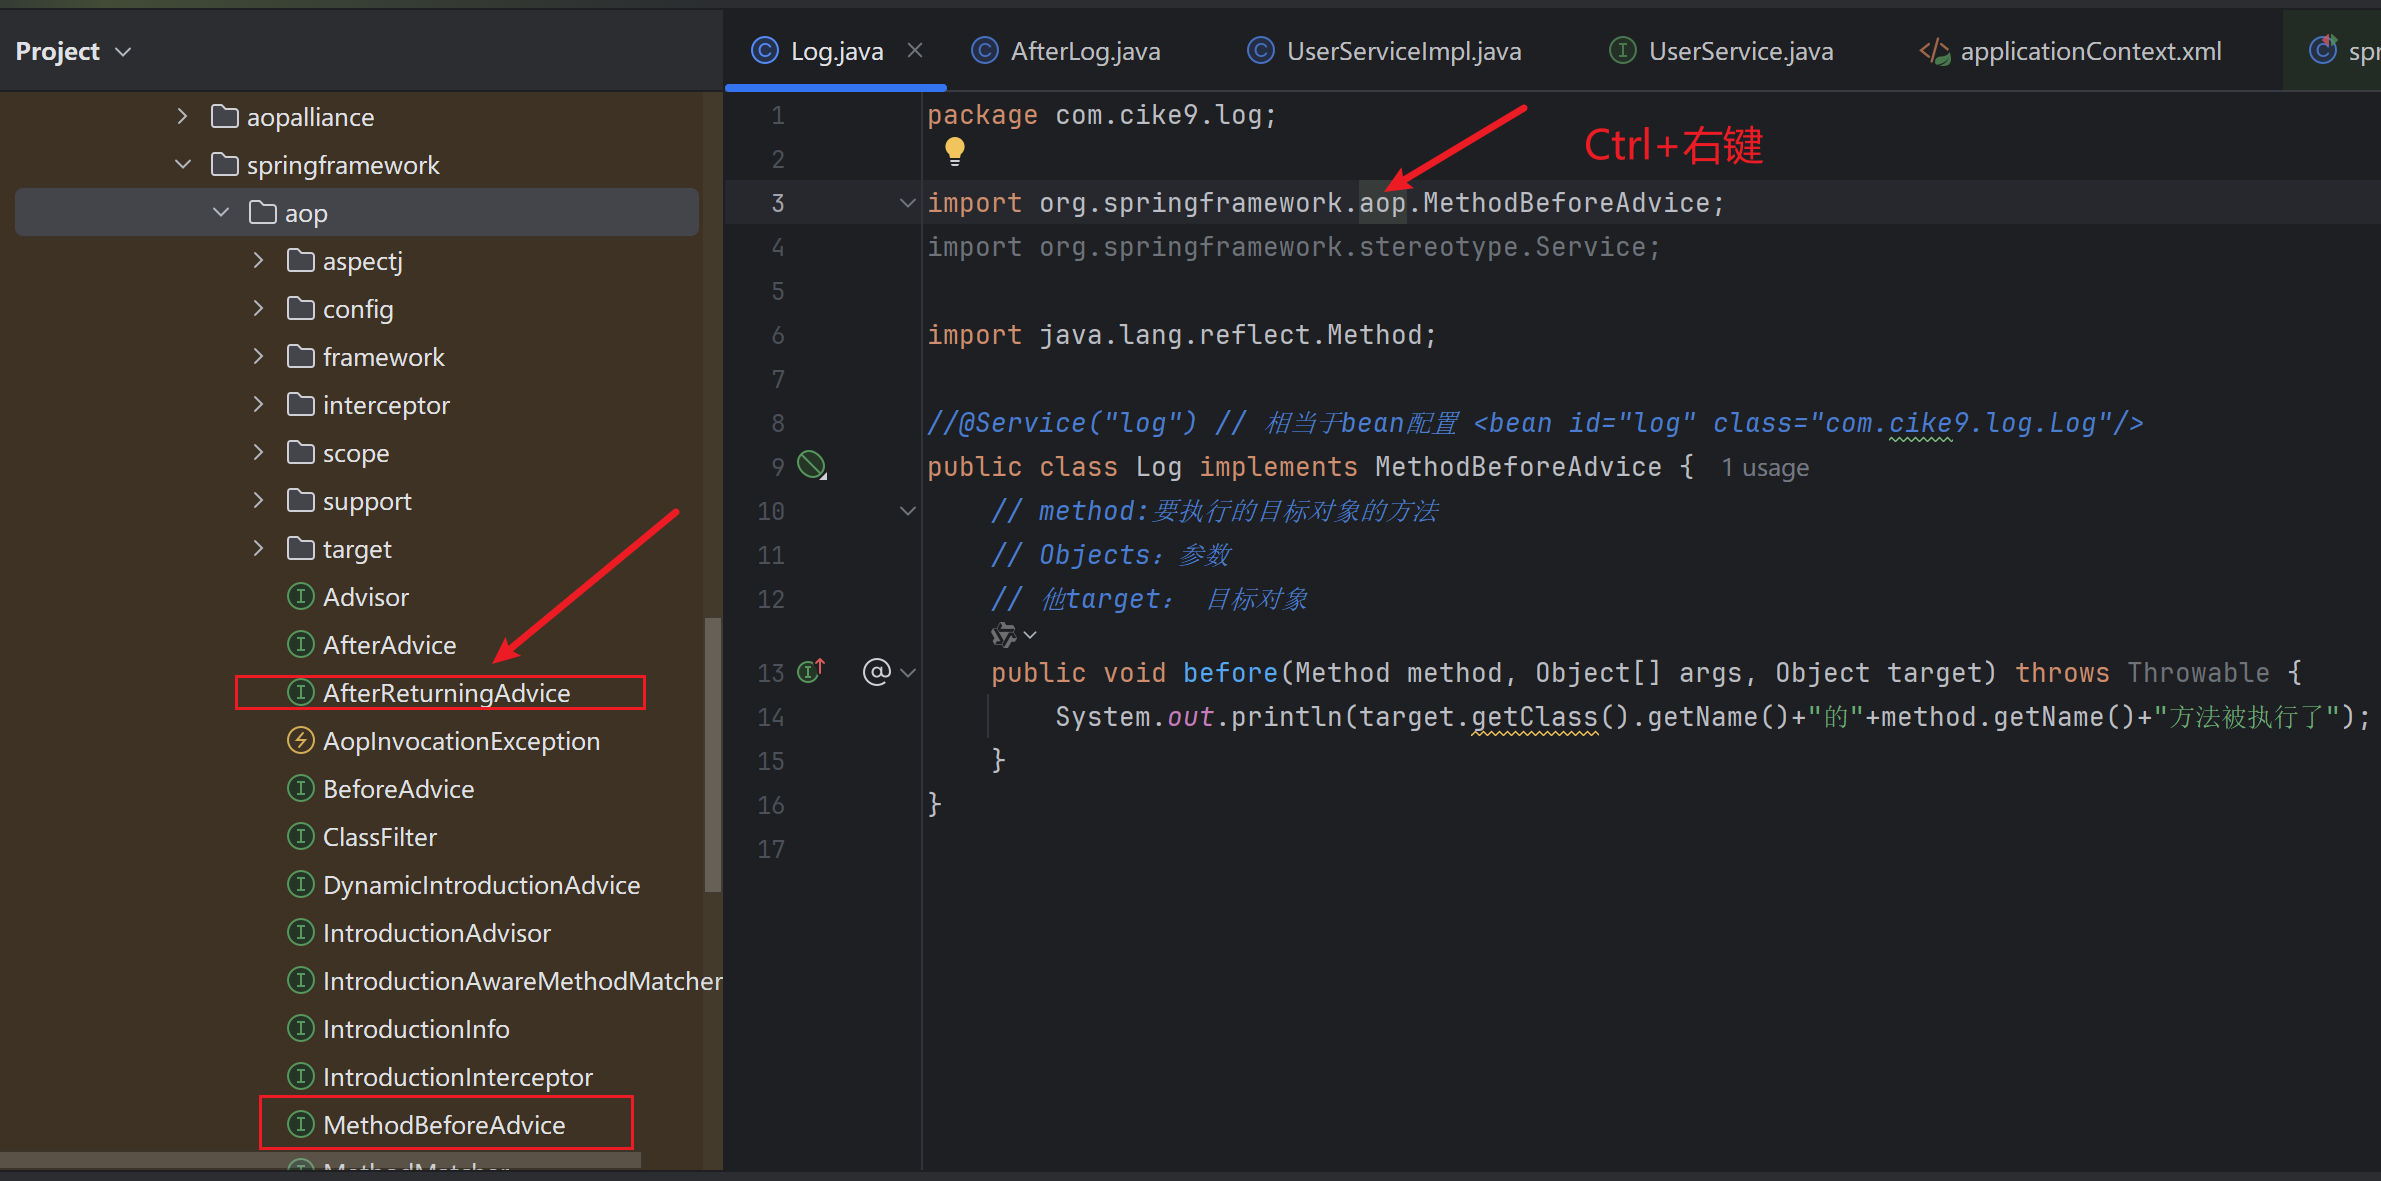
通过这种方式,可以找到aop下可以用的接口(方法)
方式二:自定义类实现AOP【主要是切面定义】
自定义类
package com.cike9.diy;

public class DiyPointCut {
    void before(){
        System.out.println("================方法执行前================");
    }

    void after(){
        System.out.println("================方法执行后================");
    }

}
applicationContext.xml
<?xml version="1.0" encoding="UTF-8"?>
<beans xmlns="http://www.springframework.org/schema/beans"
       xmlns:xsi="http://www.w3.org/2001/XMLSchema-instance"
       xmlns:context="http://www.springframework.org/schema/context"
       xmlns:aop="http://www.springframework.org/schema/aop"
       xsi:schemaLocation="http://www.springframework.org/schema/beans
		https://www.springframework.org/schema/beans/spring-beans.xsd
		http://www.springframework.org/schema/aop
		https://www.springframework.org/schema/aop/spring-aop.xsd
		http://www.springframework.org/schema/context
		https://www.springframework.org/schema/context/spring-context.xsd">

    <context:annotation-config/>
    <context:component-scan base-package="com.cike9"/>

    <bean id="log" class="com.cike9.log.Log"/>
    <bean id="afterLog" class="com.cike9.log.AfterLog"/>
    <bean id="userServiceImpl" class="com.cike9.service.UserServiceImpl"/>

    <!--方式二:自定义类-->
    <bean id="diy" class="com.cike9.diy.DiyPointCut"/>

    <aop:config>
        <!--自定义切面-->
        <aop:aspect ref="diy">
            <!--切入点-->
            <aop:pointcut id="point" expression="execution(* com.cike9.service.UserServiceImpl.*(..))"/>
            <!--通知  -->
            <aop:before method="before" pointcut-ref="point"/> <!--在切入点之前执行通知-->
            <aop:after method="after" pointcut-ref="point"/>
        </aop:aspect>

    </aop:config>


</beans>
业务接口
public interface UserService {
    void add();
    void delete();
    void update();
    void query();
}
业务实现类
public class UserServiceImpl implements UserService{
    @Override
    public void add() {
        System.out.println("增加了一个用户");

    }

    @Override
    public void delete() {
        System.out.println("删除了一个用户");
    }

    @Override
    public void update() {
        System.out.println("更新用户");
    }

    @Override
    public void query() {
        System.out.println("查询用户");
    }
}
测试类
public class spring09_Test {
    @Test
    public void test(){
        ApplicationContext context = new ClassPathXmlApplicationContext("applicationContext.xml");
        // 动态代理的是接口,不应该写实现类这里
        UserService userServiceImpl = (UserService) context.getBean("userServiceImpl");
        userServiceImpl.add();
    }
}
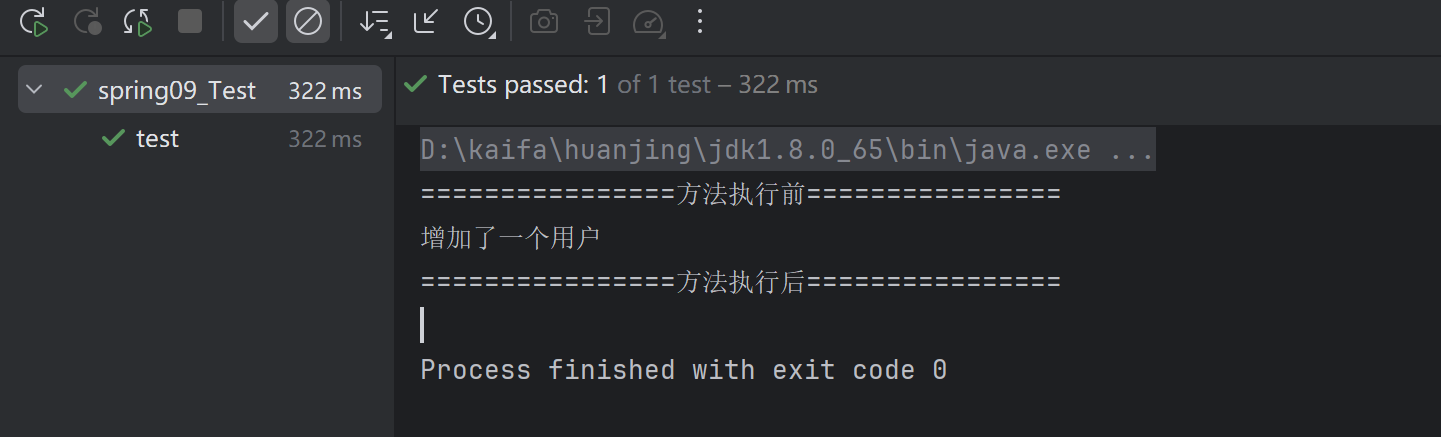
方式三:使用注解实现
在自定义类里面添加注解
- 开启直接支持!aop:aspectj-autoproxy/
- 切面 @Aspect
- 切入点 @Before(“execution(* com.cike9.service.UserServiceImpl.*(…))”)
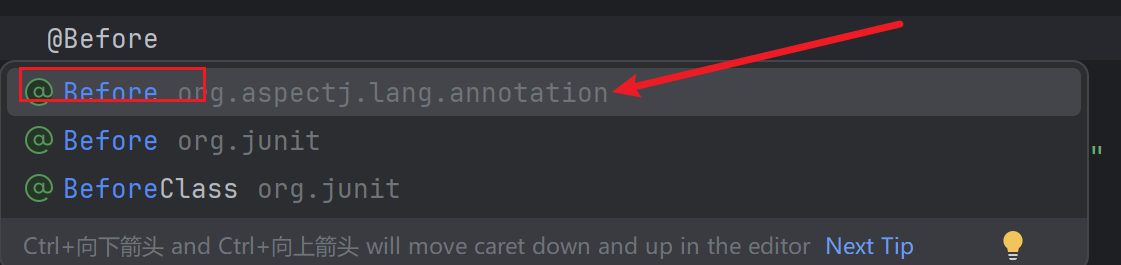
自定义类中进行注解开发AOP
@Component("annotationPointCut")
// 使用注解方式实现AOP
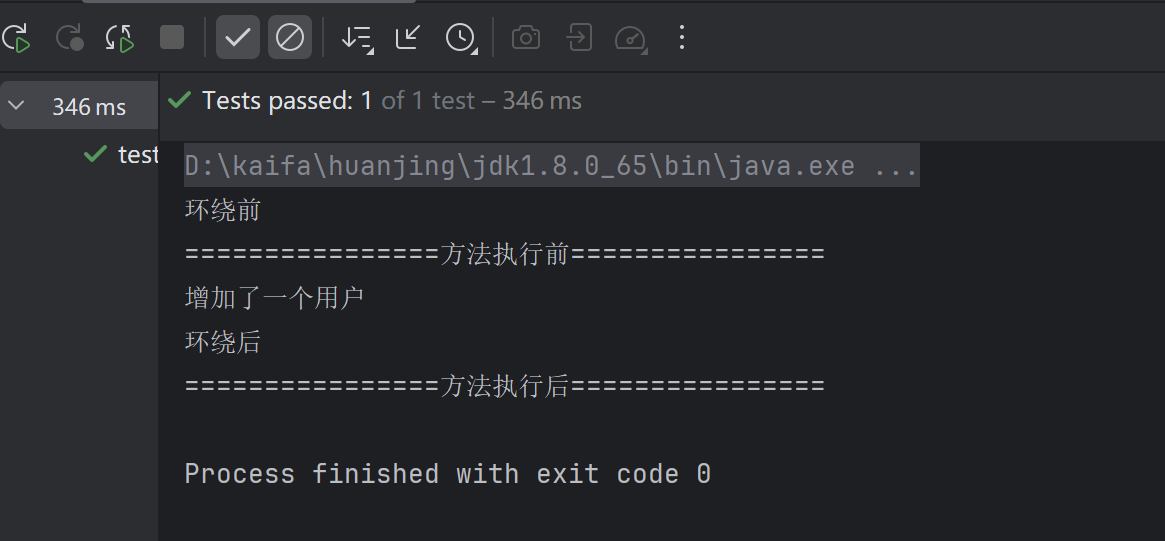
@Aspect // 标注这个类是一个切面  相当于<aop:config><aop:aspect ref="diy"></aop:config>
public class AnnotationPointCut {

    // 这里相当于切入点
    @Before("execution(* com.cike9.service.UserServiceImpl.*(..))")
    void before(){//通知的方法
        System.out.println( "================方法执行前================" );
    }

    @After("execution(* com.cike9.service.UserServiceImpl.*(..))")
    void after(){
        System.out.println( "================方法执行后================" );
    }
}
applicattionContext.xml
<?xml version="1.0" encoding="UTF-8"?>
<beans xmlns="http://www.springframework.org/schema/beans"
       xmlns:xsi="http://www.w3.org/2001/XMLSchema-instance"
       xmlns:context="http://www.springframework.org/schema/context"
       xmlns:aop="http://www.springframework.org/schema/aop"
       xsi:schemaLocation="http://www.springframework.org/schema/beans
		https://www.springframework.org/schema/beans/spring-beans.xsd
		http://www.springframework.org/schema/aop
		https://www.springframework.org/schema/aop/spring-aop.xsd
		http://www.springframework.org/schema/context
		https://www.springframework.org/schema/context/spring-context.xsd">

    <context:annotation-config/>
    <context:component-scan base-package="com.cike9"/>

    <!--方式三:开启注解支持  JDK(默认 proxy-target-class="false") cgilib(proxy-target-class="true")-->
    <aop:aspectj-autoproxy proxy-target-class="false"/>


</beans>
业务实现类
import org.springframework.stereotype.Service;

@Service("userServiceImpl") // 相当于bean配置 <bean id="userServiceImpl" class="com.cike9.service.UserServiceImpl"/>
public class UserServiceImpl implements UserService{
    @Override
    public void add() {
        System.out.println("增加了一个用户");

    }

    @Override
    public void delete() {
        System.out.println("删除了一个用户");
    }

    @Override
    public void update() {
        System.out.println("更新用户");
    }

    @Override
    public void query() {
        System.out.println("查询用户");
    }
}
业务接口
public interface UserService {
    void add();
    void delete();
    void update();
    void query();
}
测试
public class spring09_Test {
    @Test
    public void test(){
        ApplicationContext context = new ClassPathXmlApplicationContext("applicationContext.xml");
        // 动态代理的是接口,不应该写实现类这里
        UserService userServiceImpl = (UserService) context.getBean("userServiceImpl");
        userServiceImpl.add();
    }
}

汇聚全球AI编程工具,助力开发者即刻编程。
更多推荐

 16
16 0
0- 0


 已为社区贡献3条内容

所有评论(0)