
spring编程中的常见错误
文章目录
一、Spring core 篇
IOC 控制反转 DI 依赖注入 AOP 面向切面编程动态代理
约定大于配置
@SpringBootApplication注解中的 @ComponentScan basePackages属性为空时候,注解默认扫描Application启动类所在的包
调试位置参考 ComponentScanAnnotationParser#parse 方法
// @ComponentScan 中的 basePackages 属性值为空时候
if (basePackages.isEmpty()) {
  basePackages.add(ClassUtils.getPackageName(declaringClass));
 }
当创建一个 Bean 时,调用的方法是 AbstractAutowireCapableBeanFactory#createBeanInstance。它主要包含两大基本步骤:寻找构造器和通过反射调用构造器创建实例
在使用 Spring,我们不能直接显式使用 new 关键字来创建实例。Spring 只能是去寻找依赖来作为构造器调用参数,ConstructorResolver#autowireConstructor
调用 createArgumentArray 方法来构建调用构造器的参数数组, 这个方法的最终实现是从 BeanFactory 中获取 Bean
定义一个类为 Bean,如果再显式定义了构造器,那么这个 Bean 在构建时,会自动根据构造器参数定义寻找对应的 Bean,然后反射创建出这个 Bean
@Service
public class ServiceImpl {
    private String serviceName;
    public ServiceImpl(String serviceName){
        this.serviceName = serviceName;
    }
    public ServiceImpl(String serviceName, String otherStringParameter){
        this.serviceName = serviceName;
    }
}
存在两个构造器,都可以调用时,到底应该调用哪个呢?最终 Spring 无从选择,只能尝试去调用默认构造器,而这个默认构造器又不存在,所以测试这个程序它会出错。
当一个单例的 Bean,使用 autowired 注解标记其属性时,你一定要注意这个属性值会被固定下来
通过 autowired 引入的bean 一定是 单例
对于 Bean 的名字,如果没有显式指明,就应该是类名,不过首字母应该小写
//方式1:属性命名为要装配的bean名称
@Autowired
DataService oracleDataService;

//方式2:使用@Qualifier直接引用
@Autowired
@Qualifier("oracleDataService")
DataService dataService;
如果一个类名是以两个大写字母开头的,则首字母不变,其它情况下默认首字母变成小写
内部类Bean
// 内部类 Bean
@Autowired
@Qualifier("studentController.InnerClassDataService")
DataService innerClassDataService;
spring bean生命周期
spring 类初始化过程
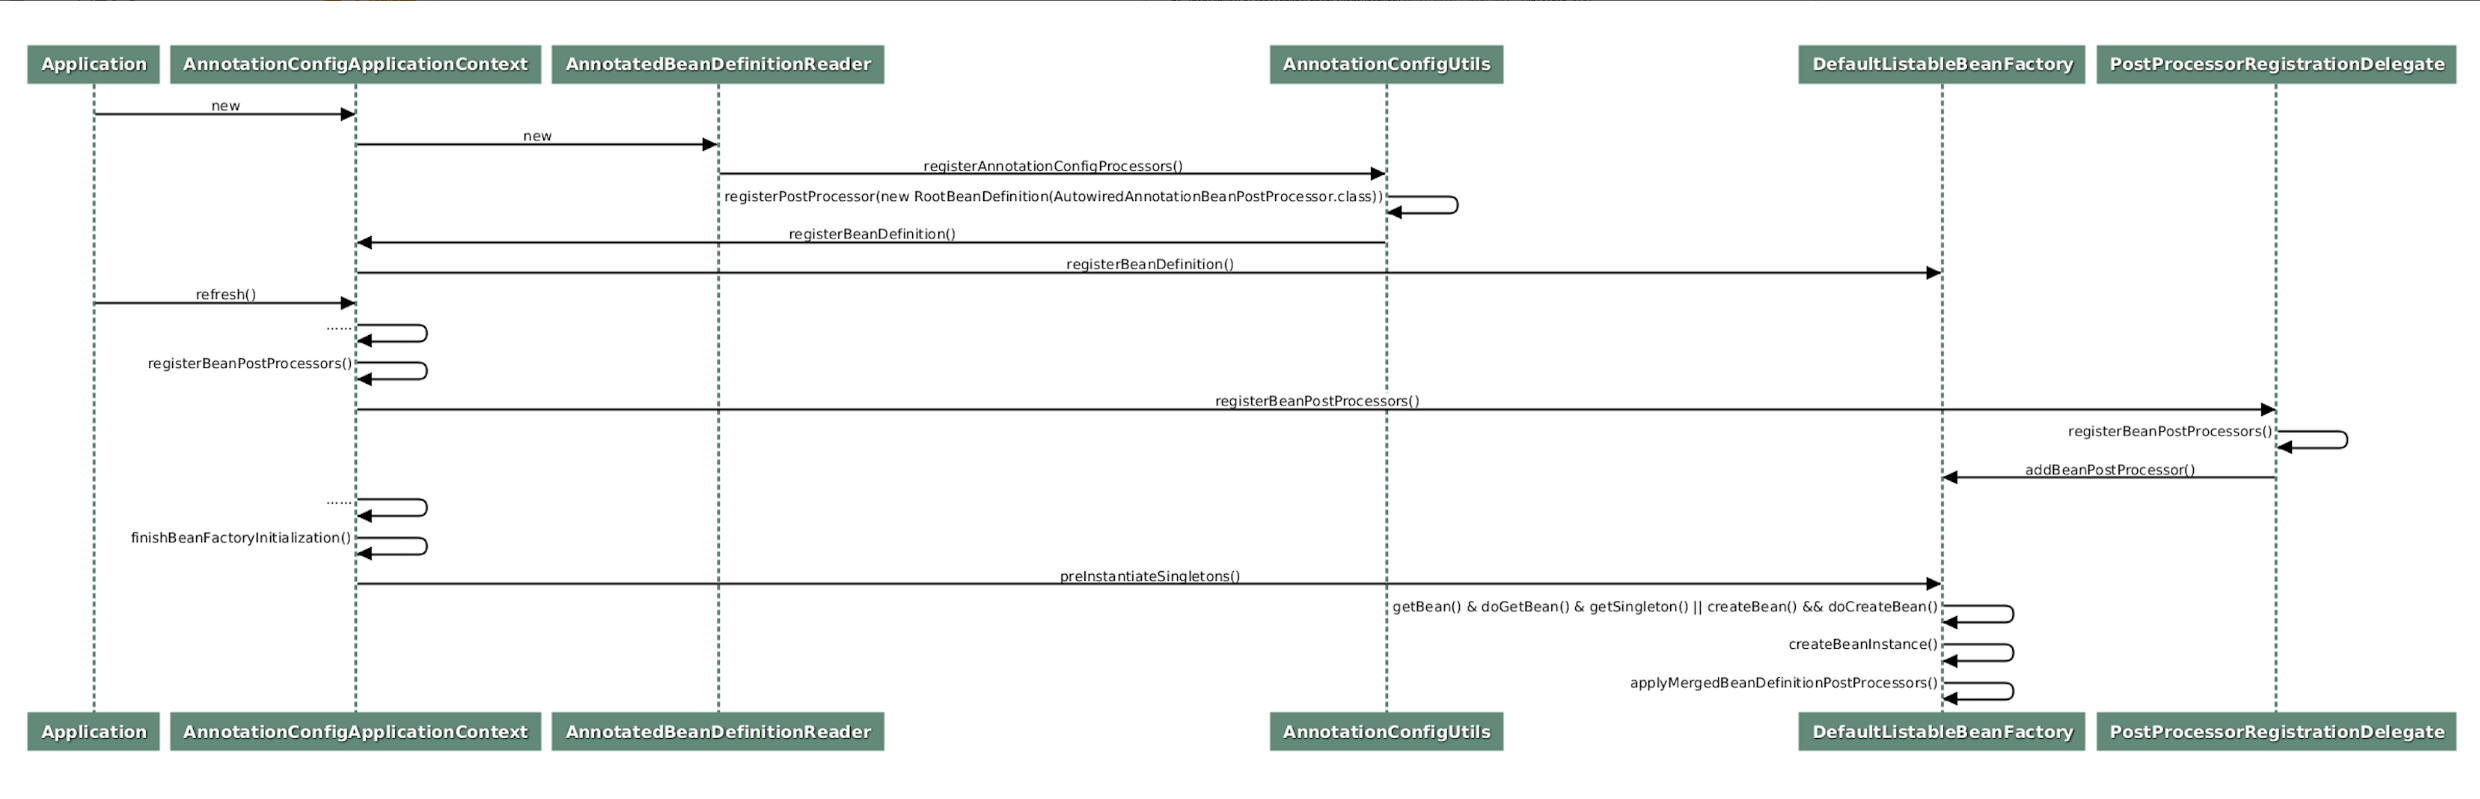
第一部分,将一些必要的系统类,比如 Bean 的后置处理器类,注册到 Spring 容器,其中就包括我们这节课关注的 CommonAnnotationBeanPostProcessor 类;
第二部分,将这些后置处理器实例化,并注册到 Spring 的容器中;
第三部分,实例化所有用户定制类,调用后置处理器进行辅助装配、类初始化等等。
Spring 初始化单例类的一般过程,基本都是 getBean()->doGetBean()->getSingleton(),如果发现 Bean 不存在,则调用 createBean()->doCreateBean() 进行实例化
DefaultListableBeanFactory 类是 Spring Bean 的灵魂,而核心就是其中的 doCreateBean 方法
可以说 doCreateBean 管理了 Bean 的整个生命周期中几乎所有的关键节点,直接负责了 Bean 对象的生老病死,其主要功能包括:
Bean 实例的创建;
Bean 对象依赖的注入;
定制类初始化方法的回调;
Disposable 方法的注册。
AbstractAutowireCapableBeanFactory . doCreateBean() 的源代码:
protected Object doCreateBean(final String beanName, final RootBeanDefinition mbd, final @Nullable Object[] args)
    throws BeanCreationException {
    //省略非关键代码
  if (instanceWrapper == null) {
    // ① 实例化 Bean
    instanceWrapper = createBeanInstance(beanName, mbd, args);
  }
  final Object bean = instanceWrapper.getWrappedInstance();

    //省略非关键代码
    Object exposedObject = bean;
    try {
       // ② 注入 Bean 依赖,自动装配
       populateBean(beanName, mbd, instanceWrapper);
       // ③ 初始化 Bean
       exposedObject = initializeBean(beanName, exposedObject, mbd);
    }
    catch (Throwable ex) {
    //省略非关键代码
}
默认构造器显然是在类实例化的时候被自动调用的,Spring 也无法控制。而此时负责自动装配的 populateBean 方法还没有被执行,LightMgrService 的属性 LightService 还是 null
使用 @Autowired 直接标记在成员属性上而引发的装配行为是发生在构造器执行之后的
使用构造器参数来隐式注入是一种 Spring 最佳实践
@Component
public class LightMgrService {

    private LightService lightService;
    // 使用构造器参数来隐式注入是一种 Spring 最佳实践
    public LightMgrService(LightService lightService) {
        this.lightService = lightService;
        lightService.check();
    }
}
Spring 在类属性完成注入【之后】,会回调用户定制的初始化方法。即在 populateBean 方法(注入 bean 自动装配)之后,会调用 AbstractAutowireCapableBeanFactory . initializeBean() 方法
protected Object initializeBean(final String beanName, final Object bean, @Nullable RootBeanDefinition mbd) {
   //省略非关键代码
   if (mbd == null || !mbd.isSynthetic()) {
      // 处理了 @PostConstruct 注解
      // applyBeanPostProcessorsBeforeInitialization  方法最终执行到后置处理器  InitDestroyAnnotationBeanPostProcessor  的  buildLifecycleMetadata  方法
      // 在这个方法里,Spring 将遍历查找被 PostConstruct.class 注解过的方法,返回到上层,并最终调用此方法
      wrappedBean = applyBeanPostProcessorsBeforeInitialization(wrappedBean, beanName);
   }
   try {
      // 处理 InitializingBean 接口
      // invokeInitMethods 方法会判断当前 Bean 是否实现了 InitializingBean 接口
      //,只有在实现了该接口的情况下,Spring 才会调用该 Bean 的接口实现方法 afterPropertiesSet()
      invokeInitMethods(beanName, wrappedBean, mbd);
   }
   //省略非关键代码
}
使用 Bean 注解注册到 Spring 容器的对象,才会在 Spring 容器被关闭的时候**自动调用 shutdown **方法
@Configuration
public class BeanConfiguration {
   /*
   Bean 注解类的代码中去寻找一些线索,可以看到属性 destroyMethod 有非常大段的注释,
   使用 Bean 注解的方法所注册的 Bean 对象,如果用户不设置 destroyMethod 属性,
   则其属性值为 AbstractBeanDefinition.INFER_METHOD。
   此时 Spring 会检查当前 Bean 对象的原始类中是否有名为 shutdown 或者 close 的方法,
   如果有,此方法会被 Spring 记录下来,并在容器被销毁时自动执行;
   当然如若没有,那么自然什么都不会发生。
   */
    @Bean
    public LightService getTransmission(){
        return new LightService();
    }
}
而使用 @Component(Service 也是一种 Component) 将当前类自动注入到 Spring 容器时,shutdown 方法则不会被自动执行
@Service
public class LightService {
  //省略其他非关键代码
  public void shutdown(){
    System.out.println("shutting down all lights");
  }
  //省略其他非关键代码
}
实现 Closeable 的接口方法 close() 会在 Spring 容器被销毁的时候自动执行
import java.io.Closeable;
@Service
public class LightService implements Closeable {
     // 接口方法 close() 也会在 Spring 容器被销毁的时候自动执行
     public void close() {
         System.out.println("turn off all lights);
     }
     //省略非关键代码
}
aop示例
@Service
public class ElectricService {

    public void charge() throws Exception {
        System.out.println("Electric charging ...");
        // 通过 this 方式调用的方法,是没有被 Spring AOP 增强
        this.pay();
    }

    public void pay() throws Exception {
        System.out.println("Pay with alipay ...");
        Thread.sleep(1000);
    }

}
@Aspect
@Service
@Slf4j
public class AopConfig {
    // 切面不会拦截到 this 指向的方法, this 对应的对象只是一个普通的对象
    @Around("execution(* com.spring.puzzle.class5.example1.ElectricService.pay()) ")
    public void recordPayPerformance(ProceedingJoinPoint joinPoint) throws Throwable {
        long start = System.currentTimeMillis();
        joinPoint.proceed();
        long end = System.currentTimeMillis();
        System.out.println("Pay method time cost(ms): " + (end - start));
    }
}
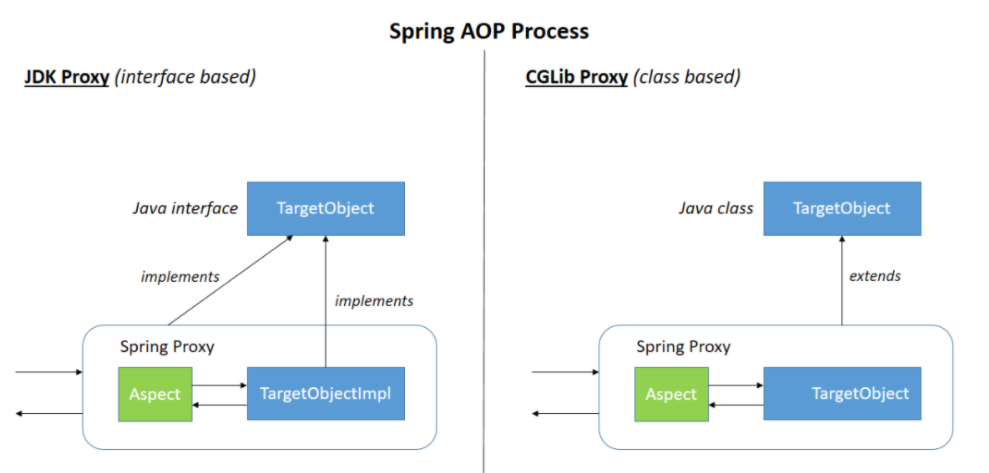
Spring AOP 的底层是动态代理。而创建代理的方式有两种,JDK 的方式和 CGLIB 的方式
JDK 动态代理只能对实现了接口的类生成代理,而不能针对普通类。
CGLIB 是可以针对类实现代理,主要是对指定的类生成一个子类,覆盖其中的方法,来实现代理对象
<dependency>
  <groupId>org.springframework.boot</groupId>
  <artifactId>spring-boot-starter-aop</artifactId>
</dependency>
在需要使用 AOP 时,它会把创建的原始的 Bean 对象 wrap 成代理对象作为 Bean 返回
只有引用的是被 动态代理 创建出来的对象,才会被 Spring 增强,具备 AOP 该有的功能。
修改思路:
方式一:通过 @Autowired 的方式,在类的内部,自己引用自己
@Service
public class ElectricService {
    @Autowired
    ElectricService electricService;
    public void charge() throws Exception {
        System.out.println("Electric charging ...");
        //this.pay();
        electricService.pay();
    }
    public void pay() throws Exception {
        System.out.println("Pay with alipay ...");
        Thread.sleep(1000);
    }
}
方式二:从 AopContext 获取当前的 Proxy
修改 EnableAspectJAutoProxy 注解的 exposeProxy 属性,表示将代理对象放入到
ThreadLocal,这样才可以直接通过 AopContext.currentProxy() 的方式获取到;
import org.springframework.aop.framework.AopContext;
import org.springframework.stereotype.Service;
@Service
public class ElectricService {
    public void charge() throws Exception {
        System.out.println("Electric charging ...");
        ElectricService electric = ((ElectricService) AopContext.currentProxy());
        electric.pay();
    }
    public void pay() throws Exception {
        System.out.println("Pay with alipay ...");
        Thread.sleep(1000);
    }
}
@SpringBootApplication
@EnableAspectJAutoProxy(exposeProxy = true)
public class Application {
    // 省略非关键代码
}
同一个切面中,不同类型的增强方法被调用的顺序依次为
Around.class,
Before.class,
After.class,
AfterReturning.class,
AfterThrowing.class
//省略 imports
@Aspect
@Service
public class AopConfig {
    @Before("execution(* com.spring.puzzle.class6.example1.ElectricService.charge()) ")
    public void checkAuthority(JoinPoint pjp) throws Throwable {
        System.out.println("validating user authority");
        Thread.sleep(1000);
    }

    @Around("execution(* com.spring.puzzle.class6.example1.ElectricService.doCharge()) ")
    public void recordPerformance(ProceedingJoinPoint pjp) throws Throwable {
    long start = System.currentTimeMillis();
    pjp.proceed();
    // 会调用完 @Before 后回到这里
    long end = System.currentTimeMillis();
    System.out.println("charge method time cost: " + (end - start));
  }
}
当【同一个切面】包含【多个同一种类型】的多个增强,且【修饰】的都是【同一个方法】时,这多个增强的执行顺序为:
如果两个方法名长度相同,则依次比较每一个字母的 ASCII 码,ASCII 码越小,排序越靠前;
若长度不同,且短的方法名字符串是长的子集时,短的排序靠前
//省略 imports
@Aspect
@Service
public class AopConfig {
  @Before("execution(* com.spring.puzzle.class6.example2.ElectricService.charge())")
  public void logBeforeMethod(JoinPoint pjp) throws Throwable {
      System.out.println("step into ->"+pjp.getSignature());
  }
  @Before("execution(* com.spring.puzzle.class6.example2.ElectricService.charge()) ")
  public void checkAuthority(JoinPoint pjp) throws Throwable {
      throw new RuntimeException("authority check failed");
  }
}
这里对增强(Advisor)的排序,其实最后就是在比较字符 l (logBeforeMethod)和 字符 c(checkAuthority)。显然易见,checkAuthority() 的排序会靠前,从而被优先执行
在同一个切面配置中,如果存在多个不同类型的增强,那么其执行优先级是按照增强类型的特定顺序排列,依次的增强类型为
** Around.class, Before.class, After.class, **AfterReturning.class, AfterThrowing.class;
在同一个切面配置中,如果存在多个相同类型的增强,那么其执行优先级是按照该增强的方法名排序,排序方式依次为比较方法名的每一个字母,直到发现第一个不相同且 ASCII 码较小的字母
spring事件处理
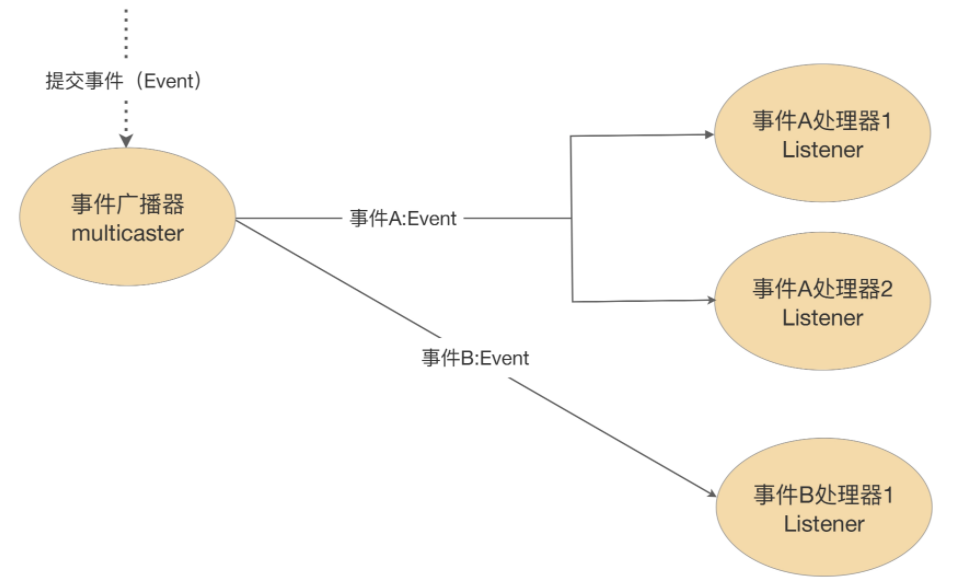
事件(Event):用来区分和定义不同的事件,在 Spring 中,常见的如 ApplicationEvent 和 AutoConfigurationImportEvent,它们都继承于 java.util.EventObject。
事件广播器(Multicaster):负责发布上述定义的事件。例如,负责发布 ApplicationEvent 的 ApplicationEventMulticaster 就是 Spring 中一种常见的广播器。
事件监听器(Listener):负责监听和处理广播器发出的事件,例如 ApplicationListener 就是用来处理 ApplicationEventMulticaster 发布的 ApplicationEvent,它继承于 JDK 的 EventListener
部分监听器失效
public class MyEvent extends ApplicationEvent {
    public MyEvent(Object source) {
        super(source);
    }
}

@Component
@Order(1)
public class MyFirstEventListener implements ApplicationListener<MyEvent> {

    Random random = new Random();

    @Override
    public void onApplicationEvent(MyEvent event) {
        log.info("{} received: {}", this.toString(), event);
        //模拟部分失效
        if(random.nextInt(10) % 2 == 1)
            throw new RuntimeException("exception happen on first listener");
    }
}

@Component
@Order(2)
public class MySecondEventListener implements ApplicationListener<MyEvent> {
    @Override
    public void onApplicationEvent(MyEvent event) {
        log.info("{} received: {}", this.toString(), event);
    }
}
最终事件的执行是由同一个线程按顺序来完成的,任何一个报错,都会导致后续的监听器执行不了
@RestController
@Slf4j
public class HelloWorldController {

    @Autowired
    private AbstractApplicationContext applicationContext;

    @RequestMapping(path = "publishEvent", method = RequestMethod.GET)
    public String notifyEvent(){
        log.info("start to publish event");
        applicationContext.publishEvent(new MyEvent(UUID.randomUUID()));
        return "ok";
    };
}
纠正案例:保证每个监听器的执行不会被其他监听器影响
@Component
@Order(1)
public class MyFirstEventListener implements ApplicationListener<MyEvent> {
    @Override
    public void onApplicationEvent(MyEvent event) {
        try {
          // 省略事件处理相关代码
        }catch(Throwable throwable){
            //write error/metric to alert
        }

    }
}
二、Spring Web 篇
解决@PathVariable 中:比如
@RequestMapping(path = "/hi1/{name}", method = RequestMethod.GET)
public String hello1(@PathVariable("name") String name){
       return name;
};
当 name 中间带有 / 的时候,会出现 404 :比如 abc
当 name 末尾带有 / 的时候,会将末尾的 / 去掉
解决方案:
private AntPathMatcher antPathMatcher = new AntPathMatcher();

@RequestMapping(path = "/hi1/**", method = RequestMethod.GET)
public String hi1(HttpServletRequest request){
    String path = (String) request.getAttribute(HandlerMapping.PATH_WITHIN_HANDLER_MAPPING_ATTRIBUTE);
    //matchPattern 即为"/hi1/**"
    String matchPattern = (String) request.getAttribute(HandlerMapping.BEST_MATCHING_PATTERN_ATTRIBUTE);
    return antPathMatcher.extractPathWithinPattern(matchPattern, path);
};
必须显式在 @RequestParam 中指定请求参数名:
具体修改如下:@RequestParam(“name”) String name
未考虑参数是否可选
通过案例解析,我们很容易就能修正这个问题,就是让参数有默认值或为非可选即可,具体方法包含以下几种。
1. 设置 @RequestParam 的默认值修改代码如下:
@RequestParam(value = “address”, defaultValue = “no address”) String address
2. 设置 @RequestParam 的 required 值修改代码如下:
@RequestParam(value = “address”, required = false) String address)
3. 标记任何名为 Nullable 且 RetentionPolicy 为 RUNTIME 的注解修改代码如下:
//org.springframework.lang.Nullable 可以
//edu.umd.cs.findbugs.annotations.Nullable 可以
@RequestParam(value = “address”) @Nullable String address
4. 修改参数类型为 Optional修改代码如下:
@RequestParam(value = “address”) Optional address
从这些修正方法不难看出:假设你不学习源码,解决方法就可能只局限于一两种,但是深入源码后,解决方法就变得格外多了。这里要特别强调的是:在 Spring Web 中,默认情况下,请求参数是必选项。
过滤器Filter:
这节课我们分析了过滤器在 Spring 框架中注册、包装以及实例化的整个流程,最后我们再次回顾下重点。
@WebFilter 和 @Component 的相同点是:它们最终都被包装并实例化成为了 FilterRegistrationBean;它们最终都是在 ServletContextInitializerBeans 的构造器中开始被实例化。
@WebFilter 和 @Component 的不同点是:
被 @WebFilter 修饰的过滤器会被提前在 BeanFactoryPostProcessors 扩展点包装成FilterRegistrationBean 类型的 BeanDefinition,然后在 ServletContextInitializerBeans.addServletContextInitializerBeans() 进行实例化;
而使用 @Component 修饰的过滤器类,是在 ServletContextInitializerBeans.addAdaptableBeans() 中被实例化成 Filter 类型后,再包装为 RegistrationBean 类型。被 @WebFilter 修饰的过滤器不会注入 Order 属性,但被 @Component 修饰的过滤器会在ServletContextInitializerBeans.addAdaptableBeans() 中注入 Order 属性
@ServletComponentScan + @WebFilter,这里我们不妨再以 @Component + Filter
Filter 背后的机制,即责任链模式:
职责链则是一个对象 把子任务交给 其他对象 的同名方法去完成
核心在于上下文 FilterChain 在不同对象 Filter 间的传递与状态的改变,通过这种链式串联,我们就可以对同一种对象资源实现不同业务场景的处理,达到业务解耦
StandardWrapperValve#invoke()
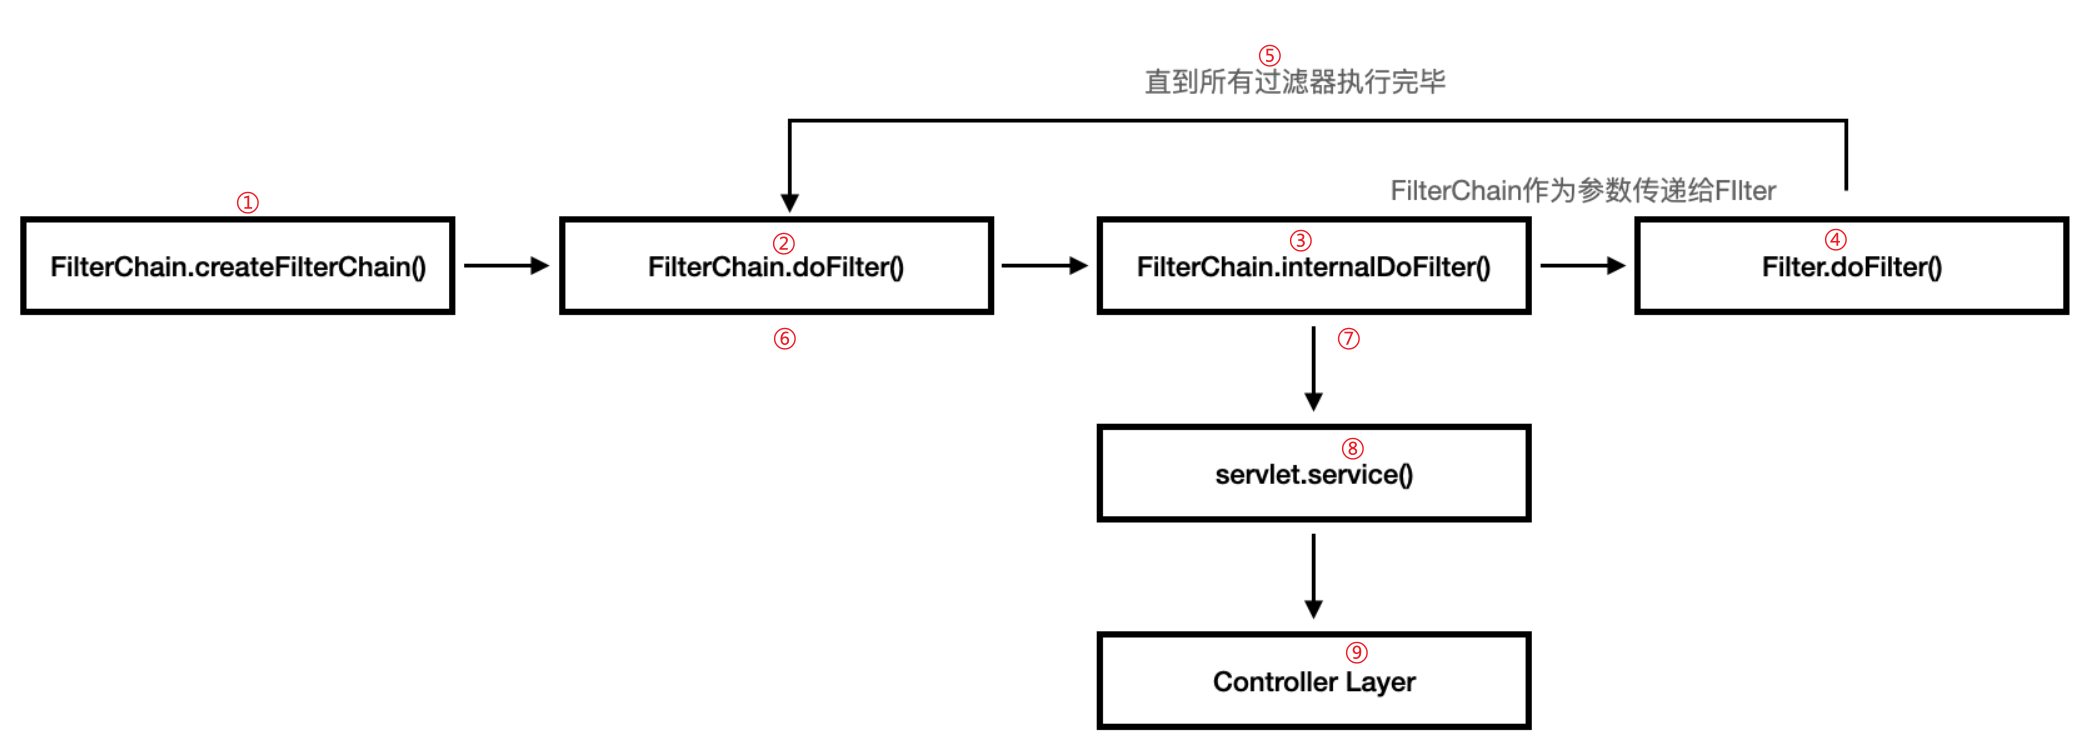
Spring 通过 ApplicationFilterFactory.createFilterChain() 创建 FilterChain,然后调用其 doFilter() 执行责任链。而这些步骤的起始点正是 StandardWrapperValve#invoke()
public final void invoke(Request request, Response response)
    throws IOException, ServletException {
    // 省略非关键代码
    // 创建filterChain
    ApplicationFilterChain filterChain =
        ApplicationFilterFactory.createFilterChain(request, wrapper, servlet);
// 省略非关键代码
try {
    if ((servlet != null) && (filterChain != null)) {
        // Swallow output if needed
        if (context.getSwallowOutput()) {
             // 省略非关键代码
             //执行filterChain
             filterChain.doFilter(request.getRequest(),
                            response.getResponse());
             // 省略非关键代码
         }
// 省略非关键代码
}
ApplicationFilterFactory.createFilterChain()
public static ApplicationFilterChain createFilterChain(ServletRequest request,
        Wrapper wrapper, Servlet servlet) {
    // 省略非关键代码
    ApplicationFilterChain filterChain = null;
    if (request instanceof Request) {
        // 省略非关键代码
        // 创建Chain
        filterChain = new ApplicationFilterChain();
        // 省略非关键代码
    }
    // 省略非关键代码
    // Add the relevant path-mapped filters to this filter chain
    for (int i = 0; i < filterMaps.length; i++) {
        // 省略非关键代码
        ApplicationFilterConfig filterConfig = (ApplicationFilterConfig)
            context.findFilterConfig(filterMaps[i].getFilterName());
        if (filterConfig == null) {
            continue;
        }
        // 增加filterConfig到Chain
        filterChain.addFilter(filterConfig);
    }

    // 省略非关键代码
    return filterChain;
}
它创建 FilterChain,并将所有 Filter 逐一添加到 FilterChain 中。然后我们继续查看 ApplicationFilterChain 类及其 addFilter():
// 省略非关键代码
private ApplicationFilterConfig[] filters = new ApplicationFilterConfig[0];
private int pos = 0;
private int n = 0;
// 省略非关键代码
void addFilter(ApplicationFilterConfig filterConfig) {
    for(ApplicationFilterConfig filter:filters)
        if(filter==filterConfig)
            return;

    if (n == filters.length) {
        ApplicationFilterConfig[] newFilters =
            new ApplicationFilterConfig[n + INCREMENT];
        System.arraycopy(filters, 0, newFilters, 0, n);
        filters = newFilters;
    }
    filters[n++] = filterConfig;
}
ApplicationFilterChain 的 doFilter()
public void doFilter(ServletRequest request, ServletResponse response)
    throws IOException, ServletException {
    if( Globals.IS_SECURITY_ENABLED ) {
        //省略非关键代码
        internalDoFilter(request,response);
        //省略非关键代码
    } else {
        internalDoFilter(request,response);
    }
}
private void internalDoFilter(ServletRequest request,
                              ServletResponse response){
    if (pos < n) {
        // pos会递增
        ApplicationFilterConfig filterConfig = filters[pos++];
        try {
            Filter filter = filterConfig.getFilter();
            // 省略非关键代码
            // 执行filter
            filter.doFilter(request, response, this);
            // 省略非关键代码
        }
        // 省略非关键代码
        return;
    }
        // 执行真正实际业务
        servlet.service(request, response);
    }
    // 省略非关键代码
}
ApplicationFilterChain 的 internalDoFilter() 是过滤器逻辑的核心;
ApplicationFilterChain 的成员变量 Filters 维护了所有用户定义的过滤器;
ApplicationFilterChain 的类成员变量 n 为过滤器总数,变量 pos 是运行过程中已经执行的过滤器个数;internalDoFilter() 每被调用一次,pos 变量值自增 1,即从类成员变量 Filters 中取下一个 Filter;filter.doFilter(request, response, this) 会调用过滤器实现的 doFilter(),注意第三个参数值为 this,即为当前 ApplicationFilterChain 实例 ,这意味着:用户需要在过滤器中显式调用一次 javax.servlet.FilterChain#doFilter,才能完成整个链路;
pos < n 意味着执行完所有的过滤器,才能通过 servlet.service(request, response) 去执行真正的业务
过滤器内抛出的异常 无法被全局异常捕获到:
@PostMapping("/regStudent/{name}")
@ResponseBody
public String saveUser(String name) throws Exception {
    System.out.println("......用户注册成功");
    return "success";
}


//去掉@WebFilter 和启动类@ServletComponentScan
@Order(10)
@Component
public class PermissionFilter implements Filter {
    @Override
    public void doFilter(ServletRequest request, ServletResponse response, FilterChain chain) throws IOException, ServletException {
        HttpServletRequest httpServletRequest = (HttpServletRequest) request;
        String token = httpServletRequest.getHeader("token");

        if (!"111111".equals(token)) {
            System.out.println("throw NotAllowException");
            // 抛出自定义异常
            throw new NotAllowException();
        }
        chain.doFilter(request, response);
    }
 }


 public class NotAllowException extends RuntimeException {
     public NotAllowException() {
          super();
     }
 }


// 全局异常捕获
@RestControllerAdvice
public class NotAllowExceptionHandler {
    @ExceptionHandler(NotAllowException.class)
    @ResponseBody
    public String handle() {
        System.out.println("403");
        return "{\"resultCode\": 403}";
    }
}
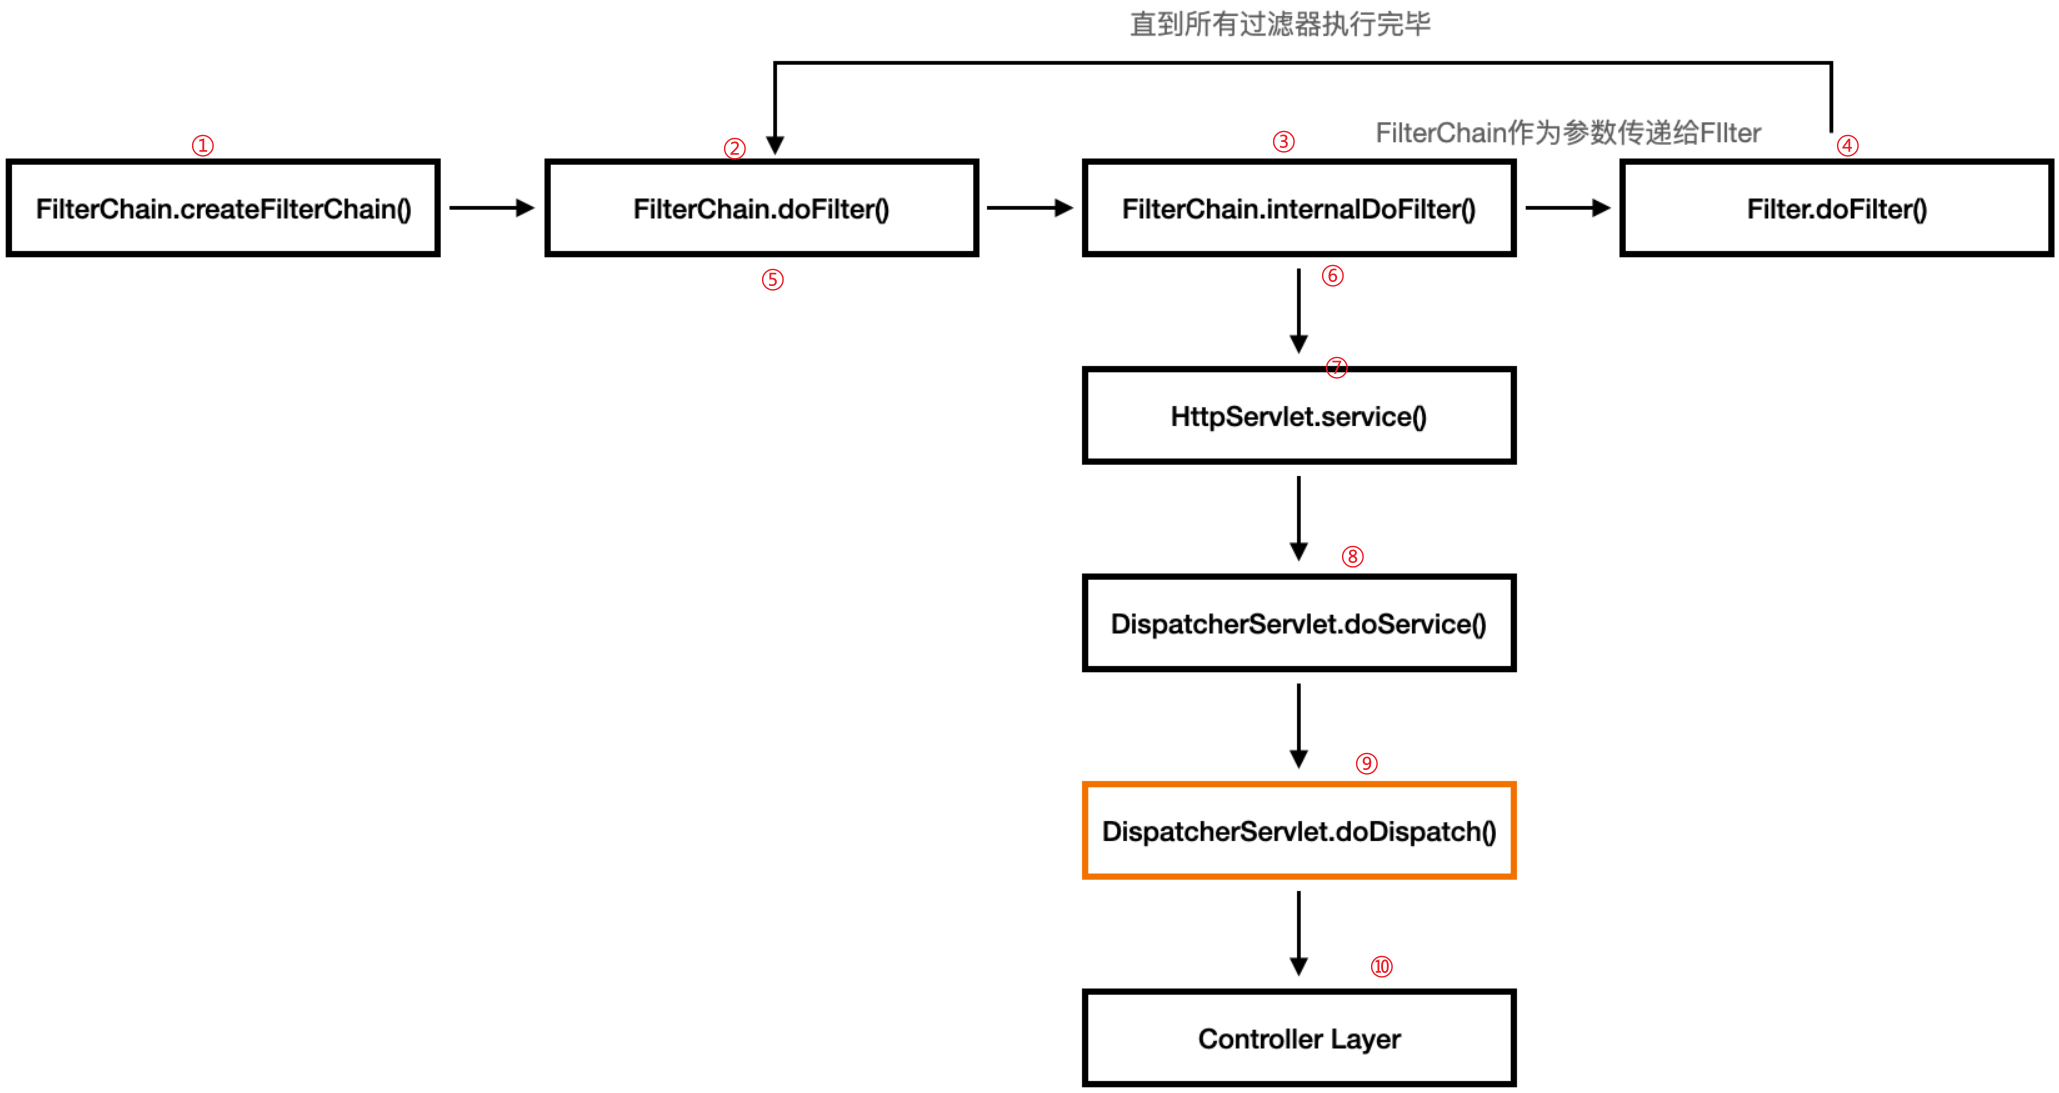
当所有的过滤器被执行完毕以后,Spring 才会进入 Servlet 相关的处理,而 DispatcherServlet 才是整个 Servlet 处理的核心,它是前端控制器设计模式的实现,提供 Spring Web MVC 的集中访问点并负责职责的分派
异常处理发生在上图的红色区域,即 DispatcherServlet 中的 doDispatch(),而此时,过滤器已经全部执行完毕了
手动捕获异常,并将异常 HandlerExceptionResolver 进行解析处理
我们可以这样修改 PermissionFilter,注入 HandlerExceptionResolver:
//去掉@WebFilter 和启动类@ServletComponentScan
@Order(10)
@Component
public class PermissionFilter implements Filter {

    @Autowired
    @Qualifier("handlerExceptionResolver")
    private HandlerExceptionResolver resolver;

    @Override
    public void doFilter(ServletRequest request, ServletResponse response, FilterChain chain) throws IOException, ServletException {
        HttpServletRequest httpServletRequest = (HttpServletRequest) request;
        String token = httpServletRequest.getHeader("token");

        if (!"111111".equals(token)) {
            System.out.println("throw NotAllowException");
            // 抛出自定义异常
            resolver.resolveException(httpServletRequest, httpServletResponse,
             null, new NotAllowException());
             return;
        }
        chain.doFilter(request, response);
    }
 }

 public class NotAllowException extends RuntimeException {
     public NotAllowException() {
          super();
     }
 }


// 全局异常捕获
@RestControllerAdvice
public class NotAllowExceptionHandler {
    @ExceptionHandler(NotAllowException.class)
    @ResponseBody
    public String handle() {
        System.out.println("403");
        return "{\"resultCode\": 403}";
    }
}
全局拦截自定义 404 返回
WebMvcAutoConfiguration 类中 addResourceHandlers() 的前两行代码吗?如果 this.resourceProperties.isAddMappings() 为 false,那么此处直接返回,后续的两个 ResourceHandler 也不会被添加。
public void addResourceHandlers(ResourceHandlerRegistry registry) {
   if (!this.resourceProperties.isAddMappings()) {
      logger.debug("Default resource handling disabled");
      return;
   }
   //省略非关键代码
}
其调用 ResourceProperties 中的 isAddMappings() 的代码如下:

public boolean isAddMappings() {
   return this.addMappings;
}
答案也就呼之欲出了,增加两个配置文件如下:
# # 关闭spring自带的映射,会导致swagger也不能访问,需指定swagger的静态资源处理
spring.resources.add-mappings=false
# 允许mvc抛出404异常
spring.mvc.throwExceptionIfNoHandlerFound=true
处理swagger不能访问的问题
package cn.mesmile.admin.common.config.swagger;

import org.springframework.context.annotation.Configuration;
import org.springframework.web.servlet.config.annotation.ResourceHandlerRegistry;
import org.springframework.web.servlet.config.annotation.WebMvcConfigurer;

/**
 * @author zb
 * @Description
 *     # 关闭spring自带的映射,会导致swagger也不能访问,需指定swagger的静态资源处理
 *     spring.web.resources.add-mappings: false  会导致swagger也不能访问
 */
@Configuration
public class SwaggerResourceMvcConfig implements WebMvcConfigurer {

    /**
     * 需指定swagger的静态资源处理
     */
    @Override
    public void addResourceHandlers(ResourceHandlerRegistry registry) {
        // 这里加上任意路径后会去匹配上,/error 资源,返回默认的404页面,所以这里先注释
//        registry.addResourceHandler("/**").addResourceLocations("classpath:/static/");

        /** 配置knife4j 显示文档 */
        registry.addResourceHandler("doc.html")
                .addResourceLocations("classpath:/META-INF/resources/");
        /**
         * 配置swagger-ui显示文档
         */
        registry.addResourceHandler("swagger-ui.html")
                .addResourceLocations("classpath:/META-INF/resources/");
        /** 公共部分内容 */
        registry.addResourceHandler("/webjars/**")
                .addResourceLocations("classpath:/META-INF/resources/webjars/");
    }

}
全局拦截404异常
// 全局异常捕获
@RestControllerAdvice
public class NotAllowExceptionHandler {

    @ExceptionHandler({NoHandlerFoundException.class,HttpRequestMethodNotSupportedException.class})
    @ResponseBody
    @ResponseStatus(HttpStatus.NOT_FOUND)
    public String handle() {
        System.out.println("404");
        return "{\"resultCode\": 404}";
    }
}
三、Spirng 补充篇
SringRedisTemplate 和 RedisTemplate 序列化方式不同
StringRedisSerializer 为例简单看下。查看下面的代码,它是 StringRedisSerializer 的构造器,在构造器中,它直接指定了 KeySerializer 为 RedisSerializer.string():
public class StringRedisTemplate extends RedisTemplate<String, String> {

   public StringRedisTemplate() {
      setKeySerializer(RedisSerializer.string());
      setValueSerializer(RedisSerializer.string());
      setHashKeySerializer(RedisSerializer.string());
      setHashValueSerializer(RedisSerializer.string());
   }
}


public class StringRedisSerializer implements RedisSerializer<String> {

   private final Charset charset;

   @Override
   public byte[] serialize(@Nullable String string) {
      return (string == null ? null : string.getBytes(charset));
   }

}
RedisTemplate序列化方式示例:
public class JdkSerializationRedisSerializer implements RedisSerializer<Object> {


   @Override
   public byte[] serialize(@Nullable Object object) {
      if (object == null) {
         return SerializationUtils.EMPTY_ARRAY;
      }
      try {
         return serializer.convert(object);
      } catch (Exception ex) {
         throw new SerializationException("Cannot serialize", ex);
      }
   }
}
spring事务相关:
Spring 处理事务的时候,如果没有在 @Transactional 中配置 rollback 属性,那么只有捕获到 RuntimeException 或者 Error 的时候才会触发回滚操作。而我们案例抛出的异常是 Exception,又没有指定与之匹配的回滚规则,所以我们不能触发回滚。
@Transactional 对 private 方法不生效,所以我们应该把需要支持事务的方法声明为 public 类型;
嵌套事务回滚错误
期望 regCourse 回滚,然后 saveStudent不回滚
因为在 saveStudent() 上声明了一个外部的事务,就已经存在一个事务了,在 propagation 值为默认的 REQUIRED 的情况下, regCourse() 就会加入到已有的事务中,两个方法共用一个事务
  // 外层事务
  @Transactional(rollbackFor = Exception.class)
  public void saveStudent(String realname) throws Exception {
      //......省略逻辑代码.....
      studentService.doSaveStudent(student);
      try {
        // 嵌套的内层事务
        @Transactional(rollbackFor = Exception.class)
        public void regCourse(int studentId) throws Exception {
           // 内部抛出异常
          //......省略逻辑代码.....
        }
      } catch (Exception e) {
          e.printStackTrace();
      }
  }
Spring 默认的事务传播属性为 REQUIRED,如我们之前介绍的,它的含义是:如果本来有事务,则加入该事务,如果没有事务,则创建新的事务,因而内外两层事务都处于同一个事务中。所以,当我们在 regCourse() 中抛出异常,并触发了回滚操作时,这个回滚会进一步传播,从而把 saveStudent() 也回滚了。最终导致整个事务都被回滚了。
要想实现 期望regCourse 回滚,然后 saveStudent不回滚
我们只需要对传播属性进行修改,把类型改成 REQUIRES_NEW 就可以,这样每次 regCourse 都会创建一个新的事务,就不会影响到 saveStudent
@Transactional(rollbackFor = Exception.class, propagation = Propagation.REQUIRES_NEW)
public void regCourse(int studentId) throws Exception {
    studentCourseMapper.saveStudentCourse(studentId, 1);
    courseMapper.addCourseNumber(1);
    throw new Exception("注册失败");
}
RestTemplate
MultiValueMap 以 表单 的形式
Map<String, Object> 以json的形式
RestTemplate template = new RestTemplate();

Map<String, Object> paramMap = new HashMap<String, Object>();
paramMap.put("para1", "001");
paramMap.put("para2", "002");

String url = "http://localhost:8080/hi";

// Map<String, Object> paramMap在这里是以 json 请求出去的
String result = template.postForObject(url, paramMap, String.class);
System.out.println(result);

// ============================================================================

//修正代码:
MultiValueMap<String, Object> paramMap = new LinkedMultiValueMap<String, Object>();
paramMap.add("para1", "001");
paramMap.add("para2", "002");

// MultiValueMap<String, Object> paramMap 在这里是以 form表单 请求出去的
String result = template.postForObject(url, paramMap, String.class);
System.out.println(result);
当 URL 中含有特殊字符
String url = "http://localhost:8080/hi?para1=1#2";
UriComponentsBuilder builder = UriComponentsBuilder.fromHttpUrl(url);
URI uri = builder.build().encode().toUri();
HttpEntity<?> entity = new HttpEntity<>(null);

RestTemplate restTemplate = new RestTemplate();
HttpEntity<String> response = restTemplate.exchange(uri, HttpMethod.GET,entity,String.class);

System.out.println(response.getBody());
避免多次 URL Encode
RestTemplate restTemplate = new RestTemplate();
UriComponentsBuilder builder = UriComponentsBuilder.fromHttpUrl("http://localhost:8080/hi");
builder.queryParam("para1", "开发测试 001");
URI url = builder.encode().build().toUri();

ResponseEntity<String> forEntity = restTemplate.getForEntity(url, String.class);
System.out.println(forEntity.getBody());
一、spring依赖注入常见错误
1.1 Bean的注入
如果一个类名是以两个大写字母开头的,则首字母不变,其它情况下默认首字母变成小写。结合我们之前的案例,SQLiteDataService 的 Bean,其名称应该就是类名本身,而 CassandraDataService 的 Bean 名称则变成了首字母小写(cassandraDataService)
内部类的Bean
public class StudentController {
    @Repository
    public static class InnerClassDataService implements DataService{
        @Override
        public void deleteStudent(int id) {
          //空实现
        }
    }
    //省略其他非关键代码
 }
内部类正确引用方式
@Autowired
@Qualifier("studentController.InnerClassDataService")
DataService innerClassDataService;
@Qualifier 可以引用想匹配的 Bean,也可以直接命名属性的名称为 Bean 的名称来引用,这两种方式如下:
//方式1:属性命名为要装配的bean名称
@Autowired
DataService oracleDataService;

//方式2:使用@Qualifier直接引用
@Autowired
@Qualifier("oracleDataService")
DataService dataService;
1.2 @Value注解
@Value 更多是用来装配 String,而且它支持多种强大的装配方式,典型的方式参考下面的示例
//注册正常字符串
@Value("我是字符串")
private String text;

//注入系统参数、环境变量或者配置文件中的值
@Value("${ip}")
private String ip

//注入其他Bean属性,其中student为bean的ID,name为其属性
@Value("#{student.name}")
private String name;
@Value 没有注入预期的值
配置文件扫描源:
[ConfigurationPropertySourcesPropertySource {name='configurationProperties'},
StubPropertySource {name='servletConfigInitParams'}, ServletContextPropertySource {name='servletContextInitParams'}, PropertiesPropertySource {name='systemProperties'}, OriginAwareSystemEnvironmentPropertySource {name='systemEnvironment'}, RandomValuePropertySource {name='random'},
OriginTrackedMapPropertySource {name='applicationConfig: classpath:/application.properties]'},
MapPropertySource {name='devtools'}]
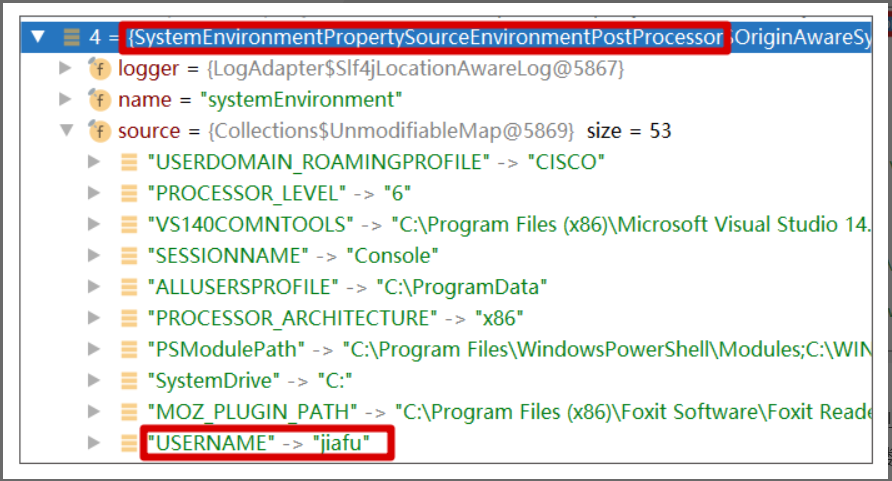
如果系统中已经存在同名的 属性,那么在 application.yml中自定义的属性可能会获取不到预期值
1.3 Bean生命周期
import org.springframework.beans.factory.annotation.Autowired;
import org.springframework.stereotype.Component;
@Component
public class LightMgrService {
  @Autowired
  private LightService lightService;

  public LightMgrService() {
    // 使用 @Autowired 直接标记在成员属性上而引发的装配行为是发生在构造器执行之后的
    // 所以这里会报 NullPointerException
    lightService.check();
  }

}
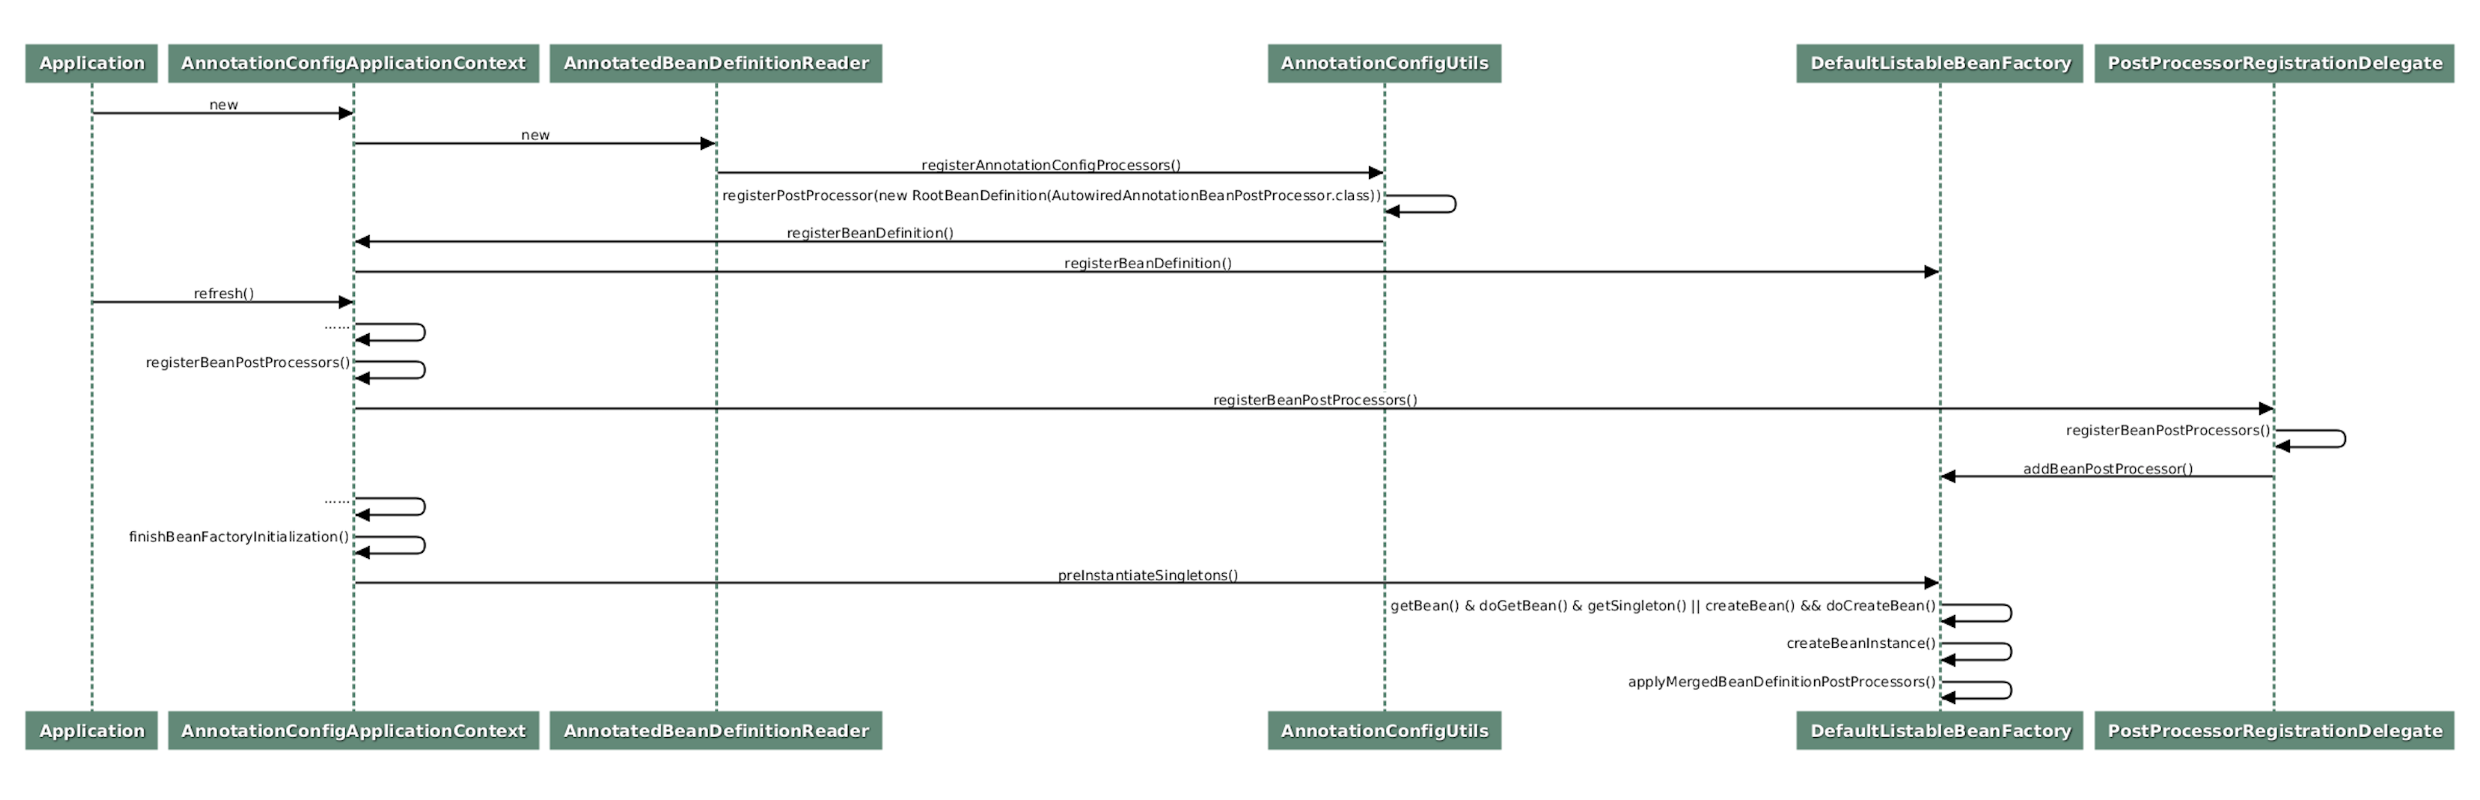
第一部分,将一些必要的系统类,比如 Bean 的后置处理器类,注册到 Spring 容器,其中就包括我们这节课关注的 CommonAnnotationBeanPostProcessor 类;
第二部分,将这些后置处理器实例化,并注册到 Spring 的容器中;
第三部分,实例化所有用户定制类,调用后置处理器进行辅助装配、类初始化等等。
第三部分,即 Spring 初始化单例类的一般过程,基本都是 getBean()->doGetBean()->getSingleton(),如果发现 Bean 不存在,则调用 createBean()->doCreateBean() 进行实例化
protected Object doCreateBean(final String beanName, final RootBeanDefinition mbd, final @Nullable Object[] args)
    throws BeanCreationException {
    //省略非关键代码
  if (instanceWrapper == null) {
    // 实例不存在则创建
    instanceWrapper = createBeanInstance(beanName, mbd, args);
  }
  final Object bean = instanceWrapper.getWrappedInstance();

    //省略非关键代码
    Object exposedObject = bean;
    try {
       // 自动装配Bean
       populateBean(beanName, mbd, instanceWrapper);
       exposedObject = initializeBean(beanName, exposedObject, mbd);
    }
    catch (Throwable ex) {
    //省略非关键代码
}
上述代码完整地展示了 Bean 初始化的三个关键步骤,按执行顺序分别是第 5 行的 createBeanInstance,第 12 行的 populateBean,以及第 13 行的 initializeBean,分别对应实例化 Bean,注入 Bean 依赖,以及初始化 Bean (例如执行 @PostConstruct 标记的方法 )这三个功能,这也和上述时序图的流程相符。
而用来实例化 Bean 的 createBeanInstance 方法通过依次调用 DefaultListableBeanFactory.instantiateBean() >SimpleInstantiationStrategy.instantiate(),最终执行到 BeanUtils.instantiateClass(),其代码如下
public static <T> T instantiateClass(Constructor<T> ctor, Object... args) throws BeanInstantiationException {
   Assert.notNull(ctor, "Constructor must not be null");
   try {
      ReflectionUtils.makeAccessible(ctor);
      return (KotlinDetector.isKotlinReflectPresent() && KotlinDetector.isKotlinType(ctor.getDeclaringClass()) ?
            KotlinDelegate.instantiateClass(ctor, args) : ctor.newInstance(args));
   }
   catch (InstantiationException ex) {
      throw new BeanInstantiationException(ctor, "Is it an abstract class?", ex);
   }
   //省略非关键代码
}
最终将调用 ctor.newInstance() 方法实例化用户定制类 LightMgrService,而默认构造器显然是在类实例化的时候被自动调用的,Spring 也无法控制。而此时负责自动装配的 populateBean 方法还没有被执行,LightMgrService 的属性 LightService 还是 null
解决办法:
1.使用构造器参数来隐式注入是一种 Spring 最佳实践
@Component
public class LightMgrService {

    private LightService lightService;

    public LightMgrService(LightService lightService) {
        this.lightService = lightService;
        lightService.check();
    }
}
2.添加 init 方法,并且使用 PostConstruct 注解进行修饰:
import org.springframework.beans.factory.annotation.Autowired;
import org.springframework.stereotype.Component;
@Component
public class LightMgrService {
  @Autowired
  private LightService lightService;

  @PostConstruct
  public void init() {
       lightService.check();
  }
}
3.实现 InitializingBean 接口,在其 afterPropertiesSet() 方法中执行初始化代码
import org.springframework.beans.factory.InitializingBean;
import org.springframework.beans.factory.annotation.Autowired;
import org.springframework.stereotype.Component;
@Component
public class LightMgrService implements InitializingBean {
    @Autowired
    private LightService lightService;

    @Override
    public void afterPropertiesSet() throws Exception {
        lightService.check();
    }
}
意外触发 shutdown 方法
只有通过使用 Bean 注解注册到 Spring 容器的对象,才会在 Spring 容器被关闭的时候自动调用 shutdown 方法,而使用 @Component(Service 也是一种 Component)将当前类自动注入到 Spring 容器时,shutdown 方法则不会被自动执行
public class LightService {
  //省略其他非关键代码
  public void shutdown(){
    System.out.println("shutting down all lights");
  }
  //省略其他非关键代码
}


import org.springframework.context.annotation.Bean;
import org.springframework.context.annotation.Configuration;
@Configuration
public class BeanConfiguration {
    @Bean
    public LightService getTransmission(){
        return new LightService();
    }
}


@SpringBootApplication
public class Application {
    public static void main(String[] args) {
        ConfigurableApplicationContext context = SpringApplication.run(Application.class, args);
        context.close();
    }
}
doCreateBean 管理了 Bean 的整个生命周期中几乎所有的关键节点,直接负责了 Bean 对象的生老病死, 其主要功能包括:
Bean 实例的创建;
Bean 对象依赖的注入;
定制类初始化方法的回调;
Disposable 方法的注册。
避免在 Java 类中定义一些带有特殊意义动词的方法来解决,当然如果一定要定义名为 close 或者 shutdown 方法,也可以通过将 Bean 注解内 destroyMethod 属性设置为空的方式来解决这个问题。
import org.springframework.context.annotation.Bean;
import org.springframework.context.annotation.Configuration;
@Configuration
public class BeanConfiguration {
    // 指定销毁方法,或者设置为空,就不会调用shudown方法了
    @Bean(destroyMethod="")
    public LightService getTransmission(){
        return new LightService();
    }
}
当我们不在 Configuration 注解类中使用 Bean 方法将其注入 Spring 容器,而是坚持使用 @Service 将其自动注入到容器,同时实现 Closeable 接口,代码如下:
import org.springframework.stereotype.Component;
import java.io.Closeable;
@Service
public class LightService implements Closeable {
    public void close() {
        System.out.println("turn off all lights);
    }
    //省略非关键代码
}
接口方法 close() 也会在 Spring 容器被销毁的时候自动执行
1.4 aop常见错误
只有引用的是被动态代理创建出来的对象,才会被 Spring 增强,具备 AOP 该有的功能
直接访问被拦截类的属性抛空指针异常
aop执行顺序
返回当前传递的增强注解在 this.instanceOrder 中的序列值,序列值越小,则越靠前。而结合之前构造参数传递的顺序,我们很快就能判断出:最终的排序结果依次是 Around.class, Before.class, After.class, AfterReturning.class, AfterThrowing.class。
到此为止,答案也呼之欲出:this.instanceOrder 的排序,即为不同类型增强的优先级,排序越靠前,优先级越高。
结合之前的讨论,我们可以得出一个结论:同一个切面中,不同类型的增强方法被调用的顺序依次为 Around.class, Before.class, After.class, AfterReturning.class, AfterThrowing.class。

汇聚全球AI编程工具,助力开发者即刻编程。
更多推荐
 20
20 0
0- 0


 已为社区贡献15条内容

所有评论(0)