
自己动手写一个spring之IOC_3
写在前面
本文来继续增加IOC部分的功能,增加基于@Autowired注解注入bean的功能。
源码 。
1:正文
1.1:目录结构调整
先来调整下目录结构,这样更加清晰,如下: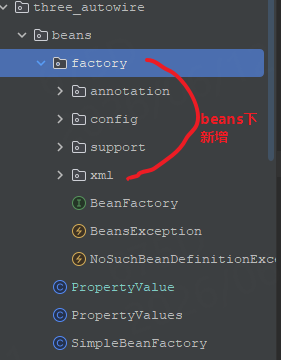
1.2:代码调整
首先在annotation包中定义注解类:
// com.hc.minispring.ioc.three_autowire.beans.factory.annotation.Autowired
@Target(ElementType.FIELD)
@Retention(RetentionPolicy.RUNTIME)
public @interface Autowired {

}
注解必须解析才会生效,否则就是注释,那么我们什么时候来解析呢?当前程序处理bean的顺序如下:创建bean实例->初始化(执行自定义init-method),很明显肯定要创建bean实例之后,为了更加精细的控制bean实例的创建过程,可以在初始化的前后都加入相关的处理逻辑,如下:创建bean实例->初始化前执行逻辑->初始化(执行之定义init-method)->初始化后执行逻辑,因为init-method执行的逻辑可能需要依赖注入的属性,所以注解解析的工作必须在初始化前执行逻辑完成,针对初始化前执行逻辑+初始化后执行逻辑我们来定义一个接口来落地职责:
// com.hc.minispring.ioc.three_autowire.beans.factory.config.BeanPostProcessor
/**
 * 后置bean处理器
 * 这里的是相对于createBean而言的
 */
public interface BeanPostProcessor {
	// creatBean之后,init-method执行之前调用的方法
	Object postProcessBeforeInitialization(Object bean, String beanName) throws BeansException;

	// creatBean之后,init-method执行之后调用的方法
	Object postProcessAfterInitialization(Object bean, String beanName) throws BeansException;

}
自然要给出针对@Autowired注解的后置bean处理器实现类,如下:
// com.hc.minispring.ioc.three_autowire.beans.factory.annotation.AutowiredAnnotationBeanPostProcessor
**
* 专门处理@Autowired注解的后置bean处理器,即基于@Autowired注解注入bean
*/
public class AutowiredAnnotationBeanPostProcessor implements BeanPostProcessor {
    private AutowireCapableBeanFactory beanFactory;

    @Override
    public Object postProcessBeforeInitialization(Object bean, String beanName) throws BeansException {
        Object result = bean;

        Class<?> clazz = result.getClass();
        Field[] fields = clazz.getDeclaredFields();
        if(fields!=null){
            for(Field field : fields){
                boolean isAutowired = field.isAnnotationPresent(Autowired.class);
                if(isAutowired){
                    String fieldName = field.getName();
                    Object autowiredObj = this.getBeanFactory().getBean(fieldName);
                    try {
                        field.setAccessible(true);
                        field.set(bean, autowiredObj);
                        System.out.println("autowire " + fieldName + " for bean " + beanName);
                    } catch (IllegalArgumentException e) {
                        e.printStackTrace();
                    } catch (IllegalAccessException e) {
                        e.printStackTrace();
                    }

                }
            }
        }

        return result;
    }
    // ...
}
就是通过代码boolean isAutowired = field.isAnnotationPresent(Autowired.class);判断是否配置了@Autowired注解,从而判断是否注入bean,这里用到的AutowireCapableBeanFactory beanFactorybean工厂我们也需要来定义出来,其具备维护使用了@Autowired注解的bean的能力,如下:
// com.hc.minispring.ioc.three_autowire.beans.factory.config.AutowireCapableBeanFactory
/**
 * 拥有维护使用了@Autowired注解的bean能力的bean工程,即能够基于@Autowired注解注入bean
 */
public class AutowireCapableBeanFactory extends AbstractBeanFactory {
    private final List<AutowiredAnnotationBeanPostProcessor> beanPostProcessors = new ArrayList<AutowiredAnnotationBeanPostProcessor>();

    public void addBeanPostProcessor(AutowiredAnnotationBeanPostProcessor beanPostProcessor) {
        this.beanPostProcessors.remove(beanPostProcessor);
        this.beanPostProcessors.add(beanPostProcessor);
    }
    public int getBeanPostProcessorCount() {
        return this.beanPostProcessors.size();
    }
    public List<AutowiredAnnotationBeanPostProcessor> getBeanPostProcessors() {
        return this.beanPostProcessors;
    }

    public Object applyBeanPostProcessorsBeforeInitialization(Object existingBean, String beanName)
            throws BeansException {

        Object result = existingBean;
        for (AutowiredAnnotationBeanPostProcessor beanProcessor : getBeanPostProcessors()) {
            beanProcessor.setBeanFactory(this);
            result = beanProcessor.postProcessBeforeInitialization(result, beanName);
            if (result == null) {
                return result;
            }
        }
        return result;
    }

    public Object applyBeanPostProcessorsAfterInitialization(Object existingBean, String beanName)
            throws BeansException {

        Object result = existingBean;
        for (BeanPostProcessor beanProcessor : getBeanPostProcessors()) {
            result = beanProcessor.postProcessAfterInitialization(result, beanName);
            if (result == null) {
                return result;
            }
        }
        return result;
    }

}
最后需要修改applicationcontext类使用新的bean工厂类完成bean的解析工作,如下:
// com.hc.minispring.ioc.three_autowire.context.ClassPathXmlApplicationContext
public class ClassPathXmlApplicationContext implements BeanFactory, ApplicationEventPublisher {
    AutowireCapableBeanFactory beanFactory;
    private final List<BeanFactoryPostProcessor> beanFactoryPostProcessors =
            new ArrayList<BeanFactoryPostProcessor>();

    public ClassPathXmlApplicationContext(String fileName) {
        this(fileName, true);
    }

    public ClassPathXmlApplicationContext(String fileName, boolean isRefresh) {
        Resource res = new ClassPathXmlResource(fileName);
        AutowireCapableBeanFactory bf = new AutowireCapableBeanFactory();
        XmlBeanDefinitionReader reader = new XmlBeanDefinitionReader(bf);
        reader.loadBeanDefinitions(res);

        this.beanFactory = bf;

        if (isRefresh) {
            try {
                refresh();
            } catch (IllegalStateException e) {
                e.printStackTrace();
            } catch (BeansException e) {
                e.printStackTrace();
            }
        }
    }

    // ...

    public void refresh() throws BeansException, IllegalStateException {
        // Register bean processors that intercept bean creation.
        registerBeanPostProcessors(this.beanFactory);

        // Initialize other special beans in specific context subclasses.
        onRefresh();
    }

    private void registerBeanPostProcessors(AutowireCapableBeanFactory bf) {
        //if (supportAutowire) {
        // 简单起见,直接硬编码,是那回事就行
        bf.addBeanPostProcessor(new AutowiredAnnotationBeanPostProcessor());
        //}
    }

    private void onRefresh() {
        this.beanFactory.refresh();
    }

}
通过方法bf.addBeanPostProcessor(new AutowiredAnnotationBeanPostProcessor());来添加针对@Autowired注解的后置bean处理器。
2:测试
xml:
<?xml version="1.0" encoding="UTF-8"?>
<beans>
    <bean id="bbs" class="com.hc.minispring.ioc.three_autowire.test.BaseBaseService" init-method="init">
        <property type="com.hc.minispring.ioc.three_autowire.test.AServiceImpl" name="as" ref="aservice"/>
    </bean>
    <bean id="aservice" class="com.hc.minispring.ioc.three_autowire.test.AServiceImpl">
        <constructor-arg type="String" name="name" value="abc"/>
        <constructor-arg type="int" name="level" value="3"/>
        <property type="String" name="property1" value="Someone says"/>
        <property type="String" name="property2" value="Hello World!"/>
        <property type="com.hc.minispring.ioc.three_autowire.test.BaseService" name="ref1" ref="baseservice"/>
    </bean>
    <bean id="baseservice" class="com.hc.minispring.ioc.three_autowire.test.BaseService" init-method="init">
    </bean>

</beans>
bean:
public class BaseService {
	@Autowired
	private BaseBaseService bbs;

	// ...
}
测试类:
public class Test1 {

	public static void main(String[] args) {
		ClassPathXmlApplicationContext ctx = new ClassPathXmlApplicationContext("three_ioc/beans.xml");
	    AService aService;
	    BaseService bService;
		try {
		    bService = (BaseService)ctx.getBean("baseservice");
		    bService.sayHello();
		} catch (BeansException e) {
			e.printStackTrace();
		}
	}

}
运行:
Base Service says hello
bean injected by annotation @Autowired run...

Process finished with exit code 0
写在后面
参考文章列表

汇聚全球AI编程工具,助力开发者即刻编程。
更多推荐

 4
4 0
0- 0


 已为社区贡献5条内容

所有评论(0)