
Jmeter请求nginx配置鉴权访问问题
·
nginx设置安全认证
nginx配置
根据路径配置
upstream user {
    server 127.0.0.1:10100;
}
location / {
    root /file;
    include /etc/nginx/conf.d/cors-user.cfg;
    index index.htm index.html;

    proxy_pass http://user;  # 127.0.0.1:10100;
    auth_basic "YiXian Pwd";
    auth_basic_user_file /etc/nginx/sslkey/passwd.db;
}
登录校验
用户名
访问user.wish.cn网站的web接口,nginx鉴权,要求登录才允许访问。
密码
要求输入密码后,才允许访问网站。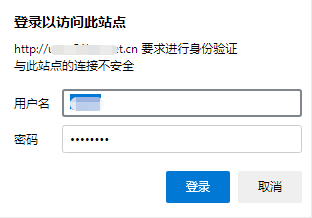
jmeter配置
新建线程组
创建线程组
新建http请求
1、选择线程组
2、添加取样器->http请求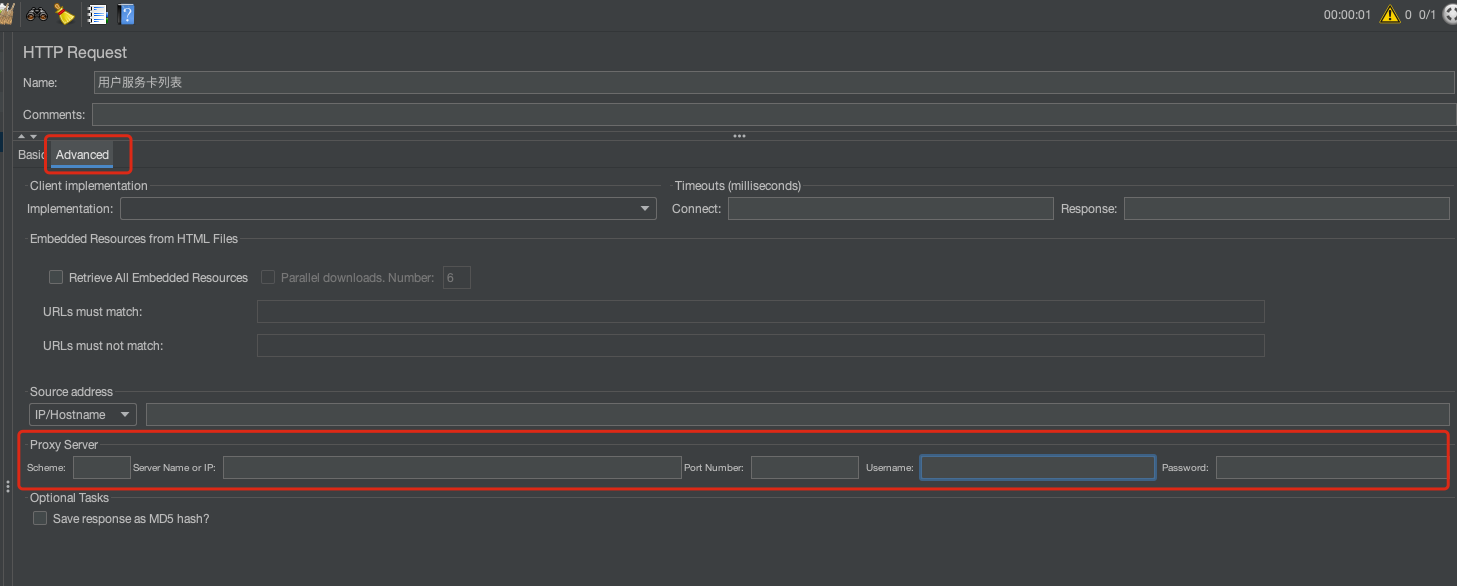
在请求的高级设置中,设置代理的服务器地址,端口号,用户名及密码即可。
填写请求信息
基本信息维护
1、协议:http
2、路径:接口地址
3、请求类型
4、参数
nginx安全信息填写
http请求高级配置
1、代理服务器域名:user.wish.cn
2、代理服务器端口号:80
3、用户名:qwerqwer
4、密码:1qaz2wsx
http请求Nginx授权
js方式
ajax调用时,ajax的url采用
http://username:password@ip:port/service
header方式
String urlString = "http://user.wish.cn/authcode?sid=123321"; // 替换为你的Nginx服务器地址和需要访问的URL
String userCredentials = "qwerqwer:1qaz2wsx"; // 替换为你的用户名和密码
String encodedCredentials = Base64.getEncoder().encodeToString(userCredentials.getBytes(StandardCharsets.UTF_8));

try {
    URL url = new URL(urlString);
    HttpURLConnection connection = (HttpURLConnection) url.openConnection();
    connection.setRequestMethod("GET");
    connection.setRequestProperty("Authorization", "Basic " + encodedCredentials);

    int responseCode = connection.getResponseCode();
    if (responseCode == HttpURLConnection.HTTP_OK) { // 200
        BufferedReader in = new BufferedReader(new InputStreamReader(connection.getInputStream()));
        String inputLine;
        StringBuilder response = new StringBuilder();
        while ((inputLine = in.readLine()) != null) {
            response.append(inputLine);
        }
        in.close();
        System.out.println(response.toString());
    } else {
        System.out.println("GET request not worked");
    }
} catch (Exception e) {
    e.printStackTrace();
}

汇聚全球AI编程工具,助力开发者即刻编程。
更多推荐

 2
2 0
0- 0


 已为社区贡献1条内容

所有评论(0)