
【mybatis-----】【学习】----Mybatis入门到精通详细教程
文章目录
第2章:文章介绍
以下为2020年gg的mybatis笔记
第3章:CRUD增删改查
3.1、创建库,实体
-- 创建库
CREATE DATABASE mp;

-- 使用库
USE mp;

-- 创建表
CREATE TABLE tbl_employee(
    id INT(11) PRIMARY KEY AUTO_INCREMENT,
    last_name VARCHAR(50),
    email VARCHAR(50),
    gender CHAR(1),
    age int
);

INSERT INTO tbl_employee(last_name,email,gender,age) VALUES('Tom','tom@zgb.com',1,22);
INSERT INTO tbl_employee(last_name,email,gender,age) VALUES('Jerry','jerry@zgb.com',0,25);
INSERT INTO tbl_employee(last_name,email,gender,age) VALUES('Black','black@zgb.com',1,30);
INSERT INTO tbl_employee(last_name,email,gender,age) VALUES('White','white@zgb.com',0,35);
@TableId 实体类字段加注解
/*
 * @TableId:
 *          value: 指定表中的主键列的列名,如果实体属性名与列名一致,可以省略不指定。
 *          type: 指定主键策略。
 */
@TableId(value="id", type = IdType.AUTO)
private Integer id;    // int
private String lastName;
private String email;
注入全局配置规则
 <!-- 注入全局MP策略配置 -->
<property name="globalConfig" ref="globalConfiguration"></property>
</bean>

<!-- 定义MybatisPlus的全局策略配置 -->
<bean id="globalConfiguration" class="com.baomidou.mybatisplus.entity.GlobalConfiguration">
    <!-- 在2.3版本以后,dbColumnUnderline 默认值就是true -->
    <property name="dbColumnUnderline" value="true"></property>

    <!-- 全局的主键策略 -->
    <property name="idType" value="0"></property>
</bean>
@TableField 忽略不是数据库字段
private String email;
private Integer gender;
private Integer age;
@TableField(exist=false)
private Double salary;
3.2 插入操作
- Integer insert(T entity);
- @TableName
- 全局的 MP 配置:
<property name="tablePrefix" value="tbl_"></property>
 <!-- 全局的表前缀策略配置 -->
<property name="tablePrefix" value="tbl_"></property>
- @TableField
- 全局的 MP 配置:
<property name="dbColumnUnderline" value="true"></property>
下划线驼峰
6. @TableId
7. 全局的 MP 配置:
<property name="idType" value="0"></property>
自增
8. 支持主键自增的数据库插入数据获取主键值
Mybatis: 需要通过 useGeneratedKeys 以及 keyProperty 来设置
MP: 自动将主键值回写到实体类中
9. Integer insertAllColumn(T entity)
// 插入到数据库
// insert方法在插入时,会根据实体类的每个属性进行非空判断,只有非空的属性对应的字段才会出现到SQL语句中
// Integer result = employeeMapper.insert(employee);

// insertAllColumn方法在插入时,不管属性是否非空,属性所对应的字段都会出现到SQL语句中。
Integer result = employeeMapper.insertAllColumn(employee);
3.3 更新操作
- Integer updateById(@Param(“et”) T entity);
- Integer updateAllColumnById(@Param(“et”) T entity)
updateAllColumnById 如果不设置就会更新为null
3.4 查询操作
- T selectById(Serializable id);
- T selectOne(@Param(“ew”) T entity);
- List selectBatchIds(List<? extends Serializable> idList);
- List selectByMap(@Param(“cm”) Map<String, Object> columnMap);
//4. 通过Map封装条件查询
Map<String, Object> columnMap = new HashMap<>();
columnMap.put("last_name", "Tom");
columnMap.put("gender", 1);

List<Employee> emps = employeeMapper.selectByMap(columnMap);
System.out.println(emps);
注意!!是数据库的列
5. List selectPage(RowBounds rowBounds, @Param(“ew”) Wrapper wrapper);
//5. 分页查询
List<Employee> emps = employeeMapper.selectPage(new Page<>(3, 2), null);
System.out.println(emps);
注意!!查的时候是查的全部数据,查回来根据内存分的,所以别用这个方法!!
3.5 删除操作
- Integer deleteById(Serializable id);
- Integer deleteByMap(@Param(“cm”) Map<String, Object> columnMap);
- Integer deleteBatchIds(List<? extends Serializable> idList);
第4章:高级查询 EntityWrapper
4.1 EntityWrapper 简介
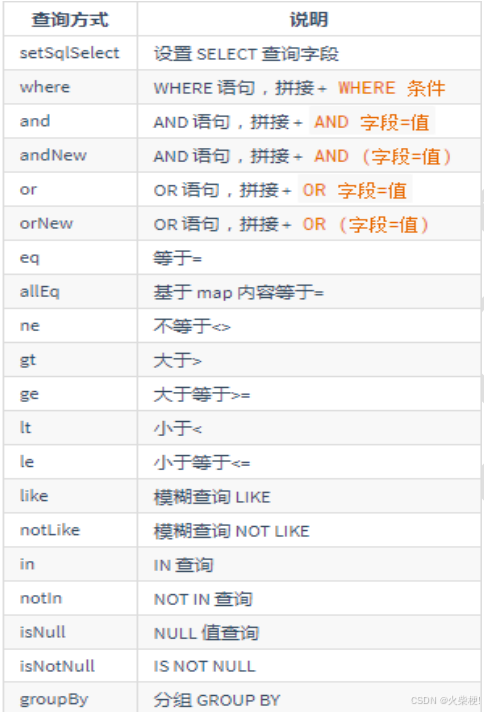
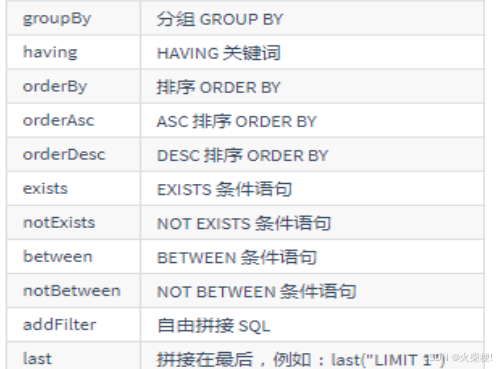
- Mybatis-Plus 通过 EntityWrapper(简称 EW,MP 封装的一个查询条件构造器)或者Condition(与 EW 类似)来让用户自由的构建查询条件,简单便捷,没有额外的负担,能够有效提高开发效率
- 实体包装器,主要用于处理 sql 拼接,排序,实体参数查询等
- 注意: 使用的是数据库字段,不是 Java 属性!
- 条件参数说明:
4.2 使用 EntityWrapper 的方式打开如上需求:
//我们需要分页查询tbl_employee表中,年龄在18~50之间性别为男且姓名为Tom的所有用户
List<Employee> userList = employeeMapper.selectPage(new Page<Employee>(2, 3),new EntityWrapper<Employee>()
.eq("last_name","MybatisPlus")
.eq("gender", 1)
.between("age", 18, 50));
4.3 带条件的查询
- List selectList(@Param(“ew”) Wrapper wrapper);
// 查询tbl_employee表中,性别为女并且名字中带有"老师" 或者 邮箱中带有"a"
List<Employee> emps = employeeMapper.selectList(
    new EntityWrapper<Employee>()
    .eq("gender", 0)
    .like("last_name", "老师")
    .or()       // orNew()
    .like("email", "a")
);
System.out.println(emps);
//----------------------------------------------------------------------------
List<Employee> emps = employeeMapper.selectList(
    new EntityWrapper<Employee>()
    .eq("gender", 0)
    .like("last_name", "老师")
    // .or()       // SQL: (gender = ? AND last_name LIKE ? OR email LIKE ?)
    .orNew()      // SQL: (gender = ? AND last_name LIKE ?) OR (email LIKE ?)
    .like("email", "a")
);
System.out.println(emps);
4.4 带条件的修改
- Integer update(@Param(“et”) T entity, @Param(“ew”) Wrapper wrapper);
Employee employee = new Employee();
employee.setLastName("苍老师");
employee.setEmail("cls@sina.com");
employee.setGender(0);

EmployeeMapper.update(employee,
    new EntityWrapper<Employee>()
        .eq("last_name", "Tom")
        .eq("age", 44)
);
4.5 带条件的删除
- Integer delete(@Param(“ew”) Wrapper wrapper);
employeeMapper.delete(
    new EntityWrapper<Employee>()
        .eq("last_name", "Tom")
        .eq("age", 22)
);
查询排序,默认是 asc
// 查询性别为女的,根据age进行排序(asc/desc),简单分页
List<Employee> emps = employeeMapper.selectList(
    new EntityWrapper<Employee>()
    .eq("gender", 0)
    // .orderBy("age")
    .orderDesc(Arrays.asList(new String [] {"age"}))
);
在后面拼接sql 有注入风险
List<Employee> emps = employeeMapper.selectList(
    new EntityWrapper<Employee>()
    .eq("gender", 0)
    .orderBy("age")
    // .orderDesc(Arrays.asList(new String [] {"age"}))
    .last("desc limit 1,3")
);
System.out.println(emps);
4.6 使用 Condition 的方式打开如上需求
List<Employee> userListCondition = employeeMapper.selectPage(
new Page<Employee>(2,3),
Condition.create().
eq("gender", 1).
eq("last_name", "MyBatisPlus").
between("age", 18, 50));
List<Employee> emps = employeeMapper.selectPage(
    new Page<Employee>(1, 2),
    Condition.create()
        .between("age", 18, 50)
        .eq("gender", "1")
        .eq("last_name", "Tom")
);
4.7 小结
MP: EntityWrapper Condition 条件构造器
MyBatis MBG : xxxExample→Criteria : QBC( Query By Criteria)
Hibernate 、 通用 Mapper
第 5 章:领域模型模式CRUD
Active Record(活动记录),是一种领域模型模式,特点是一个模型类对应关系型数据库中的一个表,而模型类的一个实例对应表中的一行记录。
ActiveRecord 一直广受动态语言( PHP 、 Ruby 等)的喜爱,而 Java 作为准静态语言,对于 ActiveRecord 往往只能感叹其优雅,所以 MP 也在 AR 道路上进行了一定的探索
5.1 如何使用 AR 模式
- 仅仅需要让实体类继承 Model 类且实现主键指定方法,即可开启 AR 之旅.
@TableName("tbl_employee")
public class Employee extends Model<Employee>{
// .. fields
// .. getter and setter
@Override
protected Serializable pkVal() {
  return this.id;
}
5.2 AR 基本 CRUD
1) 插入操作
public boolean insert()
/**
 * AR 插入操作
 */
@Test
public void testARInsert() {
    Employee employee = new Employee();
    employee.setLastName("宋老师");
    employee.setEmail("sls@atguigu.com");
    employee.setGender(1);
    employee.setAge(35);

    boolean result = employee.insert();
    System.out.println("result:" + result);
}
2) 修改操作
public boolean updateById()
Employee employee = new Employee();
    employee.setId(14);
    employee.setLastName("宋老湿");
    employee.setEmail("sls@atguigu.com");
    employee.setGender(1);
    employee.setAge(36);

    boolean result = employee.updateById();
    System.out.println("result:");
3) 查询操作
public T selectById()
public T selectById(Serializable id)
public List<T> selectAll()
public List<T> selectList(Wrapper wrapper)
public int selectCount(Wrapper wrapper)
4) 删除操作
public boolean deleteById()
public boolean deleteById(Serializable id)
public boolean delete(Wrapper wrapper)
注意:删除不存在的数据 逻辑上也是属于成功的。
5) 分页复杂操作
public Page<T> selectPage(Page<T> page, Wrapper<T> wrapper)
 Employee employee = new Employee();

Page<Employee> page = employee.selectPage(new Page<>(1, 1), new EntityWrapper<Employee>().like("last_name", "老"));
List<Employee> emps = page.getRecords();
System.out.println(emps);
5.3 AR 小结
- AR 模式提供了一种更加便捷的方式实现 CRUD 操作,其本质还是调用的 Mybatis 对应的方法,类似于语法糖语法糖是指计算机语言中添加的某种语法,这种语法对原本语言的功能并没有影响.可以更方便开发者使用,可以避免出错的机会,让程序可读性更好.
- 到此,我们简单领略了 Mybatis-Plus 的魅力与高效率,值得注意的一点是:我们提供了强大的代码生成器,可以快速生成各类代码,真正的做到了即开即用
第 6 章:代码生成器
- MP 提供了大量的自定义设置,生成的代码完全能够满足各类型的需求
- MP 的代码生成器 和 Mybatis MBG 代码生成器:
MP 的代码生成器都是基于 java 代码来生成。MBG 基于 xml 文件进行代码生成
MyBatis 的代码生成器可生成: 实体类、Mapper 接口、Mapper 映射文件
MP 的代码生成器可生成: 实体类(可以选择是否支持 AR)、Mapper 接口、Mapper 映射文件、 Service 层、Controller 层. - 表及字段命名策略选择
在 MP 中,我们建议数据库表名 和 表字段名采用驼峰命名方式, 如果采用下划线命名方式 请开启全局下划线开关,如果表名字段名命名方式不一致请注解指定,我们建议最好保持一致。这么做的原因是为了避免在对应实体类时产生的性能损耗,这样字段不用做映射就能直接和实体类对应。当然如果项目里不用考虑这点性能损耗,那么你采用下滑线也是没问题的,只需要在生成代码时配置 dbColumnUnderline 属性就可以
6.1 代码生成器依赖
- 模板引擎
MP 的代码生成器默认使用的是 Apache 的 Velocity 模板,当然也可以更换为别的模板
技术,例如 freemarker。此处不做过多的介绍。
需要加入 Apache Velocity 的依赖
<dependency>
<groupId>org.apache.velocity</groupId>
<artifactId>velocity-engine-core</artifactId>
<version>2.0</version>
</dependency>
- 加入 slf4j ,查看日志输出信息
<dependency>
    <groupId>org.slf4j</groupId>
    <artifactId>slf4j-api</artifactId>
    <version>1.7.7</version>
</dependency>
<dependency>
    <groupId>org.slf4j</groupId>
    <artifactId>slf4j-log4j12</artifactId>
    <version>1.7.7</version>
</dependency>
6.2 MP 代码生成器示例代码
@Test
public void testGenerator() {
    // 全局配置
    GlobalConfig config = new GlobalConfig();
    config.setActiveRecord(true) // 是否支持AR模式
          .setAuthor("zhuguanbo") // 作者
          .setOutputDir("D:\\workspace_my\\mp03\\src\\main\\java") // 生成路径
          .setFileOverride(true) // 文件覆盖
          .setServiceName("%sService") // 设置生成的service接口名,首字母是否为I
          .setIdType(IdType.AUTO); // 主键策略

    DataSourceConfig dsConfig = new DataSourceConfig();
    dsConfig.setDbType(DbType.MYSQL)
            .setUrl("jdbc:mysql://localhost:3306/javaEE_0228")
            .setDriverName("com.mysql.jdbc.Driver")
            .setUsername("root")
            .setPassword("1234");

    // 策略配置
    StrategyConfig stConfig = new StrategyConfig();
    stConfig.setCapitalMode(true) // 全局大写命名
            .setDbColumnUnderline(true) // 表名、字段名是否使用下划线命名
            .setNaming(NamingStrategy.underline_to_camel) // 数据库表映射到实体的命名策略
            .setInclude("tbl_employee") // 生成的表
            .setTablePrefix("tbl_"); // 表前缀

    // 包名策略
    PackageConfig pkConfig = new PackageConfig();
    pkConfig.setParent("com.zhuguanbo.mp")
            .setController("controller")
            .setEntity("beans")
            .setService("service");

    AutoGenerator ag = new AutoGenerator()
            .setGlobalConfig(config)
            .setDataSource(dsConfig)
            .setStrategy(stConfig)
            .setPackageInfo(pkConfig);

    ag.execute();
}
6.3 ServiceImpl 说明
EmployeeServiceImpl 继承了 ServiceImpl 类,mybatis-plus 通过这种方
式为我们注入了 EmployeeMapper,这样可以使用 service 层默认为我们提供的很
多方法,也可以调用我们自己在 dao 层编写的操作数据库的方法.
第 7 章:插件扩展
7.1 Mybatis 插件机制简介
- 插件机制:
Mybatis 通过插件(Interceptor) 可以做到拦截四大对象相关方法的执行,根据需求,完成相关数据的动态改变。
Executor
StatementHandler
ParameterHandler
ResultSetHandler - 插件原理
四大对象的每个对象在创建时,都会执行 interceptorChain.pluginAll(),会经过每个插件对象的 plugin()方法,目的是为当前的四大对象创建代理。代理对象就可以拦截到四大对象相关方法的执行,因为要执行四大对象的方法需要经过代理.
7.2 分页插件
- com.baomidou.mybatisplus.plugins.PaginationInterceptor
@Test
public void testPage() {
    Page<Employee> page = new Page<>(1, 1);
    List<Employee> emps = employeeMapper.selectPage(page, null);
    System.out.println(emps);

    System.out.println("===============获取分页相关的一些信息===============");
    System.out.println("总条数:" + page.getTotal());
    System.out.println("当前页码: " + page.getCurrent());
    System.out.println("总页码:" + page.getPages());
    System.out.println("每页显示的条数:" + page.getSize());
    System.out.println("是否有上一页: " + page.hasPrevious());
    System.out.println("是否有下一页: " + page.hasNext());

    //将查询的结果封装到page对象中
    page.setRecords(emps);
}
7.3 执行分析插件
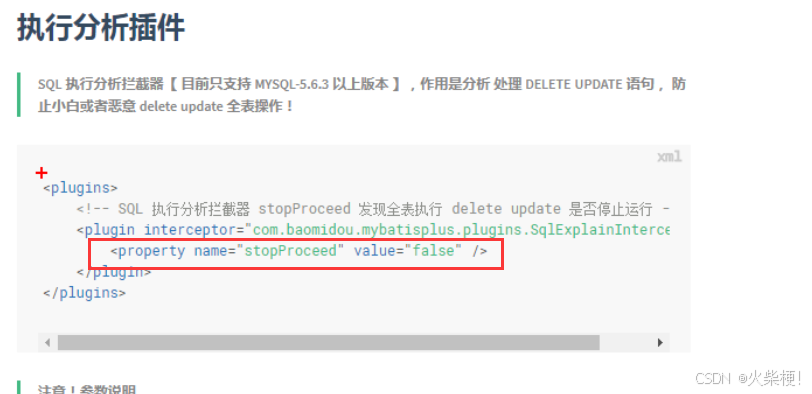
- com.baomidou.mybatisplus.plugins.SqlExplainInterceptor
- SQL 执行分析拦截器,只支持 MySQL5.6.3 以上版本
- 该插件的作用是分析 DELETE UPDATE 语句,防止小白或者恶意进行 DELETE UPDATE 全表操作
- 只建议在开发环境中使用,不建议在生产环境使用
- 在插件的底层 通过 SQL 语句分析命令:Explain 分析当前的 SQL 语句,根据结果集中的 Extra 列来断定当前是否全表操作。
7.4 性能分析插件
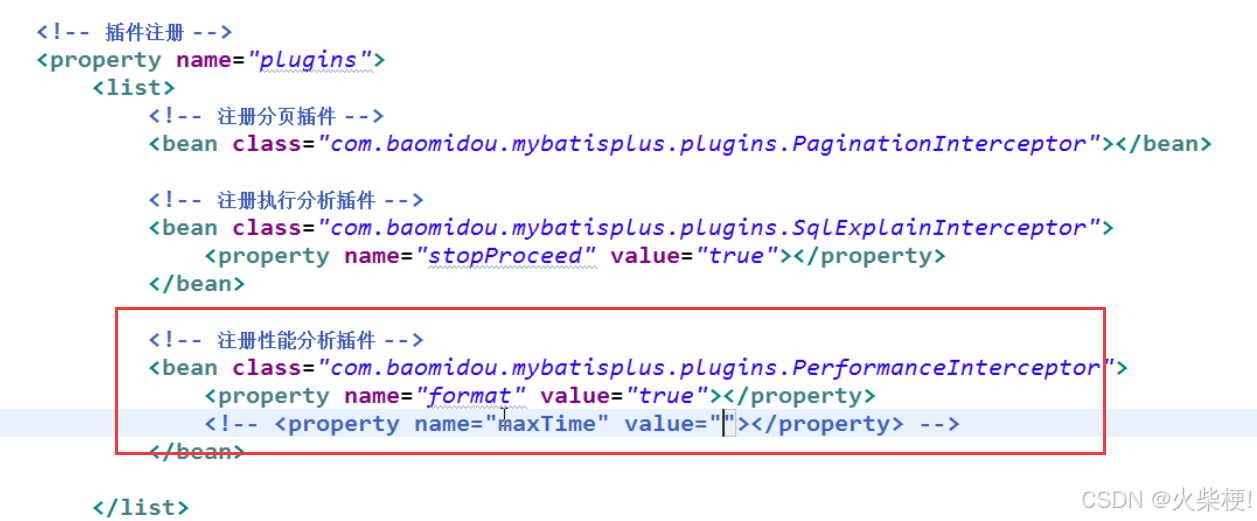
- com.baomidou.mybatisplus.plugins.PerformanceInterceptor
- 性能分析拦截器,用于输出每条 SQL 语句及其执行时间
- SQL 性能执行分析,开发环境使用,超过指定时间,停止运行。有助于发现问题
7.5 乐观锁插件
- com.baomidou.mybatisplus.plugins.OptimisticLockerInterceptor
- 如果想实现如下需求: 当要更新一条记录的时候,希望这条记录没有被别人更新
- 乐观锁的实现原理:
取出记录时,获取当前 version 2
更新时,带上这个 version 2
执行更新时, set version = yourVersion+1 where version = yourVersion
如果 version 不对,就更新失败 - @Version 用于注解实体字段,必须要有。
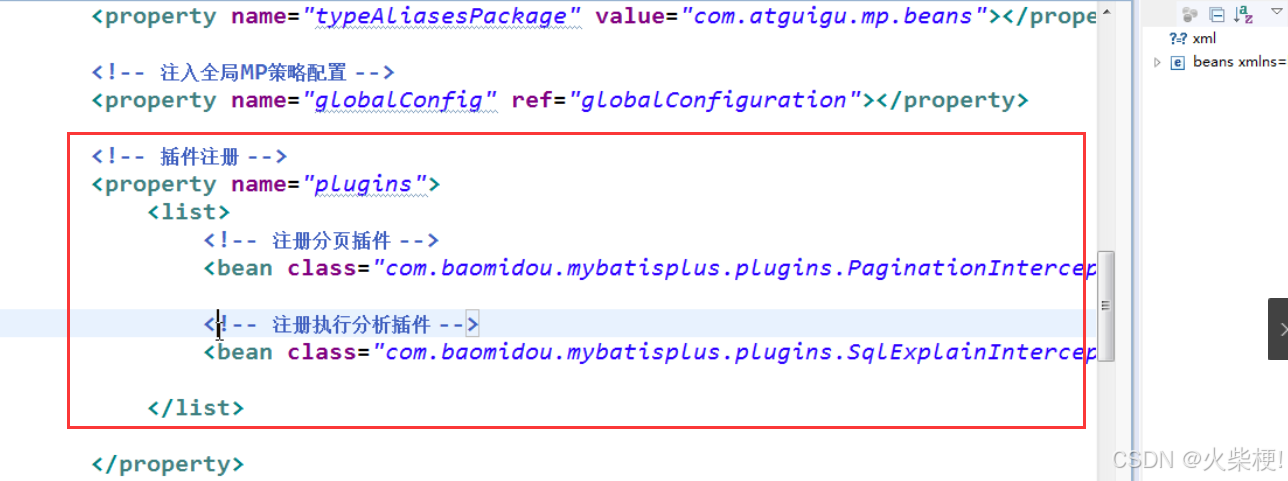
<!-- 注册乐观锁插件 -->
<bean class="com.baomidou.mybatisplus.plugins.OptimisticLockerInterceptor"> </bean>
private Integer age;
@Version
private Integer version;
第 8 章:自定义全局操作
根据 MybatisPlus 的 AutoSqlInjector 可以自定义各种你想要的 sql ,注入到全局中,相当于自定义 Mybatisplus 自动注入的方法。
之前需要在 xml 中进行配置的 SQL 语句,现在通过扩展 AutoSqlInjector 在加载 mybatis 环境时就注入。
8.1 AutoSqlInjector
- 在 Mapper 接口中定义相关的 CRUD 方法

/**
*@since"2018-06-21
*/
public interface EmployeeMapper extends BaseMapper<Employee>{
int deleteA 11();
}
- 扩展 AutoSqlInjector inject 方法,实现 Mapper 接口中方法要注入的 SQL
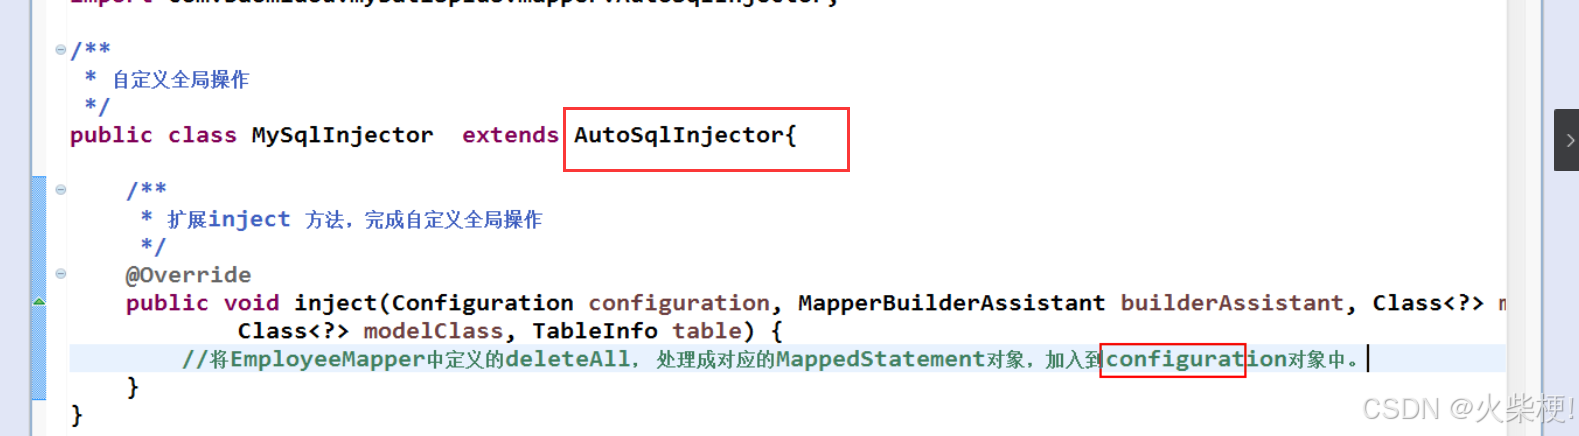
/**
自定义全局操作
public class MySqlInjector extends
AutoSqlInjector{
/**
* 扩展inject 方法, 完成自定义全局操作
@Override
public void inject(Configuration configuration, MapperbuilderAssistant builderAssistant, Class<?> n
Class<?> modelClass, TableInfo table) {
//将EmployeeMapper中定义的deleteAl1, 处理成对应的MappedStatement对象, 加入configuration对象中。|
}
}
Class<?> modelClass, TableInfo table) {
//将EmployeeMapper中定义的deleteAl1, 处理成对应的MappedStatement对象, 加入到configuration对象中。
//注入的SQL语句
String sql = "delete from " +table.getTableName();
//注入的方法名 一定要与EmployeeMapper接口中的方法名一致
String method ="deleteAll";
//构造Sq1Source对象
Sq1Source sqlSource =languageDriver. createsqlSource(configuration, sql, modelclass);
//构造一个删除的MappedStatement
this. addDeleteMappedStatemenit (mapperClass, method, sqlSource) ;
}
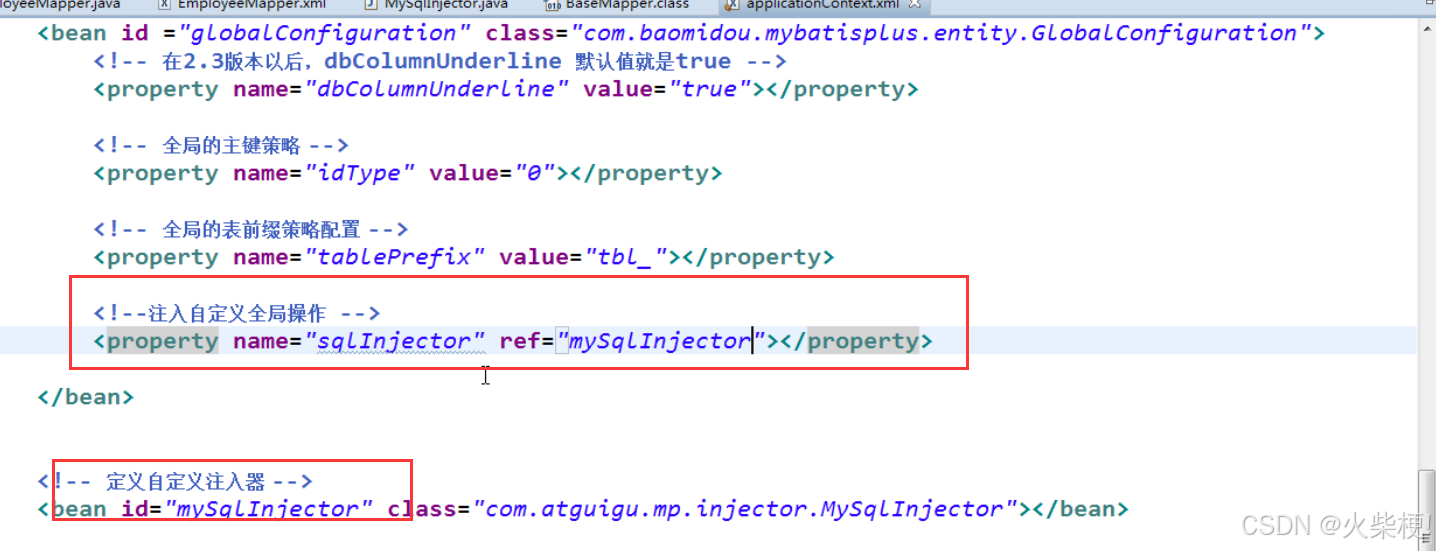
- 在 MP 全局策略中,配置 自定义注入器
测试
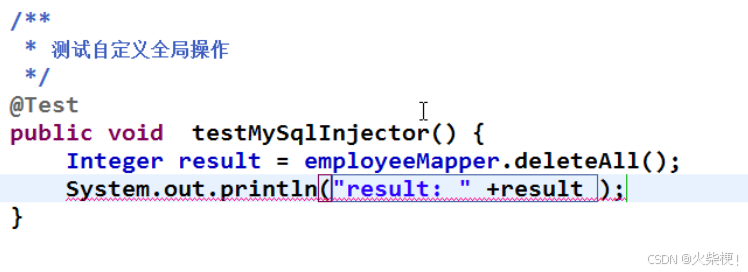
/**
* 测试自定义全局操作
*/
@Test
I
public void testMySqlInjector(){
Integer result = employeeMapper.deleteAl1();
System.out.println("result:" +result);
}
8.2 自定义注入器的应用之 逻辑删除
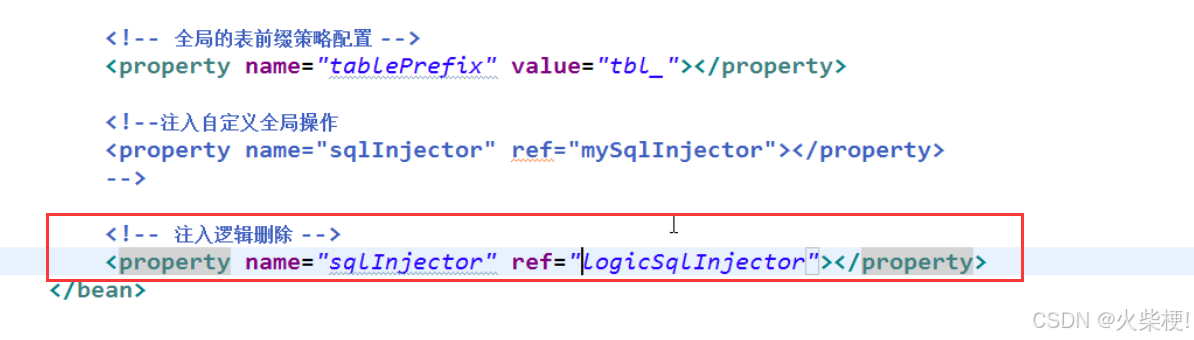
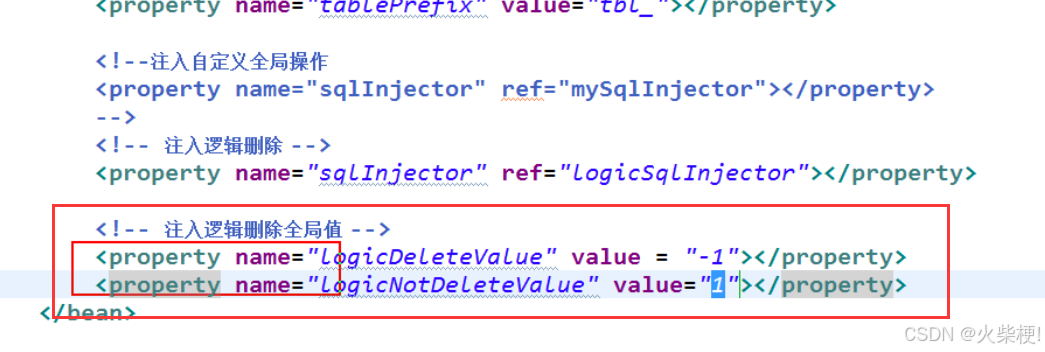
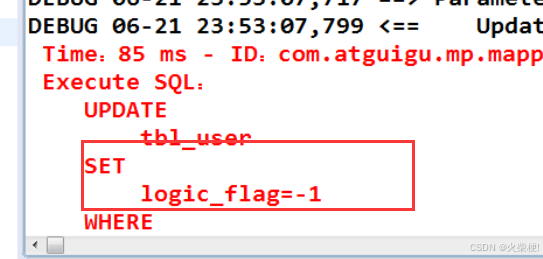
假删除、逻辑删除: 并不会真正的从数据库中将数据删除掉,而是将当前被删除的这条数据中的一个逻辑删除字段置为删除状态.tbl_user logic_flag = 1 → -1
- com.baomidou.mybatisplus.mapper.LogicSqlInjector
- logicDeleteValue 逻辑删除全局值
- logicNotDeleteValue 逻辑未删除全局值
- 在 POJO 的逻辑删除字段 添加 @TableLogic 注解
- 会在 mp 自带查询和更新方法的 sql 后面,追加『逻辑删除字段』=『LogicNotDeleteValue默认值』删除方法: deleteById()和其他 delete 方法, 底层 SQL 调用的是 update tbl_xxx set 『逻辑删除字段』=『logicDeleteValue 默认值』

public class User {
    private Integer id;
    private String name;
    @TableLogic // 逻辑删除属性
    private Integer logicFlag;
 }
 /**
 * 测试逻辑删除
 */
@Test
public void testLogicDelete() {
    Integer result = userMapper.deleteById(1);
    System.out.println("result:" + result);
}
第 9 章:公共字段自动填充
9.1 元数据处理器接口
com.baomidou.mybatisplus.mapper.MetaObjectHandler
insertFill(MetaObject metaObject)
updateFill(MetaObject metaObject)
metaobject: 元对象. 是 Mybatis 提供的一个用于更加方便,更加优雅的访问对象的属性,给对象的属性设置值 的一个对象. 还会用于包装对象. 支持对 Object 、Map、Collection等对象进行包装本质上 metaObject 获取对象的属性值或者是给对象的属性设置值,最终是要通过 Reflector 获取到属性的对应方法的 Invoker, 最终 invoke.
9.2 开发步骤
- 注解填充字段 @TableFile(fill = FieldFill.INSERT) 查看 FieldFill
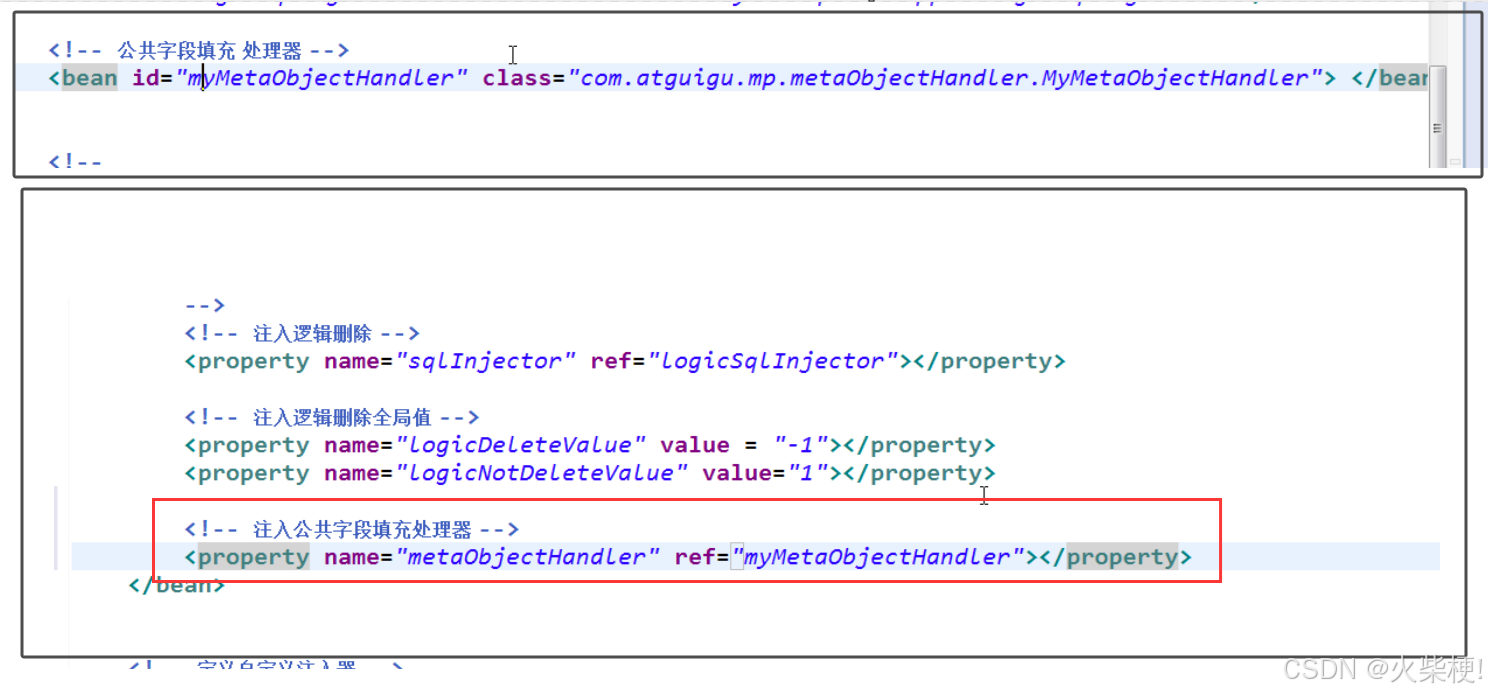
- 自定义公共字段填充处理器
- MP 全局注入 自定义公共字段填充处理器
 public class User {
    private Integer id;
    @TableField(fill=FieldFill.INSERT_UPDATE)
    private String name;
    @TableLogic // 逻辑删除属性
    private Integer logicFlag;
}
public enum FieldFill {
    DEFAULT(0, "默认不处理"),
    INSERT(1, "插入填充字段"),
    UPDATE(2, "更新填充字段"),
    INSERT_UPDATE(3, "插入和更新填充字段");
}
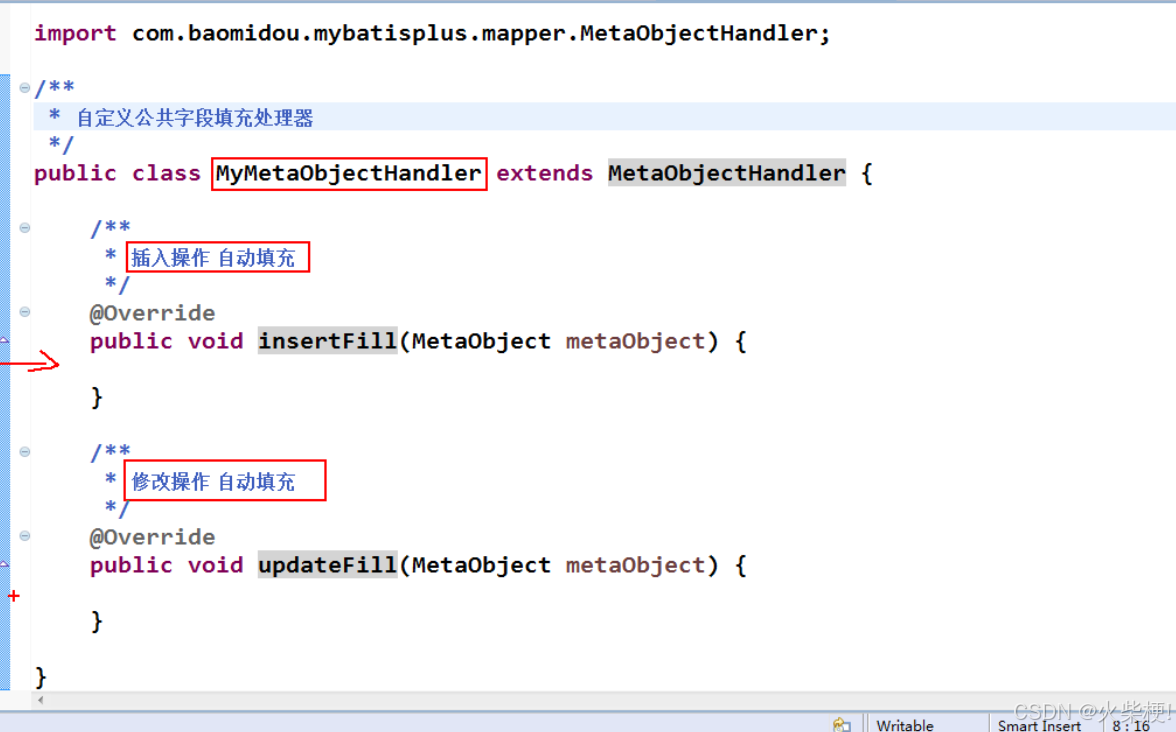
import com. baomidou. mybatisplus. mapper. Meta0bjectHandler;
/**
*自定义公共字段填充处理器
*/
public class [MyMeta0bjectHandlerextends Meta0bjectHandler{
/**
插入操作自动填充
*
@Override
public void insertFil1(Meta0bject meta0bject) {
}
/**
修改操作自动填充
@Override
public void updateFill(Meta0bject meta0bject) {
}
}
Writable
Smart Insert
8:16)
public void insertFill(MetaObject metaObject) {
    //获取到需要被填充的字段的值
    Object fieldValue = getFieldValByName("name", metaObject);
    if(fieldValue == null) {
        System.out.println("**********插入操作 满足填充条件**********");
        setFieldValByName("name", "zhugaunbo", metaObject);
    }
}
/**
 * 修改操作 自动填充
 */
@Override
public void updateFill(MetaObject metaObject) {
    Object fieldValue = getFieldValByName("name", metaObject);
    if(fieldValue == null) {
        System.out.println("**********修改操作 满足填充条件**********");
        setFieldValByName("name", "weiyyh", metaObject);
    }
}
//测试  如果不设置值就用我们填充的,有值就用设置的值
@Test
public void testMetaObjectHandler() {
    User user = new User();
    user.setName("Tom");
    user.setLogicFlag(1);

    userMapper.insert(user);
}
如果文章对你有一点点帮助,欢迎【点赞、留言、+ 关注】,
您的关注是我持续创作的重要动力!有问题欢迎随时交流!多一个朋友多一条路!

汇聚全球AI编程工具,助力开发者即刻编程。
更多推荐

 11
11 0
0- 0


 已为社区贡献70条内容

所有评论(0)