
Docker环境下部署常用软件服务的完整流程,例如mysql,redis,elasticsearch,nginx等常用软件服务!以及springboot项目部署
部署软件安装
1. 安装docker
2. 安装mysql
3. 安装redis
4. 安装elasticsearch
5. 安装nacos
6. 安装seata
7. 安装sentinel
8. 安装minio
9. 安装nginx部署前端项目
10. 安装启动springboot项目
安装docker
简介
Docker CE是免费的Docker产品的新名称,Docker CE包含了完整的Docker平台,非常适合开发人员和运维团队构建容器APP。
注意:原则上部署到docker,如果需要部署到其他,如宝塔,应与其他同事及项目经理说明,同时做好文档说明
Ubuntu(使用 apt-get 进行安装)
# step 1: 安装必要的一些系统工具
sudo apt-get update
sudo apt-get install ca-certificates curl gnupg

# step 2: 信任 Docker 的 GPG 公钥
sudo install -m 0755 -d /etc/apt/keyrings
curl -fsSL https://mirrors.aliyun.com/docker-ce/linux/ubuntu/gpg | sudo gpg --dearmor -o /etc/apt/keyrings/docker.gpg
sudo chmod a+r /etc/apt/keyrings/docker.gpg

# Step 3: 写入软件源信息
echo \
 "deb [arch=$(dpkg --print-architecture) signed-by=/etc/apt/keyrings/docker.gpg] https://mirrors.aliyun.com/docker-ce/linux/ubuntu \
 "$(. /etc/os-release && echo "$VERSION_CODENAME")" stable" | \
 sudo tee /etc/apt/sources.list.d/docker.list > /dev/null

# Step 4: 安装Docker
sudo apt-get update
sudo apt-get install docker-ce docker-ce-cli containerd.io docker-buildx-plugin docker-compose-plugin

# 安装指定版本的Docker-CE:
# Step 1: 查找Docker-CE的版本:
# apt-cache madison docker-ce
#   docker-ce | 17.03.1~ce-0~ubuntu-xenial | https://mirrors.aliyun.com/docker-ce/linux/ubuntu xenial/stable amd64 Packages
#   docker-ce | 17.03.0~ce-0~ubuntu-xenial | https://mirrors.aliyun.com/docker-ce/linux/ubuntu xenial/stable amd64 Packages
# Step 2: 安装指定版本的Docker-CE: (VERSION例如上面的17.03.1~ce-0~ubuntu-xenial)
# sudo apt-get -y install docker-ce=[VERSION]
CentOS (使用 yum 进行安装)
 # step 1: 安装必要的一些系统工具
sudo yum install -y yum-utils

# Step 2: 添加软件源信息
yum-config-manager --add-repo https://mirrors.aliyun.com/docker-ce/linux/centos/docker-ce.repo

# Step 3: 安装Docker
sudo yum install docker-ce docker-ce-cli containerd.io docker-buildx-plugin docker-compose-plugin

# Step 4: 开启Docker服务
sudo service docker start

# 注意:
# 官方软件源默认启用了最新的软件,您可以通过编辑软件源的方式获取各个版本的软件包。例如官方并没有将测试版本的软件源置为可用,您可以通过以下方式开启。同理可以开启各种测试版本等。
# vim /etc/yum.repos.d/docker-ce.repo
#   将[docker-ce-test]下方的enabled=0修改为enabled=1
#
# 安装指定版本的Docker-CE:
# Step 1: 查找Docker-CE的版本:
# yum list docker-ce.x86_64 --showduplicates | sort -r
#   Loading mirror speeds from cached hostfile
#   Loaded plugins: branch, fastestmirror, langpacks
#   docker-ce.x86_64            17.03.1.ce-1.el7.centos            docker-ce-stable
#   docker-ce.x86_64            17.03.1.ce-1.el7.centos            @docker-ce-stable
#   docker-ce.x86_64            17.03.0.ce-1.el7.centos            docker-ce-stable
#   Available Packages
# Step2: 安装指定版本的Docker-CE: (VERSION例如上面的17.03.0.ce.1-1.el7.centos)
# sudo yum -y install docker-ce-[VERSION]
安装校验
 root@iZbp12adskpuoxodbkqzjfZ:$ docker version
    Client: Docker Engine - Community
	 Version:           28.3.0
	 API version:       1.51
	 Go version:        go1.24.4
	 Git commit:        38b7060
	 Built:             Tue Jun 24 15:44:12 2025
	 OS/Arch:           linux/amd64
	 Context:           default

	Server: Docker Engine - Community
	 Engine:
	  Version:          28.3.0
	  API version:      1.51 (minimum version 1.24)
	  Go version:       go1.24.4
	  Git commit:       265f709
	  Built:            Tue Jun 24 15:44:12 2025
	  OS/Arch:          linux/amd64
	  Experimental:     false
	 containerd:
	  Version:          1.7.27
	  GitCommit:        05044ec0a9a75232cad458027ca83437aae3f4da
	 runc:
	  Version:          1.2.5
	  GitCommit:        v1.2.5-0-g59923ef
	 docker-init:
	  Version:          0.19.0
	  GitCommit:        de40ad0
修改镜像源
# 由于国外的镜像源非常慢,经常拉取不到镜像或者失败,使用的是国内的轩辕镜像
# 需要在/etc/docker/daemon.json修改,没有则创建即可
{
  "registry-mirrors": ["https://docker.xuanyuan.me"]
}
# 修改完需要执行
sudo systemctl daemon-reload
sudo systemctl restart docker
安装docker-compose
# 最新版
curl -L curl -L https://github.com/docker/compose/releases/download/v2.39.2/docker-compose-`uname -s`-`uname -m` > /usr/local/bin/docker-compose
# 授予执行权限
sudo chmod +x /usr/local/bin/docker-compose
卸载docker
# 1. 删除Docker容器
docker rm -f $(docker ps -a -q)
# 2. 删除Docker镜像
docker rmi -f $(docker images -q)
# 3. 删除Docker卷
docker volume rm $(docker volume ls -q)
# 4. 卸载Docker CE(社区版)
sudo apt-get purge docker-ce docker-ce-cli containerd.io
# 5. 删除残留配置文件
sudo rm -rf /var/lib/docker
sudo rm -rf /var/lib/containerd
# 6. 删除Docker组(可选)
sudo groupdel docker
# 7. 清理APT缓存(可选)
sudo apt-get autoremove --purge && sudo apt-get clean
docker已安装成功,我们就来安装项目所需要的软件,例如mysql,redis,elasticsearch,minio等。
安装mysql
第一步:先拉取镜像,目前我们需要的mysql最低的要求是8.0以上的,安装以8.4.5为例
docker pull mysql:8.4.5
# 如需要最新版本
# docker pull mysql:latest
可使用docker images查看拉取的镜像
root@iZbp12adskpuoxodbkqzjfZ:$ docker images
REPOSITORY   TAG       IMAGE ID       CREATED        SIZE
mysql        8.4.5     060652337213   2 months ago   777MB
第二步:创建持久化目录,一定要考虑数据持久化的问题。如果没有挂在持久化数据卷,一旦MySQL容器被销毁,则数据将会全部丢失。
# 用于存放mysql配置文件
mkdir -p /home/mysql/conf
# 用于存放mysql数据
mkdir -p /home/mysql/data
第三步:启动MySQL容器
docker run -itd -p 3306:3306 --restart=always --name mysql -v /home/mysql/conf:/etc/mysql/conf.d -v /home/mysql/data:/var/lib/mysql -e MYSQL_ROOT_PASSWORD=tAgONhU2pICMbfT -e TZ=Asia/Shanghai mysql:8.4.5
## 解释
## docker run -itd 是docker中用于以后台交互模式启动容器的命令组合,其中 -i 保持标准输入打开,-t 分配伪终端,-d 使容器在后台运行。
## -p 3306:3306 是将容器的 MySQL 3306(后者) 端口映射到宿主机的 3306(前者) 端口
## --restart=always 是docker开机启动,失败也会一直重启,创建容器时没有添加参数,导致的后果是:当 docker 重启时,容器未能自动启动
## --name 为容器指定一个名称为 mysql
## -v 或 --volume 是挂载主机目录或命名卷到容器。例如将mysql容器中的/etc/mysql/conf.d挂载到宿主主机/home/mysql/conf下。
## --env 或 -e 是设置容器内的环境变量。MYSQL_ROOT_PASSWORD=tAgONhU2pICMbfT 是设置mysql中root的密码
## mysql:8.4.5 是要启动的容器镜像
第四步:查看mysql是否安装启动成功
docker ps -f name=mysql
## 也可以查看全部容器状态 docker ps -a
# CONTAINER ID   IMAGE         COMMAND                  CREATED      STATUS      PORTS                                                    NAMES
# 6d0db98107e1   mysql:8.4.5   "docker-entrypoint.s…"   3 days ago   Up 3 days   0.0.0.0:3306->3306/tcp, [::]:3306->3306/tcp, 33060/tcp   mysql

## 安装启动成功状态显示Up和端口信息
## 可进去容器中执行命令,有两种方式
## 第一种,直接进入
docker exec -it 6d0db98107e1 mysql -uroot -p
## 第二种,先进入bash命令
docker exec -it 6d0db98107e1 /bin/bash
## 再进入mysql
mysql -uroot -p
## 6d0db98107e1 为容器id,即为字段CONTAINER ID,可执行docker ps -a查看

## 如没有成功可执行命令查看日志
docker logs mysql
到这mysql就安装成功,接下来就是mysql操作了,例如开远程访问等操作。
## 开远程操作,尽量不要开root用户远程
CREATE USER 'username'@'%' IDENTIFIED BY 'password';
GRANT ALL PRIVILEGES ON database.* TO 'username'@'%';
## 解释
## username 创建的用户名
## password 创建用户名的密码,尽可能复杂些
## database 远程访问的数据库
## 整体就是,创建一个username的用户名来单独专门访问database数据库
安装Redis
简介
Redis是一种开放源代码(BSD许可)的内存中数据结构存储,用作数据库,缓存和消息代理。Redis提供数据结构,例如字符串,哈希,列表,集合,带范围查询的排序集合,位图,超日志,地理空间索引和流。Redis具有内置的复制[集群],Lua脚本,LRU驱逐,事务和不同级别的磁盘持久性[磁盘],并通过Redis Sentinel和Redis Cluster自动分区提供了高可用性【集群】。
Redis的特点
- Redis读取的速度是110000次/s,写的速度是81000次/s
- Redis的所有操作都是原子性的,同时Redis还支持对几个操作全并后的原子性执行。线程安全
- 支持多种数据结构:string(字符串);list(列表);hash(哈希),set(集合);zset(有序集合)
- 持久化–磁盘,主从复制(集群)步:redis版本没有要求,拉取最新版本即可
第一步:拉取redis镜像
docker pull redis:latest
第二步:创建持久化目录
# 用于存放redis配置文件
mkdir -p /home/redis/conf
# 用于存放redis数据
mkdir -p /home/redis/data
需要在/home/redis/conf下创建redis.conf文件
touch redis.conf
编辑redis.conf文件,redis.conf文件内容如下,按照实际修改
# 是否允许远程连接,正式不建议开远程
# bind 127.0.0.1 -::1

# Redis 6.0 及以上版本引入了保护模式,需要远程则为no,否则为yes
protected-mode no

port 6379

tcp-backlog 511
#redis密码 强烈建议设置复杂一些
requirepass Mx1TwBazxKl3QbDg

timeout 0

tcp-keepalive 300

daemonize no

supervised no

pidfile /var/run/redis_6379.pid

loglevel notice

logfile ""

databases 30

always-show-logo yes

save 900 1
save 300 10
save 60 10000

stop-writes-on-bgsave-error yes

rdbcompression yes

rdbchecksum yes

dbfilename dump.rdb

dir ./

replica-serve-stale-data yes

replica-read-only yes

repl-diskless-sync no

repl-disable-tcp-nodelay no

replica-priority 100

lazyfree-lazy-eviction no
lazyfree-lazy-expire no
lazyfree-lazy-server-del no
replica-lazy-flush no

appendonly yes

appendfilename "appendonly.aof"

no-appendfsync-on-rewrite no

auto-aof-rewrite-percentage 100
auto-aof-rewrite-min-size 64mb

aof-load-truncated yes

aof-use-rdb-preamble yes

lua-time-limit 5000

slowlog-max-len 128

notify-keyspace-events ""

hash-max-ziplist-entries 512
hash-max-ziplist-value 64

list-max-ziplist-size -2

list-compress-depth 0

set-max-intset-entries 512

zset-max-ziplist-entries 128
zset-max-ziplist-value 64

hll-sparse-max-bytes 3000

stream-node-max-bytes 4096
stream-node-max-entries 100

activerehashing yes

hz 10

dynamic-hz yes

aof-rewrite-incremental-fsync yes

rdb-save-incremental-fsync yes
第三步:启动redis容器
docker run -itd --name redis --restart=always --log-opt max-size=100m --log-opt max-file=2 -p 6379:6379 -v /home/redis/conf/redis.conf:/etc/redis/redis.conf -v /home/redis/data:/data redis redis-server /etc/redis/redis.conf
命令如上安装mysql有介绍,不做赘述
安装elasticsearch
简介
Elasticsearch是一个基于Lucene的搜索服务器。它提供了一个分布式多用户能力的全文搜索引擎,基于RESTful web接口。Elasticsearch是用Java语言开发的,并作为Apache许可条款下的开放源码发布,是一种流行的企业级搜索引擎。Elasticsearch用于云计算中,能够达到实时搜索,稳定,可靠,快速,安装使用方便。官方客户端在Java、.NET(C#)、PHP、Python、Apache Groovy、Ruby和许多其他语言中都是可用的。根据DB-Engines的排名显示,Elasticsearch是最受欢迎的企业搜索引擎,其次是Apache Solr,也是基于Lucene。
Elasticsearch 教程Elasticsearch是一个实时分布式的开源全文搜索和分析引擎。它用于单页应用程序(SPA)项目。Elasticsearch是一个用Java开发的开放源码,世界上许多大组织都在使用它。它是根据Apache许可证2.0版授权的。
第一步:拉取elasticsearch镜像,由于小弟项目使用的是7.17.15,所以此教程就以此版本为主
docker pull elasticsearch:7.17.15
第二步:创建持久化目录
# config 挂载配置文件
# data   数据
# plugins 插件,主要放分词器的啦
mkdir -p /home/elasticsearch{config,data,plugins}
# 注意注意,data文件需要权限
chmod 777 /home/elasticsearch/data
进去config目录,创建文件elasticsearch.yml
cd /home/elasticsearch/config
touch elasticsearch.yml
elasticsearch.yml内容如下
# ======================== Elasticsearch Configuration =========================
#
# NOTE: Elasticsearch comes with reasonable defaults for most settings.
#       Before you set out to tweak and tune the configuration, make sure you
#       understand what are you trying to accomplish and the consequences.
#
# The primary way of configuring a node is via this file. This template lists
# the most important settings you may want to configure for a production cluster.
#
# Please consult the documentation for further information on configuration options:
# https://www.elastic.co/guide/en/elasticsearch/reference/index.html
#
# ---------------------------------- Cluster -----------------------------------
#
# Use a descriptive name for your cluster:
#
#cluster.name: my-application
#
# ------------------------------------ Node ------------------------------------
#
# Use a descriptive name for the node:
#
#node.name: node-1
#
# Add custom attributes to the node:
#
#node.attr.rack: r1
#
# ----------------------------------- Paths ------------------------------------
#
# Path to directory where to store the data (separate multiple locations by comma):
#
#path.data: /path/to/data
#
# Path to log files:
#
#path.logs: /path/to/logs
#
# ----------------------------------- Memory -----------------------------------
#
# Lock the memory on startup:
#
#bootstrap.memory_lock: true
#
# Make sure that the heap size is set to about half the memory available
# on the system and that the owner of the process is allowed to use this
# limit.
#
# Elasticsearch performs poorly when the system is swapping the memory.
#
# ---------------------------------- Network -----------------------------------
#
# By default Elasticsearch is only accessible on localhost. Set a different
# address here to expose this node on the network:
#
#network.host: 192.168.0.1
#
# By default Elasticsearch listens for HTTP traffic on the first free port it
# finds starting at 9200. Set a specific HTTP port here:
#
#http.port: 9200
#
# For more information, consult the network module documentation.
#
# --------------------------------- Discovery ----------------------------------
#
# Pass an initial list of hosts to perform discovery when this node is started:
# The default list of hosts is ["127.0.0.1", "[::1]"]
#
#discovery.seed_hosts: ["host1", "host2"]
#
# Bootstrap the cluster using an initial set of master-eligible nodes:
#
#cluster.initial_master_nodes: ["node-1", "node-2"]
#
# For more information, consult the discovery and cluster formation module documentation.
#
# ---------------------------------- Various -----------------------------------
#
# Require explicit names when deleting indices:
#
#action.destructive_requires_name: true
#
# ---------------------------------- Security ----------------------------------
#
#                                 *** WARNING ***
#
# Elasticsearch security features are not enabled by default.
# These features are free, but require configuration changes to enable them.
# This means that users don’t have to provide credentials and can get full access
# to the cluster. Network connections are also not encrypted.
#
# To protect your data, we strongly encourage you to enable the Elasticsearch security features.
# Refer to the following documentation for instructions.
#
# https://www.elastic.co/guide/en/elasticsearch/reference/7.16/configuring-stack-security.html
ingest.geoip.downloader.enabled: false
注意:具体要求具体配置即可
第三步:启动elasticsearch容器
docker run -itd --restart=always --name elasticsearch -p 9200:9200 -p 9300:9300 -v /home/elasticsearch/config/elasticsearch.yml:/usr/share/elasticsearch/config/elasticsearch.yml -v /home/elasticsearch/data:/usr/share/elasticsearch/data -v /home/elasticsearch/plugins:/usr/share/elasticsearch/plugins -e "discovery.type=single-node" -e "ES_JAVA_OPTS=-Xms512m -Xmx512m" elasticsearch:7.17.15
验证是否成功
root@iZbp12adskpuoxodbkqzjfZ:$ curl 127.0.0.1:9200
{
  "name" : "bde65d9ac2a2",
  "cluster_name" : "elasticsearch",
  "cluster_uuid" : "criLqflqRzeG_IxDs7byxA",
  "version" : {
    "number" : "7.17.15",
    "build_flavor" : "default",
    "build_type" : "docker",
    "build_hash" : "0b8ecfb4378335f4689c4223d1f1115f16bef3ba",
    "build_date" : "2023-11-10T22:03:46.987399016Z",
    "build_snapshot" : false,
    "lucene_version" : "8.11.1",
    "minimum_wire_compatibility_version" : "6.8.0",
    "minimum_index_compatibility_version" : "6.0.0-beta1"
  },
  "tagline" : "You Know, for Search"
}
安装成功了,那么就要来分词器了
小弟常用四大分词器:
analysis-icu: 利用ICU库提供了针对非英语语言的增强分词功能,特别是对亚洲语言的支持。
analysis-ik: 是一款中文的分词插件,支持自定义词库。
analysis-pinyin: 处理中文拼音的分词插件,其核心功能是将中文文本转换为拼音或拼音首字母,支持多种过滤参数以定制输出格式。
analysis-stconvert: 处理简体和繁体的转换。
安装分词器,进入/home/elasticsearch/plugins,分别新建目录analysis-icu,analysis-ik,analysis-pinyin,analysis-stconvert
cd /home/elasticsearch/plugins
mkdir -p /home/elasticsearch/plugins/{analysis-icu,analysis-ik,analysis-pinyin,analysis-stconvert}
然后进去对应的目录下载安装对应的分词器,依次执行命令即可
analysis-icu安装
# 进入对应的目录
cd /home/elasticsearch/plugins/analysis-icu
# 下载分词器
wget https://artifacts.elastic.co/downloads/elasticsearch-plugins/analysis-icu/analysis-icu-7.17.15.zip
# 解压分词器
unzip analysis-icu-7.17.15.zip
analysis-ik安装
# 进入对应的目录
cd /home/elasticsearch/plugins/analysis-ik
# 下载分词器
wget https://release.infinilabs.com/analysis-ik/stable/elasticsearch-analysis-ik-7.17.15.zip
# 解压分词器
unzip elasticsearch-analysis-ik-7.17.15.zip
analysis-pinyin安装
# 进入对应的目录
cd /home/elasticsearch/plugins/analysis-pinyin
# 下载分词器
wget https://release.infinilabs.com/analysis-pinyin/stable/elasticsearch-analysis-pinyin-7.17.15.zip
# 解压分词器
unzip elasticsearch-analysis-pinyin-7.17.15.zip
analysis-stconvert安装
# 进入对应的目录
cd /home/elasticsearch/plugins/analysis-stconvert
# 下载分词器
wget https://release.infinilabs.com/analysis-stconvert/stable/elasticsearch-analysis-stconvert-7.17.15.zip
# 解压分词器
unzip elasticsearch-analysis-stconvert-7.17.15.zip
最后重启elasticsearch即可
# bde65d9ac2a2 容器id
docker restart bde65d9ac2a2
# 执行如下命令查看日志
docker logs -f bde65d9ac2a2
出现一下,分词器则安装成功
注意注意:分词器如何使用暂不做介绍,后续有时间再做,小弟只是日夜赶工的小程序员而已,如有小伙伴需要的先自行百度一下,你就知道。
安装nacos
简介
Nacos /nɑ:kəʊs/ 是 Dynamic Naming and Configuration Service 的首字母简称,一个易于构建 AI Agent 应用的动态服务发现、配置管理和AI智能体管理平台。
Nacos 致力于帮助您发现、配置和管理微服务及AI智能体应用。Nacos 提供了一组简单易用的特性集,帮助您快速实现动态服务发现、服务配置、服务元数据、流量管理。
Nacos 帮助您更敏捷和容易地构建、交付和管理微服务平台。 Nacos 是构建以 “服务” 为中心的现代应用架构 (例如微服务范式、云原生范式) 的服务基础设施。
第一步:拉取nacos镜像,目前小弟项目用的是2.2.0,故以此为例
docker pull nacos/nacos-server:v2.2.0
第二步:创建持久化目录
# 用于存放redis数据
### conf 配置文件
### data 数据
### logs 日志
mkdir -p /home/nacos/{conf,data,logs}
进去conf目录,创建文件application.properties
cd /home/nacos/conf
touch application.properties
application.properties内容如下
#
# Copyright 1999-2021 Alibaba Group Holding Ltd.
#
# Licensed under the Apache License, Version 2.0 (the "License");
# you may not use this file except in compliance with the License.
# You may obtain a copy of the License at
#
#      http://www.apache.org/licenses/LICENSE-2.0
#
# Unless required by applicable law or agreed to in writing, software
# distributed under the License is distributed on an "AS IS" BASIS,
# WITHOUT WARRANTIES OR CONDITIONS OF ANY KIND, either express or implied.
# See the License for the specific language governing permissions and
# limitations under the License.
#

#*************** Spring Boot Related Configurations ***************#
### Default web context path:
server.servlet.contextPath=/nacos
### Include message field
server.error.include-message=ALWAYS
### Default web server port:
server.port=8848

#*************** Network Related Configurations ***************#
### If prefer hostname over ip for Nacos server addresses in cluster.conf:
# nacos.inetutils.prefer-hostname-over-ip=false

### Specify local server's IP:
# nacos.inetutils.ip-address=


#*************** Config Module Related Configurations ***************#
### If use MySQL as datasource:
# spring.datasource.platform=mysql

### Count of DB:
# db.num=1

### Connect URL of DB:
# db.url.0=jdbc:mysql://127.0.0.1:3306/nacos?characterEncoding=utf8&connectTimeout=1000&socketTimeout=3000&autoReconnect=true&useUnicode=true&useSSL=false&serverTimezone=UTC
# db.user=nacos
# db.password=nacos

### Connection pool configuration: hikariCP
db.pool.config.connectionTimeout=30000
db.pool.config.validationTimeout=10000
db.pool.config.maximumPoolSize=20
db.pool.config.minimumIdle=2

#*************** Naming Module Related Configurations ***************#

### If enable data warmup. If set to false, the server would accept request without local data preparation:
# nacos.naming.data.warmup=true

### If enable the instance auto expiration, kind like of health check of instance:
# nacos.naming.expireInstance=true

### Add in 2.0.0
### The interval to clean empty service, unit: milliseconds.
# nacos.naming.clean.empty-service.interval=60000

### The expired time to clean empty service, unit: milliseconds.
# nacos.naming.clean.empty-service.expired-time=60000

### The interval to clean expired metadata, unit: milliseconds.
# nacos.naming.clean.expired-metadata.interval=5000

### The expired time to clean metadata, unit: milliseconds.
# nacos.naming.clean.expired-metadata.expired-time=60000

### The delay time before push task to execute from service changed, unit: milliseconds.
# nacos.naming.push.pushTaskDelay=500

### The timeout for push task execute, unit: milliseconds.
# nacos.naming.push.pushTaskTimeout=5000

### The delay time for retrying failed push task, unit: milliseconds.
# nacos.naming.push.pushTaskRetryDelay=1000

### Since 2.0.3
### The expired time for inactive client, unit: milliseconds.
# nacos.naming.client.expired.time=180000

#*************** CMDB Module Related Configurations ***************#
### The interval to dump external CMDB in seconds:
# nacos.cmdb.dumpTaskInterval=3600

### The interval of polling data change event in seconds:
# nacos.cmdb.eventTaskInterval=10

### The interval of loading labels in seconds:
# nacos.cmdb.labelTaskInterval=300

### If turn on data loading task:
# nacos.cmdb.loadDataAtStart=false


#*************** Metrics Related Configurations ***************#
### Metrics for prometheus
#management.endpoints.web.exposure.include=*

### Metrics for elastic search
management.metrics.export.elastic.enabled=false
#management.metrics.export.elastic.host=http://localhost:9200

### Metrics for influx
management.metrics.export.influx.enabled=false
#management.metrics.export.influx.db=springboot
#management.metrics.export.influx.uri=http://localhost:8086
#management.metrics.export.influx.auto-create-db=true
#management.metrics.export.influx.consistency=one
#management.metrics.export.influx.compressed=true

#*************** Access Log Related Configurations ***************#
### If turn on the access log:
server.tomcat.accesslog.enabled=true

### The access log pattern:
server.tomcat.accesslog.pattern=%h %l %u %t "%r" %s %b %D %{User-Agent}i %{Request-Source}i

### The directory of access log:
server.tomcat.basedir=file:.

#*************** Access Control Related Configurations ***************#
### If enable spring security, this option is deprecated in 1.2.0:
#spring.security.enabled=false

### The ignore urls of auth
nacos.security.ignore.urls=/,/error,/**/*.css,/**/*.js,/**/*.html,/**/*.map,/**/*.svg,/**/*.png,/**/*.ico,/console-ui/public/**,/v1/auth/**,/v1/console/health/**,/actuator/**,/v1/console/server/**

### The auth system to use, currently only 'nacos' and 'ldap' is supported:
nacos.core.auth.system.type=nacos

### If turn on auth system:
nacos.core.auth.enabled=false

### Turn on/off caching of auth information. By turning on this switch, the update of auth information would have a 15 seconds delay.
nacos.core.auth.caching.enabled=true

### Since 1.4.1, Turn on/off white auth for user-agent: nacos-server, only for upgrade from old version.
nacos.core.auth.enable.userAgentAuthWhite=false

### Since 1.4.1, worked when nacos.core.auth.enabled=true and nacos.core.auth.enable.userAgentAuthWhite=false.
### The two properties is the white list for auth and used by identity the request from other server.
### 根据具体修改哈!为了安全,千万不要一致哈
nacos.core.auth.server.identity.key=security
### security_nacos md5加密,根据具体修改哈!为了安全,千万不要一致哈
nacos.core.auth.server.identity.value=d203f62510a84d10bccd812e630bd5d6

### worked when nacos.core.auth.system.type=nacos
### The token expiration in seconds:
nacos.core.auth.plugin.nacos.token.expire.seconds=18000
### The default token (Base64 String):
### security_nacos_token md5加密 50bebae6f2af2f4649f8891a0c3cca38,再base64,根据具体修改哈!为了安全,千万不要一致哈
nacos.core.auth.plugin.nacos.token.secret.key=NTBiZWJhZTZmMmFmMmY0NjQ5Zjg4OTFhMGMzY2NhMzg=

### worked when nacos.core.auth.system.type=ldap,{0} is Placeholder,replace login username
#nacos.core.auth.ldap.url=ldap://localhost:389
#nacos.core.auth.ldap.basedc=dc=example,dc=org
#nacos.core.auth.ldap.userDn=cn=admin,${nacos.core.auth.ldap.basedc}
#nacos.core.auth.ldap.password=admin
#nacos.core.auth.ldap.userdn=cn={0},dc=example,dc=org
#nacos.core.auth.ldap.filter.prefix=uid
#nacos.core.auth.ldap.case.sensitive=true


#*************** Istio Related Configurations ***************#
### If turn on the MCP server:
nacos.istio.mcp.server.enabled=false

#*************** Core Related Configurations ***************#

### set the WorkerID manually
# nacos.core.snowflake.worker-id=

### Member-MetaData
# nacos.core.member.meta.site=
# nacos.core.member.meta.adweight=
# nacos.core.member.meta.weight=

### MemberLookup
### Addressing pattern category, If set, the priority is highest
# nacos.core.member.lookup.type=[file,address-server]
## Set the cluster list with a configuration file or command-line argument
# nacos.member.list=192.168.16.101:8847?raft_port=8807,192.168.16.101?raft_port=8808,192.168.16.101:8849?raft_port=8809
## for AddressServerMemberLookup
# Maximum number of retries to query the address server upon initialization
# nacos.core.address-server.retry=5
## Server domain name address of [address-server] mode
# address.server.domain=jmenv.tbsite.net
## Server port of [address-server] mode
# address.server.port=8080
## Request address of [address-server] mode
# address.server.url=/nacos/serverlist

#*************** JRaft Related Configurations ***************#

### Sets the Raft cluster election timeout, default value is 5 second
# nacos.core.protocol.raft.data.election_timeout_ms=5000
### Sets the amount of time the Raft snapshot will execute periodically, default is 30 minute
# nacos.core.protocol.raft.data.snapshot_interval_secs=30
### raft internal worker threads
# nacos.core.protocol.raft.data.core_thread_num=8
### Number of threads required for raft business request processing
# nacos.core.protocol.raft.data.cli_service_thread_num=4
### raft linear read strategy. Safe linear reads are used by default, that is, the Leader tenure is confirmed by heartbeat
# nacos.core.protocol.raft.data.read_index_type=ReadOnlySafe
### rpc request timeout, default 5 seconds
# nacos.core.protocol.raft.data.rpc_request_timeout_ms=5000

#*************** Distro Related Configurations ***************#

### Distro data sync delay time, when sync task delayed, task will be merged for same data key. Default 1 second.
# nacos.core.protocol.distro.data.sync.delayMs=1000

### Distro data sync timeout for one sync data, default 3 seconds.
# nacos.core.protocol.distro.data.sync.timeoutMs=3000

### Distro data sync retry delay time when sync data failed or timeout, same behavior with delayMs, default 3 seconds.
# nacos.core.protocol.distro.data.sync.retryDelayMs=3000

### Distro data verify interval time, verify synced data whether expired for a interval. Default 5 seconds.
# nacos.core.protocol.distro.data.verify.intervalMs=5000

### Distro data verify timeout for one verify, default 3 seconds.
# nacos.core.protocol.distro.data.verify.timeoutMs=3000

### Distro data load retry delay when load snapshot data failed, default 30 seconds.
# nacos.core.protocol.distro.data.load.retryDelayMs=30000

### enable to support prometheus service discovery
#nacos.prometheus.metrics.enabled=true
需要使用mysql,首先要初始化mysql,如下
/*
 * Copyright 1999-2018 Alibaba Group Holding Ltd.
 *
 * Licensed under the Apache License, Version 2.0 (the "License");
 * you may not use this file except in compliance with the License.
 * You may obtain a copy of the License at
 *
 *      http://www.apache.org/licenses/LICENSE-2.0
 *
 * Unless required by applicable law or agreed to in writing, software
 * distributed under the License is distributed on an "AS IS" BASIS,
 * WITHOUT WARRANTIES OR CONDITIONS OF ANY KIND, either express or implied.
 * See the License for the specific language governing permissions and
 * limitations under the License.
 */

/******************************************/
/*   数据库全名 = nacos_config   */
/*   表名称 = config_info   */
/******************************************/
CREATE TABLE `config_info` (
  `id` bigint(20) NOT NULL AUTO_INCREMENT COMMENT 'id',
  `data_id` varchar(255) NOT NULL COMMENT 'data_id',
  `group_id` varchar(128) DEFAULT NULL,
  `content` longtext NOT NULL COMMENT 'content',
  `md5` varchar(32) DEFAULT NULL COMMENT 'md5',
  `gmt_create` datetime NOT NULL DEFAULT CURRENT_TIMESTAMP COMMENT '创建时间',
  `gmt_modified` datetime NOT NULL DEFAULT CURRENT_TIMESTAMP COMMENT '修改时间',
  `src_user` text COMMENT 'source user',
  `src_ip` varchar(50) DEFAULT NULL COMMENT 'source ip',
  `app_name` varchar(128) DEFAULT NULL,
  `tenant_id` varchar(128) DEFAULT '' COMMENT '租户字段',
  `c_desc` varchar(256) DEFAULT NULL,
  `c_use` varchar(64) DEFAULT NULL,
  `effect` varchar(64) DEFAULT NULL,
  `type` varchar(64) DEFAULT NULL,
  `c_schema` text,
  `encrypted_data_key` text NOT NULL COMMENT '秘钥',
  PRIMARY KEY (`id`),
  UNIQUE KEY `uk_configinfo_datagrouptenant` (`data_id`,`group_id`,`tenant_id`)
) ENGINE=InnoDB DEFAULT CHARSET=utf8 COLLATE=utf8_bin COMMENT='config_info';

/******************************************/
/*   数据库全名 = nacos_config   */
/*   表名称 = config_info_aggr   */
/******************************************/
CREATE TABLE `config_info_aggr` (
  `id` bigint(20) NOT NULL AUTO_INCREMENT COMMENT 'id',
  `data_id` varchar(255) NOT NULL COMMENT 'data_id',
  `group_id` varchar(128) NOT NULL COMMENT 'group_id',
  `datum_id` varchar(255) NOT NULL COMMENT 'datum_id',
  `content` longtext NOT NULL COMMENT '内容',
  `gmt_modified` datetime NOT NULL COMMENT '修改时间',
  `app_name` varchar(128) DEFAULT NULL,
  `tenant_id` varchar(128) DEFAULT '' COMMENT '租户字段',
  PRIMARY KEY (`id`),
  UNIQUE KEY `uk_configinfoaggr_datagrouptenantdatum` (`data_id`,`group_id`,`tenant_id`,`datum_id`)
) ENGINE=InnoDB DEFAULT CHARSET=utf8 COLLATE=utf8_bin COMMENT='增加租户字段';


/******************************************/
/*   数据库全名 = nacos_config   */
/*   表名称 = config_info_beta   */
/******************************************/
CREATE TABLE `config_info_beta` (
  `id` bigint(20) NOT NULL AUTO_INCREMENT COMMENT 'id',
  `data_id` varchar(255) NOT NULL COMMENT 'data_id',
  `group_id` varchar(128) NOT NULL COMMENT 'group_id',
  `app_name` varchar(128) DEFAULT NULL COMMENT 'app_name',
  `content` longtext NOT NULL COMMENT 'content',
  `beta_ips` varchar(1024) DEFAULT NULL COMMENT 'betaIps',
  `md5` varchar(32) DEFAULT NULL COMMENT 'md5',
  `gmt_create` datetime NOT NULL DEFAULT CURRENT_TIMESTAMP COMMENT '创建时间',
  `gmt_modified` datetime NOT NULL DEFAULT CURRENT_TIMESTAMP COMMENT '修改时间',
  `src_user` text COMMENT 'source user',
  `src_ip` varchar(50) DEFAULT NULL COMMENT 'source ip',
  `tenant_id` varchar(128) DEFAULT '' COMMENT '租户字段',
  `encrypted_data_key` text NOT NULL COMMENT '秘钥',
  PRIMARY KEY (`id`),
  UNIQUE KEY `uk_configinfobeta_datagrouptenant` (`data_id`,`group_id`,`tenant_id`)
) ENGINE=InnoDB DEFAULT CHARSET=utf8 COLLATE=utf8_bin COMMENT='config_info_beta';

/******************************************/
/*   数据库全名 = nacos_config   */
/*   表名称 = config_info_tag   */
/******************************************/
CREATE TABLE `config_info_tag` (
  `id` bigint(20) NOT NULL AUTO_INCREMENT COMMENT 'id',
  `data_id` varchar(255) NOT NULL COMMENT 'data_id',
  `group_id` varchar(128) NOT NULL COMMENT 'group_id',
  `tenant_id` varchar(128) DEFAULT '' COMMENT 'tenant_id',
  `tag_id` varchar(128) NOT NULL COMMENT 'tag_id',
  `app_name` varchar(128) DEFAULT NULL COMMENT 'app_name',
  `content` longtext NOT NULL COMMENT 'content',
  `md5` varchar(32) DEFAULT NULL COMMENT 'md5',
  `gmt_create` datetime NOT NULL DEFAULT CURRENT_TIMESTAMP COMMENT '创建时间',
  `gmt_modified` datetime NOT NULL DEFAULT CURRENT_TIMESTAMP COMMENT '修改时间',
  `src_user` text COMMENT 'source user',
  `src_ip` varchar(50) DEFAULT NULL COMMENT 'source ip',
  PRIMARY KEY (`id`),
  UNIQUE KEY `uk_configinfotag_datagrouptenanttag` (`data_id`,`group_id`,`tenant_id`,`tag_id`)
) ENGINE=InnoDB DEFAULT CHARSET=utf8 COLLATE=utf8_bin COMMENT='config_info_tag';

/******************************************/
/*   数据库全名 = nacos_config   */
/*   表名称 = config_tags_relation   */
/******************************************/
CREATE TABLE `config_tags_relation` (
  `id` bigint(20) NOT NULL COMMENT 'id',
  `tag_name` varchar(128) NOT NULL COMMENT 'tag_name',
  `tag_type` varchar(64) DEFAULT NULL COMMENT 'tag_type',
  `data_id` varchar(255) NOT NULL COMMENT 'data_id',
  `group_id` varchar(128) NOT NULL COMMENT 'group_id',
  `tenant_id` varchar(128) DEFAULT '' COMMENT 'tenant_id',
  `nid` bigint(20) NOT NULL AUTO_INCREMENT,
  PRIMARY KEY (`nid`),
  UNIQUE KEY `uk_configtagrelation_configidtag` (`id`,`tag_name`,`tag_type`),
  KEY `idx_tenant_id` (`tenant_id`)
) ENGINE=InnoDB DEFAULT CHARSET=utf8 COLLATE=utf8_bin COMMENT='config_tag_relation';

/******************************************/
/*   数据库全名 = nacos_config   */
/*   表名称 = group_capacity   */
/******************************************/
CREATE TABLE `group_capacity` (
  `id` bigint(20) unsigned NOT NULL AUTO_INCREMENT COMMENT '主键ID',
  `group_id` varchar(128) NOT NULL DEFAULT '' COMMENT 'Group ID,空字符表示整个集群',
  `quota` int(10) unsigned NOT NULL DEFAULT '0' COMMENT '配额,0表示使用默认值',
  `usage` int(10) unsigned NOT NULL DEFAULT '0' COMMENT '使用量',
  `max_size` int(10) unsigned NOT NULL DEFAULT '0' COMMENT '单个配置大小上限,单位为字节,0表示使用默认值',
  `max_aggr_count` int(10) unsigned NOT NULL DEFAULT '0' COMMENT '聚合子配置最大个数,,0表示使用默认值',
  `max_aggr_size` int(10) unsigned NOT NULL DEFAULT '0' COMMENT '单个聚合数据的子配置大小上限,单位为字节,0表示使用默认值',
  `max_history_count` int(10) unsigned NOT NULL DEFAULT '0' COMMENT '最大变更历史数量',
  `gmt_create` datetime NOT NULL DEFAULT CURRENT_TIMESTAMP COMMENT '创建时间',
  `gmt_modified` datetime NOT NULL DEFAULT CURRENT_TIMESTAMP COMMENT '修改时间',
  PRIMARY KEY (`id`),
  UNIQUE KEY `uk_group_id` (`group_id`)
) ENGINE=InnoDB DEFAULT CHARSET=utf8 COLLATE=utf8_bin COMMENT='集群、各Group容量信息表';

/******************************************/
/*   数据库全名 = nacos_config   */
/*   表名称 = his_config_info   */
/******************************************/
CREATE TABLE `his_config_info` (
  `id` bigint(20) unsigned NOT NULL,
  `nid` bigint(20) unsigned NOT NULL AUTO_INCREMENT,
  `data_id` varchar(255) NOT NULL,
  `group_id` varchar(128) NOT NULL,
  `app_name` varchar(128) DEFAULT NULL COMMENT 'app_name',
  `content` longtext NOT NULL,
  `md5` varchar(32) DEFAULT NULL,
  `gmt_create` datetime NOT NULL DEFAULT CURRENT_TIMESTAMP,
  `gmt_modified` datetime NOT NULL DEFAULT CURRENT_TIMESTAMP,
  `src_user` text,
  `src_ip` varchar(50) DEFAULT NULL,
  `op_type` char(10) DEFAULT NULL,
  `tenant_id` varchar(128) DEFAULT '' COMMENT '租户字段',
  `encrypted_data_key` text NOT NULL COMMENT '秘钥',
  PRIMARY KEY (`nid`),
  KEY `idx_gmt_create` (`gmt_create`),
  KEY `idx_gmt_modified` (`gmt_modified`),
  KEY `idx_did` (`data_id`)
) ENGINE=InnoDB DEFAULT CHARSET=utf8 COLLATE=utf8_bin COMMENT='多租户改造';


/******************************************/
/*   数据库全名 = nacos_config   */
/*   表名称 = tenant_capacity   */
/******************************************/
CREATE TABLE `tenant_capacity` (
  `id` bigint(20) unsigned NOT NULL AUTO_INCREMENT COMMENT '主键ID',
  `tenant_id` varchar(128) NOT NULL DEFAULT '' COMMENT 'Tenant ID',
  `quota` int(10) unsigned NOT NULL DEFAULT '0' COMMENT '配额,0表示使用默认值',
  `usage` int(10) unsigned NOT NULL DEFAULT '0' COMMENT '使用量',
  `max_size` int(10) unsigned NOT NULL DEFAULT '0' COMMENT '单个配置大小上限,单位为字节,0表示使用默认值',
  `max_aggr_count` int(10) unsigned NOT NULL DEFAULT '0' COMMENT '聚合子配置最大个数',
  `max_aggr_size` int(10) unsigned NOT NULL DEFAULT '0' COMMENT '单个聚合数据的子配置大小上限,单位为字节,0表示使用默认值',
  `max_history_count` int(10) unsigned NOT NULL DEFAULT '0' COMMENT '最大变更历史数量',
  `gmt_create` datetime NOT NULL DEFAULT CURRENT_TIMESTAMP COMMENT '创建时间',
  `gmt_modified` datetime NOT NULL DEFAULT CURRENT_TIMESTAMP COMMENT '修改时间',
  PRIMARY KEY (`id`),
  UNIQUE KEY `uk_tenant_id` (`tenant_id`)
) ENGINE=InnoDB DEFAULT CHARSET=utf8 COLLATE=utf8_bin COMMENT='租户容量信息表';


CREATE TABLE `tenant_info` (
  `id` bigint(20) NOT NULL AUTO_INCREMENT COMMENT 'id',
  `kp` varchar(128) NOT NULL COMMENT 'kp',
  `tenant_id` varchar(128) default '' COMMENT 'tenant_id',
  `tenant_name` varchar(128) default '' COMMENT 'tenant_name',
  `tenant_desc` varchar(256) DEFAULT NULL COMMENT 'tenant_desc',
  `create_source` varchar(32) DEFAULT NULL COMMENT 'create_source',
  `gmt_create` bigint(20) NOT NULL COMMENT '创建时间',
  `gmt_modified` bigint(20) NOT NULL COMMENT '修改时间',
  PRIMARY KEY (`id`),
  UNIQUE KEY `uk_tenant_info_kptenantid` (`kp`,`tenant_id`),
  KEY `idx_tenant_id` (`tenant_id`)
) ENGINE=InnoDB DEFAULT CHARSET=utf8 COLLATE=utf8_bin COMMENT='tenant_info';

CREATE TABLE `users` (
	`username` varchar(50) NOT NULL PRIMARY KEY,
	`password` varchar(500) NOT NULL,
	`enabled` boolean NOT NULL
);

CREATE TABLE `roles` (
	`username` varchar(50) NOT NULL,
	`role` varchar(50) NOT NULL,
	UNIQUE INDEX `idx_user_role` (`username` ASC, `role` ASC) USING BTREE
);

CREATE TABLE `permissions` (
    `role` varchar(50) NOT NULL,
    `resource` varchar(255) NOT NULL,
    `action` varchar(8) NOT NULL,
    UNIQUE INDEX `uk_role_permission` (`role`,`resource`,`action`) USING BTREE
);

INSERT INTO users (username, password, enabled) VALUES ('nacos', '$2a$10$EuWPZHzz32dJN7jexM34MOeYirDdFAZm2kuWj7VEOJhhZkDrxfvUu', TRUE);

INSERT INTO roles (username, role) VALUES ('nacos', 'ROLE_ADMIN');
修改配置文件即可
spring.datasource.platform=mysql
db.num=1
db.url.0=jdbc:mysql://127.0.0.1:3306/nacos?characterEncoding=utf8&connectTimeout=1000&socketTimeout=3000&autoReconnect=true&useUnicode=true&useSSL=false&serverTimezone=UTC
db.user=nacos
db.password=nacos
第三步:启动nacos容器
docker run -itd --restart=always --name nacos -p 8848:8848 -e JVM_XMS=256m -e JVM_XMX=256m -e MODE=standalone -v /home/nacos/conf/application.properties:/home/nacos/conf/application.properties -v /home/nacos/data:/home/nacos/data -v /home/nacos/logs:/home/nacos/logs nacos/nacos-server:v2.2.0
命令如上安装mysql有介绍,不做赘述
第四步:验证是否启动成功
第一种:在安装的服务器输入
curl 127.0.0.1:8848/nacos/index.html
有如下,即为安装成功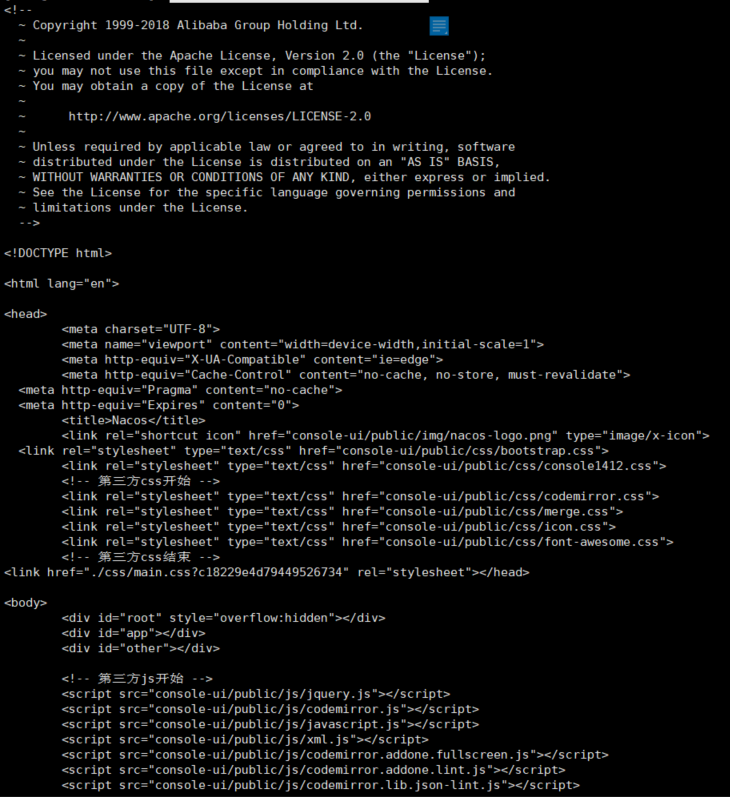
第二种:直接在浏览器输入ip:8848/nacos/index.html,能打开登录界面即为成功。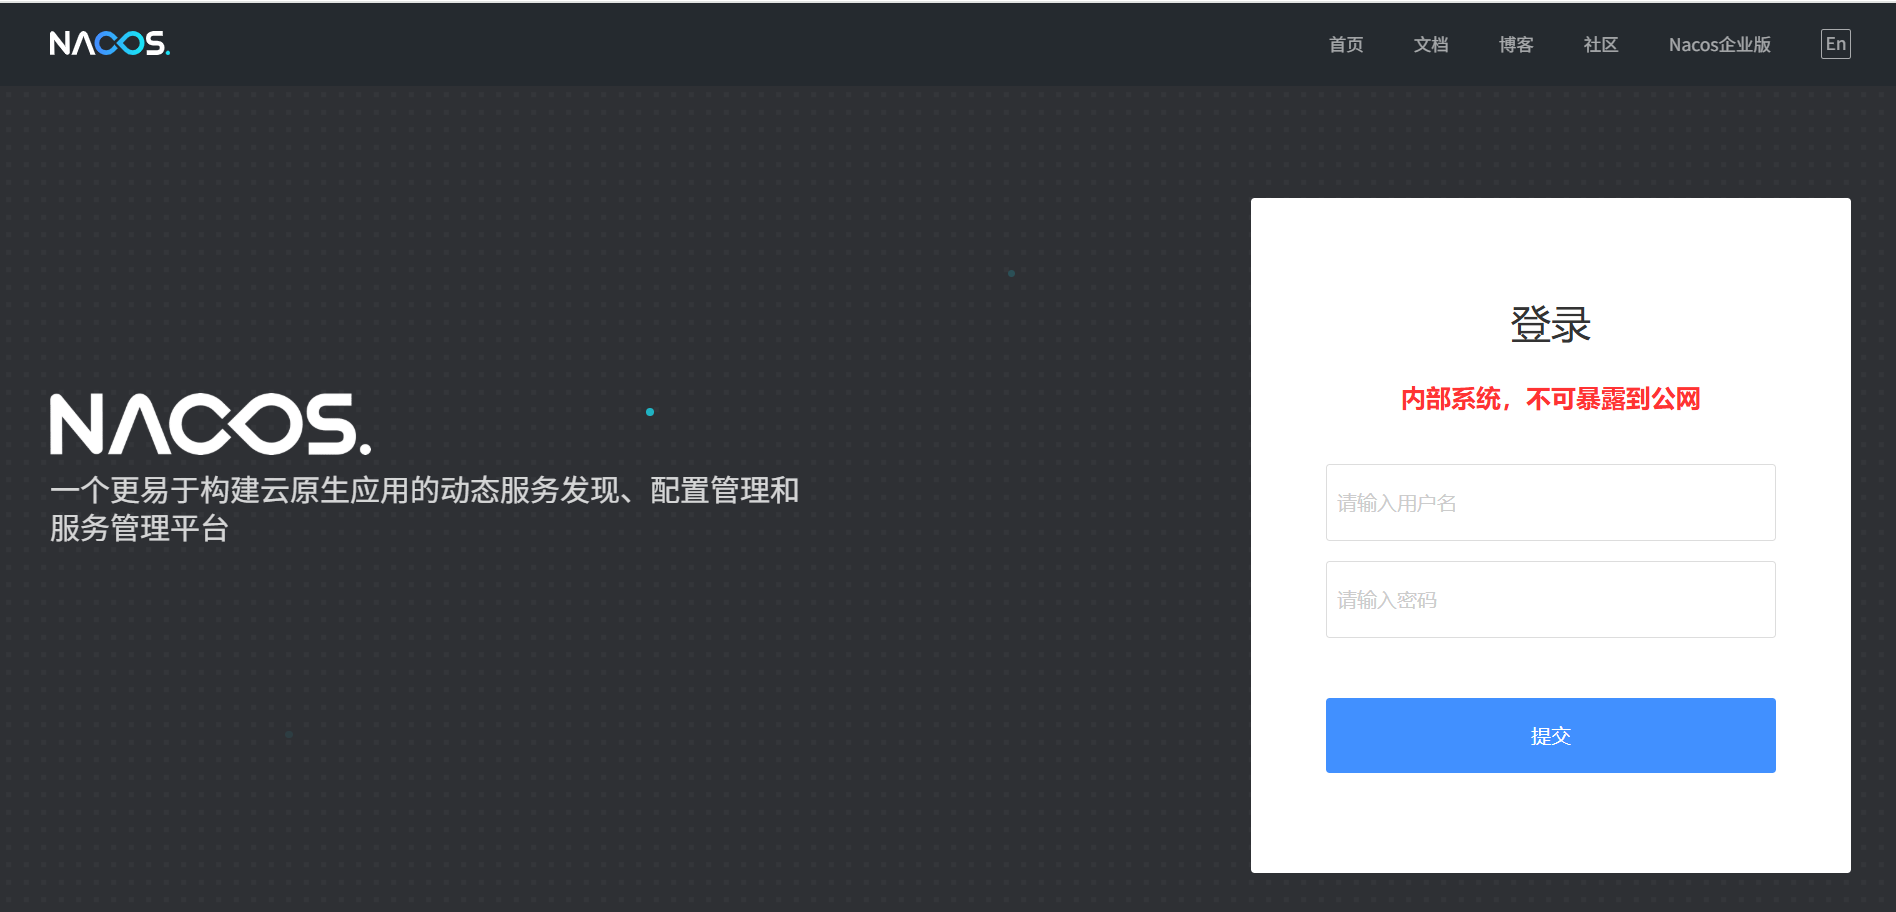
初始化用户名密码为nacos,建议修改哈!
安装seata
简介
Seata 是一款开源的分布式事务解决方案,致力于提供高性能和简单易用的分布式事务服务。Seata 将为用户提供了 AT、TCC、SAGA 和 XA 事务模式,为用户打造一站式的分布式解决方案。
分布式事务产生
一个重要原因,就是参与事务的多个分支事务互相无感知,不知道彼此的执行状态。因此解决分布式事务的思想非常简单:
就是找一个统一的事务协调者,与多个分支事务通信,检测每个分支事务的执行状态,保证全局事务下的每一个分支事务同时成功或失败即可。大多数的分布式事务框架都是基于这个理论来实现的。
在Seata的事务管理中有三个重要的角色:
TC ( Transaction Coordinator ) - 事务协调者: 维护全局和分支事务的状态,协调全局事务提交或回滚。
TM (Transaction Manager) - 事务管理器: 定义全局事务的范围、开始全局事务、提交或回滚全局事务。
RM (Resource Manager) - 资源管理器: 管理分支事务,与TC交谈以注册分支事务和报告分支事务的状态,并驱动分支事务提交或回滚。
第一步:拉取seata镜像,与nacos2.2.0搭配使用,所以拉取的是1.6.1镜像
docker pull seataio/seata-server:1.6.1
第二步:创建持久化目录,创建application.yml文件
mkdir -p /home/seate
# 创建application.yml文件
touch application.yml
application.yml文件内容如下,使用的是nacos
server:
  port: 7091

spring:
  application:
    name: seata-server

logging:
  config: classpath:logback-spring.xml
  file:
    path: ${user.home}/logs/seata
  extend:
    logstash-appender:
      destination: 127.0.0.1:4560
    kafka-appender:
      bootstrap-servers: 127.0.0.1:9092
      topic: logback_to_logstash

# 控制台通过127.0.0.1:7091访问登录
console:
  user:
    username: seata
    password: seata

seata:
  # seata 接入 nacos 配置中心
  config:
    # support: nacos, consul, apollo, zk, etcd3
    type: nacos
    nacos:
      server-addr: 127.0.0.1:8848
      namespace:  # 命名空间ID,换成自己的
      group: SEATA_GROUP # 组名,换成自己的
      username: nacos
      password: nacos
      data-id: seataServer.properties
  # seata 接入 nacos 注册中心
  registry:
    # support: nacos, eureka, redis, zk, consul, etcd3, sofa
    type:  nacos
    nacos:
      application: seata-server #在nacos显示的注册名
      server-addr: 127.0.0.1:8848
      namespace:
      group: SEATA_GROUP
      cluster: default
      username: nacos
      password: nacos

  # 以下通过配置文件配置即可
  # store:
    # support: file 、 db 、 redis
    # mode: file
#  server:
#    service-port: 8091 #If not configured, the default is '${server.port} + 1000'
  security:
    secretKey: 48b753f2fd75bf6f8eef863475298671274845480c92edaeeff3e09854b270b9 # HS256生成
    tokenValidityInMilliseconds: 1800000
    ignore:
      urls: /,/**/*.css,/**/*.js,/**/*.html,/**/*.map,/**/*.svg,/**/*.png,/**/*.ico,/console-fe/public/**,/api/v1/auth/login
初始化数据库
进入script\server\db找到sql文件,根据不同数据库选择相应文件,这里我选择了mysql.sql
新建seata数据库,导入以下数据(这里使用的是seata默认的AT模式,所以需要导入undo_log表)
mysql.sql内容如下:
-- -------------------------------- The script used when storeMode is 'db' --------------------------------
-- the table to store GlobalSession data
CREATE TABLE IF NOT EXISTS `global_table`
(
    `xid`                       VARCHAR(128) NOT NULL,
    `transaction_id`            BIGINT,
    `status`                    TINYINT      NOT NULL,
    `application_id`            VARCHAR(32),
    `transaction_service_group` VARCHAR(32),
    `transaction_name`          VARCHAR(128),
    `timeout`                   INT,
    `begin_time`                BIGINT,
    `application_data`          VARCHAR(2000),
    `gmt_create`                DATETIME,
    `gmt_modified`              DATETIME,
    PRIMARY KEY (`xid`),
    KEY `idx_status_gmt_modified` (`status` , `gmt_modified`),
    KEY `idx_transaction_id` (`transaction_id`)
) ENGINE = InnoDB
  DEFAULT CHARSET = utf8mb4;

-- the table to store BranchSession data
CREATE TABLE IF NOT EXISTS `branch_table`
(
    `branch_id`         BIGINT       NOT NULL,
    `xid`               VARCHAR(128) NOT NULL,
    `transaction_id`    BIGINT,
    `resource_group_id` VARCHAR(32),
    `resource_id`       VARCHAR(256),
    `branch_type`       VARCHAR(8),
    `status`            TINYINT,
    `client_id`         VARCHAR(64),
    `application_data`  VARCHAR(2000),
    `gmt_create`        DATETIME(6),
    `gmt_modified`      DATETIME(6),
    PRIMARY KEY (`branch_id`),
    KEY `idx_xid` (`xid`)
) ENGINE = InnoDB
  DEFAULT CHARSET = utf8mb4;

-- the table to store lock data
CREATE TABLE IF NOT EXISTS `lock_table`
(
    `row_key`        VARCHAR(128) NOT NULL,
    `xid`            VARCHAR(128),
    `transaction_id` BIGINT,
    `branch_id`      BIGINT       NOT NULL,
    `resource_id`    VARCHAR(256),
    `table_name`     VARCHAR(32),
    `pk`             VARCHAR(36),
    `status`         TINYINT      NOT NULL DEFAULT '0' COMMENT '0:locked ,1:rollbacking',
    `gmt_create`     DATETIME,
    `gmt_modified`   DATETIME,
    PRIMARY KEY (`row_key`),
    KEY `idx_status` (`status`),
    KEY `idx_branch_id` (`branch_id`),
    KEY `idx_xid` (`xid`)
) ENGINE = InnoDB
  DEFAULT CHARSET = utf8mb4;

CREATE TABLE IF NOT EXISTS `distributed_lock`
(
    `lock_key`       CHAR(20) NOT NULL,
    `lock_value`     VARCHAR(20) NOT NULL,
    `expire`         BIGINT,
    primary key (`lock_key`)
) ENGINE = InnoDB
  DEFAULT CHARSET = utf8mb4;

INSERT INTO `distributed_lock` (lock_key, lock_value, expire) VALUES ('AsyncCommitting', ' ', 0);
INSERT INTO `distributed_lock` (lock_key, lock_value, expire) VALUES ('RetryCommitting', ' ', 0);
INSERT INTO `distributed_lock` (lock_key, lock_value, expire) VALUES ('RetryRollbacking', ' ', 0);
INSERT INTO `distributed_lock` (lock_key, lock_value, expire) VALUES ('TxTimeoutCheck', ' ', 0);
在要使用事物的数据库导入以下数据表undo_log:
CREATE TABLE IF NOT EXISTS `undo_log`
(
    `branch_id`     BIGINT       NOT NULL COMMENT 'branch transaction id',
    `xid`           VARCHAR(128) NOT NULL COMMENT 'global transaction id',
    `context`       VARCHAR(128) NOT NULL COMMENT 'undo_log context,such as serialization',
    `rollback_info` LONGBLOB     NOT NULL COMMENT 'rollback info',
    `log_status`    INT(11)      NOT NULL COMMENT '0:normal status,1:defense status',
    `log_created`   DATETIME(6)  NOT NULL COMMENT 'create datetime',
    `log_modified`  DATETIME(6)  NOT NULL COMMENT 'modify datetime',
    UNIQUE KEY `ux_undo_log` (`xid`, `branch_id`)
) ENGINE = InnoDB AUTO_INCREMENT = 1 DEFAULT CHARSET = utf8mb4 COMMENT ='AT transaction mode undo table';
ALTER TABLE `undo_log` ADD INDEX `ix_log_created` (`log_created`);
第三步:启动seata容器
docker run -itd --restart=always --name seata-server -p 8091:8091 -p 7091:7091 -v /home/seata/application.yml:/seata-server/resources/application.yml -e SEATA_PORT=8091 seataio/seata-server:1.6.1
安装成功后可访问http://127.0.0.1:7091
或者查看启动日志
# 521e02fa5e49 seate容器id
docker logs -f 521e02fa5e49
如图所示即为安装启动成功

开打nacos管理页面可在服务管理-服务列表中看到seata-server服务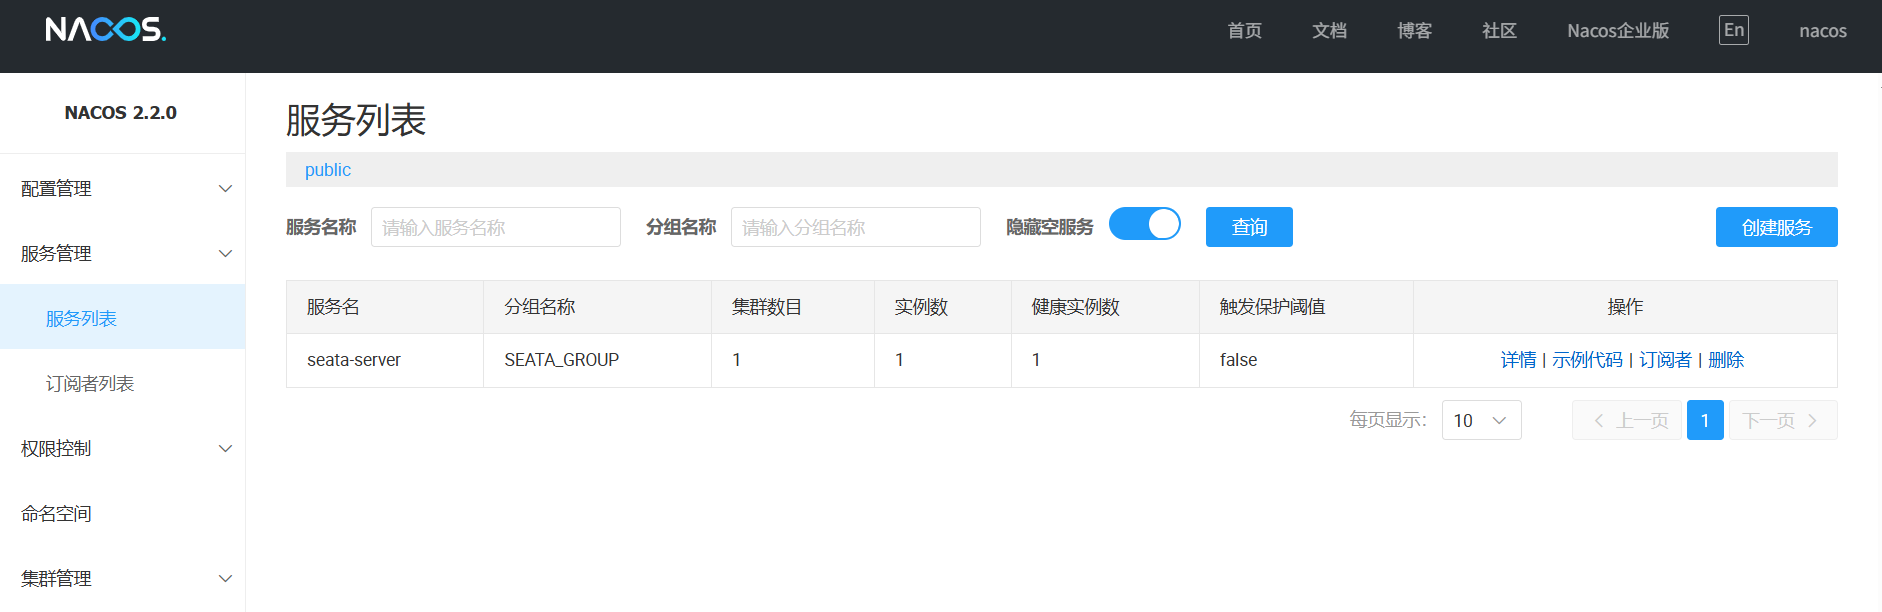
接下来就是nacos配置了,需要nacos中的配置管理-配置列表中新增seataServer.properties配置文件
注意:seataServer.properties要与seata中的application.yml配置文件中的data-id: seataServer.properties一致,组名命名空间等也要一致。
seataServer.properties内容如下:
#For details about configuration items, see https://seata.io/zh-cn/docs/user/configurations.html
#Transport configuration, for client and server
transport.type=TCP
transport.server=NIO
transport.heartbeat=true
transport.enableTmClientBatchSendRequest=false
transport.enableRmClientBatchSendRequest=true
transport.enableTcServerBatchSendResponse=false
transport.rpcRmRequestTimeout=30000
transport.rpcTmRequestTimeout=30000
transport.rpcTcRequestTimeout=30000
transport.threadFactory.bossThreadPrefix=NettyBoss
transport.threadFactory.workerThreadPrefix=NettyServerNIOWorker
transport.threadFactory.serverExecutorThreadPrefix=NettyServerBizHandler
transport.threadFactory.shareBossWorker=false
transport.threadFactory.clientSelectorThreadPrefix=NettyClientSelector
transport.threadFactory.clientSelectorThreadSize=1
transport.threadFactory.clientWorkerThreadPrefix=NettyClientWorkerThread
transport.threadFactory.bossThreadSize=1
transport.threadFactory.workerThreadSize=default
transport.shutdown.wait=3
transport.serialization=seata
transport.compressor=none

#Transaction routing rules configuration, only for the client
service.vgroupMapping.default-system-group=default
#If you use a registry, you can ignore it
service.default.grouplist=127.0.0.1:8091
service.enableDegrade=false
service.disableGlobalTransaction=false

#Transaction rule configuration, only for the client
client.rm.asyncCommitBufferLimit=10000
client.rm.lock.retryInterval=10
client.rm.lock.retryTimes=30
client.rm.lock.retryPolicyBranchRollbackOnConflict=true
client.rm.reportRetryCount=5
client.rm.tableMetaCheckEnable=true
client.rm.tableMetaCheckerInterval=60000
client.rm.sqlParserType=druid
client.rm.reportSuccessEnable=false
client.rm.sagaBranchRegisterEnable=false
client.rm.sagaJsonParser=fastjson
client.rm.tccActionInterceptorOrder=-2147482648
client.tm.commitRetryCount=5
client.tm.rollbackRetryCount=5
client.tm.defaultGlobalTransactionTimeout=60000
client.tm.degradeCheck=false
client.tm.degradeCheckAllowTimes=10
client.tm.degradeCheckPeriod=2000
client.tm.interceptorOrder=-2147482648
client.undo.dataValidation=true
client.undo.logSerialization=jackson
client.undo.onlyCareUpdateColumns=true
server.undo.logSaveDays=7
server.undo.logDeletePeriod=86400000
client.undo.logTable=undo_log
client.undo.compress.enable=true
client.undo.compress.type=zip
client.undo.compress.threshold=64k
#For TCC transaction mode
tcc.fence.logTableName=tcc_fence_log
tcc.fence.cleanPeriod=1h

#Log rule configuration, for client and server
log.exceptionRate=100

#Transaction storage configuration, only for the server. The file, db, and redis configuration values are optional.
store.mode=db
store.lock.mode=db
store.session.mode=db
#Used for password encryption
#store.publicKey=

#These configurations are required if the `store mode` is `db`. If `store.mode,store.lock.mode,store.session.mode` are not equal to `db`, you can remove the configuration block.
store.db.datasource=druid
store.db.dbType=mysql
store.db.driverClassName=com.mysql.cj.jdbc.Driver
store.db.url=jdbc:mysql://127.0.0.1:3306/seata?useUnicode=true&rewriteBatchedStatements=true
store.db.user=root
store.db.password=123456
store.db.minConn=5
store.db.maxConn=30
store.db.globalTable=global_table
store.db.branchTable=branch_table
store.db.distributedLockTable=distributed_lock
store.db.queryLimit=100
store.db.lockTable=lock_table
store.db.maxWait=5000

#Transaction rule configuration, only for the server
server.recovery.committingRetryPeriod=1000
server.recovery.asynCommittingRetryPeriod=1000
server.recovery.rollbackingRetryPeriod=1000
server.recovery.timeoutRetryPeriod=1000
server.maxCommitRetryTimeout=-1
server.maxRollbackRetryTimeout=-1
server.rollbackRetryTimeoutUnlockEnable=false
server.distributedLockExpireTime=10000
server.xaerNotaRetryTimeout=60000
server.session.branchAsyncQueueSize=5000
server.session.enableBranchAsyncRemove=false
server.enableParallelRequestHandle=false

#Metrics configuration, only for the server
metrics.enabled=false
metrics.registryType=compact
metrics.exporterList=prometheus
metrics.exporterPrometheusPort=9898
该配置文件中,有service.vgroupMapping.default-system-group=default需要再nacos中创建,注意,要与服务在同一个组,不然找不到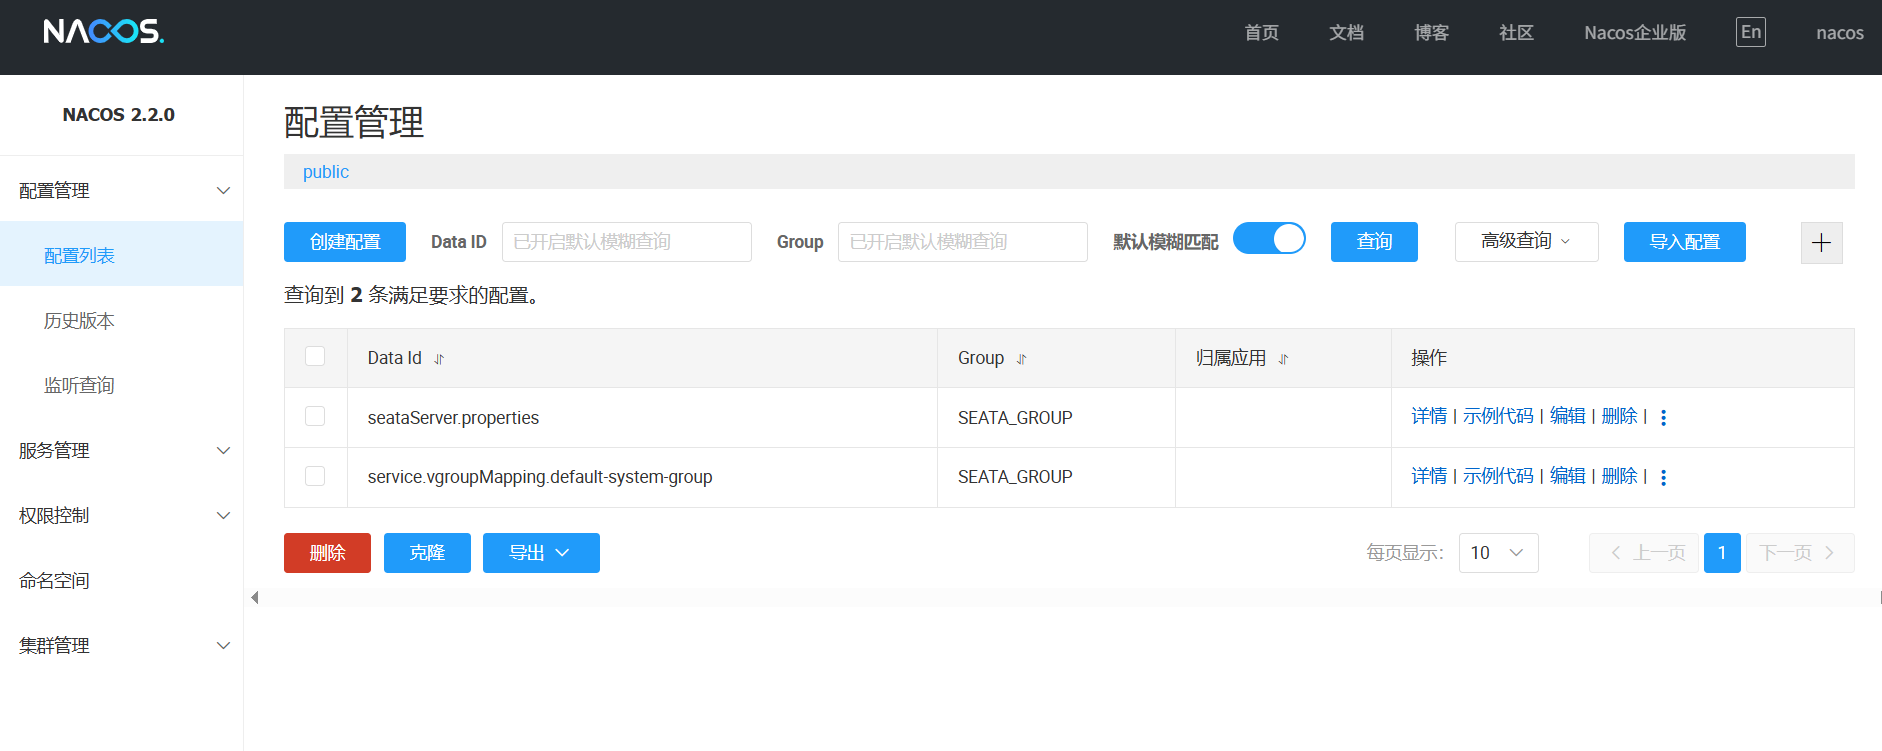
到这,seata与nacos就已搭建完成了
安装sentinel
简介
Sentinel是一款强大的微服务流量防卫防护组件,可以有效地保护微服务的稳定性和安全性。使用Docker可以方便地部署和扩展Sentinel,降低运维成本。
第一步:拉取镜像,需要从Docker Hub上拉取Sentinel镜像,目前用的是sentinel-1.8.6,与seate和naocs搭配使用的,如需要别的,具体安装即可。
docker pull bladex/sentinel-dashboard:1.8.6
第二步:启动镜像即可,不需要创建持久化目录
docker run --name sentinel -itd -p 8858:8858 -p 8868:8868 -e SENTINEL_ADMIN_PASSWORD=sentinel bladex/sentinel-dashboard:1.8.6
# 解释
# SENTINEL_ADMIN_PASSWORD 设置登录密码
验证
第一种:打开浏览器 http://127.0.0.1:8858/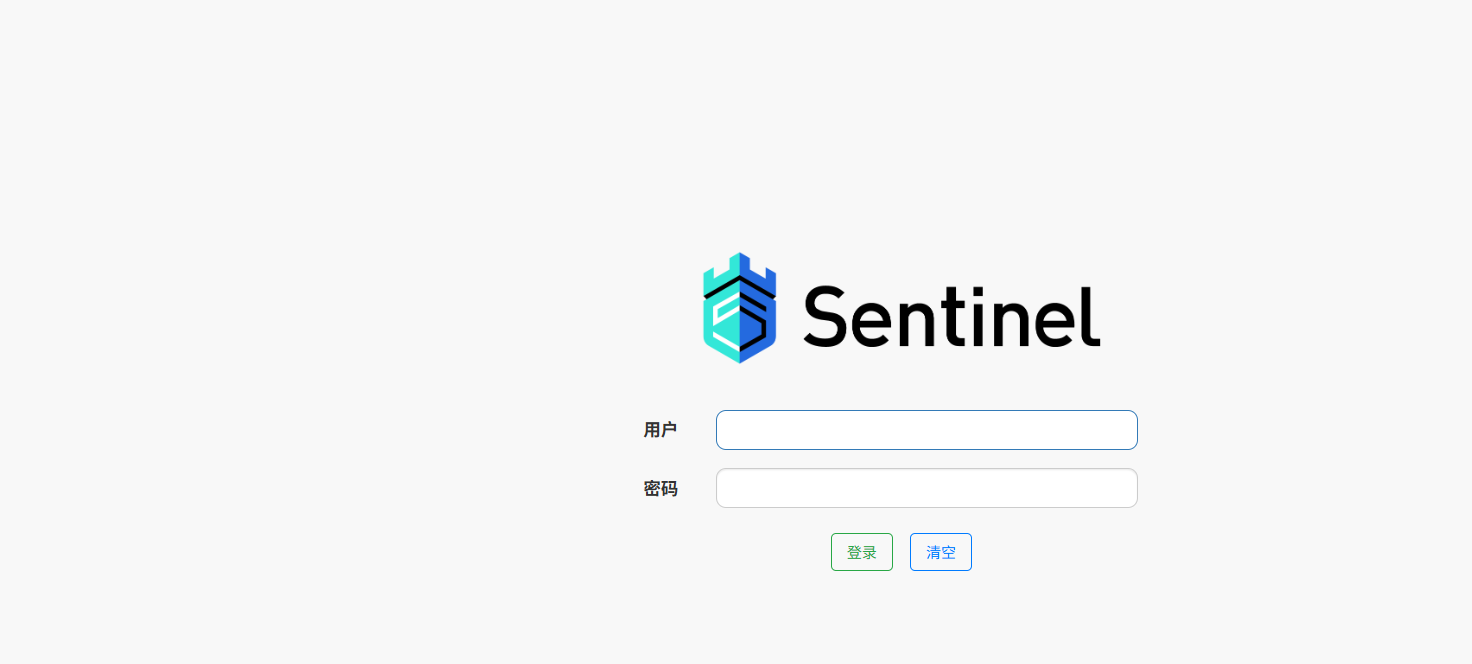
第二种:查看docker日志
# 6148388a0608  容器id
docker logs -f 6148388a0608
如图即安装启动成功
到此sentinel就启动安装完了
安装MinIO(项目有需要)
简介
MinIO 是一款高性能、分布式的对象存储系统. 它是一款软件产品, 可以100%的运行在标准硬件。即X86等低成本机器也能够很好的运行MinIO。
MinIO提供高性能、S3兼容的对象存储。Minio 是一个基于Go语言的对象存储服务。它实现了大部分亚马逊S3云存储服务接口,可以看做是是S3的开源版本,非常适合于存储大容量非结构化的数据,例如图片、视频、日志文件、备份数据和容器/虚拟机镜像等,而一个对象文件可以是任意大小,从几kb到最大5T不等。区别于分布式存储系统,minio的特色在于简单、轻量级,对开发者友好,认为存储应该是一个开发问题而不是一个运维问题。
注意:网上许多网友都说大公司都会弃用,有说AGPL v3.0协议带来的开源合规风险;安全漏洞修复不及时,依赖用户自行处理等等啥的,但是对于小公司,只做文件储蓄,问题不大的,也有很多平替的产品,例如国产RustFS,本人后续会试试。
第一步:拉取minio镜像,要拉取2025年之前的镜像,因为MinIO 社区版被故意阉割,Web管理功能全面移除
docker pull minio/minio:RELEASE.2025-04-22T22-12-26Z
第二步:创建持久化目录
# 用于存放redis数据
mkdir -p /home/minio/data
第三步:启动minio容器
docker run -itd --name minio --restart=always -p 9000:9000 -p 9090:9090 -v /home/minio/data:/data -e "MINIO_ROOT_USER=admin" -e "MINIO_ROOT_PASSWORD=xzm@wtutech.com" minio/minio:RELEASE.2025-04-22T22-12-26Z server /data --console-address ":9090"
命令如上安装mysql有介绍,不做赘述
项目部署
前端项目部署
第一步:项目使用vue开发,需要打包后上传dist文件即可,项目一般放在/app下面,不存在则需要创建项目
mkdir -p /app/xxxxx_web_nginx
## xxxxx一般为项目名
第二步:挂载前端项目目录,需要创建目前conf.d,html,logs,还需要创建文件nginx.conf
# 创建目录
mkdir -p /app/xxxxx_web_nginx/{conf.d,html,logs}
# conf.d 是nginx配置文件
# html 是存放项目的文件
# logs 是项目运气的日志
进去conf.d目录下创建default.conf文件
touch default.conf
编辑default.conf文件,default.conf文件内容如下,按照实际修改
server {
    listen       80;
    listen  [::]:80;
    server_name   localhost;

    #access_log  /var/log/nginx/host.access.log  main;
	root   /usr/share/nginx/html;
    location / {
        index  index.html index.htm;
        try_files $uri $uri/ /index.html;
    }

    location /api/ {
      proxy_pass http://127.0.0.1:8157/;
      proxy_set_header Host $host;
      proxy_set_header X-Real-IP $remote_addr;
      proxy_set_header X-Forwarded-For $proxy_add_x_forwarded_for;
      proxy_set_header REMOTE-HOST $remote_addr;

      #缓存相关配置
      #proxy_cache cache_one;
      #proxy_cache_key $host$request_uri$is_args$args;
      #proxy_cache_valid 200 304 301 302 1h;

      #持久化连接相关配置
      proxy_connect_timeout 3000s;
      proxy_read_timeout 86400s;
      proxy_send_timeout 3000s;
      #proxy_http_version 1.1;
      #proxy_set_header Upgrade $http_upgrade;
      #proxy_set_header Connection "upgrade";

      add_header X-Cache $upstream_cache_status;

      #expires 12h;
    }
    #error_page  404              /404.html;

    # redirect server error pages to the static page /50x.html
    #
    error_page   500 502 503 504  /50x.html;
    location = /50x.html {
        root   /usr/share/nginx/html;
    }

    # proxy the PHP scripts to Apache listening on 127.0.0.1:80
    #
    #location ~ \.php$ {
    #    proxy_pass   http://127.0.0.1;
    #}

    # pass the PHP scripts to FastCGI server listening on 127.0.0.1:9000
    #
    #location ~ \.php$ {
    #    root           html;
    #    fastcgi_pass   127.0.0.1:9000;
    #    fastcgi_index  index.php;
    #    fastcgi_param  SCRIPT_FILENAME  /scripts$fastcgi_script_name;
    #    include        fastcgi_params;
    #}

    # deny access to .htaccess files, if Apache's document root
    # concurs with nginx's one
    #
    #location ~ /\.ht {
    #    deny  all;
    #}
}
在目录/app/xxxxx_web_nginx下创建nginx.conf文件
touch nginx.conf
编辑nginx.conf文件,nginx.conf文件内容如下,按照实际修改
user  nginx;
worker_processes  auto;

error_log  /var/log/nginx/error.log notice;
pid        /var/run/nginx.pid;


events {
    worker_connections  1024;
}


http {
    include       /etc/nginx/mime.types;
    default_type  application/octet-stream;
    client_max_body_size 30m;

    log_format  main  '$remote_addr - $remote_user [$time_local] "$request" '
                      '$status $body_bytes_sent "$http_referer" '
                      '"$http_user_agent" "$http_x_forwarded_for"';

    access_log  /var/log/nginx/access.log  main;

    sendfile        on;
    #tcp_nopush     on;

    keepalive_timeout  65;

    #gzip  on;

    include /etc/nginx/conf.d/*.conf;
}
第三步:启动项目
docker run -itd -p 80:80 --name xxx_admin_nginx --restart=always -v /app/xxx_admin_nginx/nginx.conf:/etc/nginx/nginx.conf -v /app/xxx_admin_nginx/ssl:/etc/nginx/ssl -v /app/xxx_admin_nginx/conf.d:/etc/nginx/conf.d -v /app/xxx_admin_nginx/logs:/var/log/nginx -v /app/xxx_admin_nginx/html:/usr/share/nginx/html -e TZ=Asia/Shanghai nginx:latest
命令如上安装mysql有介绍,不做赘述
后端项目部署(spring-boot项目)
安装jdk
第一步,需要按照jdk(根据项目所需要版本按照),本次安装以1.8为例
请到官网下载对应的版本jdk
下载地址:https://www.oracle.com/cn/java/technologies/downloads/#java8
第二步:解压所下载的jdk文件
sudo tar -zxvf jdk-8u451-linux-x64.tar.gz -C /usr/local/
第三步:修改环境变量(ubuntu和centos不一样)
ubuntu配置
cd ~
sudo vi ~/.bashrc
centos配置
cd ~
sudo vi /etc/profile
在末尾添加
export JAVA_HOME=/usr/local/jdk1.8.0_451
export JRE_HOME=${JAVA_HOME}/jre
export CLASSPATH=.:${JAVA_HOME}/lib:${JRE_HOME}/lib
export PATH=${JAVA_HOME}/bin:$PATH
保存并退出后在终端输入命令source ~/.bashrc或者source /etc/profile生效配置文件
# ubuntu配置
source ~/.bashrc
# centos配置
source /etc/profile
第四步:测试是否成功
root@iZbp12adskpuoxodbkqzjfZ:$ java -version
openjdk version "1.8.0_451"
OpenJDK Runtime Environment (build 1.8.0_451-8u451-ga~us1-0ubuntu1~24.04-b09)
OpenJDK 64-Bit Server VM (build 25.451-b09, mixed mode)
上传jar包
将后端项目spring-boot打包成jar包,并上传到服务器,例如放在/app目录下,需要创建xxxxx_admin目录,把jar上传到该目录下
mkdir -p /app/xxxxx_admin
cd /app/xxxxx_admin
在/app/xxxxx_admin目录下创建文件start.sh
touch start.sh
该文件内容如下
#!/bin/sh
# security_train项目名称
project="security_train"
env=""

ps -aux|grep $project|grep jar|grep java|grep -v grep|awk '{cmd="kill -9 "$2;system(cmd)}'

runPath="/app/xxxxx_admin/"
runPahtLog="/app/xxxxx_admin/logs"
if [ ! -d "$runPath" ]; then
    mkdir "$runPath"
fi

if [ ! -d "$runPahtLog" ]; then
    mkdir "$runPahtLog"
fi

cd $runPath
log_file=$project-$(date +%Y-%m-%d).log
nohup java -jar $project.jar $env >> $runPahtLog/$project-$(date +%Y-%m-%d).log 2>&1 &
启动项目
sh start.sh
查看日志
tail -f /app/xxxxx_admin/logs/security_train-*.log
到此,项目即可部署完毕,后续有需要的其他安装软件会同步更新

汇聚全球AI编程工具,助力开发者即刻编程。
更多推荐

 27
27 0
0- 0


 已为社区贡献1条内容

所有评论(0)