
基于gitlab构建项目文档
·
GitLab Pages 介绍与实践
什么是 GitLab Pages?
GitLab Pages 是 GitLab 内置的静态网站托管服务,支持快速部署前端项目(如文档、博客、演示页等),无需额外服务器或第三方平台。
使用场景
| 场景 | 说明 |
|---|---|
| 技术文档 | 使用 VuePress / Docusaurus 构建内部知识库 |
| 项目官网 | 展示产品功能、API 文档 |
| 博客系统 | 基于静态生成器搭建个人博客 |
| 演示页面 | 展示 UI 组件、原型交互 |
实践:在 macOS 上部署 GitLab Pages
一、安装 GitLab Runner
1. 下载 arm64 架构的二进制文件
sudo curl --output /usr/local/bin/gitlab-runner \
  "https://s3.dualstack.us-east-1.amazonaws.com/gitlab-runner-downloads/latest/binaries/gitlab-runner-darwin-arm64"
2. 赋予执行权限
sudo chmod +x /usr/local/bin/gitlab-runner
3. 验证安装
iqnauy@marchen ~ % gitlab-runner --version
Version:      18.5.0
Git revision: bda84871
Git branch:   18-5-stable
GO version:   go1.24.6 X:cacheprog
Built:        2025-10-13T19:20:30Z
OS/Arch:      darwin/arm64
二、注册 Runner 到 GitLab 实例
注册令牌用于将本地 Runner 关联到指定项目或组。
gitlab-runner register
逐步填写配置项
| 提示 | 输入内容 | 说明 |
|---|---|---|
| GitLab instance URL | http://gitlab.abc.local/ | 替换为你的 GitLab 地址(注意结尾斜杠 /) |
| Registration token | abcdefg | 在项目 → Settings → CI/CD → Runners 复制 |
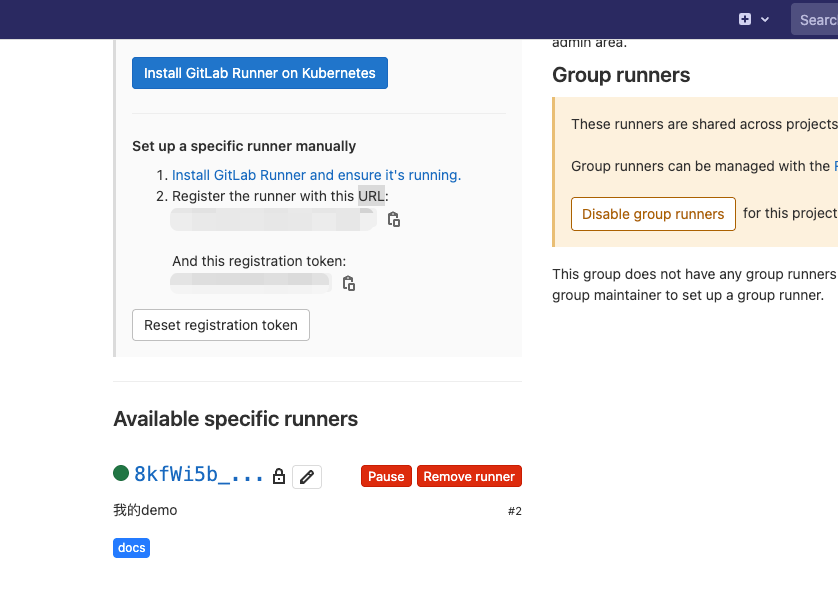
| Description | [marchen.local]: 我的demo | 推荐命名规则:<主机名>: <用途>,便于识别 |
| Tags | docs | 标签需与 .gitlab-ci.yml 中匹配 |
| Maintenance note (optional) | 文档组件 | 记录负责人、用途等信息,非必填 |
| Executor | shell | 推荐选择 shell(直接调用本地环境)注册成功确认 |
- 输出显示
Runner registered successfully - 配置保存路径:
~/.gitlab-runner/config.toml - 可在 GitLab 项目界面查看该 Runner 是否在线
三、Runner 服务管理(后台运行 & 开机自启)
为了让 Runner 持续监听任务,需将其安装为系统服务。
1. 安装为系统服务(支持开机自启)
gitlab-runner install
2. 启动 Runner 服务
gitlab-runner start
3. 查看运行状态
gitlab-runner status
# 正常输出:gitlab-runner: Service is running
4. 其他常用命令
| 命令 | 作用 |
|---|---|
gitlab-runner stop | 停止服务 |
gitlab-runner restart | 重启服务 |
gitlab-runner verify | 检查所有已注册 Runner 是否可达 |
四、配置 CI/CD 流水线:.gitlab-ci.yml
该文件定义了如何构建和发布 Pages 站点。
# .gitlab-ci.yml
image: node:14

# 缓存依赖,加速后续构建
cache:
  paths:
    - node_modules/

pages:
  stage: deploy
  tags:
    - docs                  # 必须与 Runner 的 tag 一致
  script:
    - node -v && npm -v    # 输出环境版本,方便排查问题
    - npm ci --prefer-offline  # 更快更稳定的依赖安装
    - npm run docs:build || { echo "❌ 文档构建失败"; exit 1; }
    - echo "✅ 构建完成,产物已移动到 public 目录"
  artifacts:
    paths:
      - public             # GitLab Pages 默认查找此目录作为站点根目录
  rules:
    - if: $CI_COMMIT_BRANCH == "feature-v9.9.9-doc-20251022"  # 仅特定分支触发
五、VuePress 集成配置
1. 安装依赖
npm i -D "vuepress@^1.9.10"
2. 目录结构要求
your-project/
├── docs/
│   ├── .vuepress/
│   │   └── config.js        # VuePress 配置文件
│   └── README.md            # 首页内容
├── .gitlab-ci.yml
└── package.json
.vuepress/config.js 示例
module.exports = {
  title: '我的技术文档',
  description: '基于 GitLab Pages 和 VuePress 构建',
  base: '/', // 如果是子路径部署,需调整
  themeConfig: {
    nav: [
      { text: '首页', link: '/' },
      { text: '指南', link: '/guide/' }
    ],
    sidebar: 'auto'
  }
}
六、访问生成的站点
部署成功后,进入:项目 → Settings → Pages,即可看到部署成功的地址,格式通常为:
https://<username>.gitlab.io/<project-name>/

汇聚全球AI编程工具,助力开发者即刻编程。
更多推荐

 8
8 0
0- 0


 已为社区贡献1条内容

所有评论(0)