
芝法酱学习笔记(1.2)——SpringBoot+openresty使用protobuf和JWT
一、前言
之前讲到,我们这次登录验证,打算放到nginx端去做。openresty可以在nginx上写lua脚本开发逻辑。为了提高B格,我们通信协议打算使用protobuf。
二、google protobuf的安装与代码生成
2.1下载
protobuf可以去官网下载
下载后文件夹结构如图所示: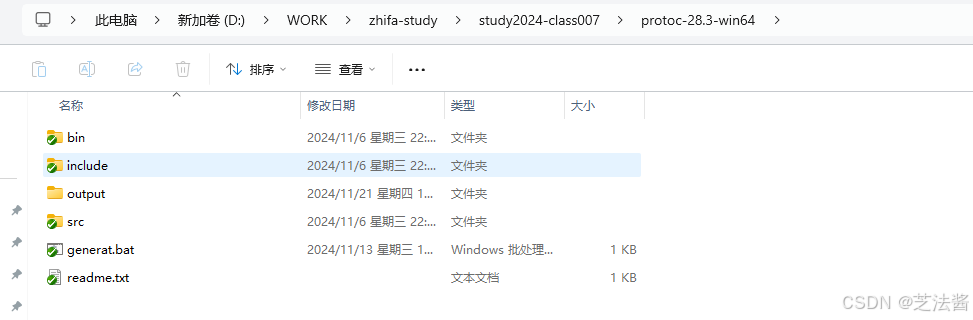
2.2 proto文件
该文件放在src文件夹下
syntax = "proto3";

message TokenObject{
	int64 enpId = 1;
	string enpCode = 2;
	string enpName = 3;
	int64 userId = 4;
	string userName = 5;
	string nickName = 6;
	repeated string roles = 7;
	string servId = 8;
	string dbCode = 9;
}
2.3 生成脚本
.\bin\protoc.exe -I=src --java_out=output src/*
.\bin\protoc.exe -I=src -o output/tokenObject.pb src/TokenObject.proto
这里解释以下,第一句是生成Java文件,第二句是生成的proto的字节码,便于lua加载。
2.4 java应用端
把生成的Java类,拷贝到项目中,并使其继承ITokenObject,如下图所示: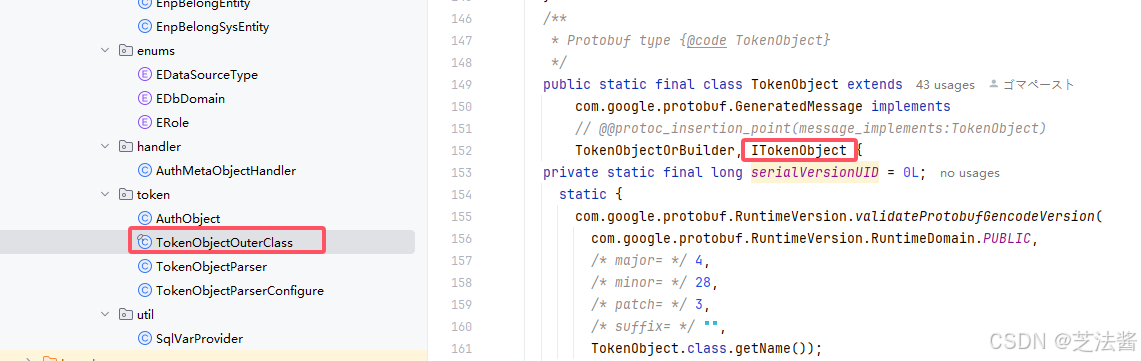
定义AuthObject
@Builder
@Data
public class AuthObject implements IAuthObject {
    Long enpId;
    String enpCode;
    String enpName;
    Long userId;
    String userName;
    String nickName;
    List<String> roles;
    String servId;
    String dbCode;
}
三、lua-protobuf
3.1 lua-protobuf 选型
google官方的protobuf,没有提供实现,当下主流的lua protobuf有3种。
protoc-gen-lua,sproto, starwing/lua-protobuf这三种
| 库名 | 年代 | 易用程度 | 安装难度 | 是否被验证 | 对proto3语法支持 |
|---|---|---|---|---|---|
| protoc-gen-lua | 12年前 | 难 | 一般 | 是 | 强 |
| sproto | 8年前 | 易 | 难 | 是 | 限制较多 |
| lua-protobuf | 2年前 | 易 | 易 | 未充分 | 完美支持 |
protoc-gen-lua是google官网推荐的一个实现,其原理是通过protobuf-python,生成相应的lua文件。该方案的问题是,把lua当成了一个强类型语言来对待,有失lua灵活的特性,用起来也比较麻烦。
sproto是游戏圈非常有名的一个大牛,梦幻西游的主程云风的作品。该方案不需要生成lua文件,使用比较方便。而且,该方案当年已被大量游戏项目组使用,是经过验证的库。云风C语言出身,功底扎实,该库的性能也比较好。但缺点是编译稍微麻烦点。
starwing/lua-protobuf是lua-protobuf的新星,完美支持lua53,proto3标准,也比较易用。然而项目的验证不足,据说性能也稍有欠缺。
然而,我们是在openresty中使用。openresty使用的是lua-git,支持支lua51的语法。并且没打算用protobuf写业务逻辑,所以也不会有太复杂的消息结构。综合考虑,我还是决定选用sproto。
3.2 sproto的安装
3.2.1 安装lua
sproto需要源码安装。想安装sproto需要先安装lua。
注意,不要用最新版的lua,我们这里需要的是lua51,可以在官网下载源码,然后拷贝到DOWNLOADS目录下。
# 安装make,g++,libreadline-dev
apt-get update
apt install make
apt install g++
apt-get install libreadline-dev
# 解压文件到/WORK/SOFTWARE/lua,并重名为51
cd /WORK/DOWNLOADS
mkdir -p /WORK/SOFTWARE/lua
tar -xzvf lua-5.1.5.tar.gz -C /WORK/SOFTWARE/lua
cd /WORK/SOFTWARE/lua
mv lua-5.1.5 51
cd 51
# 安装
make linux
make install
3.2.2 编译sproto
首先下载zip包,把zip包拷到/WORK/DOWNLOADS下
cd /WORK/DOWNLOADS
mkdir -p /WORK/SOFTWARE/sproto
unzip pbc-master.zip -D /WORK/SOFTWARE/sproto
cd /WORK/SOFTWARE/sproto/pbc-master
make
cd binding/lua
make
ls
此时,我们发现编译出了1个文件:protobuf.so
我们把protobuf.so和protobuf.lua粘贴到/usr/local/openresty/lualib
此时,sproto就可以使用了。
3.2.3 sproto使用简介
在nginx中新建一个文件夹protobuf,把之前生成的tokenObject.pb拷贝到该文件夹下。解析代码如下:
local pb = require "protobuf"
local tokenObject = pb.decode("TokenObject",actual_data)
我们来解释下,使用require "protobuf"得到pb模块
decode函数,第一个参数是使用protobuf协议的名字,第二个参数是lua中的字符串(实质是buff数组)
仅仅这样,我们就完成了对pb消息的读取。tokenObject返回的是lua的表{}。
四、openresty下的jwt解析
4.1 lib库的安装
openresty默认没有把jwt解析的库打包进项目,但他的官网却有推荐的解析库,那就是resty.jwt。
而这个库,需要依赖lua-resty-hmac,该库同样没被官方打入默认的包中
下面我们将介绍这两个库的编译安装
首先是lua-resty-hmac,该模块,只需要解压,把lib文件夹下的lua文件,拷贝到openresty对应的地方即可。我的地址在/usr/local/openresty/lualib/resty
对于resty.jwt,我们也是相同,把lib文件夹的相应文件拷过去即可。
4.2 需求梳理
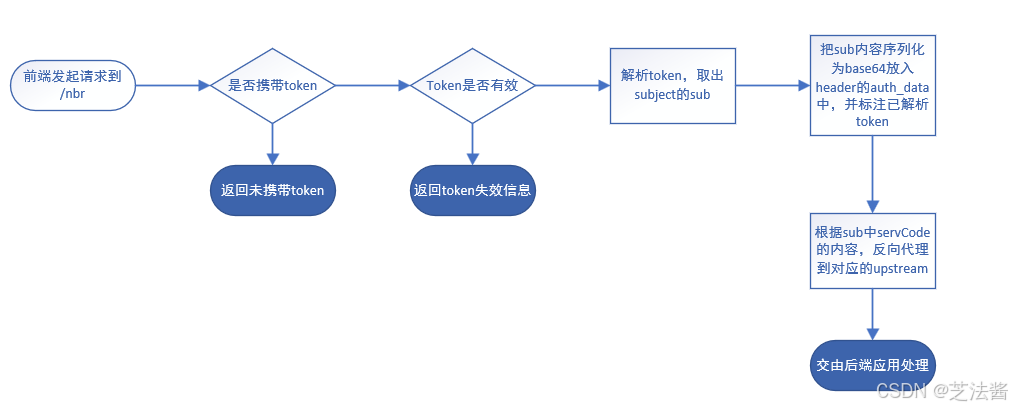
4.3 lua实现逻辑
openresty的拦截器,可以使用access_by_lua_file实现
location配置:
location /nbr/ {
    rewrite ^/nbr/(.*)$ /$1 break;
    set $target "";
    access_by_lua_file "lua/jwt_filter.lua";
    proxy_pass http://${target};
    proxy_set_header Host $host;
    proxy_set_header X-Real-IP $remote_addr;
    proxy_set_header X-Forwarded-For $proxy_add_x_forwarded_for;
    proxy_set_header X-Forwarded-Proto $scheme;
}
这里讲解一个技巧。我们希望传到后端应用时,链接去掉/nbr,就可以像我这样配置。使用rewrite。由于牵扯了lua脚本设置变量,这里只能这样做,proxy_pass http://${target}/;的方式貌似不行。
upstream配置
upstream nbr_busy1 {
server localhost:8081;
server localhost:8082;
}
upstream nbr_busy2 {
    server localhost:8083;
    server localhost:8084;
}
lua代码:
local jwt = require "resty.jwt"
local json = require "cjson"
local jwt_key = "zf-class2024"

local headers = ngx.req.get_headers()
local auth_header = headers["auth"]
local token = string.gsub(auth_header, "bearer:", "")

local jwt_obj = jwt:verify(jwt_key, token)
local pb = require "protobuf"

--ngx.log(ngx.ERR,zf_common.tableToString(RestResponse))

local response
local tokenObject
if jwt_obj.valid then
	--ngx.say("jwt object is "..zf_common.tableToString(jwt_obj))
	if jwt_obj.verified then
		local payload = jwt_obj.payload
		local subStrBase64 = payload.sub
		local subStr = ngx.decode_base64(subStrBase64)

		local length = string.byte(subStr, 1) * 16777216 +
               string.byte(subStr, 2) * 65536 +
               string.byte(subStr, 3) * 256 +
               string.byte(subStr, 4)
        local actual_data = string.sub(subStr, 5, 4 + length)

        tokenObject = pb.decode("TokenObject",actual_data)
        local tokenObjectStr = json.encode(tokenObject)

        local base64TokenStr = ngx.encode_base64(tokenObjectStr)
        ngx.req.set_header("jwt_decode", "true")
        ngx.req.set_header("auth_data", base64TokenStr)
		--response = RestResponse.ok(tokenObject)
	else
		response = RestResponse.err("验证失败,失败原因为"..jwt_obj.reason)
	end

else
	response = RestResponse.err("jwt token verify faild, bacause "..jwt_obj.reason)
end

if response and response.code ~= 200 then
	ngx.header.content_type = "application/json"
	ngx.say(response:toJson())
else
	ngx.var.target = tokenObject.servId
end
4.4一些lua其他的代码:
class
local ClassDefineMt = {}
function ClassDefineMt.__index( tbl, key )
		local tBaseClass = tbl.__tbl_Baseclass__
		for i = 1, #tBaseClass do
			local xValue = rawget(tBaseClass[i],key)
			if xValue then
				rawset( tbl, key, xValue )
				return xValue
			end
		end
end


function class( ... )
	local arg = {...}
    local ClassDefine = {}

    -- 这里是把所有的基类放到 ClassDefine.__tbl_Bseclass__ 里面
    ClassDefine.__tbl_Baseclass__ =  {}
    for index = 1, #arg do
    		local tBaseClass = arg[index]
        table.insert(ClassDefine.__tbl_Baseclass__, tBaseClass)

        for i = 1, #tBaseClass.__tbl_Baseclass__ do
        	table.insert(ClassDefine.__tbl_Baseclass__, tBaseClass.__tbl_Baseclass__[i])
        end
    end

    -- 所有对实例对象的访问都会访问转到ClassDefine上
    local InstanceMt =  { __index = ClassDefine }

       --  IsClass 函数提供对象是否某种类型的检测, 支持多重继承
    ClassDefine.IsClass = function(self, classtype)
        local bIsType = (self == classtype)
        if bIsType then
            return bIsType
        end

        for index=1, #self.__tbl_Baseclass__ do
            local baseclass = self.__tbl_Baseclass__[index]
            bIsType =  (baseclass == classtype)
            if bIsType then
                return bIsType
            end
        end
        return bIsType
    end

    --构造函数参数的传递,只支持一层, 出于动态语言的特性以及性能的考虑
    ClassDefine.new = function( self, ... )
    	local NewInstance = {}
    	NewInstance.__ClassDefine__ = self    -- IsType 函数的支持由此来

        NewInstance.IsClass = function( self, classtype )
            return self.__ClassDefine__:IsClass(classtype)
        end

        -- 这里要放到调用构造函数之前,因为构造函数里面,可能调用基类的成员函数或者成员变量
        setmetatable( NewInstance, InstanceMt )

      local funcCtor = rawget(self, "Ctor")
    	if funcCtor then
    	    funcCtor(NewInstance, ...)
    	end

    	return NewInstance
    end

    setmetatable( ClassDefine, ClassDefineMt )
    return ClassDefine
end
zfResponse
local json = require "cjson"
local RestResponse = class()

function RestResponse:ctor()
	self.code = 0
	self.data = null
	self.message = ""
end

RestResponse.ok = function(pData)
	local rtn = RestResponse:new()
	rtn.code = 200
	rtn.data = pData
	return rtn
end

RestResponse.err = function(pMsg)
	local rtn = RestResponse:new()
	rtn.code = 500
	rtn.message = pMsg
	return rtn
end

function RestResponse:toJson()
	local raw_data = {
		code = self.code,
		data = self.data,
		message = self.message
	}
	return json.encode(raw_data)
end

_G.RestResponse = RestResponse
五、验证
在我们的nbr项目中,添加一个配置:
app:
  serv-name: "busy1"
增加一个测试接口:
@Operation(summary = "whoImI")
    @GetMapping("/whoImI")
    public TestWhoImIResponse whoImI(@RequestHeader(value = "auth_data", required = false) String pAuthHeader){
        if(StringUtils.hasText(pAuthHeader)){
            log.info("获取到权限信息头"+pAuthHeader);
            return mWhoImIService.whoImI(pAuthHeader);
        }else{
            throw new ServiceException("没有获取到auth_data");
        }
    }
@RequiredArgsConstructor
@Component
public class WhoImIServiceImpl implements IWhoImIService {

    private final AppProperties mAppProperties;

    @Override
    public TestWhoImIResponse whoImI(String pAuthHeader) {
        TestWhoImIResponse testWhoImIResponse = new TestWhoImIResponse();
        testWhoImIResponse.setServName(mAppProperties.getServName());
        byte[] authArr = Base64.getDecoder().decode(pAuthHeader);
        AuthObject authObject = JSON.parseObject(authArr).to(AuthObject.class);
        testWhoImIResponse.setAuthObject(authObject);
        return testWhoImIResponse;
    }
}
使用我之前讲的jenkins部署4个docker容器,并修改配置文件,做一下测试

汇聚全球AI编程工具,助力开发者即刻编程。
更多推荐
 25
25 0
0- 0


 已为社区贡献1条内容

所有评论(0)