
nacos源码03 - 心跳和健康检查
心跳和健康检查
文章目录
一:Nacos心跳源码流程
1:心跳基本介绍
1.1:心跳机制概述
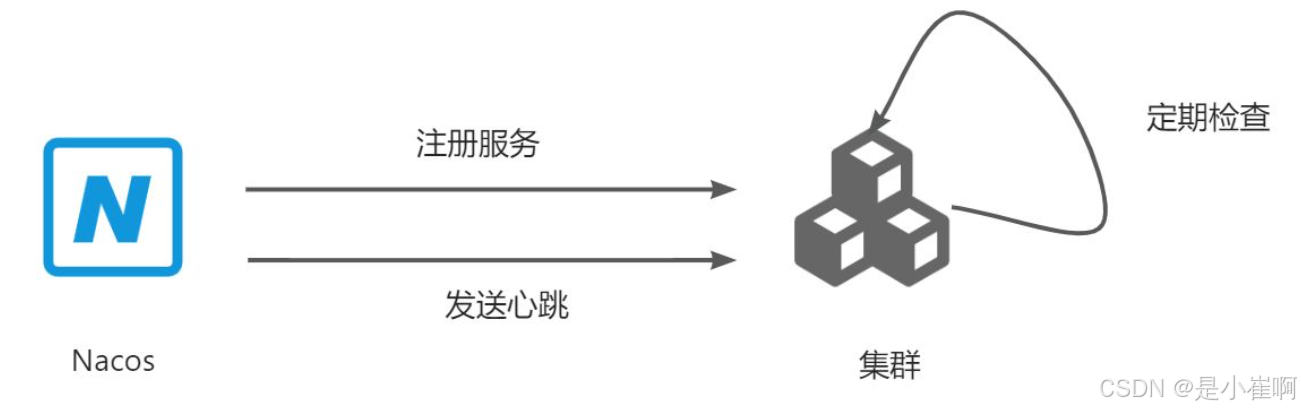
心跳机制是一种用于监测和管理微服务可用性的机制,它用来维护注册中心和服务提供者之间的连接状态,并及时更新服务实例的状态信息
心跳机制主要包含了两个:心跳发送方【客户端】和心跳接收方【服务端】
每隔几分钟发送一个固定的信息给服务端,服务端收到之后返回一个固定的信息,如果服务端几分钟内没有收到客户端的信息则视为客户端断开,发包方可以是客户也可以是服务端
- 心跳发送方(Heartbeat Sender):每个微服务都会定期发送称为心跳消息的请求到一个中央位置(例如注册中心或负载均衡器)。这个心跳消息包含有关该微服务的健康信息,如服务是否正常运行、负载情况、资源消耗等。心跳消息的频率可以根据需求进行配置,通常是以固定的时间间隔发送
- 心跳接收方(Heartbeat Receiver):中央位置上的组件(如注册中心或负载均衡器)负责接收并处理微服务发送的心跳消息。它会记录每个微服务的心跳,并根据心跳消息的到达情况和内容来判断微服务的可用性。如果心跳消息超过一定时间没有到达,或者心跳消息中报告了错误状态,中央位置可以采取相应的措施,如将该微服务标记为不可用、重新分配负载或发送警报通知等
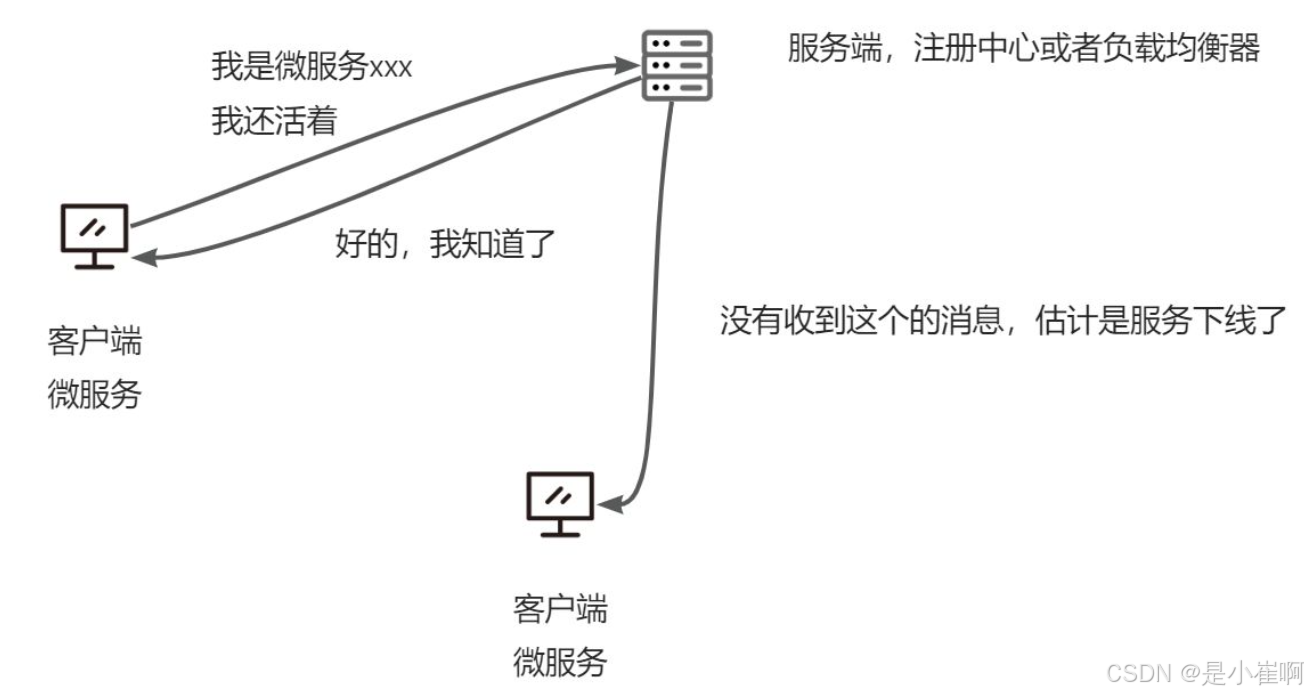
1.2:Nacos中的2种健康检查机制
客户端主动上报机制
ephemeral: true
- 客户端通过心跳上报方式告知服务端(nacos注册中心)健康状态;
- 默认心跳间隔5秒
- nacos会在超过15秒未收到心跳后将实例设置为不健康状态;
- 超过30秒将实例删除
服务端反向探测机制
ephemeral: false
- nacos主动探知客户端的健康状态,默认间隔是20s
- 健康检查失败后实例会被标记为不健康,不会被立即删除
Nacos 中的健康检查机制不能主动设置,但健康检查机制是和 Nacos 的服务实例类型强相关的
也就是说 Nacos 中的两种服务实例分别对应了两种健康检查机制:
- 临时实例(也可以叫做非持久化实例):对应的是客户端主动上报机制
- 永久实例(也可以叫做持久化实例):服务端反向探测机制
临时实例配置如下:
spring:
  application:
    name: order-service
  cloud:
    nacos:
      discovery:
        ephemeral: false # 设置实例为永久实例。true:临时; false:永久
      server-addr: 192.168.137.2:8845
- 如果是临时实例,则不会再Nacos服务端持久化存储,需要通过上报心跳的方式进行保活,如果一段时间内没有上报心跳,就会被Nacos服务端摘除。在被摘除后又开始上报心跳的话,则会重新将这个实例注册
- 持久化实例如果客户端进程不在,也不会从服务端删除,只会将健康状态设置为不健康
2:心跳源码解析
2.1:心跳请求接口
Nacos提供的心跳的API接口为:PUT请求的/nacos/v1/ns/instance/beat:
请求参数:
| 名称 | 类型 | 是否必选 | 描述 |
|---|---|---|---|
| serviceName | 字符串 | 是 | 服务名 |
| groupName | 字符串 | 否 | 分组名 |
| ephemeral | boolean | 否 | 是否临时实例 |
| beat | JSON格式字符串 | 是 | 实例心跳内容 |
错误编码:
| 错误代码 | 描述 | 语义 |
|---|---|---|
| 400 | Bad Request | 客户端请求中的语法错误 |
| 403 | Forbidden | 没有权限 |
| 404 | Not Found | 无法找到资源 |
| 500 | Internal Server Error | 服务器内部错误 |
| 200 | OK | 正常 |
2.2:NacosNamingService
NacosNamingService这个类实现了服务的注册,同时也实现了服务心跳:
@Override
public void registerInstance(String serviceName, String groupName, Instance instance) throws NacosException {
    NamingUtils.checkInstanceIsLegal(instance);
    String groupedServiceName = NamingUtils.getGroupedName(serviceName, groupName);
    // 判断是否是临时实例。
    if (instance.isEphemeral()) {
        // 如果是临时实例,则构建心跳信息BeatInfo
        BeatInfo beatInfo = beatReactor.buildBeatInfo(groupedServiceName, instance);
        // 添加心跳任务
        beatReactor.addBeatInfo(groupedServiceName, beatInfo);
    }
    serverProxy.registerService(groupedServiceName, groupName, instance);
}
2.3:BeatInfo
BeanInfo就包含心跳需要的各种信息:
public class BeatInfo {
    private int port;
    private String ip;
    private double weight;
    private String serviceName;
    private String cluster;
}
2.4:BeatReactor
BeatReactor这个类则维护了一个线程池
public BeatReactor(NamingProxy serverProxy, int threadCount) {
    this.serverProxy = serverProxy;
    this.executorService = new ScheduledThreadPoolExecutor(threadCount, new ThreadFactory() {
        @Override
        public Thread newThread(Runnable r) {
            Thread thread = new Thread(r);
            thread.setDeamon(true);
            thread.setName("com.alibaba.nacos.naming.beat.sender");
            return thread;
        }
    });
}
public void addBeatInfo(String serviceName, BeatInfo beatInfo) {
    NAMING_LOGGER.info("[BEAT] adding beat: {} to beat map.", beatInfo);
    String key = buildKey(serviceName, beatInfo.getIp(), beatInfo.getPort());
    BeatInfo existBeat = null;
    //fix #1733
    if ((existBeat = dom2Beat.remove(key)) != null) {
        existBeat.setStopped(true);
    }
    dom2Beat.put(key, beatInfo);
    // 利用线程池,定期执行心跳任务,周期为 beatInfo.getPeriod()
    executorService.schedule(new BeatTask(beatInfo), beatInfo.getPeriod(), TimeUnit.MILLISECONDS);
    MetricsMonitor.getDom2BeatSizeMonitor().set(dom2Beat.size());
}
2.5:BeatTask
跳的任务封装在BeatTask这个类中,是一个Runnable,其run方法如下 :
@Override
public void run() {
    if (beatInfo.isStopped()) {
        return;
    }
    // 获取心跳周期
    long nextTime = beatInfo.getPeriod();
    try {
        // 发送心跳
        JsonNode result = serverProxy.sendBeat(beatInfo, BeatReactor.this.lightBeatEnabled);
        long interval = result.get("clientBeatInterval").asLong();
        boolean lightBeatEnabled = false;
        if (result.has(CommonParams.LIGHT_BEAT_ENABLED)) {
            lightBeatEnabled = result.get(CommonParams.LIGHT_BEAT_ENABLED).asBoolean();
        }
        BeatReactor.this.lightBeatEnabled = lightBeatEnabled;
        if (interval > 0) {
            nextTime = interval;
        }
        // 判断心跳结果
        int code = NamingResponseCode.OK;
        if (result.has(CommonParams.CODE)) {
            code = result.get(CommonParams.CODE).asInt();
        }
        if (code == NamingResponseCode.RESOURCE_NOT_FOUND) {
            // 如果失败,则需要 重新注册实例
            Instance instance = new Instance();
            instance.setPort(beatInfo.getPort());
            instance.setIp(beatInfo.getIp());
            instance.setWeight(beatInfo.getWeight());
            instance.setMetadata(beatInfo.getMetadata());
            instance.setClusterName(beatInfo.getCluster());
            instance.setServiceName(beatInfo.getServiceName());
            instance.setInstanceId(instance.getInstanceId());
            instance.setEphemeral(true);
            try {
                serverProxy.registerService(beatInfo.getServiceName(),
                                            NamingUtils.getGroupName(beatInfo.getServiceName()), instance);
            } catch (Exception ignore) {
            }
        }
    } catch (NacosException ex) {
        NAMING_LOGGER.error("[CLIENT-BEAT] failed to send beat: {}, code: {}, msg: {}",
                            JacksonUtils.toJson(beatInfo), ex.getErrCode(), ex.getErrMsg());

    } catch (Exception unknownEx) {
        NAMING_LOGGER.error("[CLIENT-BEAT] failed to send beat: {}, unknown exception msg: {}",
                            JacksonUtils.toJson(beatInfo), unknownEx.getMessage(), unknownEx);
    } finally {
        executorService.schedule(new BeatTask(beatInfo), nextTime, TimeUnit.MILLISECONDS);
    }
}
public JsonNode sendBeat(BeatInfo beatInfo, boolean lightBeatEnabled) throws NacosException {

    if (NAMING_LOGGER.isDebugEnabled()) {
        NAMING_LOGGER.debug("[BEAT] {} sending beat to server: {}", namespaceId, beatInfo.toString());
    }
    // 组织请求参数
    Map<String, String> params = new HashMap<String, String>(8);
    Map<String, String> bodyMap = new HashMap<String, String>(2);
    if (!lightBeatEnabled) {
        bodyMap.put("beat", JacksonUtils.toJson(beatInfo));
    }
    params.put(CommonParams.NAMESPACE_ID, namespaceId);
    params.put(CommonParams.SERVICE_NAME, beatInfo.getServiceName());
    params.put(CommonParams.CLUSTER_NAME, beatInfo.getCluster());
    params.put("ip", beatInfo.getIp());
    params.put("port", String.valueOf(beatInfo.getPort()));
    // 发送请求,这个地址就是:/v1/ns/instance/beat
    String result = reqApi(UtilAndComs.nacosUrlBase + "/instance/beat", params, bodyMap, HttpMethod.PUT);
    return JacksonUtils.toObj(result);
}
3:基本流程总结
- 总的来说就是在注册这个实例的时候,客户端就会创建一个心跳的实例,一起发送到这个服务端,
- 这个时候服务端会开启一个线程去执行这个客户端给服务端发送心跳的的这个延迟队列线程。
- 客户端注册到这个服务端之后,会开启一个延迟的线程池任务,在注册成功5s之后再发送这个心跳给服务端。
- 服务端在接收到这个客户端的心跳之后,会对这些心跳做一个记录,并且也会开启这个都是任务,去查看这些全部的实例是否需要删除,是否处于健康状态等。
二:健康检查流程
1:健康检查
在Nacos2.0之后,使用gRPC协议代替了http协议
gRPC是一个长连接的,长连接会保持客户端和服务端发送的状态,配置中心动态刷新也是基于这个
在Nacos源码中ConnectionManager管理所有客户端的长连接。
ConnectionManager每隔3秒检测所有超过20S内没有发生过通讯的客户端,向客户端发起ClientDetectionRequest探测请求
如果客户端在指定时间内成功响应,则检测通过,否则执行unregister()方法移除Connection。
我们从ConnectionManager类的源码开始分析:
ConnectionManager内部有一个map用于存放当前所有客户端的长连接信息:
/**
 * 连接集合
 * key: ConnectionId
 * value: Connection
 */
Map<String, Connection> connections = new ConcurrentHashMap<>();
当我们启动一个nacos客户端的时候,就会往connections里面保存这个连接信息
在ConnectionManager类内部,我们发现了存在一个使用@PostConstruct注解标识的方法,说明构造方法执行后就会触发执行start()
/**
 * 应用启动的时候执行,首次执行延迟1s,运行中周期为3秒执行一次
 * Start Task:Expel the connection which active Time expire.
 */
@PostConstruct
public void start() {
    // 初始化runtimeConnectionEjector为NacosRuntimeConnectionEjector
    initConnectionEjector();
    // 开始执行不健康连接的剔除任务
    RpcScheduledExecutor.COMMON_SERVER_EXECUTOR.scheduleWithFixedDelay(() -> {
        // 调用com.alibaba.nacos.core.remote.NacosRuntimeConnectionEjector.doEject
        runtimeConnectionEjector.doEject();
    }, 1000L, 3000L, TimeUnit.MILLISECONDS);
}
可以看到,start()方法创建了一个定时任务,首次执行延迟1s,后面每隔3s执行一次,实际上就是执行不健康连接的剔除任务
public void doEject() {
    try {
        Loggers.CONNECTION.info("Connection check task start");
        Map<String, Connection> connections = connectionManager.connections;
        int totalCount = connections.size();
        MetricsMonitor.getLongConnectionMonitor().set(totalCount);
        int currentSdkClientCount = connectionManager.currentSdkClientCount();

        Loggers.CONNECTION.info("Long connection metrics detail ,Total count ={}, sdkCount={},clusterCount={}",
                totalCount, currentSdkClientCount, (totalCount - currentSdkClientCount));

        // 超时的连接集合
        Set<String> outDatedConnections = new HashSet<>();
        long now = System.currentTimeMillis();
        for (Map.Entry<String, Connection> entry : connections.entrySet()) {
            Connection client = entry.getValue();
            // client.getMetaInfo().getLastActiveTime(): 客户端最近一次活跃时间
            // 客户端最近一次活跃时间距离当前时间超过20s的客户端,服务端会发起请求探活,如果失败或者超过指定时间内未响应则剔除服务。
            if (now - client.getMetaInfo().getLastActiveTime() >= KEEP_ALIVE_TIME) {
                outDatedConnections.add(client.getMetaInfo().getConnectionId());
            }
        }

        // check out date connection
        Loggers.CONNECTION.info("Out dated connection ,size={}", outDatedConnections.size());
        if (CollectionUtils.isNotEmpty(outDatedConnections)) {
            // 记录成功探活的客户端连接的集合
            Set<String> successConnections = new HashSet<>();
            final CountDownLatch latch = new CountDownLatch(outDatedConnections.size());
            for (String outDateConnectionId : outDatedConnections) {
                try {
                    Connection connection = connectionManager.getConnection(outDateConnectionId);
                    if (connection != null) {
                        // 创建一个客户端检测请求
                        ClientDetectionRequest clientDetectionRequest = new ClientDetectionRequest();
                        connection.asyncRequest(clientDetectionRequest, new RequestCallBack() {
                            @Override
                            public Executor getExecutor() {
                                return null;
                            }

                            @Override
                            public long getTimeout() {
                                return 5000L;
                            }

                            @Override
                            public void onResponse(Response response) {
                                latch.countDown();
                                if (response != null && response.isSuccess()) {
                                    // 探活成功,更新最近活跃时间,然后加入到探活成功的集合中
                                    connection.freshActiveTime();
                                    successConnections.add(outDateConnectionId);
                                }
                            }

                            @Override
                            public void onException(Throwable e) {
                                latch.countDown();
                            }
                        });

                        Loggers.CONNECTION.info("[{}]send connection active request ", outDateConnectionId);
                    } else {
                        latch.countDown();
                    }

                } catch (ConnectionAlreadyClosedException e) {
                    latch.countDown();
                } catch (Exception e) {
                    Loggers.CONNECTION.error("[{}]Error occurs when check client active detection ,error={}",
                            outDateConnectionId, e);
                    latch.countDown();
                }
            }

            latch.await(5000L, TimeUnit.MILLISECONDS);
            Loggers.CONNECTION.info("Out dated connection check successCount={}", successConnections.size());

            for (String outDateConnectionId : outDatedConnections) {
                // 不在探活成功的集合,说明探活失败,执行注销连接操作
                if (!successConnections.contains(outDateConnectionId)) {
                    Loggers.CONNECTION.info("[{}]Unregister Out dated connection....", outDateConnectionId);
                    // 注销过期连接
                    connectionManager.unregister(outDateConnectionId);
                }
            }
        }

        Loggers.CONNECTION.info("Connection check task end");

    } catch (Throwable e) {
        Loggers.CONNECTION.error("Error occurs during connection check... ", e);
    }
}
如上代码,比较容易看懂,总体逻辑就是:
- 拿到当前所有的连接;
- 循环判断每个连接,判断下最近一次活跃时间距离当前时间,是不是超过20s,如果超过20s,将连接ID加入到一个过期连接集合中放着;
- 循环过期连接集合中的每个连接,Nacos服务端主动发起一个探活,如果探活成功,将连接ID加入到探活成功的集合中;
- 比较过期连接集合、探活成功集合,两者的差集,就是真正探活失败,需要剔除的那些连接,将会执行注销连接操作;
针对探活失败的那些连接,需要执行注销连接,具体代码如下:
// 注销过期连接
connectionManager.unregister(outDateConnectionId);

public synchronized void unregister(String connectionId) {
    // 根据connectionId从连接集合中移除这个连接
    // Map<String, Connection> connections = new ConcurrentHashMap<>();
    Connection remove = this.connections.remove(connectionId);
    // 移除成功
    if (remove != null) {
        String clientIp = remove.getMetaInfo().clientIp;
        AtomicInteger atomicInteger = connectionForClientIp.get(clientIp);
        if (atomicInteger != null) {
            int count = atomicInteger.decrementAndGet();
            if (count <= 0) {
                connectionForClientIp.remove(clientIp);
            }
        }
        remove.close();
        LOGGER.info("[{}]Connection unregistered successfully. ", connectionId);

        // 通知其它客户端,这个连接断开了
        clientConnectionEventListenerRegistry.notifyClientDisConnected(remove);
    }
}
unregister()方法首先根据connectionId从连接集合中移除这个连接,然后通知其它客户端,这个连接断开了。
继续跟踪clientConnectionEventListenerRegistry.notifyClientDisConnected(remove)的源码
public void notifyClientDisConnected(final Connection connection) {
    // ClientConnectionEventListener其实就是客户端连接事件的一些监听器
    for (ClientConnectionEventListener clientConnectionEventListener : clientConnectionEventListeners) {
        try {
            clientConnectionEventListener.clientDisConnected(connection);
        } catch (Throwable throwable) {
            Loggers.REMOTE.info("[NotifyClientDisConnected] failed for listener {}",
                    clientConnectionEventListener.getName(), throwable);
        }
    }
}
ClientConnectionEventListener主要有三个子类,这里关注ConnectionBasedClientManager。
public void clientDisConnected(Connection connect) {
    clientDisconnected(connect.getMetaInfo().getConnectionId());
}

public boolean clientDisconnected(String clientId) {
    Loggers.SRV_LOG.info("Client connection {} disconnect, remove instances and subscribers", clientId);
    ConnectionBasedClient client = clients.remove(clientId);
    if (null == client) {
        return true;
    }
    client.release();
    boolean isResponsible = isResponsibleClient(client);
    // 发布客户端释放连接事件
    /**
     * 具体处理是在:{@link com.alibaba.nacos.naming.core.v2.index.ClientServiceIndexesManager.onEvent}
     * 主要做了下面几个事情:
     * 1、从订阅者列表中移除所有服务对这个客户端的引用
     * 2、从发布者列表中移除所有服务对这个客户端的引用
     */
    NotifyCenter.publishEvent(new ClientOperationEvent.ClientReleaseEvent(client, isResponsible));

    // 发布客户端断开连接事件
    /**
     * 具体处理是在:{@link com.alibaba.nacos.naming.core.v2.metadata.NamingMetadataManager.onEvent}
     * 主要做了下面几个事情:
     * 1、将服务实例元数据添加到过期集合中
     */
    NotifyCenter.publishEvent(new ClientEvent.ClientDisconnectEvent(client, isResponsible));
    return true;
}
可以看到,关键的逻辑就是发布了两个事件:客户端释放连接事件、客户端断开连接事件
2:客户端释放连接事件
具体处理是在com.alibaba.nacos.naming.core.v2.index.ClientServiceIndexesManager.onEvent()
public void onEvent(Event event) {
    if (event instanceof ClientOperationEvent.ClientReleaseEvent) {
        // 处理客户端释放连接事件
        handleClientDisconnect((ClientOperationEvent.ClientReleaseEvent) event);
    } else if (event instanceof ClientOperationEvent) {
        // 处理排除ClientReleaseEvent后的其它客户端操作事件
        handleClientOperation((ClientOperationEvent) event);
    }
}

private void handleClientDisconnect(ClientOperationEvent.ClientReleaseEvent event) {
    Client client = event.getClient();
    for (Service each : client.getAllSubscribeService()) {
        // 从订阅者列表中移除所有服务对这个客户端的引用
        // private final ConcurrentMap<Service, Set<String>> subscriberIndexes = new ConcurrentHashMap<>();
        // key: Service
        // value: 客户端ID集合
        removeSubscriberIndexes(each, client.getClientId());
    }
    DeregisterInstanceReason reason = event.isNative()
            ? DeregisterInstanceReason.NATIVE_DISCONNECTED : DeregisterInstanceReason.SYNCED_DISCONNECTED;
    long currentTimeMillis = System.currentTimeMillis();
    for (Service each : client.getAllPublishedService()) {
        // 从发布者列表中移除所有服务对这个客户端的引用
        removePublisherIndexes(each, client.getClientId());
        InstancePublishInfo instance = client.getInstancePublishInfo(each);
        NotifyCenter.publishEvent(new DeregisterInstanceTraceEvent(currentTimeMillis,
                "", false, reason, each.getNamespace(), each.getGroup(), each.getName(),
                instance.getIp(), instance.getPort()));
    }
}
主要做了两件事情:
- 从订阅者列表中移除所有服务对这个客户端的引用;
- 从发布者列表中移除所有服务对这个客户端的引用;
3:客户端断开连接事件
具体处理是在com.alibaba.nacos.naming.core.v2.metadata.NamingMetadataManager.onEvent():
public void onEvent(Event event) {
    if (event instanceof MetadataEvent.InstanceMetadataEvent) {
        // 处理实例元数据事件
        handleInstanceMetadataEvent((MetadataEvent.InstanceMetadataEvent) event);
    } else if (event instanceof MetadataEvent.ServiceMetadataEvent) {
        // 处理服务元数据事件
        handleServiceMetadataEvent((MetadataEvent.ServiceMetadataEvent) event);
    } else {
        // 处理客户端断开连接事件
        handleClientDisconnectEvent((ClientEvent.ClientDisconnectEvent) event);
    }
}

private void handleClientDisconnectEvent(ClientEvent.ClientDisconnectEvent event) {
    for (Service each : event.getClient().getAllPublishedService()) {
        String metadataId = event.getClient().getInstancePublishInfo(each).getMetadataId();
        if (containInstanceMetadata(each, metadataId)) {
            // 实例已过期,将实例元数据添加到过期集合中
            updateExpiredInfo(true, ExpiredMetadataInfo.newExpiredInstanceMetadata(each, metadataId));
        }
    }
}
主要做了一件事情:判断实例元数据是否存在,存在的话,将它标志已过期,添加到过期集合中;
4:健康检查总结
- 入口在
ConnectionManager.start()方法,该方法有注解@PostConstruct; - start()方法启动了一个定时任务,3s定时调度一次(每次结束后延迟3s);
- 判断哪些客户端最近一次活跃时间已经超过20s,如果超过,判断为连接过期,并把过期的client存放到过期集合中;
- Nacos服务端会对过期的client进行一次探活操作,如果失败或者指定时间内还没有响应,直接剔除该客户端;
- 剔除客户端的过程,发布了两个事件:客户端释放连接事件、客户端断开连接事件。拿到订阅者列表、发布者列表,移除掉所有服务对这个client的引用,保证服务不会引用到过期的client;
三:服务剔除
前面健康检查我们主要分析了ConnectionBasedClientManager这个类
细心的可能会发现ConnectionBasedClientManager的构造方法其实启动了一个定时任务
public ConnectionBasedClientManager() {
    // 启动了一个定时任务,无延迟,每隔5s执行一次
    // 具体就是执行ExpiredClientCleaner.run()方法
    GlobalExecutor
            .scheduleExpiredClientCleaner(new ExpiredClientCleaner(this), 0, Constants.DEFAULT_HEART_BEAT_INTERVAL,
                    TimeUnit.MILLISECONDS);
}
这个定时任务,每隔5s就会执行一次,具体就是执行ExpiredClientCleaner.run()方法:
private static class ExpiredClientCleaner implements Runnable {

    private final ConnectionBasedClientManager clientManager;

    public ExpiredClientCleaner(ConnectionBasedClientManager clientManager) {
        this.clientManager = clientManager;
    }

    @Override
    public void run() {
        long currentTime = System.currentTimeMillis();
        for (String each : clientManager.allClientId()) {
            // 判断客户端是否超时
            ConnectionBasedClient client = (ConnectionBasedClient) clientManager.getClient(each);
            if (null != client && client.isExpire(currentTime)) {
                // 超时连接处理
                clientManager.clientDisconnected(each);
            }
        }
    }
}
上面这个clientManager.clientDisconnected(each)超时连接处理,在前面已经分析过了,这里不再分析
关键的逻辑就是发布了两个事件:客户端释放连接事件、客户端断开连接事件。

汇聚全球AI编程工具,助力开发者即刻编程。
更多推荐

 12
12 0
0- 0


 已为社区贡献1条内容

所有评论(0)