
AI开发全流程工具链:从代码生成到模型部署的智能化实践
本文系统介绍了AI开发工具链的核心组件及应用方法。GitHub Copilot通过GPT模型实现智能代码补全,LabelStudio支持高效数据标注,MLflow提供实验追踪与模型管理,FastAPI实现模型服务化部署。文章详细解析了各工具的技术原理、使用策略和最佳实践,包括Prompt优化、ML辅助标注、超参数调优等关键技巧,并展示了如何通过MLOps构建自动化流水线。随着AI工具能力的提升,开
人工智能开发已形成涵盖编码辅助、数据处理、模型训练、部署监控的完整工具链。本文通过技术原理拆解、代码示例、流程图解和最佳实践,系统介绍GitHub Copilot等核心AI工具的应用方法,帮助开发者构建高效智能的机器学习工作流。
一、智能编码工具:GitHub Copilot与AI辅助编程
1.1 GitHub Copilot技术原理与核心功能
GitHub Copilot基于OpenAI的GPT系列模型优化,通过分析上下文生成代码建议。其核心特性包括:
- 上下文感知:理解函数名、注释、变量命名等上下文信息
- 多语言支持:覆盖Python、JavaScript、Java等主流编程语言
- 代码补全:从单行补全到完整函数生成的递进式辅助
工作流程图(mermaid):
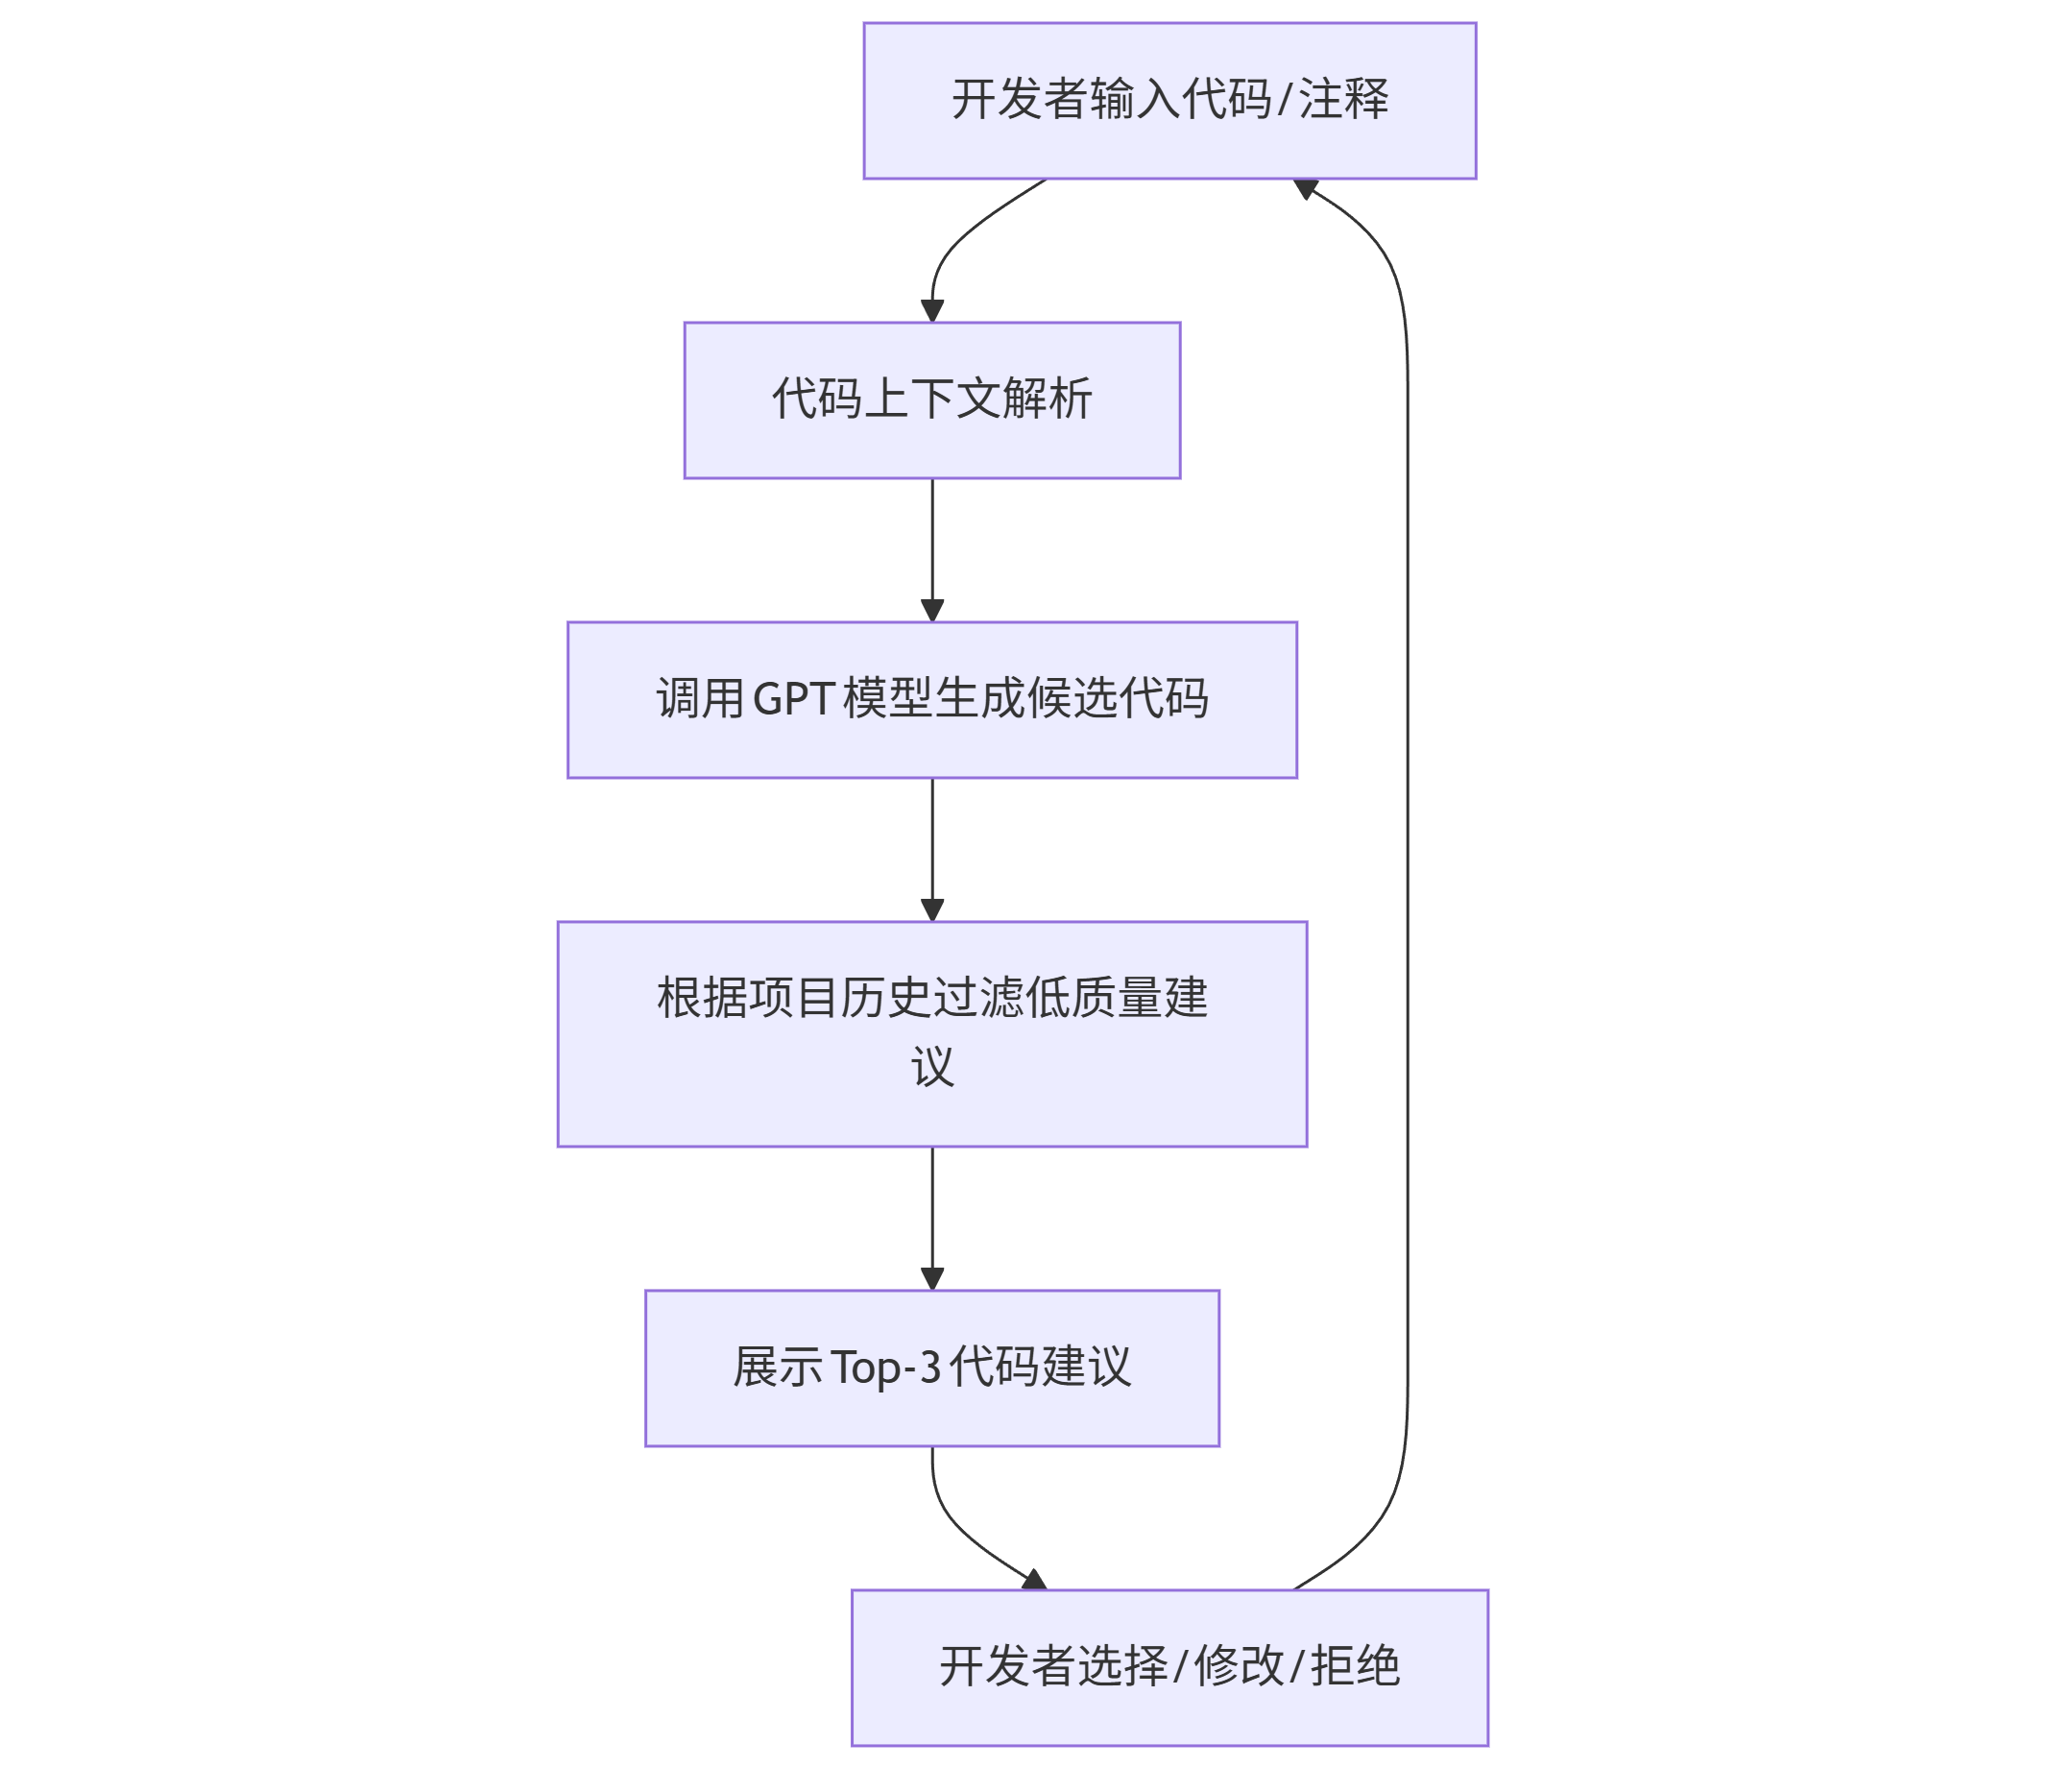
graph TD A[开发者输入代码/注释] --> B[代码上下文解析] B --> C[调用GPT模型生成候选代码] C --> D[根据项目历史过滤低质量建议] D --> E[展示Top-3代码建议] E --> F[开发者选择/修改/拒绝] F --> A
1.2 高效使用GitHub Copilot的Prompt策略
优质提示词(Prompt)能显著提升Copilot输出质量,以下是三类关键场景及示例:
场景1:函数功能描述
# Prompt: 实现一个批量处理CSV文件的函数,要求: # 1. 输入文件夹路径和输出路径 # 2. 读取所有.csv文件并合并 # 3. 添加"来源文件名"列 # 4. 处理缺失值:数值列填充0,字符串列填充"unknown" def batch_process_csv(input_dir, output_path):
Copilot生成结果:
import pandas as pd import os def batch_process_csv(input_dir, output_path): # 获取所有CSV文件 csv_files = [f for f in os.listdir(input_dir) if f.endswith('.csv')] dfs = [] for file in csv_files: file_path = os.path.join(input_dir, file) df = pd.read_csv(file_path) # 添加来源文件名列 df['source_file'] = file dfs.append(df) # 合并数据 combined_df = pd.concat(dfs, ignore_index=True) # 处理缺失值 numeric_cols = combined_df.select_dtypes(include=['number']).columns combined_df[numeric_cols] = combined_df[numeric_cols].fillna(0) string_cols = combined_df.select_dtypes(include=['object']).columns combined_df[string_cols] = combined_df[string_cols].fillna('unknown') # 保存结果 combined_df.to_csv(output_path, index=False) return combined_df
场景2:算法实现提示
# Prompt: 实现快速排序算法,要求: # - 原地排序(in-place) # - 时间复杂度O(n log n) # - 处理重复元素 def quicksort(arr):
场景3:错误处理增强
# Prompt: 完善下面的API请求函数,添加: # 1. 请求超时处理(3秒) # 2. 重试机制(最多3次,指数退避) # 3. 状态码200/404/500的差异化处理 import requests def fetch_data(url):
1.3 企业级应用最佳实践
- 配置.gitignore规则:避免敏感信息通过上下文传递给Copilot
- 启用Copilot Labs:使用Explain Code功能理解复杂代码片段
- 自定义代码风格:通过编辑.github/copilot-settings.json统一代码风格
性能对比表:
| 任务类型 | 传统编码(分钟) | Copilot辅助(分钟) | 效率提升 |
|---|---|---|---|
| 简单CRUD接口 | 15 | 5 | 67% |
| 数据分析脚本 | 25 | 8 | 68% |
| 单元测试编写 | 20 | 7 | 65% |
二、数据标注工具:Label Studio与自动化标注流程
2.1 数据标注工具选型对比
| 工具名称 | 核心功能 | 适用场景 | 开源/商业 |
|---|---|---|---|
| Label Studio | 多模态标注、ML辅助标注 | NLP、图像、音频 | 开源 |
| LabelImg | 图像目标检测标注 | 简单物体检测数据集 | 开源 |
| Amazon SageMaker Ground Truth | 云端大规模标注 | 企业级数据集 | 商业 |
Label Studio因其灵活性成为开源首选,支持文本分类、图像分割、音频转录等20+标注类型。
2.2 Label Studio部署与使用指南
Docker快速部署:
# 拉取镜像并启动 docker run -it -p 8080:8080 -v $(pwd)/mydata:/label-studio/data heartexlabs/label-studio:latest # 创建管理员账户 label-studio create_user --username admin --password strong_password
标注项目创建流程:
- 创建项目→选择数据类型(如Text Classification)
- 导入数据集(支持CSV、JSON、本地文件)
- 配置标签体系(如情感分析的Positive/Negative/Neutral)
- 启动标注任务
ML辅助标注配置:
通过集成预置模型(如BERT文本分类模型)实现半自动化标注:
# label_studio/ml_backend/model.py from label_studio_ml.model import LabelStudioMLBase class TextClassificationModel(LabelStudioMLBase): def predict(self, tasks, **kwargs): predictions = [] for task in tasks: text = task['data']['text'] # 调用预训练模型预测 pred_label = self.classifier.predict([text])[0] predictions.append({ 'result': [{ 'value': {'choices': [pred_label]}, 'from_name': 'sentiment', 'to_name': 'text', 'type': 'choices' }], 'score': 0.95 # 模型置信度 }) return {'predictions': predictions}
2.3 数据标注质量控制策略
- 标注规范文档:明确标注边界案例(如模糊情感文本处理规则)
- 交叉验证:对10%样本进行多人标注,计算Cohen's Kappa系数(目标≥0.85)
- 主动学习:优先标注模型预测置信度低于0.7的样本
三、模型训练平台:MLflow与实验追踪
3.1 MLflow核心组件与工作流
MLflow解决机器学习生命周期中的四大痛点:实验追踪、模型打包、模型部署、模型注册。
核心组件:
- MLflow Tracking:记录参数、指标、 artifacts
- MLflow Projects:标准化运行环境
- MLflow Models:统一模型打包格式
- MLflow Registry:模型版本管理
实验追踪示例代码:
import mlflow from sklearn.ensemble import RandomForestClassifier from sklearn.datasets import load_iris from sklearn.model_selection import train_test_split from sklearn.metrics import accuracy_score # 初始化MLflow实验 mlflow.set_experiment("iris-classification") # 加载数据 data = load_iris() X_train, X_test, y_train, y_test = train_test_split(data.data, data.target, test_size=0.2) # 启动实验运行 with mlflow.start_run(run_name="rf-baseline"): # 记录参数 mlflow.log_param("n_estimators", 100) mlflow.log_param("max_depth", 5) # 训练模型 model = RandomForestClassifier(n_estimators=100, max_depth=5) model.fit(X_train, y_train) # 评估指标 y_pred = model.predict(X_test) accuracy = accuracy_score(y_test, y_pred) mlflow.log_metric("accuracy", accuracy) # 保存模型 mlflow.sklearn.log_model(model, "model") # 记录 artifacts(如特征重要性图) import matplotlib.pyplot as plt plt.bar(data.feature_names, model.feature_importances_) plt.savefig("feature_importance.png") mlflow.log_artifact("feature_importance.png")
3.2 分布式训练与超参数优化
使用Hyperopt进行超参数搜索:
from hyperopt import fmin, tpe, hp, STATUS_OK, Trials space = { 'n_estimators': hp.quniform('n_estimators', 50, 200, 10), 'max_depth': hp.quniform('max_depth', 3, 10, 1) } def objective(params): with mlflow.start_run(nested=True): model = RandomForestClassifier( n_estimators=int(params['n_estimators']), max_depth=int(params['max_depth']) ) model.fit(X_train, y_train) accuracy = accuracy_score(y_test, model.predict(X_test)) mlflow.log_params(params) mlflow.log_metric("accuracy", accuracy) return {'loss': -accuracy, 'status': STATUS_OK} trials = Trials() best = fmin(objective, space, algo=tpe.suggest, max_evals=20, trials=trials)
MLflow UI可视化:
mlflow ui --port 5000 # 访问http://localhost:5000查看实验结果
四、模型部署与监控:FastAPI与Prometheus监控
4.1 FastAPI模型服务化
将MLflow保存的模型部署为REST API:
# main.py from fastapi import FastAPI import mlflow import pandas as pd app = FastAPI() model = mlflow.sklearn.load_model("runs:/<RUN_ID>/model") # 替换为实际RUN_ID @app.post("/predict") def predict(data: dict): # 数据预处理 df = pd.DataFrame(data["features"]) # 模型预测 prediction = model.predict(df) return {"prediction": prediction.tolist()} # 启动服务:uvicorn main:app --reload --port 8000
API测试(curl):
curl -X POST "http://localhost:8000/predict" \ -H "Content-Type: application/json" \ -d '{"features": [[5.1, 3.5, 1.4, 0.2], [6.2, 2.9, 4.3, 1.3]]}'
4.2 模型监控与性能预警
使用Prometheus+Grafana监控API性能指标:
# 添加Prometheus监控 from prometheus_fastapi_instrumentator import Instrumentator Instrumentator().instrument(app).expose(app)
关键监控指标:
- 请求延迟(p95/p99分位数)
- 预测分布变化(数据漂移检测)
- 准确率衰减趋势(模型性能退化)
五、AI开发工具链整合:MLOps自动化流水线
5.1 GitHub Actions实现CI/CD流水线
.github/workflows/ml-pipeline.yml:
name: ML Pipeline on: [push] jobs: train-and-deploy: runs-on: ubuntu-latest steps: - uses: actions/checkout@v3 - name: Set up Python uses: actions/setup-python@v4 with: python-version: '3.9' - name: Install dependencies run: | python -m pip install --upgrade pip pip install -r requirements.txt - name: Train model run: python train.py # 包含MLflow实验追踪 - name: Deploy to production if: github.ref == 'refs/heads/main' run: | aws s3 cp runs/ s3://mlflow-artifacts/ --recursive # 同步模型到S3 aws ecs update-service --cluster ml-cluster --service model-service --force-new-deployment
5.2 完整MLOps流程图(mermaid)

graph LR A[代码提交触发CI] --> B[单元测试] B --> C[数据验证] C --> D[模型训练+MLflow追踪] D --> E[模型评估] E --> F{性能达标?} F -->|是| G[模型注册到生产环境] F -->|否| H[终止并通知开发者] G --> I[部署API服务] I --> J[监控性能指标] J --> K{检测到漂移?} K -->|是| A K -->|否| J
结语:AI工具链的未来趋势
随着大语言模型能力的提升,AI开发工具正从辅助功能向自主智能演进。未来工具链将呈现三大趋势:
- 全流程自然语言编程:通过对话生成完整项目代码
- 端到端自动化:从需求分析到部署的零人工干预
- 多模态协同:代码、文档、可视化的统一理解与生成
开发者应关注工具链的可解释性与伦理安全,在提升效率的同时,避免对AI工具形成过度依赖。最终,AI工具应成为"思考伙伴"而非简单的代码生成器,真正放大人类开发者的创造力与问题解决能力。
思考问题:当AI工具能自主完成80%的编码工作时,软件工程师的核心竞争力将转向何处?

汇聚全球AI编程工具,助力开发者即刻编程。
更多推荐

 2
2 0
0- 0


 已为社区贡献83条内容

所有评论(0)