
基于Claude Code实现ResNet网络搭建记录
注:个人的IDE使用PyCharm/VScode,环境管理使用Conda/miniconda
项目存放在个人的github仓库
ResNet网络简单介绍
ResNet(Residual Network,残差网络)是 2015 年提出的经典卷积网络,核心创新是残差连接(Residual Connection),解决了深层网络训练时的梯度消失问题,目前仍作为CNN的核心骨干网络适用于图像分类、目标检测等任务。
ResNet的基础结构:
输入层 → 卷积层(7×7,步长2)+ 池化层(3×3,步长2) → 4个残差块组(layer1-layer4) → 全局平均池化 → 全连接层(分类头)
对于不同版本的ResNet,残差块有所不同:
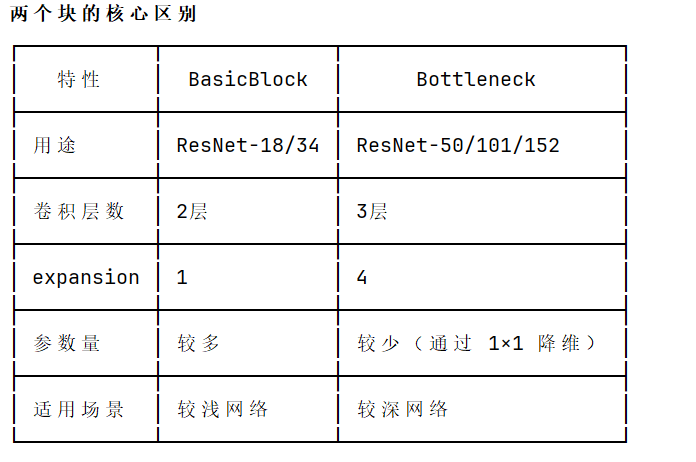
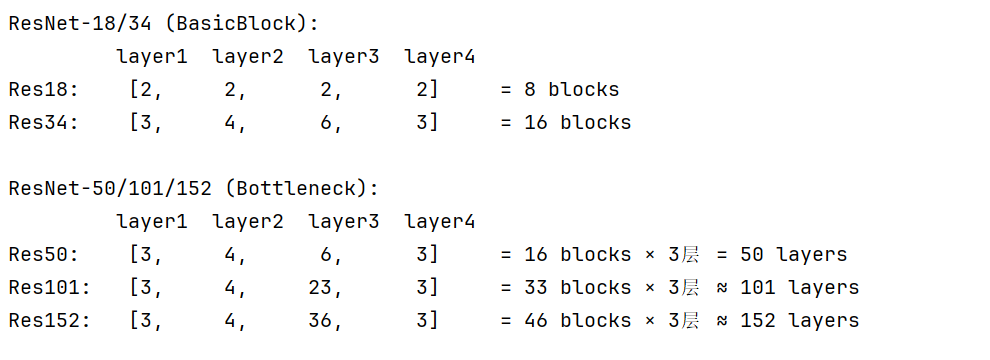
- 基础残差块(BasicBlock):用于 ResNet18/34,由 2 个 3×3 卷积层组成;
- 瓶颈残差块(Bottleneck):用于 ResNet50/101/152,由 1×1 + 3×3 + 1×1 卷积层组成(减少计算量)

因此ResNet50 虽然层数更多,但用了 Bottleneck 结构,参数量只比 ResNet34 多一点(25M vs 21M),计算量也只略高,是当下任务的第一选择(当然还需要考虑数据集大小和硬件资源)
基于Claude Code实现ResNet的规划
明确目的:从零开始实现 ResNet深度学习模型,使用 PyTorch 框架。
技术栈:Pytorch框架,python3.8+
需要实现的功能:
1.搭建ResNet网络,支持18/34/50/101等型号
2.支持加载pytorch的预训练权重,例如Resnet34
https://download.pytorch.org/models/resnet18-f37072fd.pth
3.支持从头开始训练或者使用预训练权重开始训练
4.支持对数据集CIFAR-10、CIFAR-100、ImageNet进行预处理或数据增强
5.支持训练完成后的模型导出和测试
Claude Code自动构建
首先在计划模式把我们的规划全部发送给Claude Code,让他生成解决方案,我使用GLM-5模型的部分解决方案如下
实现步骤
阶段 1: 基础设施
1. 创建项目目录结构
2. 创建 requirements.txt
3. 实现 src/models/blocks.py - BasicBlock 和 Bottleneck
4. 实现 src/models/resnet.py - 主 ResNet 类
5. 实现 src/models/variants.py - 工厂函数(支持 pretrained=True 参数)
6. 实现 src/utils/weights.py - 预训练权重下载和管理阶段 2: 数据管道
7. 实现 src/data/transforms.py - 数据增强
8. 实现 src/data/dataset.py - 数据集加载器
9. 实现 src/utils/metrics.py - 评估指标阶段 3: 训练引擎
10. 实现 src/engine/optimizer.py - 优化器和调度器
11. 实现 src/engine/trainer.py - 训练循环
12. 实现 src/utils/checkpoint.py - 模型保存/加载
13. 实现 src/utils/logger.py - TensorBoard 日志阶段 4: 用户接口
14. 实现 scripts/train.py - 训练脚本(支持 --pretrained 参数)
15. 实现 scripts/evaluate.py - 评估脚本
16. 创建 config.yaml - 配置文件
17. 创建 README.md - 使用文档
确认无误后交给Claude Code自动执行即可,经过12分钟的等待时间,执行结果如下:
ResNet 深度学习项目已全部完成!
已创建的文件结构
C:\Users\Temp\Desktop\Resnet\
├── .gitignore
├── README.md
├── requirements.txt
├── config.yaml
│
├── src/
│ ├── __init__.py
│ ├── models/
│ │ ├── __init__.py
│ │ ├── blocks.py # BasicBlock 和 Bottleneck
│ │ ├── resnet.py # 主 ResNet 类
│ │ └── variants.py # 工厂函数
│ ├── data/
│ │ ├── __init__.py
│ │ ├── transforms.py # 数据增强
│ │ └── dataset.py # 数据集加载
│ ├── engine/
│ │ ├── __init__.py
│ │ ├── optimizer.py # 优化器配置
│ │ └── trainer.py # 训练循环
│ └── utils/
│ ├── __init__.py
│ ├── weights.py # 预训练权重下载
│ ├── metrics.py # 评估指标
│ ├── checkpoint.py # 模型保存/加载
│ └── logger.py # TensorBoard 日志
│
├── scripts/
│ ├── train.py # 训练脚本
│ └── evaluate.py # 评估脚本
│
├── outputs/ # 输出目录
├── tests/
├── examples/
└── notebooks/快速开始
1. 安装依赖:
pip install -r requirements.txt2. 从头训练 ResNet-50:
python scripts/train.py --model resnet50 --dataset cifar10 --epochs 1003. 使用预训练权重训练:
python scripts/train.py --model resnet50 --dataset cifar10 --pretrained true --epochs 1004. 评估模型:
python scripts/evaluate.py --checkpoint outputs/checkpoints/best_model.pth --dataset cifar10
不难发现,项目结构非常清晰,ResNet模型代码均在src/models文件夹下,数据集的加载和变换在src/data文件夹,训练和测试均在scripts文件夹下,我们依次来看
ResNet模型代码
blocks.py实现了基础残差块(BasicBlock)和瓶颈残差块(Bottleneck)
两个类所需参数均为:输入通道数、输出通道数、卷积步长和残差连接维度匹配
然后我们看resnet.py,这是用于搭建ResNet的整体网络,核心是用def_make_layer 将多个残差块组合成一个 stage,所有resnet型号都包含4个stage,区别是每个stage的block数量不同
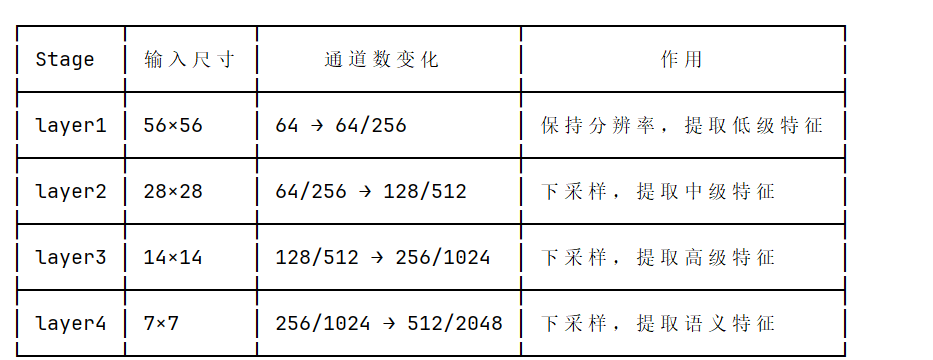
注:这里通道数变化受expansion参数影响,因此会有4倍的区别
此外代码还提供了两个forward版本:
def forward(self, x: torch.Tensor) -> torch.Tensor:
    """
    Forward pass through the network.

    Args:
        x: Input tensor of shape (batch_size, channels, height, width)

    Returns:
        Output tensor of shape (batch_size, num_classes)
    """
    # Initial convolution and pooling
    x = self.conv1(x)
    x = self.bn1(x)
    x = self.relu(x)
    x = self.maxpool(x)

    # Four stages of residual blocks
    x = self.layer1(x)
    x = self.layer2(x)
    x = self.layer3(x)
    x = self.layer4(x)

    # Global average pooling and classification
    x = self.avgpool(x)
    x = torch.flatten(x, 1)
    x = self.fc(x)

    return x

def forward_features(self, x: torch.Tensor) -> torch.Tensor:
    """
    Forward pass returning the feature maps before the final FC layer.
    Useful for feature extraction and transfer learning.

    Args:
        x: Input tensor

    Returns:
        Feature tensor of shape (batch_size, 512 * expansion, 1, 1)
    """
    x = self.conv1(x)
    x = self.bn1(x)
    x = self.relu(x)
    x = self.maxpool(x)

    x = self.layer1(x)
    x = self.layer2(x)
    x = self.layer3(x)
    x = self.layer4(x)

    x = self.avgpool(x)
    return xb
不难看出区别是有没有最后的全连接层(即分类头), forward_features() 让 ResNet 可以作为通用的特征提取器,而不受原始分类任务的限制。
最后看variants.py使用工厂函数模式来构建不同型号的 ResNet实例
工作流程
调用 resnet50(pretrained=True, num_classes=10)
↓
创建 ResNet(Bottleneck, [3,4,6,3], num_classes=10)
↓
检查 pretrained=True
↓
调用 _load_pretrained_weights()
↓
从 PyTorch 下载权重
↓
检测到 num_classes=10 ≠ 1000
↓
移除预训练的 fc 层权重
↓
加载权重(fc 层随机初始化)
↓
返回模型
数据集加载和处理代码
dataset.py 功能分析:
数据集加载器函数def get_dataset_loaders--提供自动下载CIFAR
封装「数据集加载 + 预处理 + 批量迭代」,返回可直接用于训练的 DataLoader;
get_custom_dataset_loaders() 允许使用自己的数据
transforms.py 实现了数据增强和预处理
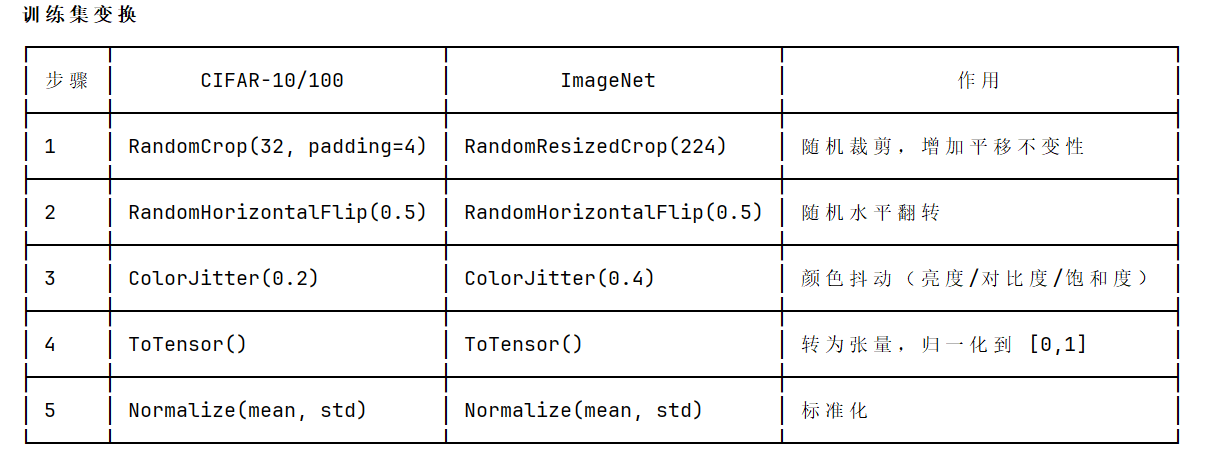
class Cutout:
"""随机遮挡图像中的方形区域"""
用途:防止模型过拟合,强制模型学习全局特征而非局部纹理。
模型训练
我们使用如下命令在终端进行训练
python scripts/train.py --model resnet18 --dataset cifar10 --epochs 100
Epoch 10 | Train Loss: 0.8419 | Train Acc: 70.91% | Val Loss: 0.8061 | Val Acc: 72.74% | LR: 0.098015
使用resnet18模型从头开始训练cifar10数据集,轮次100,代码会自动下载数据集,如果速度太慢请自行去网站下载压缩包解压后,放入data\raw文件夹
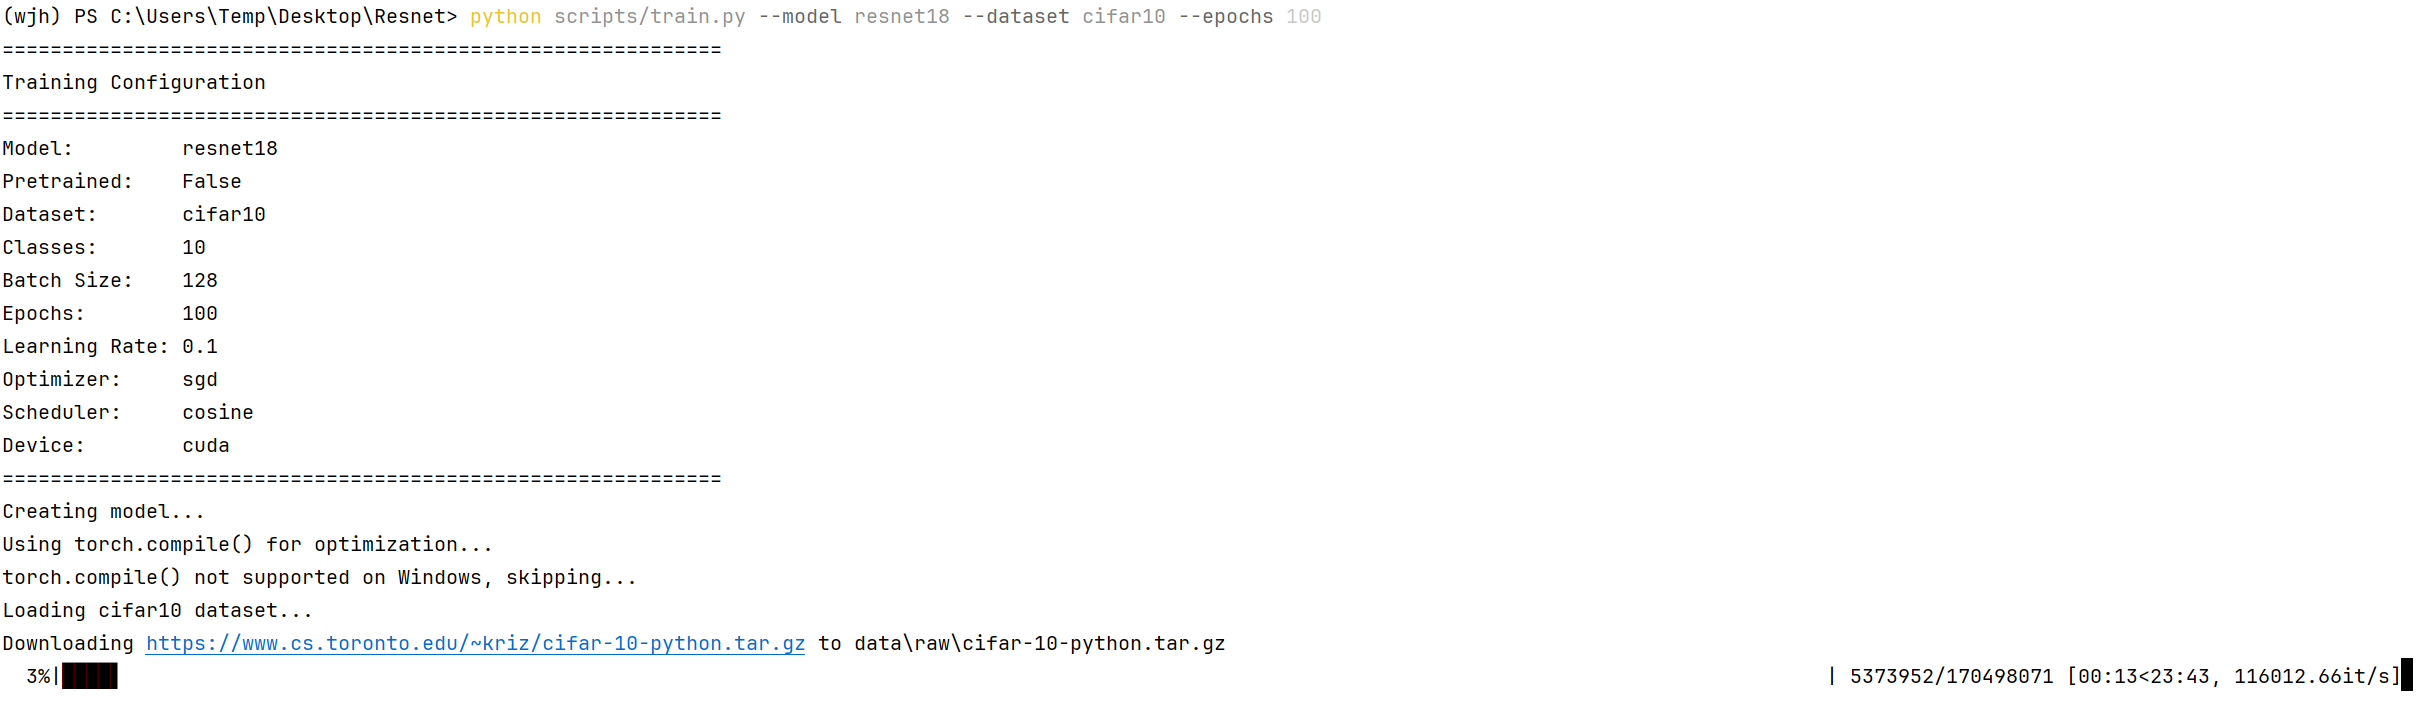
训练过程中发现,当前的训练每一个epoch都会保存权重文件,改为每10轮/20轮保存一次,后续可自行加入中断训练后恢复训练、训练早停等通用功能。
我们重新运行训练:改为使用预训练权重
python scripts/train.py --model resnet18 --dataset cifar10 --pretrained true --epochs 50

汇聚全球AI编程工具,助力开发者即刻编程。
更多推荐

 27
27 0
0- 0


 已为社区贡献1条内容

所有评论(0)