
vLLM-0.11.0运行qwen3-vl-4b
显卡: NVIDIA GeForce RTX 4060 Ti 16g
执行:
conda create -n vllmenv python=3.11 -y
conda activate vllmenv
pip install vllm==0.11.0 -i https://pypi.tuna.tsinghua.edu.cn/simple
# 通过以下命令确认flash-attn的版本
python -c "import torch; print(torch._C._GLIBCXX_USE_CXX11_ABI)"
python -c "import torch; print(torch.__version__); print(torch.cuda.is_available()); print(torch.version.cuda)"
python -c "import sys; print(f'cp{sys.version_info.major}{sys.version_info.minor}')"
uname -m
- GitHub Releases: https://github.com/Dao-AILab/flash-attention/releases
根据输出找到目标版本
pip install flash_attn-2.8.3+cu12torch2.8cxx11abiTRUE-cp311-cp311-linux_x86_64.whl
# 手动编译请参考:
apt-get update && apt-get install -y build-essential ninja
pip install --upgrade pip setuptools wheel
pip install packaging
pip install flash-attn --no-build-isolation
# 心理路程 :
1 千万注意 torch版本 vLLM版本和flash-attn版本 等的兼容性, 最开始用的vLLM.0.11.0 , 通过pip install flash-attn 也没有直接指定版本, 包管理器一直通过当前环境判断下载预编译版本,然后进入无限的等待中...
2 qwen3vl模型是10月份新出的模型 只能用vllm0.11.+部署
参考issue: Qwen3-VL vllm启动报错 · Issue #6183 · modelscope/ms-swift
下载模型: 通义千问3-VL-4B-Instruct · 模型库
启动命令: 注意控制好上下文长度 Qwen3-VL-4B-Instruct 的 max_model_len 默认为 262,144 tokens(超长上下文),需要 36 GiB 显存, 同时允许访问本地路径
python -m vllm.entrypoints.openai.api_server --model /opt/models/Qwen/Qwen3-VL-4B-Instruct --host 0.0.0.0 --port 8888 --max-model-len 4096 --gpu-memory-utilization 0.9 --allowed-local-media-path "/opt/pycodes"
python测试代码
from openai import OpenAI

# 连接到您的 vLLM 服务器
client = OpenAI(
    base_url="http://localhost:8888/v1",  # 确保与您的 vLLM 服务端口一致
    api_key="EMPTY"  # vLLM 默认无需认证,任意字符串即可
)

# 构建多模态请求
response = client.chat.completions.create(
    model="/opt/models/Qwen/Qwen3-VL-4B-Instruct",  # 使用的模型名称,需与启动服务时指定的一致
    messages=[
        {
            "role": "user",
            "content": [
                {
                    "type": "text",
                    "text": "你从图片中看见了什么?"
                },
                {
                    "type": "image_url",
                    "image_url": {
                        "url":  "file:///opt/pycodes/img_dog.jpg"
                    }
                }
            ]
        }
    ]
)

# 输出模型的回复
print(response.choices[0].message.content)
再附上通过transfer加载模型的代码
from transformers import AutoProcessor,Qwen3VLForConditionalGeneration
from PIL import Image
import torch

model_path = "/opt/models/Qwen/Qwen3-VL-4B-Instruct"

# 加载 processor(包含 tokenizer + image processor)
processor = AutoProcessor.from_pretrained(model_path, trust_remote_code=True)


# 加载模型
model = Qwen3VLForConditionalGeneration.from_pretrained(
    model_path,
    device_map="auto",
    trust_remote_code=True,
    torch_dtype=torch.bfloat16
).eval()


# 加载图像
image = Image.open("img_dog.jpg").convert("RGB")

# 构造对话
query = "你从图片中看见了什么?"

messages = [
    {
        "role": "user",
        "content": [
            {"type": "image"},
            {"type": "text", "text": query}
        ]
    }
]


# 使用 processor 构造输入
text = processor.apply_chat_template(messages, tokenize=False, add_generation_prompt=True)
inputs = processor(
    text=[text],
    images=[image],
    return_tensors="pt",
    padding=True
).to(model.device)

# 推理
with torch.no_grad():
    output_ids = model.generate(
        **inputs,
        max_new_tokens=512,
        do_sample=True,
        temperature=0.7,
        top_p=0.9
    )

# 解码输出
generated_text = processor.batch_decode(
    output_ids,
    skip_special_tokens=True,
    clean_up_tokenization_spaces=False
)[0]


print(generated_text)
运行结果图:
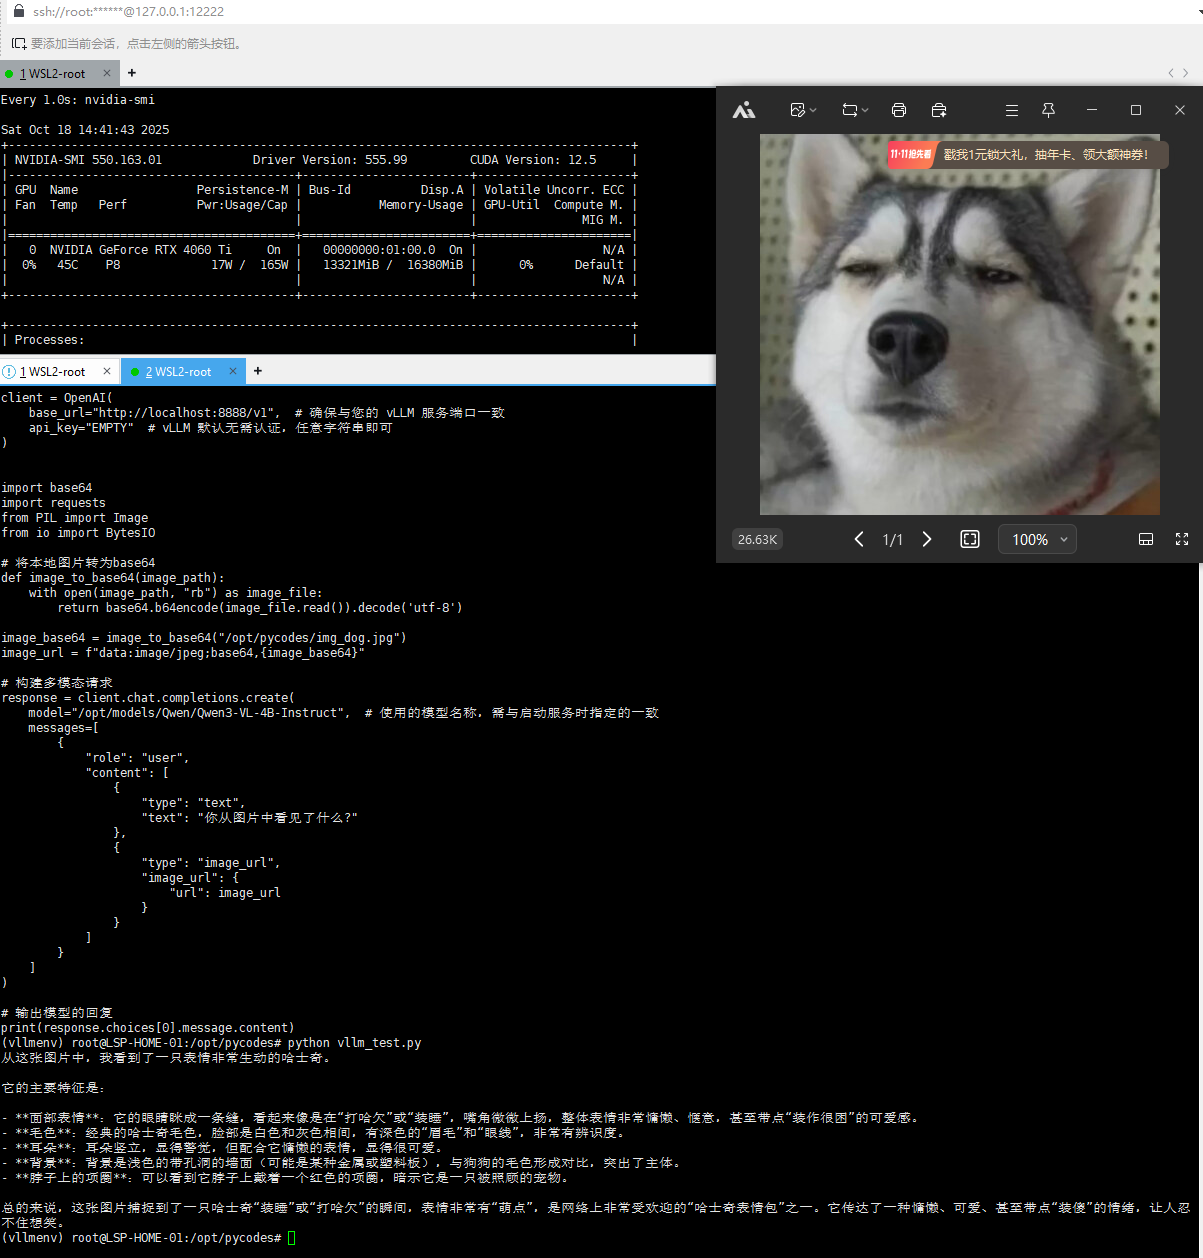
消费级显卡也是秒级回复 还可以!

汇聚全球AI编程工具,助力开发者即刻编程。
更多推荐

 10
10 0
0- 0


 已为社区贡献1条内容

所有评论(0)