
基于TensorRT-LLM部署llama3
·
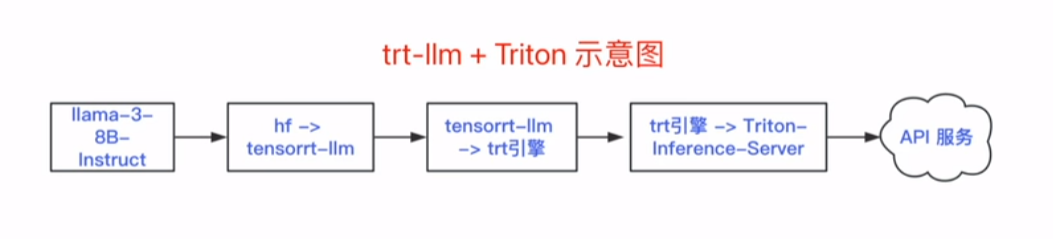
1. TensorRT-LLM 环境配置
#1.下载 TensorRT-LLM 项目
git clone -b v0.8.0 https://github.com/NVIDIA/TensorRT-LLM.git
# 2.创建容器
docker run itd --name trt-llm--runtime=nvidia --gpus all -v /root/projects:/root/projects -v /root/models:/root/models -p 8000:8000 nvidia/cuda:12.1.0-devel-ubuntu22.04
# 3.进入容器
docker exec it trt-llm /bin/bash
#4.安装相关依赖包
apt-get update && apt-get -y install python3.10 python3-pip openmpi-bin libopenmpi-dev git
# 5.安装 TensorRT-LLM
pip3 install tensorrt llm=0.8.0 -U --extra-index-url https://pypi.nvidia.com
# 6.检查安装
python3 -c "import tensorrt llm"
2. 模型转换
场景1:Meta-Llama-3-8B
#1.模型格式转换(hf-> tensorrt-llm)
python3 convert_checkpoint.py --model_dir /root/models/Meta-Llama-3-8B \
--output_dir /root/models/output/example-
1/tllm_checkpoint_lgpu_fp16_wq \
--dtype float16 \
--use_weight_only \
-weight_only_precision int8
#2.编译模型,创建trt引擎
trtllm-build --checkpoint_dir /root/models/output/example-1/tllm_checkpoint_1gpu_fp16_wq \
--output_dir /root/models/output/example-1/trt_ engines/weight_only/1-gpu \
--gemm_plugin float16
# 3.引擎推理
python3 ../run.py --input_text"请介绍一下火星" --max_output_len=50 --tokenizer_dir /root/models/Meta-Llama-3-8B --engine_dir=/root/models/output/example-1/trt_engines/weight_only/1-gpu
场景2:Meta-Llama-3-8B-Instruct
# 注意:请在容器内执行下面的所有命令
cd /root/projects/TensorRT-LLM/examples/llama
#1.模型格式转换(hf ->tensorrt-llm)
python3 convert_checkpoint.py --model_dir /root/models/Meta-Llama-3-8B-Instruct\
--output_dir /root/models/output/example-2/tllm_checkpoint_lgpu_fp16_wq
--dtype float16
--use_weiqht_only
--weight_only_precision int8
#2.编译模型,创建trt引擎
trtllm-build --checkpoint_dir /root/models/output/example-2/t1lm_checkpoint_1gpu_fp16_wg \
--output_dir /root/models/output/example-2/trt_engines/weight_only/1-gpu \
--gemm_plugin float16
--max_num_tokens 8012
--max_batch_size 64
--max_input_len 512
--max_output_len 512
--remove_input_padding enable
python3 ../run.py --input_text"特朗普是谁?" --max_output_len=50 \
--tokenizer_dir=/root/models/Meta-Llama-3-8B-Instruct \
--engine_dir=/root/models/output/example-2/trt_engines/weight_only/l-gpu
3. 基于 Triton Inference Server 进行服务部署
- all_models/inflight_batcher_llm/:设置所需模型仓库
- preprocessing/和postprocessing/:包含用于文本标记化和去标记化的脚本,适用于Triton的Python后端
- tensorrt_llm:存放之前编译的模型引警
- ensemble:定义模型集合,整合各组件,并指导数据流动
#下载 tensorrtllm_backend
git clone -b v0.8.0 https://github.com/triton-inference-server/tensorrtllm_backend.git
cd tensorrtllm_backend
#拷贝引擎到tensorrtllm_backend指定的路径
cp /root/models/output/example-2/trt_engines/weight_only/1-gpu/*/root/projects/tensorrtllm_ backend/all_models/inflight_batcher_llm/tensorrt_llm/1
配置config.pbtxt
确保Triton Inference Server能够正确识别和加载模型,同时优化内存使用,以保持高效率的操作。
#指定ensorRT-LLM模型
export HF_LLAMA_MODEL=/root/models/Meta-Llama-3-8B-Instruct
#指定TensorRr加速的LLM模型引擎文件的路径
export ENGINE_PATH=/root/projects/tensorrtllm_backend/all_models/inflight_batcher_llm/tensorrt 1lm/1
python3 tools/fill template.py -i all_models/inflight_batcher_llm/preprocessing/config.pbtxt tokenizer_dir:$(HF_LLAMA_MODEL),tokenizer_type:auto,triton_max_batch_size:64,preprocessing_instance_count:1

python3 tools/fill_template.py -i
all_models/inflight_batcher_llm/postprocessing/config.pbtxt tokenizer_dir:$(HF_LLAMA_ MODEL),tokenizer_type:auto,triton_max_batch_size:64,postprocessing_instance_count:1

python3 tools/fill_template.py -i
all_models/inflight_batcher_1lm/tensorrt_llm/config.pbtxt triton_max_batch_size:64,decoupled_ mode:False,bls_instance_count:1,accumulate_tokens:False

python3 tools/fill_template.py -i all_models/inflight_batcher_llm/ensemble/config.pbtxt triton_ max_batch_size:64

python3 tools/fill_template.py -i
all_models/inflight_batcher_llm/tensorrt_llm/config.pbtxt triton_max_batch_size:64,decoupled_ mode:False,max_beam_width:1,engine_dir:$(ENGINE_PATH),max_tokens_in_paged_kv_cache:2560,max_ attention_window_size:2560,kv_cache_free_gpu_mem_fraction:0,5,exclude_input_in_output:True,enable_kv_cache_reuse:False,batching_strategy:inflight_fused_batching,max queue_delay_microseconds : 0
创建tensorrt-llm容器,并启动服务
# 创建容器并运行
docker run -itd --network host --name trt-backend --shm-size=2g --ulimit memlock=-1 --ulimit stack=67108864 --gpus all -v
/root/projects/tensorrtllm_backend:/root/projects/tensorrtllm_backend -v/root/models:/root/models nvcr.io/nvidia/tritonserver:24.03-trtllm-python-py.
# 进入容器
docker exec it trt-backend /bin/bash
#在容器内,启动 Triton server
cd projects/tensorrtllm_backend
# 安装依赖
pip install sentencepiece protobuf
# 启动服务
python3 scripts/launch_triton_server.py --world_size=1 \
 --model-repo=all_models/inflight_batcher_llm
#cur1命令服务请求测试
cur1-X POST http://1ocalhost:8000/v2/models/ensemble/generate -d '{"text_input": "请介绍-下特朗普的情况","max_tokens":512,"bad_words":[""],"stop_words":["<|eot id|>"]}'
# requests请求服务# trttest.py
import requests
response =requests.post(
'http://localhost:8000/v2/models/ensemble/generate'json={
"text_input":"请介绍一下火星的情况"
"max tokens":512,
"bad words": [""],
stop_words":[""]
result=response.json()["text_output"]
print(result)

汇聚全球AI编程工具,助力开发者即刻编程。
更多推荐

 5
5 0
0- 0


 已为社区贡献1条内容

所有评论(0)