
从零实现一个本地 AI 编程助手
从零实现一个本地 AI 编程助手(Python + 多模型 + GUI)
在学习 AI Agent 开发的过程中,我从一个简单的命令行对话工具开始,逐步实现了支持多模型切换、工具调用、智能上下文管理、GUI 可视化的完整 AI 编程助手。本文详细记录整个实现过程中的架构设计、关键代码和踩坑经验。
一、项目概述
1.1 目标
构建一个类似 Cursor / Codex CLI 的本地 AI 编程助手,核心能力:
- 读写项目文件、执行终端命令、分析代码结构
- 支持 Gemini / DeepSeek / OpenAI / 本地 Ollama 多模型热切换
- 提供 CLI 和 Web GUI 两种交互方式
- 文件修改自带安全网(快照回滚 + 语法检查 + 自动测试)
1.2 技术栈
| 层级 | 技术选型 | 说明 |
|---|---|---|
| 后端 | Python 3.12 + FastAPI | Agent 核心 + API 服务 |
| 通信 | WebSocket | 实时推送工具调用状态、流式输出 |
| 模型 | google.genai / openai SDK | Gemini 原生 + OpenAI 兼容格式(DeepSeek/Ollama) |
| 前端 | 原生 JS + CSS | 零框架依赖,单页应用 |
| 桌面 | PyWebView(可选) | 独立窗口,也可直接浏览器访问 |
1.3 最终效果预览
— CLI 终端交互效果 — 输入自然语言指令,Agent 自动分析依赖、修改多文件、跑测试
![**[图片位置]** 插入](https://i-blog.csdnimg.cn/direct/25f7e1ad4de44377b231f23730c65b6a.png)
二、核心架构设计
2.1 分层架构图
+-----------------------------------------------------------+
|                   User Interface Layer                      |
|  +-----------+      +-------------------------------+      |
|  | CLI(REPL) |      | GUI (FastAPI + WebSocket)     |      |
|  | cli.py    |      | server/ + web/                |      |
|  +-----+-----+      +-------------+----------------+      |
+--------|---------------------------|----------------------+
         |                           |
         v                           v
+-----------------------------------------------------------+
|                    Agent Core Layer                         |
|  +-----------------------------------------------------+  |
|  |          AgentLoop (agent_loop.py)                   |  |
|  |  Input -> Context Inject -> LLM -> Tools -> Loop     |  |
|  +-----------------------------------------------------+  |
|        |              |               |                    |
|  +-----v-----+  +----v-------+  +----v----------+        |
|  |LLM Factory|  |Tool System |  |Memory System  |        |
|  |Multi-model|  |12+ tools   |  |Compression    |        |
|  +-----------+  +------------+  +---------------+        |
+-----------------------------------------------------------+
2.2 核心数据流
用户输入
  │
  ▼
智能上下文注入(相关文件签名 + 任务计划 + 修改记录)
  │
  ▼
自动压缩检测(上下文超限时增量摘要)
  │
  ▼
调用 LLM(带 tools 定义)
  │
  ├─ 返回 tool_calls → 执行工具 → 结果追加到消息 → 回到 LLM
  │
  └─ 返回纯文本 → 流式输出给用户 → 结束
设计原则:LLM 负责决策(调什么工具、传什么参数),框架负责执行和验证。框架不信任 LLM 的输出——写完文件要检查语法,改完代码要跑测试。
2.3 项目目录结构
ai-agent-cli/
├── agent/
│   ├── agent_loop.py      # Agent 主循环(~55K,核心)
│   ├── llm_factory.py     # 多模型工厂
│   ├── memory.py          # 记忆系统
│   ├── cli.py             # CLI 交互 + 命令注册
│   └── tools/             # 工具模块(按职责拆分)
│       ├── file_ops.py    # 文件读写(快照+验证)
│       ├── search.py      # 搜索(正则+语义)
│       ├── shell.py       # 命令执行(自动纠错)
│       ├── refactor.py    # 重构(引用查找+批量重命名)
│       ├── code_intel.py  # 代码智能(签名提取+依赖图)
│       ├── plan.py        # 任务计划管理
│       └── docs.py        # 文档提取(PDF/Office/图片)
├── server/
│   └── __init__.py        # FastAPI + WebSocket 后端
├── web/
│   ├── index.html         # 单页应用入口
│   ├── app.js             # 前端逻辑(~47K)
│   └── style.css          # 深色主题
├── config.yaml            # 模型配置 + Agent 行为参数
└── prompts/default.md     # 系统提示词
三、关键模块实现
3.1 多模型工厂(LLM Factory)
设计思路
不同模型的 API 格式差异很大:Gemini 用 google.genai,DeepSeek 和 Ollama 兼容 OpenAI 格式但有细微差别。通过工厂模式 + 抽象基类统一接口,上层代码无需关心底层是哪个模型。
from abc import ABC, abstractmethod

class LLMResponse:
    """统一响应格式"""
    def __init__(self, text=None, tool_calls=None):
        self.text = text
        self.tool_calls = tool_calls  # [ToolCall(id, name, params)]

class LLMProvider(ABC):
    @abstractmethod
    def chat(self, messages: list, tools: list = None) -> LLMResponse:
        """统一的对话接口"""
        ...

class GeminiProvider(LLMProvider):
    """Google Gemini — 使用 google.genai SDK"""
    def chat(self, messages, tools=None):
        response = self.client.models.generate_content(
            model=self.model_name,
            contents=self._convert_messages(messages),
            config=GenerateContentConfig(
                tools=self._build_tools(tools),
                # 关键:开启 thinking 大幅提升工具调用质量
                thinking_config=ThinkingConfig(thinking_budget=2048),
            )
        )
        return self._parse_response(response)

class OpenAICompatibleProvider(LLMProvider):
    """DeepSeek / Ollama — 兼容 OpenAI 格式"""
    def chat(self, messages, tools=None):
        response = self.client.chat.completions.create(
            model=self.model_name,
            messages=messages,
            tools=self._format_tools(tools),
        )
        return self._parse_response(response)

class LLMFactory:
    """根据 config.yaml 动态创建 Provider"""
    def create(self, model_id: str) -> LLMProvider:
        cfg = self.config["models"][model_id]
        if cfg["provider"] == "gemini":
            return GeminiProvider(cfg)
        elif cfg["provider"] == "openai_compatible":
            return OpenAICompatibleProvider(cfg)
配置文件驱动
# config.yaml
active_model: deepseek

models:
  gemini_flash:
    provider: gemini
    model_name: gemini-2.5-flash
    api_key: ${GEMINI_API_KEY}

  deepseek:
    provider: openai_compatible
    model_name: deepseek-chat
    api_key: ${DEEPSEEK_API_KEY}
    base_url: https://api.deepseek.com/v1

  local_ollama:
    provider: openai_compatible
    model_name: qwen2.5:14b
    base_url: http://localhost:11434/v1
    # 本地模型不需要 api_key
踩坑记录
| 问题 | 模型 | 解决方案 |
|---|---|---|
| tool_call 缺少 id 字段报 400 | DeepSeek | 手动生成 call_xxxx 格式的 id |
| content 为 None 导致后续请求崩溃 | Gemini | 空字符串兜底 content = resp.text or "" |
| tool 消息顺序错误 | DeepSeek | 确保 tool result 紧跟 assistant tool_calls |
| thinking 未开启导致工具调用质量差 | Gemini Flash | 添加 thinking_budget=2048 配置 |
3.2 Agent 主循环(Tool-Use Loop)
这是整个系统的核心——一个 LLM 决策 + 框架执行的循环:
class AgentLoop:
    def __init__(self, llm, system_prompt, config):
        self.llm = llm
        self.messages = [{"role": "system", "content": system_prompt}]
        self.tool_call_count = 0
        self.max_tool_calls = config.get("max_tool_calls", 20)

    def run(self, user_input: str) -> str:
        self.messages.append({"role": "user", "content": user_input})

        while self.tool_call_count < self.max_tool_calls:
            # 1. 智能上下文注入
            self._inject_context_hints()

            # 2. 上下文过长时自动压缩
            if self._token_count() > self.context_limit * 0.8:
                self._auto_compress()

            # 3. 调用 LLM
            response = self.llm.chat(self.messages, tools=TOOL_REGISTRY)

            # 4. 有工具调用 → 执行 → 继续循环
            if response.tool_calls:
                self._execute_tools(response.tool_calls)
                continue

            # 5. 纯文本 → 返回给用户
            return response.text

        return "⚠️ 达到工具调用上限,已停止"

    def _execute_tools(self, tool_calls):
        """执行工具并把结果追加到消息历史"""
        for tc in tool_calls:
            result = execute_tool(tc.name, tc.params)
            self.messages.append({
                "role": "tool",
                "tool_call_id": tc.id,
                "content": str(result)
            })
            self.tool_call_count += 1
防护机制
- 循环检测:连续 3 次写同一文件 → 自动中断并提示
- 空响应兜底:LLM 返回空内容时尝试解析文本中的工具调用
- 流式输出:最后一轮(无 tools 参数)时启用 stream,体验更流畅
3.3 工具系统
工具注册机制
每个工具 = 一个函数 + 一份 JSON Schema 描述(供 LLM 理解参数格式):
TOOL_REGISTRY = []

def register_tool(name, description, parameters):
    """装饰器:注册工具到全局列表"""
    def decorator(func):
        TOOL_REGISTRY.append({
            "type": "function",
            "function": {
                "name": name,
                "description": description,
                "parameters": parameters
            }
        })
        func._tool_name = name
        return func
    return decorator

@register_tool(
    name="edit_file",
    description="精确替换文件中的指定内容",
    parameters={
        "type": "object",
        "properties": {
            "path": {"type": "string", "description": "文件路径"},
            "old_text": {"type": "string", "description": "要替换的原文"},
            "new_text": {"type": "string", "description": "替换后的内容"}
        },
        "required": ["path", "old_text", "new_text"]
    }
)
def tool_edit_file(path, old_text, new_text):
    # 实际实现...
    pass
内置工具清单
| 工具 | 功能 | 安全措施 |
|---|---|---|
| read_file | 读取文件(支持行范围) | — |
| write_file | 创建/覆盖文件 | 快照备份 + 语法检查 + 依赖验证 + 自动测试 |
| edit_file | 精确替换文件内容 | 同上 |
| run_shell | 执行终端命令 | 用户确认 + 自动纠错(失败后让 LLM 修复) |
| search_text | 正则搜索项目文件 | — |
| list_dir | 目录结构 | — |
| find_references | AST 查找符号引用 | — |
| rename_symbol | 批量重命名(跨文件) | 快照 + 单词边界匹配 |
| read_pdf / read_office | 文档提取 | — |
| read_image | 图片识别(Gemini Vision) | — |
| fetch_url | 网页抓取 | — |
文件修改安全网(核心亮点)
每次 write_file / edit_file 触发完整的验证链:
def _post_write_pipeline(self, filepath):
    """文件修改后的自动验证流水线"""
    results = []

    # 1. 自动快照(修改前的备份)
    self._create_snapshot(filepath)

    # 2. 语法检查
    if filepath.endswith('.py'):
        try:
            ast.parse(open(filepath).read())
            results.append("✅ Python 语法检查通过")
        except SyntaxError as e:
            results.append(f"❌ 语法错误: {e}")

    # 3. 依赖验证(检查 import 是否可解析)
    broken = self._check_imports(filepath)
    if broken:
        results.append(f"⚠️ 无法解析的导入: {broken}")

    # 4. 自动跑相关测试
    test_file = self._find_test_file(filepath)
    if test_file:
        outcome = subprocess.run(
            ["pytest", test_file, "-x", "--timeout=30"],
            capture_output=True, timeout=30
        )
        if outcome.returncode == 0:
            results.append(f"🧪 测试通过: {test_file}")
        else:
            results.append(f"❌ 测试失败: {outcome.stdout}")

    # 5. 影响范围分析
    refs = self._get_referencing_files(filepath)
    if refs:
        results.append(f"📎 影响范围: 被 {len(refs)} 个文件引用 → {', '.join(refs)}")

    return "\n".join(results)
— Work 模式下工具调用完整流程 — 调用 list_dir 工具后展示结果并给出文字回复
3.4 智能上下文管理
问题
LLM 的上下文窗口有限(128K tokens 听起来很大,但一个中型项目全部塞进去也不够)。盲目注入所有文件会浪费 token 且降低回答质量。
解决方案:按需注入
def _inject_context_hints(self):
    """从用户输入中提取相关文件,按关联度注入不同粒度的信息"""
    user_msg = self.messages[-1]["content"]

    # 1. 提取用户提到的文件名/符号名
    mentioned_files = extract_file_mentions(user_msg)
    mentioned_symbols = extract_symbol_mentions(user_msg)

    # 2. 通过依赖图扩展关联文件
    related_files = set()
    for f in mentioned_files:
        related_files.update(self.dep_graph.get_dependents(f))
        related_files.update(self.dep_graph.get_dependencies(f))

    # 3. 分级注入
    context_parts = []
    total_chars = 0

    for f in mentioned_files:  # 直接提到的:完整内容
        content = read_file(f)
        if len(content) <= 2000:
            context_parts.append(f"[{f}]\n{content}")
            total_chars += len(content)

    for f in related_files - mentioned_files:  # 间接关联:只要签名
        if total_chars > 6000:
            break
        sigs = extract_signatures(f)  # 提取函数/类定义行
        context_parts.append(f"[{f} 签名]\n{sigs}")
        total_chars += len(sigs)

    if context_parts:
        hint = "[相关上下文]\n" + "\n\n".join(context_parts)
        self.messages[-1]["content"] += f"\n\n{hint}"
依赖图构建
def build_dep_graph(project_root):
    """扫描所有 .py 文件的 import 关系,建双向映射"""
    graph = {"imports": {}, "imported_by": {}}

    for py_file in glob(f"{project_root}/**/*.py"):
        tree = ast.parse(open(py_file).read())
        for node in ast.walk(tree):
            if isinstance(node, (ast.Import, ast.ImportFrom)):
                module = resolve_module(node, py_file)
                graph["imports"].setdefault(py_file, []).append(module)
                graph["imported_by"].setdefault(module, []).append(py_file)

    return graph
效果:用户说"改一下 calc.py 的 add 函数",框架自动注入 calc.py 完整内容 + main.py/api.py 中引用 add 的函数签名。LLM 能看到全貌,一次性正确修改所有相关文件。
3.5 记忆系统
为什么需要记忆
长任务中 LLM 会"忘事"——对话太长被截断,或者压缩后丢失关键信息。记忆系统解决两个问题:
- 上下文超限时如何压缩(不能简单截断)
- 哪些信息绝对不能丢(如项目技术栈、约定)
增量压缩算法
class MemoryManager:
    def compress(self, new_messages: list):
        """增量压缩:上次摘要 + 新对话 → 合并为新摘要(1次 LLM 调用)"""
        prompt = f"""请将以下内容合并为简洁摘要,保留所有技术细节:

[已有摘要]
{self.compressed_summary}

[新增对话]
{format_messages(new_messages)}

要求:保留文件名、函数名、具体数字,删除寒暄和重复内容。"""

        self.compressed_summary = self.llm.chat([
            {"role": "user", "content": prompt}
        ]).text
优先级分级
class Priority(Enum):
    DISPOSABLE = 0  # 可随时丢弃(如"好的"、"明白了")
    LOW = 1         # 低优先级(日常操作记录)
    NORMAL = 2      # 默认
    HIGH = 3        # 重要(架构决策、Bug 修复方案)
    CRITICAL = 4    # 永不压缩(项目技术栈、部署方式、关键约定)
critical_points 示例:
[
  {"content": "项目用 Flask + pymongo,部署在私有服务器", "priority": 4},
  {"content": "API 统一返回格式 {code, data, msg}", "priority": 4},
  {"content": "部署脚本是 deploy_ai.sh", "priority": 3}
]
这些信息无论对话多长都会保留在上下文中。
四、GUI 交互系统
4.1 架构
┌─────────────┐    WebSocket     ┌──────────────┐    ┌────────────┐
│  浏览器/     │◄──────────────►│  FastAPI      │◄──►│ AgentLoop  │
│  PyWebView   │    双向实时      │  server/     │    │ 核心引擎    │
└─────────────┘                 └──────────────┘    └────────────┘
为什么选 WebSocket 而不是普通 HTTP?
- 工具调用过程需要实时推送状态(thinking → tool_start → tool_done → reply)
- 流式输出需要持续推送 chunk
- 审批请求需要前端即时响应
4.2 三种工作模式
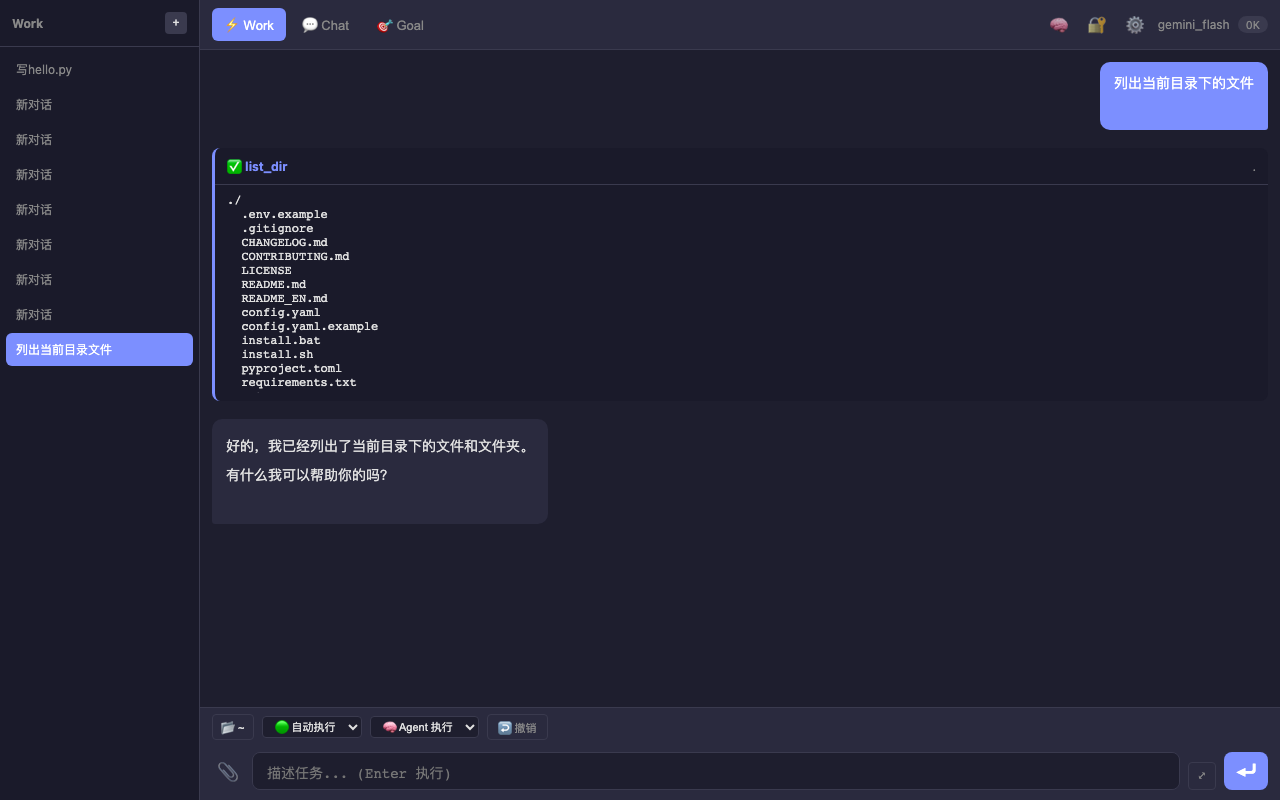
— GUI 主界面 — 深色主题,顶部 Work/Chat/Goal 三个 Tab,左侧会话列表,底部输入框
| 模式 | 用途 | 交互方式 |
|---|---|---|
| Chat | 普通对话问答 | 逐条发送,流式回复,不自动执行工具 |
| Work | 自动执行任务 | 描述目标后 Agent 自动规划执行,敏感操作弹审批 |
| Goal | 复杂目标拆解 | 多轮沟通需求 → 生成步骤计划 → 确认后批量执行 |
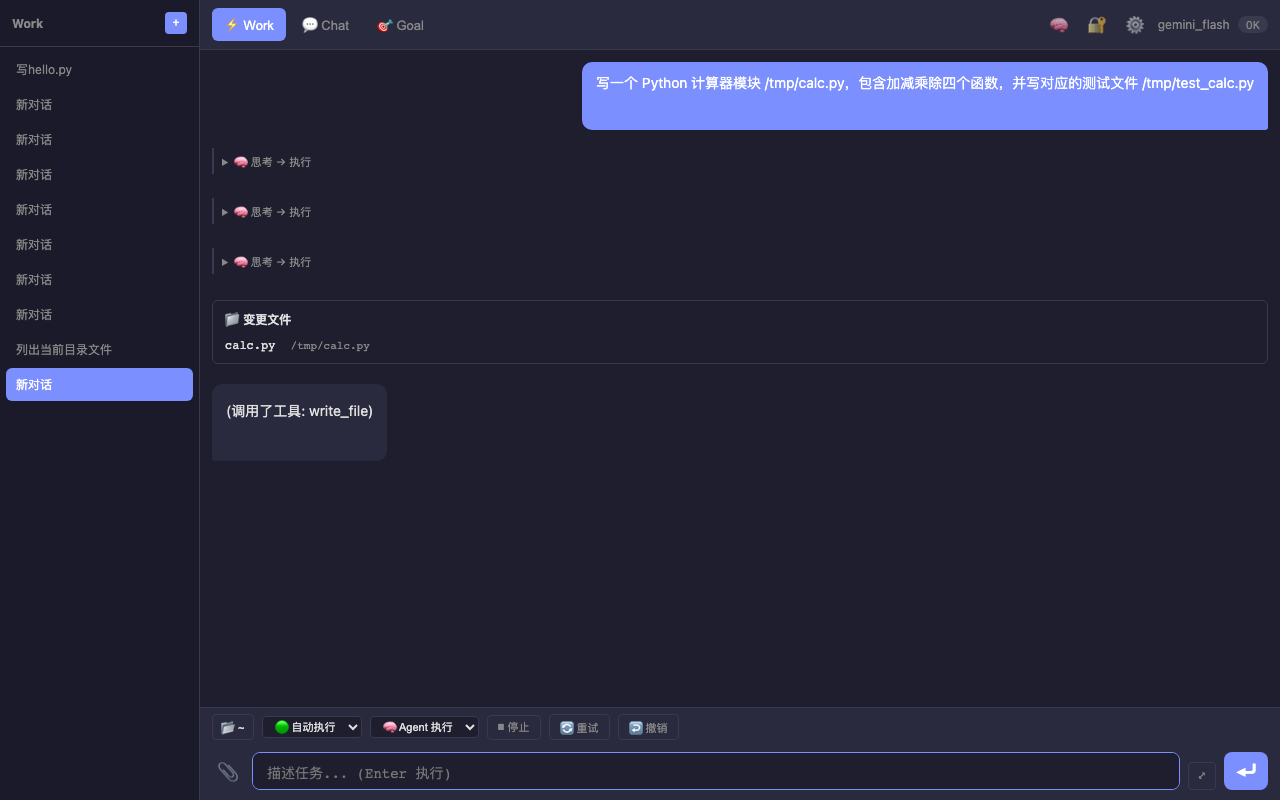
Work 模式流程
用户描述任务 → Agent 思考 → 调用工具(自动/审批)→ 展示结果 → 总结
— Work 模式执行"写计算器模块"任务 — 展示思考过程、文件变更卡片、工具调用详情
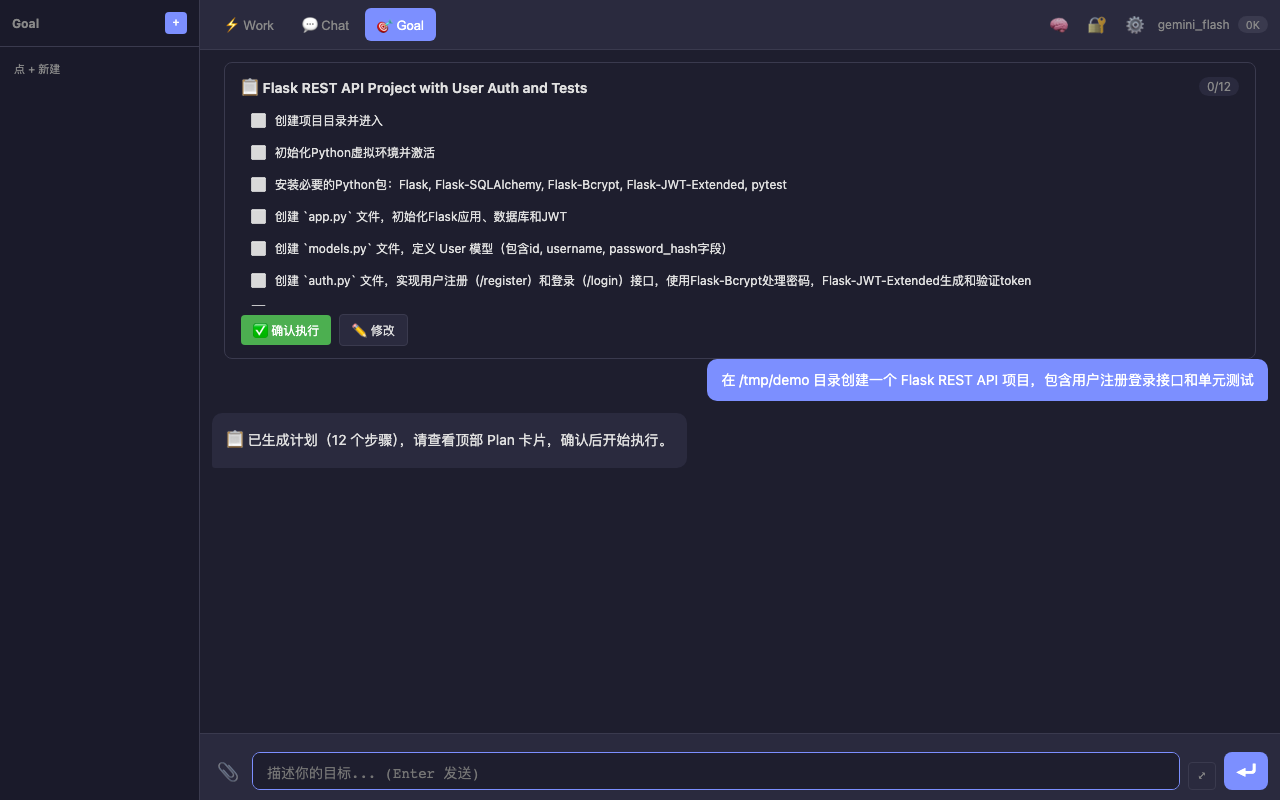
Goal 模式流程(亮点功能)
用户描述目标
    │
    ▼
AI 追问关键细节(不超过 3 个问题)
    │
    ▼
信息充分 → 生成 Step-by-Step 执行计划
    │
    ▼
用户确认 / 修改计划
    │
    ▼
逐步自动执行(支持暂停、失败重试、依赖跳过)
— Goal 模式生成 12 步执行计划 — 创建 Flask REST API 项目,包含"确认执行"和"修改"按钮
4.3 审批机制
参考 Codex CLI 的审批设计,当 Agent 要执行敏感操作时弹出审批:
┌─────────────────────────────────────────────────────┐
│  Agent 想要执行:                                     │
│    rm -rf /tmp/old_project                          │
│                                                     │
│  [✓ 本次允许]  [本会话允许]  [永久允许]  [✗ 拒绝]    │
└─────────────────────────────────────────────────────┘
四种策略:
- once:仅本次允许
- session:本会话内同类操作自动通过
- policy:永久写入策略文件,下次不再询问
- decline:拒绝执行
策略持久化到 ~/.ai-agent/trust_policy.json,支持通配符匹配:
{
  "rules": [
    {"pattern": "cat *", "action": "allow"},
    {"pattern": "pytest *", "action": "allow"},
    {"pattern": "rm -rf *", "action": "deny"}
  ]
}
4.4 WebSocket 事件协议
| 事件 | 方向 | 说明 |
|---|---|---|
chat |
前端→后端 | 用户发送消息 |
goal_chat |
前端→后端 | Goal 模式对话 |
approval_response |
前端→后端 | 审批结果 |
message |
后端→前端 | 文本回复(含 token 统计) |
thinking |
后端→前端 | 思考状态(start/done) |
tool_call |
后端→前端 | 工具调用详情 |
approval_request |
后端→前端 | 请求审批 |
goal_event |
后端→前端 | Goal 计划/步骤状态更新 |
五、模型对比与调优经验
5.1 实测对比
测试任务:电商代码重构(读取现有 4 个文件 → 重新组织架构 → 保证测试通过)
| 模型 | 通过率 | 耗时 | 关键行为差异 |
|---|---|---|---|
| Gemini Flash(无 thinking) | 0% | 3s | 不读现有文件就开始写,接口不一致 |
| Gemini Flash(有 thinking) | 54-73% | 8s | 开启思考后会先读文件确认 |
| Gemini Pro(有 thinking) | 100% | 45s | 深度思考后一次性正确写 4 文件 |
| DeepSeek V3 | 100% | 12s | 先读完所有 6 个相关文件再动手 |
5.2 关键调优发现
1. Thinking 配置对工具调用质量影响巨大
# Gemini 开启 thinking 后通过率从 0% → 73%
thinking_config = ThinkingConfig(thinking_budget=2048)
2. 框架层安全网让弱模型也能用
| 保护机制 | 效果 |
|---|---|
| 签名注入(Repo Map) | LLM 能看到 import 模块的函数列表,不会调用不存在的函数 |
| 接口一致性检测 | 写完后检查调用的函数是否存在于目标模块 |
| 自动续跑 | 测试失败后自动追加一轮修复 |
| 文件刷新 | 同文件多次 edit 后注入最新版本内容 |
3. 最终策略
# 动态选择模型
简单任务(单文件修改、查询)→ Gemini Flash(快 + 免费)
复杂任务(多文件重构、架构变更)→ DeepSeek 或 Gemini Pro(100% 通过率)
六、调试与优化
6.1 防循环机制
Agent 有时会陷入"写文件 → 测试失败 → 改文件 → 测试还是失败"的死循环:
def _detect_write_loop(self):
    """检测最近 3 次是否在写同一文件"""
    recent_writes = [m for m in self.messages[-10:]
                     if m.get("role") == "tool" and "write_file" in str(m)]
    if len(recent_writes) >= 3:
        files = [extract_path(m) for m in recent_writes]
        if len(set(files)) == 1:  # 同一文件被写了 3 次
            return True
    return False
6.2 自动纠错
Shell 命令执行失败后,自动把错误信息反馈给 LLM 让它修复:
def tool_run_shell(command):
    result = subprocess.run(command, shell=True, capture_output=True)
    if result.returncode != 0:
        # 不是直接报错,而是把错误信息作为结果返回
        # LLM 看到错误后会自动调整命令重试
        return f"❌ 执行失败 (exit {result.returncode}):\n{result.stderr}\n请分析错误并修复"
    return result.stdout
配合 auto_fix_max_retries: 3 配置,最多自动修复 3 次。
6.3 长任务进度追踪
# 任务计划 — 每轮注入当前进度
task_plan = {
    "goal": "重构电商模块",
    "steps": [
        {"desc": "读取现有代码", "status": "done"},
        {"desc": "拆分 models.py", "status": "running"},  # ← 当前
        {"desc": "更新 routes.py", "status": "pending"},
        {"desc": "跑测试", "status": "pending"}
    ]
}

# 修改记录 — 最近 10 条注入 prompt
changes = [
    {"time": "14:23", "file": "models.py", "action": "edit", "summary": "拆分 User 类"},
    {"time": "14:24", "file": "routes.py", "action": "edit", "summary": "更新 import"},
]
LLM 每轮都能看到"我在做什么、做到哪了、之前改了什么",不会重复操作或遗漏步骤。
七、部署与扩展
7.1 CLI 命令速查
| 命令 | 功能 |
|---|---|
/model <id> |
切换模型 |
/memory |
查看记忆 |
/undo |
回滚最近一次文件修改 |
/plan set <目标> |
创建任务计划 |
/deps <file> |
查看文件依赖关系 |
/changes |
查看修改历史 |
!deploy-backend |
执行快捷命令(config.yaml 定义) |
7.2 扩展方向
| 优先级 | 功能 | 说明 |
|---|---|---|
| P0 | 多语言签名提取 | Vue/PHP/Java/Go 项目的函数签名索引 |
| P1 | SSH 远程分析 | 读取远程服务器文件和日志 |
| P2 | 自动模型切换 | 根据任务复杂度自动选择模型 |
| P2 | 插件系统 | 用户自定义工具注册 |
八、总结
核心收获
- Tool-Use Loop 是 Agent 的本质:LLM 决策 + 框架执行 + 结果反馈,循环直到完成
- 框架安全网比模型能力更重要:语法检查、自动测试、影响范围分析让任何模型都更可靠
- 上下文管理决定能力上限:精准注入相关文件签名,比盲目塞入所有代码有效 10 倍
- 多模型支持的实际价值:简单任务用免费 Flash(3秒),复杂任务切 Pro/DeepSeek(100% 通过率)
- 记忆压缩让长任务成为可能:增量合并 + 优先级分级,既省 token 又不丢关键信息
附录
A. 避坑指南
- DeepSeek tool_call.id:必须手动生成,格式
call_+ 随机字符串 - Gemini content: None:assistant 消息的 content 不能为 None,用空字符串兜底
- 上下文窗口:别信标称的 128K/200K,实际超过 60% 就会出现质量下降
- 流式 + 工具调用:不能同时用,最后一轮确认无 tool_calls 时再开 stream
- Python AST 检查:只能检查语法,不能检查运行时错误,需要配合测试
B. 性能数据
| 操作 | Gemini Flash | DeepSeek | Gemini Pro |
|---|---|---|---|
| 简单问答 | 1-2s | 2-3s | 5-8s |
| 单文件修改 | 3-5s | 4-6s | 10-15s |
| 多文件重构 | 8-15s | 10-15s | 30-50s |
| 上下文压缩 | 2s | 3s | 5s |
C. 参考资料
关键词:AI Agent, Python, Function Calling, LLM 工具调用, Gemini, DeepSeek, 编程助手, 智能编码, Agent Loop, 多模型切换

汇聚全球AI编程工具,助力开发者即刻编程。
更多推荐


 10
10 0
0- 0


 已为社区贡献1条内容

所有评论(0)