
【ELK】-2 ELK的搭建
·
文章目录
ELK 搭建笔记
一、部署架构
![[Pasted image 20260606162924.png]]
| 节点 | 配置 | IP | 部署组件 |
|---|---|---|---|
| node1 | 2C/4G | 192.168.80.10 | Elasticsearch |
| node2 | 2C/4G | 192.168.80.11 | Elasticsearch |
| node3 | 2C/4G | 192.168.80.12 | Elasticsearch |
| web1 | 2C/4G | 192.168.80.13 | Logstash + Kibana + Nginx |
| web2 | 2C/4G | 192.168.80.14 | Filebeat + Nginx |
二、准备工作(每个节点都需要执行)
# 关闭防火墙
systemctl stop ufw
systemctl disable ufw

# 修改主机名
hostnamectl set-hostname node1   # node2 / node3 / web1 按需修改
hostnamectl set-hostname node2
hostnamectl set-hostname node3
hostnamectl set-hostname web1

# 时间同步 & 同步到硬件时钟
timedatectl set-ntp true
timedatectl set-timezone Asia/Shanghai
timedatectl
hwclock --systohc
hwclock --show

# 设置系统语言为中文
apt install -y language-pack-zh-hans lrzsz
localectl set-locale LANG=zh_CN.utf8
localectl
三、Elasticsearch 集群部署
3.1 环境准备
软件包下载地址:https://www.elastic.co/cn/downloads/past-releases#elasticsearch
JDK 说明:Elasticsearch 7.x 之前需要单独安装 JDK,7.x 之后内置了 JDK 环境,可装可不装。
3.2 安装 Elasticsearch
# 解压安装包
tar -zxvf elasticsearch-7.17.27-linux-x86_64.tar.gz -C /usr/local/
cd /usr/local/
mv elasticsearch-7.17.27 elasticsearch

# 创建数据目录
mkdir /usr/local/elasticsearch/data
3.3 修改主配置文件
cd /usr/local/elasticsearch/config
cp elasticsearch.yml elasticsearch.yml.bak

vim elasticsearch.yml
# --17-- 集群名称
cluster.name: my-elk-cluster

# --23-- 节点名称(node1 / node2 / node3)
node.name: node1

# --33-- 数据存放路径
path.data: /usr/local/elasticsearch/data

# --37-- 日志存放路径
path.logs: /usr/local/elasticsearch/logs

# --43-- 锁定内存,避免使用 swap 提高性能
bootstrap.memory_lock: true

# --56-- 监听地址,0.0.0.0 代表所有地址
network.host: 0.0.0.0

# --61-- 端口配置
http.port: 9200               # ES 对外访问接口
transport.tcp.port: 9300      # 集群内部通信接口

# --71-- 服务发现的节点列表
discovery.seed_hosts: ["192.168.80.10:9300", "192.168.80.11:9300", "192.168.80.12:9300"]

# --75-- 候选 master 节点列表(对应 node.name)
cluster.initial_master_nodes: ["node1", "node2", "node3"]
可选配置
node.master: true                          # 是否 master 节点
node.data: true                            # 是否 data 节点
discovery.zen.minimum_master_nodes: 2      # 避免脑裂,最少为 (节点数/2)+1
transport.tcp.compress: true               # 压缩 TCP 传输数据
http.cors.enabled: true                    # 允许跨域
http.cors.allow-origin: "*"                # 允许所有域名
节点类型说明:ES 集群节点分为 master(主节点)、data(数据节点)、client(客户端节点)。默认情况下三合一(混合节点),生产环境建议分离。
3.4 JVM 堆内存配置
cd /usr/local/elasticsearch/config
vim jvm.options
-Xms2g
-Xmx2g
# Xms 和 Xmx 设置相同值,一般不超过系统内存的 50%,不超过 30G
3.5 分发到其他节点
# 把整个 elasticsearch 目录复制到其他两个节点
scp -r /usr/local/elasticsearch node2:/usr/local/
scp -r /usr/local/elasticsearch node3:/usr/local/
# 到 node2、node3 上修改节点名称
# vim /usr/local/elasticsearch/config/elasticsearch.yml
# node.name: node2   # node3 上改为 node3
3.6 性能调优(三台节点都需要执行)
① 文件描述符 & 进程限制
vim /etc/security/limits.conf
*  soft    nofile          65535
*  hard    nofile          65535
*  soft    nproc           65535
*  hard    nproc           65535
*  soft    memlock         unlimited
*  hard    memlock         unlimited
vim /etc/systemd/system.conf
DefaultLimitNOFILE=65535
DefaultLimitNPROC=65535
DefaultLimitMEMLOCK=infinity
字段说明:
nofile— 进程可打开的最大文件数nproc— 用户可创建的最大进程数memlock— 进程可锁定在 RAM 中的最大内存
② 虚拟内存优化(mmap)
Elasticsearch 通过文件映射(mmap)读取磁盘文件,比 read 系统调用少一次内存拷贝(零拷贝技术)。
# 一个进程可拥有的最大内存映射区域数
# 参考值:2G→262144,4G→4194304,8G→8388608
echo "vm.max_map_count = 262144" >> /etc/sysctl.conf
sysctl -p
sysctl -a | grep vm.max_map_count
③ 禁止交换空间
echo "vm.swappiness = 1" >> /etc/sysctl.conf   # 仅在万不得已时使用交换
sysctl -p

swapoff -a
sed -ri 's/.*swap.*/#&/' /etc/fstab
3.7 配置 Systemd 服务
vim /usr/lib/systemd/system/elasticsearch.service
[Unit]
Description=elasticsearch
After=network.target

[Service]
Type=forking
User=elasticsearch
ExecStart=/usr/local/elasticsearch/bin/elasticsearch -d -p /usr/local/elasticsearch/elasticsearch.pid
PrivateTmp=true
LimitNOFILE=65535
LimitNPROC=65535
LimitAS=infinity
LimitFSIZE=infinity
TimeoutStopSec=0
KillSignal=SIGTERM
KillMode=process
SendSIGKILL=no
SuccessExitStatus=143

[Install]
WantedBy=multi-user.target
3.8 启动 Elasticsearch
# 创建专用用户并授权
useradd elasticsearch
echo elasticsearch:123456 | chpasswd
chown -R elasticsearch:elasticsearch /usr/local/elasticsearch

# 启动服务
systemctl daemon-reload
systemctl start elasticsearch.service
systemctl enable elasticsearch.service
ss -lntp | grep 9200
3.9 验证集群
# 查看节点信息
curl http://192.168.80.10:9200

# 查看集群健康状态
curl http://192.168.80.10:9200/_cluster/health?pretty
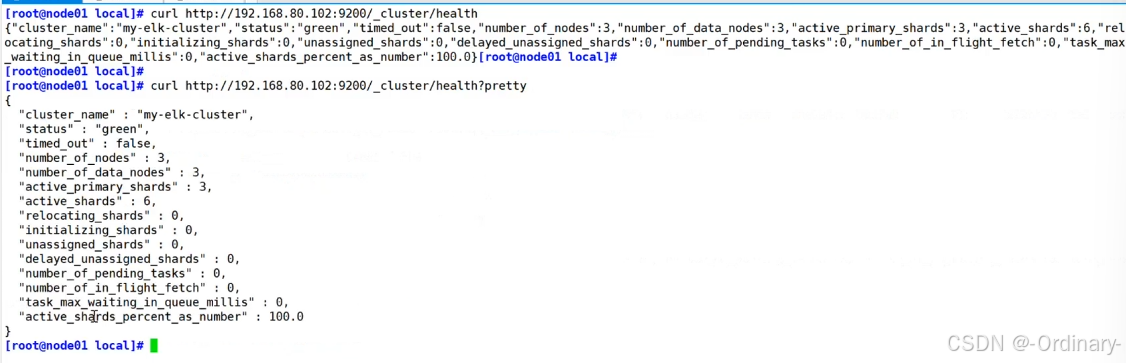
集群健康状态说明:
- green — 所有索引分片均已分配 ✅
- yellow — 主分片已分配,但存在未分配的副本分片 ⚠️
- red — 存在未分配的主分片,部分数据不可用 ❌
ES 7.0 之前默认 5 个分片,7.0 之后默认 1 个分片。
也可以用浏览器访问
http://192.168.80.10:9200/_cluster/health?pretty查看,看到status值为green即表示运行正常。在 Kibana → Dev Tools 中,点击 New → URL 填入
http://192.168.80.10:9200,如果集群健康值为 green 绿色,代表集群很健康。

汇聚全球AI编程工具,助力开发者即刻编程。
更多推荐



 7
7 0
0- 0


 已为社区贡献2条内容

所有评论(0)