
Netty( EventLoop,Channel, Future & Promise异步, Handler & Pipeline)------黑马程序员Netty全套教程网课(学习笔记)
前言
本文是本小白学习Netty的学习笔记: 博主学习的网课是黑马程序员的网课: 黑马程序员Netty全套教程( 视频讲的很好哦, 都去看🥰🥰🥰 )
⚠️注: 在学习Netty之前一定要了解NIO, 可以看看我这篇文章 Netty[ NIO 核心速成 ] ---- NIO三大组件(Channel & Buffer&selector)
目录
Netty 是什么?
Netty 是一个异步的、基于事件驱动的网络应用框架,用于快速开发可维护、高性能的网络服务器和客户端
一 先来看一个简单的入门程序( 之后再绵绵解释每一个组件 )
1.1 目标
开发一个简单的服务器端和客户端
- 客户端向服务器端发送 hello, world
- 服务器仅接收,不返回
1.2 加入依赖
<dependency>
    <groupId>io.netty</groupId>
    <artifactId>netty-all</artifactId>
    <version>4.1.39.Final</version>
</dependency>
1.3 服务端
 public static void main(String[] args) throws InterruptedException {
        // 1. 启动器,负责组装 netty 组件,启动服务器
        new ServerBootstrap()
                // 2. BossEventLoop, WorkerEventLoop(selector,thread), group 组
                .group(new NioEventLoopGroup())
                // 3. 选择 服务器的 ServerSocketChannel 实现
                .channel(NioServerSocketChannel.class) // OIO BIO
                // 4. boss 负责处理连接 worker(child) 负责处理读写,决定了 worker(child) 能执行哪些操作(handler)
                .childHandler(
                        // 5. channel 代表和客户端进行数据读写的通道 Initializer 初始化,负责添加别的 handler
                        new ChannelInitializer<NioSocketChannel>() {
                            @Override
                            protected void initChannel(NioSocketChannel ch) throws Exception {
                                // 6. 添加具体 handler
                                ch.pipeline().addLast(new StringDecoder());
                                ch.pipeline().addLast(new ChannelInboundHandlerAdapter() {
                                    @Override
                                    public void channelRead(ChannelHandlerContext ctx, Object msg) throws Exception {
                                        System.out.println(msg); // 你的代码原封不动保留
                                    }
                                });
                            }
                        })
                .bind(8080).sync(); // 绑定端口,启动服务
    }
1. 启动器:ServerBootstrap
new ServerBootstrap()
这是 Netty 的服务端/客户端启动引导类,负责把所有组件(线程组、通道、处理器等)组装起来,最后启动服务器。
2. 线程组:NioEventLoopGroup
.group(new NioEventLoopGroup())
这里只传了一个 NioEventLoopGroup,在 Netty 里会自动拆成:
- Boss Group:1 个线程,专门负责接收新连接
- Worker Group:默认是 CPU 核心数 ×2 个线程,每个线程绑定一个 Selector,负责已连接客户端的读写事件
3. 通道类型:NioServerSocketChannel/ ServerSocketChannel我这里把他俩和Boss Group,Worker Group一起理解
.channel(NioServerSocketChannel.class)
→ 只负责一件事:等客户端来连接!
- 只监听端口 8080
- 只处理 accept 事件
- 不读写数据!
- 一个服务端只有一个!
ChannelInitializer<NioSocketChannel>
→ 只负责一件事:和客户端收发消息!
- 每个客户端连接成功,新建一个
- 负责 read / write
- 由 Worker Group 管理
- 一个客户端 = 一个 NioSocketChannel
4. ch.pipeline().addLast(new StringDecoder());
SocketChannel 的处理器,解码 ByteBuf => String
5. .bind(8080).sync();
ServerSocketChannel 绑定的监听端口
1.4 客户端
new Bootstrap()
    .group(new NioEventLoopGroup()) // 1
    .channel(NioSocketChannel.class) // 2
    .handler(new ChannelInitializer<Channel>() { // 3
        @Override
        protected void initChannel(Channel ch) {
            ch.pipeline().addLast(new StringEncoder()); // 8
        }
    })
    .connect("127.0.0.1", 8080) // 4
    .sync() // 5
    .channel() // 6
    .writeAndFlush(new Date() + ": hello world!"); // 7
- 1处, 创建 NioEventLoopGroup,同 Server
- 2 处,选择客户 Socket 实现类,NioSocketChannel 表示基于 NIO 的客户端实现( 因为客户端不像服务端需要处理很多连接, 因此只用一个NioSocketChannel )
- 3 处,添加 SocketChannel 的处理器,ChannelInitializer 处理器(仅执行一次),它的作用是待客户端 SocketChannel 建立连接后,执行 initChannel 以便添加更多的处理器
- 4 处,指定要连接的服务器和端口
- 5 处,Netty 中很多方法都是异步的,如 connect,这时需要使用 sync 方法等待 connect 建立连接完毕
- 6 处,获取 channel 对象,它即为通道抽象,可以进行数据读写操作
- 7 处,写入消息并清空缓冲区
- 8 处,消息会经过通道 handler 处理,这里是将 String => ByteBuf 发出
- 数据经过网络传输,到达服务器端,服务器端 5 和 6 处的 handler 先后被触发,走完一个流程
来看看完整的实现流程
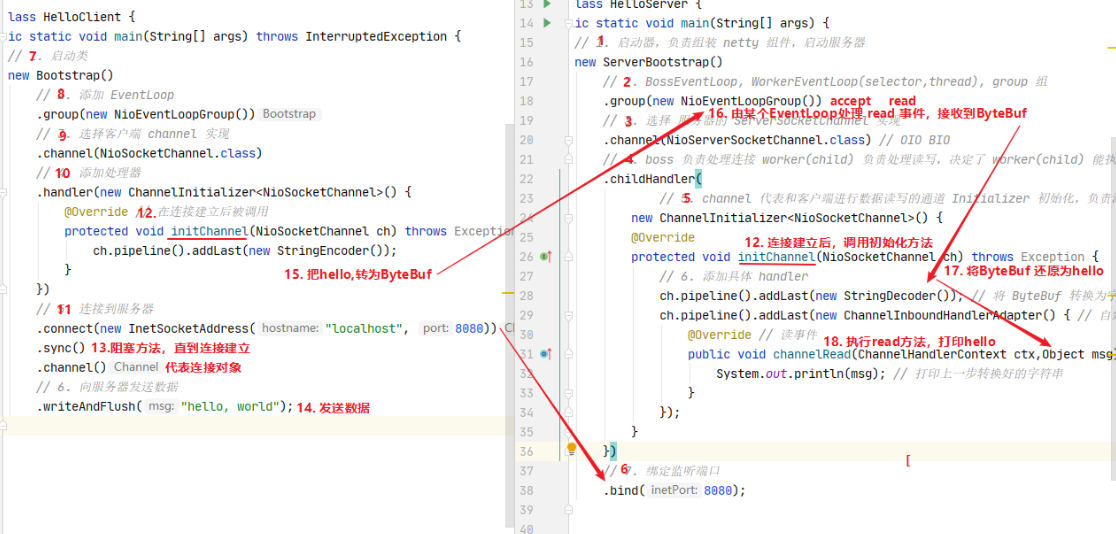
二 来看看各个组件的API和工作方式
2.1 EventLoop
事件循环对象( EventLoop )
EventLoop 本质是一个单线程执行器(同时维护了一个 Selector),里面有 run 方法处理 Channel 上源源不断的 io 事件。
它的继承关系比较复杂
- 一条线是继承自 j.u.c.ScheduledExecutorService 因此包含了线程池中所有的方法
- 另一条线是继承自 netty 自己的 OrderedEventExecutor,
- 提供了 boolean inEventLoop(Thread thread) 方法判断一个线程是否属于此 EventLoop
- 提供了 parent 方法来看看自己属于哪个 EventLoopGroup
事件循环组( EventLoopGroup )
EventLoopGroup 是一组 EventLoop,Channel 一般会调用 EventLoopGroup 的 register 方法来绑定其中一个 EventLoop,后续这个 Channel 上的 io 事件都由此 EventLoop 来处理(保证了 io 事件处理时的线程安全)
- 继承自 netty 自己的 EventExecutorGroup
- 实现了 Iterable 接口提供遍历 EventLoop 的能力
- 另有 next 方法获取集合中下一个 EventLoop
💡简单来说: 我觉得这里主要就是要把他跟前面学习的NIO的三大组件联系在一起: EventLoop就相当于一个Selector( 因此就是一个线程 ), 然后因为NIO 的主从多线程 Reactor 模型( Boss(主 Reactor)+ Worker(从 Reactor) ), 因此需要好多个Selector, 这就对应了EventLoopGroup
来看看代码
1. 服务器端安排两个 nio worker 工人
new ServerBootstrap()
    .group(new NioEventLoopGroup(1), new NioEventLoopGroup(2))
    .channel(NioServerSocketChannel.class)
    .childHandler(new ChannelInitializer<NioSocketChannel>() {
        @Override
        protected void initChannel(NioSocketChannel ch) {
            ch.pipeline().addLast(new ChannelInboundHandlerAdapter() {
                @Override
                public void channelRead(ChannelHandlerContext ctx, Object msg) {
                    ByteBuf byteBuf = msg instanceof ByteBuf ? ((ByteBuf) msg) : null;
                    if (byteBuf != null) {
                        byte[] buf = new byte[16];
                        ByteBuf len = byteBuf.readBytes(buf, 0, byteBuf.readableBytes());
                        log.debug(new String(buf));
                    }
                }
            });
        }
    }).bind(8080).sync();
2. 客户端,启动三次,分别修改发送字符串为 zhangsan(第一次),lisi(第二次),wangwu(第三次)
public static void main(String[] args) throws InterruptedException {
    Channel channel = new Bootstrap()
            .group(new NioEventLoopGroup(1))
            .handler(new ChannelInitializer<NioSocketChannel>() {
                @Override
                protected void initChannel(NioSocketChannel ch) throws Exception {
                    System.out.println("init...");
                    ch.pipeline().addLast(new LoggingHandler(LogLevel.DEBUG));
                }
            })
            .channel(NioSocketChannel.class).connect("localhost", 8080)
            .sync()
            .channel();

    channel.writeAndFlush(ByteBufAllocator.DEFAULT.buffer().writeBytes("wangwu".getBytes()));
    Thread.sleep(2000);
    channel.writeAndFlush(ByteBufAllocator.DEFAULT.buffer().writeBytes("wangwu".getBytes()));
最后输出
22:03:34 [DEBUG] [nioEventLoopGroup-3-1] c.i.o.EventLoopTest - zhangsan
22:03:36 [DEBUG] [nioEventLoopGroup-3-1] c.i.o.EventLoopTest - zhangsan
22:05:36 [DEBUG] [nioEventLoopGroup-3-2] c.i.o.EventLoopTest - lisi
22:05:38 [DEBUG] [nioEventLoopGroup-3-2] c.i.o.EventLoopTest - lisi
22:06:09 [DEBUG] [nioEventLoopGroup-3-1] c.i.o.EventLoopTest - wangwu
22:06:11 [DEBUG] [nioEventLoopGroup-3-1] c.i.o.EventLoopTest - wangwu
可以看到两个工人轮流处理 channel,但工人与 channel 之间进行了绑定
2.2 Channel
channel 的主要作用
- close() 可以用来关闭 channel
- closeFuture() 用来处理 channel 的关闭
- sync 方法作用是同步等待 channel 关闭
- 而 addListener 方法是异步等待 channel 关闭
- pipeline() 方法添加处理器
- write() 方法将数据写入
- writeAndFlush() 方法将数据写入并刷出
看看代码( 还是刚刚的客户端代码 )
new Bootstrap()
    .group(new NioEventLoopGroup())
    .channel(NioSocketChannel.class)
    .handler(new ChannelInitializer<Channel>() {
        @Override
        protected void initChannel(Channel ch) {
            ch.pipeline().addLast(new StringEncoder());
        }
    })
    .connect("127.0.0.1", 8080)
    .sync()
    .channel()
    .writeAndFlush(new Date() + ": hello world!");
拆开来看
ChannelFuture channelFuture = new Bootstrap()
    .group(new NioEventLoopGroup())
    .channel(NioSocketChannel.class)
    .handler(new ChannelInitializer<Channel>() {
        @Override
        protected void initChannel(Channel ch) {
            ch.pipeline().addLast(new StringEncoder());
        }
    })
    .connect("127.0.0.1", 8080); // 1

channelFuture.sync().channel().writeAndFlush(new Date() + ": hello world!");
简单来说: Channel = 一条电话线
你能做的事:
- close() → 挂电话
- writeAndFlush() → 说话
- pipeline() → 加个翻译 / 处理
ChannelFuture 是啥?
ChannelFuture = 取货条 / 挂号单
你去医院挂号:
- 你去挂号(调用 connect() 连接服务器)
- 护士给你一个挂号单(ChannelFuture)
- 你不能立刻看病,因为还没排到
- 等叫号了,你才能看病
channel这里外界的重点就是channel连接和发送的异步问题
先来看看代码:
ChannelFuture channelFuture = new Bootstrap()
    .group(new NioEventLoopGroup())
    .channel(NioSocketChannel.class)
    .handler(new ChannelInitializer<Channel>() {
        @Override
        protected void initChannel(Channel ch) {
            ch.pipeline().addLast(new StringEncoder());
        }
    })
    .connect("127.0.0.1", 8080);

System.out.println(channelFuture.channel()); // 1
channelFuture.sync(); // 2
System.out.println(channelFuture.channel()); // 3
- 执行到 1 时,连接未建立,打印
[id: 0x2e1884dd] - 执行到 2 时,sync 方法是同步等待连接建立完成
- 执行到 3 时,连接肯定建立了,打印
[id: 0x2e1884dd, L:/127.0.0.1:57191 - R:/127.0.0.1:8080]
除了用 sync 方法可以让异步操作同步以外,还可以使用回调的方式
ChannelFuture channelFuture = new Bootstrap()
    .group(new NioEventLoopGroup())
    .channel(NioSocketChannel.class)
    .handler(new ChannelInitializer<Channel>() {
        @Override
        protected void initChannel(Channel ch) {
            ch.pipeline().addLast(new StringEncoder());
        }
    })
    .connect("127.0.0.1", 8080);
System.out.println(channelFuture.channel()); // 1
channelFuture.addListener((ChannelFutureListener) future -> {
    System.out.println(future.channel()); // 2
});
- 执行到 1 时,连接未建立,打印
[id: 0x749124ba] - ChannelFutureListener 会在连接建立时被调用(其中 operationComplete 方法),因此执行到 2 时,连接肯定建立了,打印
[id: 0x749124ba, L:/127.0.0.1:57351 - R:/127.0.0.1:8080]
因为这个发送消息的过程分为:
- 连接的建立
主线程(main)发起 connect
connect(...) → 发起连接
sync() → 主线程等 Netty 后台线程
- 数据传输
数据传输的线程是:NioEventLoop 里的线程
Netty 后台线程(NioEventLoop 中的线程)
真正去执行 TCP 连接
异步 = 主线程不等后台线程,直接先返回!
🙌🙌🙌简单来说: connect () 是异步的,因为:主线程只负责 “叫 Netty 去连接”不等待连接成功,直接继续往下跑, 真正建立连接的是 Netty 自己的后台线程
优点:
- 单线程没法异步提高效率,必须配合多线程、多核 cpu 才能发挥异步的优势
- 异步并没有缩短响应时间,反而有所增加
- 合理进行任务拆分,也是利用异步的关键
CloseFuture
这个简单来说: 可以基于前面的ChannelFuture来理解:
ChannelFuture = 【建立连接】用的清单(打开电话)CloseFuture = 【关闭连接】用的清单(挂电话)它们两个是:一模一样的东西!
只是作用的时机不同!
- ChannelFuture
- 连接的时候用connect() 异步
- 返回一个 Future
- 等连接成功后通知你
- 你才能拿到 Channel 发消息
- CloseFuture
和上面 完全一样:
- 关闭的时候用close() 异步
- 返回一个 Future
- 等通道真正关闭后通知你
- 你才能做善后(关闭线程池)
它们底层是同一个类!(这个下面会讲哦)
ChannelFuture(连接)
CloseFuture(关闭)
→ 全都继承自 Promise
→ 用法完全一样!
@Slf4j
public class CloseFutureClient {
    public static void main(String[] args) throws InterruptedException {
        NioEventLoopGroup group new NioEventLoopGroup();
        ChannelFuture channelFuture = new Bootstrap()
                .group(group)
                .channel(NioSocketChannel.class)
                .handler(new ChannelInitializer<NioSocketChannel>() {
                    @Override // 在连接建立后被调用
                    protected void initChannel(NioSocketChannel ch) throws Exception {
                        ch.pipeline().addLast(new LoggingHandler(LogLevel.DEBUG));
                        ch.pipeline().addLast(new StringEncoder());
                    }
                })
                .connect(new InetSocketAddress("localhost", 8080));
        Channel channel = channelFuture.sync().channel();
        log.debug("{}", channel);
        new Thread(()->{
            Scanner scanner = new Scanner(System.in);
            while (true) {
                String line = scanner.nextLine();
                if ("q".equals(line)) {
                    channel.close(); // close 异步操作 1s 之后
//                    log.debug("处理关闭之后的操作"); // 不能在这里善后
                    break;
                }
                channel.writeAndFlush(line);
            }
        }, "input").start();

        // 获取 CloseFuture 对象, 1) 同步处理关闭, 2) 异步处理关闭
        ChannelFuture closeFuture = channel.closeFuture();
        /*log.debug("waiting close...");
        closeFuture.sync();
        log.debug("处理关闭之后的操作");*/
        closeFuture.addListener(new ChannelFutureListener() {
            @Override
            public void operationComplete(ChannelFuture future) throws Exception {
                log.debug("处理关闭之后的操作");
                group.shutdownGracefully();
            }
        });
    }
}
第一段:创建客户端(启动)
NioEventLoopGroup group = new NioEventLoopGroup();
👉 开一个客户端线程(处理连接、收发消息)
ChannelFuture channelFuture = new Bootstrap()
    .group(group)
    .channel(NioSocketChannel.class)
    .handler(new ChannelInitializer<NioSocketChannel>() {
        @Override
        protected void initChannel(NioSocketChannel ch) {
            ch.pipeline().addLast(new LoggingHandler(LogLevel.DEBUG));
            ch.pipeline().addLast(new StringEncoder());
        }
    })
    .connect(new InetSocketAddress("localhost", 8080));
第二段:等待连接成功
Channel channel = channelFuture.sync().channel();
log.debug("{}", channel);
第三段:开一个线程,让你键盘输入(重点)
new Thread(()->{
    Scanner scanner = new Scanner(System.in);
    while (true) {
        String line = scanner.nextLine();  // 等待你输入

        if ("q".equals(line)) {  // 如果你输入 q
            channel.close();     // 关闭连接(异步!)
            break;
        }

        channel.writeAndFlush(line);  // 发送消息
    }
}).start();
第四段:获取 “关闭未来” 对象
ChannelFuture closeFuture = channel.closeFuture();
第五段:等关闭后,做善后(安全退出)
closeFuture.addListener(new ChannelFutureListener() {
    @Override
    public void operationComplete(ChannelFuture future) {
        log.debug("处理关闭之后的操作");
        group.shutdownGracefully(); // 关闭线程池,释放资源
    }
});
三 Future & Promise( 上面讲的异步的实现全靠他俩 )
首先什么是Future / Promise ?
他们俩个是connect、bind、write、read 的底层也就是前面我写异步的底层:
ChannelFuture channelFuture = bootstrap.connect("127.0.0.1", 8080).sync();
这里的 ChannelFuture就是 Netty 版 Promise + Future!
为什么 Netty 要用它?
因为 Netty 所有 IO 都是异步 的:
connect() → 异步连接
bind() → 异步绑定端口
writeAndFlush() → 异步发送
Netty 异步 是这样的:
- 主线程:发起连接 connect()
- 主线程:不用等,直接去干别的
- Netty 线程(NioEventLoop):后台偷偷建立连接
- 等连接好了 → 通知主线程
问题来了:
主线程怎么知道 “连接成功了”?
连接成功后返回的 “通道” 怎么传给主线程?
这些操作不能立刻拿到结果,所以需要一个 “结果容器”,等操作完成后把结果放进去。
这个容器就是 Promise!
那怎么使用呢?( 注意啊, 这里讲的api啥的都是底层, Netty代码里都是封装好的 )
在异步处理时,经常用到这两个接口
首先要说明 netty 中的 Future 与 jdk 中的 Future 同名,但是是两个接口,netty 的 Future 继承自 jdk 的 Future,而 Promise 又对 netty Future 进行了扩展
- jdk Future 只能同步等待任务结束(或成功、或失败)才能得到结果
- netty Future 可以同步等待任务结束得到结果,也可以异步方式得到结果,但都是要等任务结束
- netty Promise 不仅有 netty Future 的功能,而且脱离了任务独立存在,只作为两个线程间传递结果的容器
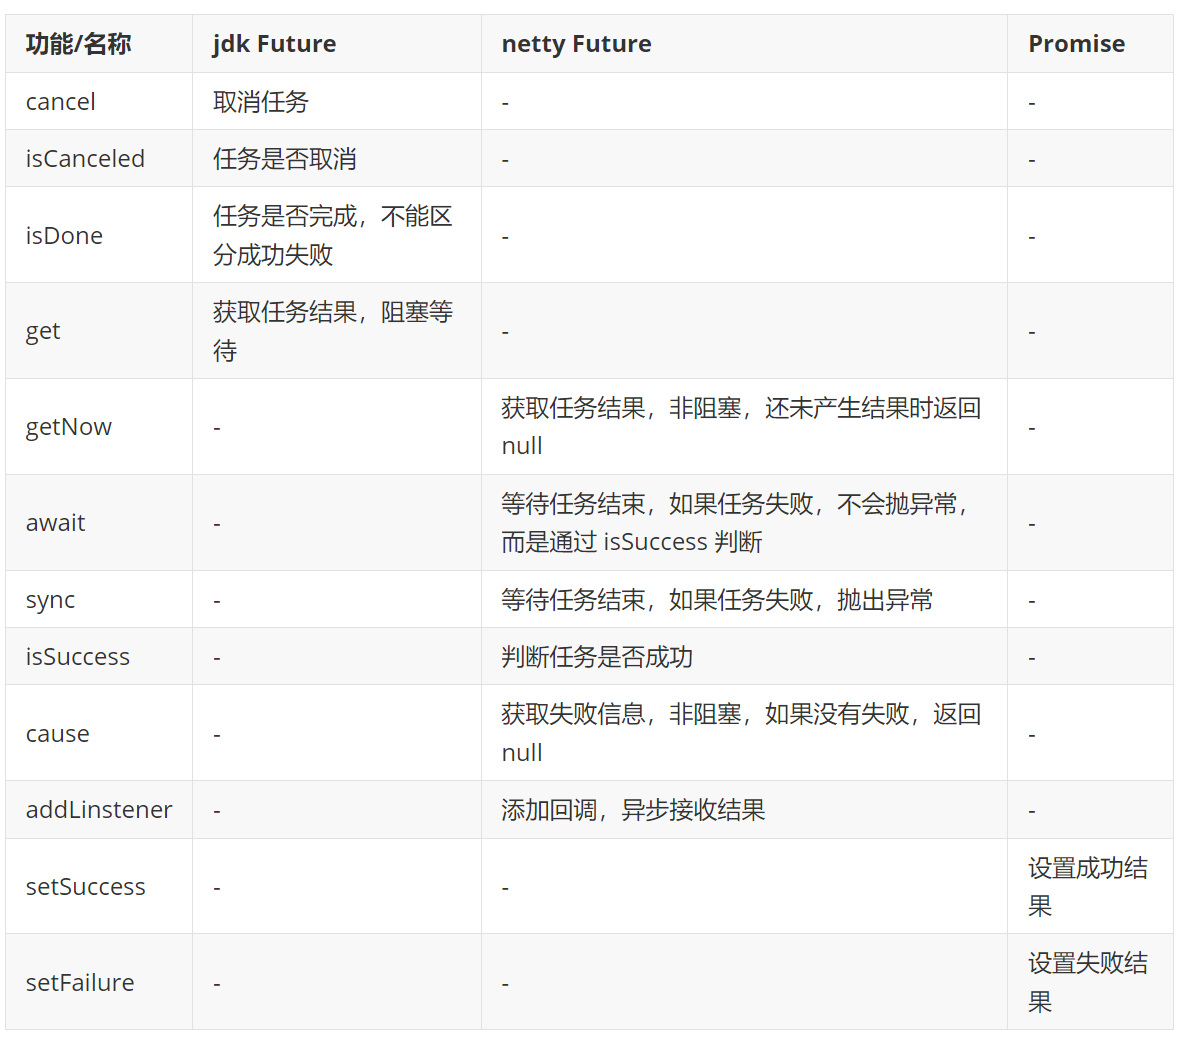
简单来说:
1)JDK Future(原始版,很难用)
- 只能等结果
- 不能主动设结果
- 不能加回调
- 只能阻塞 get()
2)Netty Future(增强版)
- 可以等
- 可以加回调(异步通知)
- 可以判断成功 / 失败
- 但不能主动设置结果
3)Netty Promise
- 继承自 Future
- 可以主动设置结果:setSuccess /setFailure
- 就是一个 “手动控制的异步结果盒子”
来举几个例子, 看看Promise的Api都是咋用的:
例1
同步处理任务成功
DefaultEventLoop eventExecutors = new DefaultEventLoop();
DefaultPromise<Integer> promise = new DefaultPromise<>(eventExecutors);

eventExecutors.execute(()->{
    try {
        Thread.sleep(1000);
    } catch (InterruptedException e) {
        e.printStackTrace();
    }
    log.debug("set success, {}",10);
    promise.setSuccess(10);
});

log.debug("start...");
log.debug("{}",promise.getNow()); // 还没有结果
log.debug("{}",promise.get());
输出
11:51:53 [DEBUG] [main] c.i.o.DefaultPromiseTest2 - start...
11:51:53 [DEBUG] [main] c.i.o.DefaultPromiseTest2 - null
11:51:54 [DEBUG] [defaultEventLoop-1-1] c.i.o.DefaultPromiseTest2 - set success, 10
11:51:54 [DEBUG] [main] c.i.o.DefaultPromiseTest2 - 10
DefaultEventLoop eventExecutors = 一个专门干活的线程(工人)
DefaultPromise promise         = 一个装结果的空盒子
execute(()->{ ... })           = 让工人去后台干活
promise.setSuccess(10)         = 工人把结果 10 放进盒子
promise.getNow()               = 立刻看一眼盒子里有没有东西
promise.get()                  = 死等!直到盒子里有结果才继续走
代码里发生了什么:
// 1. 让工人去干活(要1秒)
eventExecutors.execute(()->{
    sleep(1000);
    promise.setSuccess(10);
});

// 2. 主线程继续
log.debug("start...");

// 3. 主线程看一眼盒子,空的
log.debug("{}",promise.getNow()); // null

// 4. 【关键】主线程 死 等!不走了!
log.debug("{}",promise.get());
执行顺序:
主线程提交任务
主线程打印 start
主线程打印 null
主线程卡住不动,等!
1 秒后工人放结果
主线程才继续打印 10
主线程:我等你!
例2
异步处理任务成功
DefaultEventLoop eventExecutors = new DefaultEventLoop();
DefaultPromise<Integer> promise = new DefaultPromise<>(eventExecutors);

// 设置回调,异步接收结果
promise.addListener(future -> {
    // 这里的 future 就是上面的 promise
    log.debug("{}",future.getNow());
});

// 等待 1000 后设置成功结果
eventExecutors.execute(()->{
    try {
        Thread.sleep(1000);
    } catch (InterruptedException e) {
        e.printStackTrace();
    }
    log.debug("set success, {}",10);
    promise.setSuccess(10);
});

log.debug("start...");
代码里发生了什么:
// 1. 留下通知:好了喊我
promise.addListener(future -> {
    log.debug("{}",future.getNow());
});

// 2. 让工人去干活(1秒)
eventExecutors.execute(()->{
    sleep(1000);
    promise.setSuccess(10);
});

// 3. 主线程直接打印,然后 主 程 直 接 结 束 了!
log.debug("start...");
执行顺序:
主线程添加监听
主线程提交任务
主线程直接打印 start,然后自己结束了!
1 秒后工人放结果
自动触发 listener 打印 10
主线程:我不等你,我走了!好了喊我!
🎯 两段代码合起来分析 唯一的区别 只有这一行!
例 1(同步):
promise.get(); // 主线程 死等!
例 2(异步):
promise.addListener(...) // 主线程 不等!
现在回到一开始的代码(哪里用了 Future?哪里用了 Promise?分别干啥?)
服务器端–哪里用了 Future & Promise?(全!部!都!是!)
new ServerBootstrap()
    .group(new NioEventLoopGroup()) // 1
    .channel(NioServerSocketChannel.class) // 2
    .childHandler(new ChannelInitializer<NioSocketChannel>() { // 3
        protected void initChannel(NioSocketChannel ch) {
            ch.pipeline().addLast(new StringDecoder()); // 5
            ch.pipeline().addLast(new SimpleChannelInboundHandler<String>() { // 6
                @Override
                protected void channelRead0(ChannelHandlerContext ctx, String msg) {
                    System.out.println(msg);
                }
            });
        }
    })
    .bind(8080);
1) .group(new NioEventLoopGroup())
创建异步线程池
所有连接、读写、业务全在这些异步线程里跑。
→ 这些线程的所有异步操作,全靠 Future/Promise
2) .channel(NioServerSocketChannel.class)
指定服务端通道类型
这个通道专门异步接收连接。
→ 接收连接这个动作 也是异步的 → 用 Promise
3) .childHandler( … )
给每个客户端连接初始化处理器
当客户端连上来时,Netty 异步线程去执initChannel。
→ 异步初始化 → 还是 Promise
4) .bind(8080) —— 最关键!服务端的核心 Promise!
.bind(8080)
这句话 完全等于客户端的 connect ()!
它是异步绑定端口!
流程:
- 主线程调用 bind
- Netty 不阻塞,直接返回一个 ChannelFuture(=Promise)
- Netty 异步线程后台去绑定端口
- 绑定成功 → Netty 自动调用 promise.setSuccess ()
- 服务端正式启动
客户端
public static void main(String[] args) throws InterruptedException {
    Channel channel = new Bootstrap()
            .group(new NioEventLoopGroup(1))
            .handler(new ChannelInitializer<NioSocketChannel>() {
                @Override
                protected void initChannel(NioSocketChannel ch) throws Exception {
                    System.out.println("init...");
                    ch.pipeline().addLast(new LoggingHandler(LogLevel.DEBUG));
                }
            })
            .channel(NioSocketChannel.class).connect("localhost", 8080)
            .sync()
            .channel();

    channel.writeAndFlush(ByteBufAllocator.DEFAULT.buffer().writeBytes("wangwu".getBytes()));
    Thread.sleep(2000);
    channel.writeAndFlush(ByteBufAllocator.DEFAULT.buffer().writeBytes("wangwu".getBytes()));
这段代码里:
connect (…) 返回的是 ChannelFuture = Promise
sync () 就是在等 Promise 的结果
writeAndFlush (…) 返回的也是 ChannelFuture = Promise
整个 Netty 异步,全靠它!
第一步:connect(“localhost”, 8080)
.connect("localhost", 8080) // 异步连接
这里发生了什么?
- 主线程发起 “连接”
- Netty 不阻塞,直接返回一个 ChannelFuture
- 这个 ChannelFuture 就是一个 Promise
Promise 此时是空的!
它就像一个空外卖盒,还没有结果。
第二步:.sync()
.sync() // 等待连接成功
- 主线程阻塞,等待 Promise 被 “填结果”
- 谁来填?Netty 的 NioEventLoop 线程
- 连接成功 → 自动调用promise.setSuccess(channel)
第三步:.channel()
.channel()
拿到的就是 Promise 里面装的结果!
🔥 终极一句话总结(客户端 + 服务端 全打通)
客户端 connect () = 异步连接 → 返回 ChannelFuture(Promise)
服务端 bind () = 异步绑定 → 返回ChannelFuture(Promise)
Netty 不管是客户端还是服务端:所有异步操作 —— 全是 Promise!
OK啊!!! 到这里终于摸到 Netty 的灵魂了!!!
Netty 从头到尾 99% 的操作全是异步 + 非阻塞!
这就是它为什么能单机扛 10 万连接 的原因!
OK啊, 终于把异步学完了( 也知道Netty如何高效传输数据 ), 下面就是感觉就是再讲Netty具体咋传数据
四 Handler & Pipeline
ChannelHandler 用来处理 Channel 上的各种事件,分为入站、出站两种。所有 ChannelHandler 被连成一串,就是 Pipeline
🙌🙌🙌先了解什么是出站/入站:
ChannelHandler 的出站入站就好像接力跑马拉松, 裁判(Netty 底层) 把接力棒(msg)直接递给第一个选手, 第一个选手跑完(对数据处理完), 再交给下一个, 只是入站是从头开始要读这个数据, 出站是从尾部开始要把数据写出去.
- 入站处理器通常是 ChannelInboundHandlerAdapter 的子类,主要用来读取客户端数据,写回结果
- 出站处理器通常是 ChannelOutboundHandlerAdapter 的子类,主要对写回结果进行加工
打个比喻,每个 Channel 是一个产品的加工车间,Pipeline 是车间中的流水线,ChannelHandler 就是流水线上的各道工序,而后面要讲的 ByteBuf 是原材料,经过很多工序的加工:先经过一道道入站工序,再经过一道道出站工序最终变成产品
欧克来举个例子:
服务端:
new ServerBootstrap()
    .group(new NioEventLoopGroup())
    .channel(NioServerSocketChannel.class)
    .childHandler(new ChannelInitializer<NioSocketChannel>() {
        protected void initChannel(NioSocketChannel ch) {
            ch.pipeline().addLast(new ChannelInboundHandlerAdapter(){
                @Override
                public void channelRead(ChannelHandlerContext ctx, Object msg) {
                    System.out.println(1);
                    ctx.fireChannelRead(msg); // 1
                }
            });
            ch.pipeline().addLast(new ChannelInboundHandlerAdapter(){
                @Override
                public void channelRead(ChannelHandlerContext ctx, Object msg) {
                    System.out.println(2);
                    ctx.fireChannelRead(msg); // 2
                }
            });
            ch.pipeline().addLast(new ChannelInboundHandlerAdapter(){
                @Override
                public void channelRead(ChannelHandlerContext ctx, Object msg) {
                    System.out.println(3);
                    ctx.channel().write(msg); // 3
                }
            });
            ch.pipeline().addLast(new ChannelOutboundHandlerAdapter(){
                @Override
                public void write(ChannelHandlerContext ctx, Object msg,
                                  ChannelPromise promise) {
                    System.out.println(4);
                    ctx.write(msg, promise); // 4
                }
            });
            ch.pipeline().addLast(new ChannelOutboundHandlerAdapter(){
                @Override
                public void write(ChannelHandlerContext ctx, Object msg,
                                  ChannelPromise promise) {
                    System.out.println(5);
                    ctx.write(msg, promise); // 5
                }
            });
            ch.pipeline().addLast(new ChannelOutboundHandlerAdapter(){
                @Override
                public void write(ChannelHandlerContext ctx, Object msg,
                                  ChannelPromise promise) {
                    System.out.println(6);
                    ctx.write(msg, promise); // 6
                }
            });
        }
    })
    .bind(8080);
客户端:
new Bootstrap()
    .group(new NioEventLoopGroup())
    .channel(NioSocketChannel.class)
    .handler(new ChannelInitializer<Channel>() {
        @Override
        protected void initChannel(Channel ch) {
            ch.pipeline().addLast(new StringEncoder());
        }
    })
    .connect("127.0.0.1", 8080)
    .addListener((ChannelFutureListener) future -> {
        future.channel().writeAndFlush("hello,world");
    });
服务器端打印:
1
2
3
6
5
4
大概流程就是这样:
head <-> In_1 <-> In_2 <-> In_3 <-> Out_4 <-> Out_5 <-> Out_6 <-> tail
- 入站流程(客户端发 hello,world → 服务端)
- 数据从网络进来 → 从 head 进入 Pipeline
- 正序执行:In_1 → In_2 → In_3
- 打印:1 → 2 → 3
- 作用:读取、处理客户端发来的消息
- 出站流程(服务端写回消息 → 客户端)
- 服务端调用 ctx.channel().write(msg) → 从 tail 进入 Pipeline
- 逆序执行:Out_6 → Out_5 → Out_4
- 打印:6 → 5 → 4
- 作用:加工、发送消息给客户端
ByteBuf
OK啊!!! 框架通道啥的东开通了, 终于可以往buffer里写数据了,
1. ByteBuf 在哪里?
@Override
public void channelRead(ChannelHandlerContext ctx, Object msg) {
   // 这里的 msg 默认就是 ByteBuf!!!
}
ByteBuf = Netty 专用的字节数组容器
所有网络发送、接收的数据,全都是 ByteBuf
它的核心结构:
readIndex  读指针
writeIndex 写指针
capacity   总容量
1)创建 ByteBuf
ByteBuf buffer = ByteBufAllocator.DEFAULT.buffer(10);
log(buffer);
什么意思?
- ByteBufAllocator.DEFAULT:Netty 默认的内存管理器
- .buffer(10):创建一个初始容量 10 字节的 ByteBuf
- 默认是 池化 + 直接内存
2)写入方法(writeXXX)
buffer.writeBytes(new byte[]{1,2,3,4});
结果:
read index:0 write index:4 capacity:10
写指针从 0 → 4
写入一个 int(4 字节)
buffer.writeInt(5);
结果:
read index:0 write index:8
3)读取方法(readXXX)
buffer.readByte();
- 每读一次,readIndex 向前移动
- 读过的内容变成废弃部分
重复读取
buffer.markReaderIndex(); // 标记
buffer.readInt();
buffer.resetReaderIndex(); // 回到标记
⚠️: 这些其实就了解就好, 因为在实际的代码中ByteBuf 这种操作都 “看不见”
因为:
- 客户端发字符串,被 StringEncoder 转成 ByteBuf
- 服务端收到 ByteBuf,被 LoggingHandler、StringDecoder 自动处理
- 你写业务时,直接拿到的是字符串 / Java 对象
其实我感觉我学的有点太细了, 应该: 先会用 → 再懂原理 → 最后才抠 API, 唉现在应该快去敲项目!!!
小白啊!!!写的不好轻喷啊🤯如果觉得写的不好,点个赞吧🤪(批评是我写作的动力)
…。。。。。。。。。。。…
…。。。。。。。。。。。…

汇聚全球AI编程工具,助力开发者即刻编程。
更多推荐



 11
11 0
0- 0


 已为社区贡献7条内容

所有评论(0)