
【Mybatis】一篇文章让你学会Mybatis基础内容


文章目录
数据库操作
查(select)
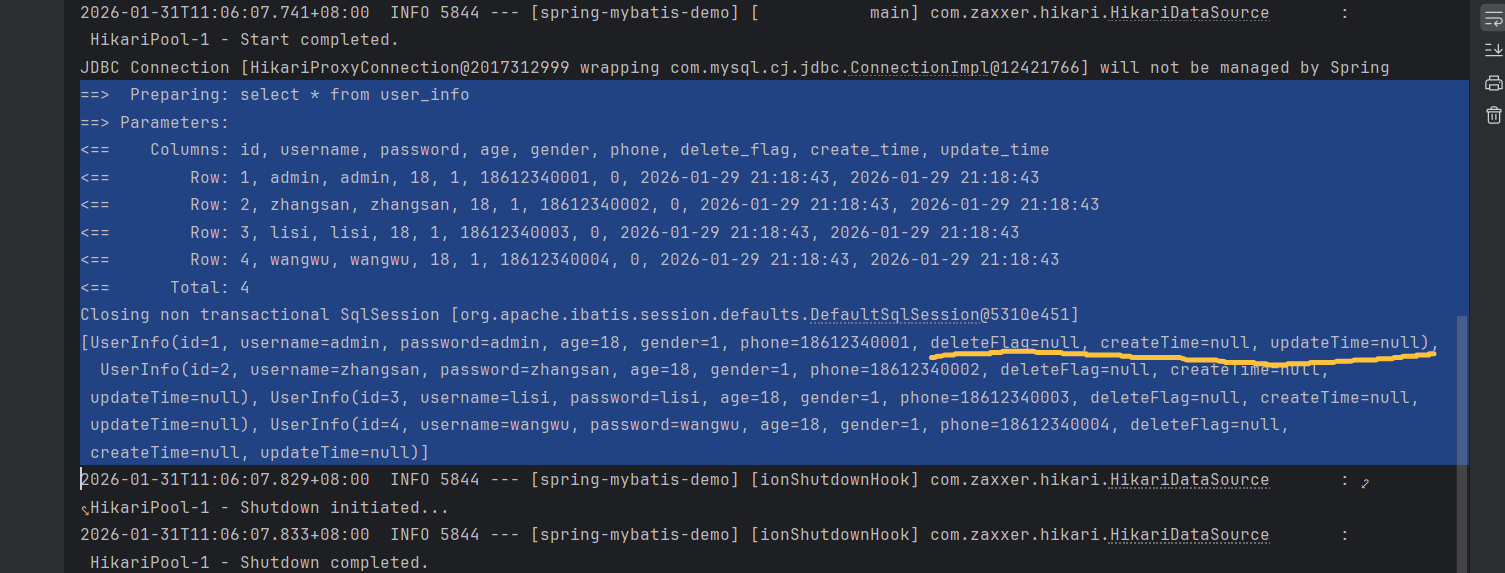
大家在进行全查询的时候有没有注意过这样一个现象:
Mybatis日志输出的内容确实很好,内容全且美观,但是咱们自己的日志输出内容中这三个变量永远是null。
MyBatis 会根据方法的返回结果进行赋值。
方法用对象 UserInfo 接收返回结果,MySQL 查询出来数据为一条,就会自动赋值给对象。
方法用 List 接收返回结果,MySQL 查询出来数据为一条或多条时,也会自动赋值给 List。
但如果 MySQL 查询返回多条,但是方法使用 UserInfo 接收,MyBatis 执行就会报错。
给对象赋值时,也是按照数据库字段名和java属性名一一对应的,当对应不上时(比如咱们的update_time和uodateTime)就无法赋值,默认为null值。
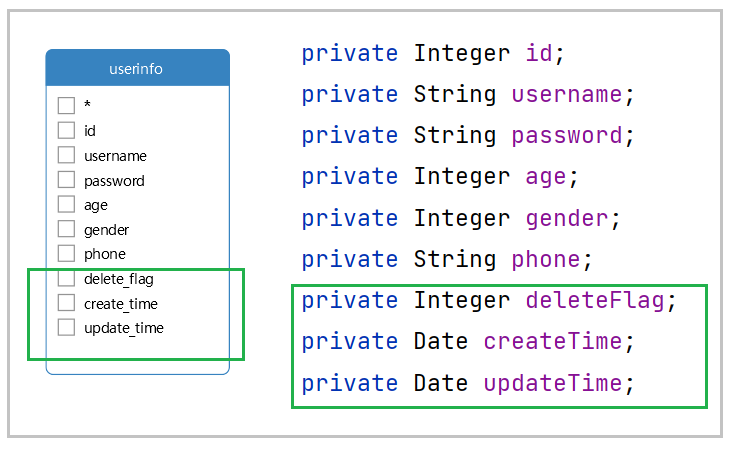
不过没事,在此奉上解决办法:
- 起别名
- 结果映射
- 开启驼峰命名
1.起别名
    @Select("select id, username,`password`, age, gender,  phone, " +
            "delete_flag as deleteFlag, create_time as createTime, update_time as updateTime" +
            " from user_info")
    List<UserInfo> selectAll();
把@Select注解里面的SQL语句中的属性名称使用起别名的方法起一个和类中的属性名称一样的名字,这样在对应时就能成功赋值了。
但是这样写确实太麻烦了,零人想写这么复杂的SQL语句。。。
2.结果映射
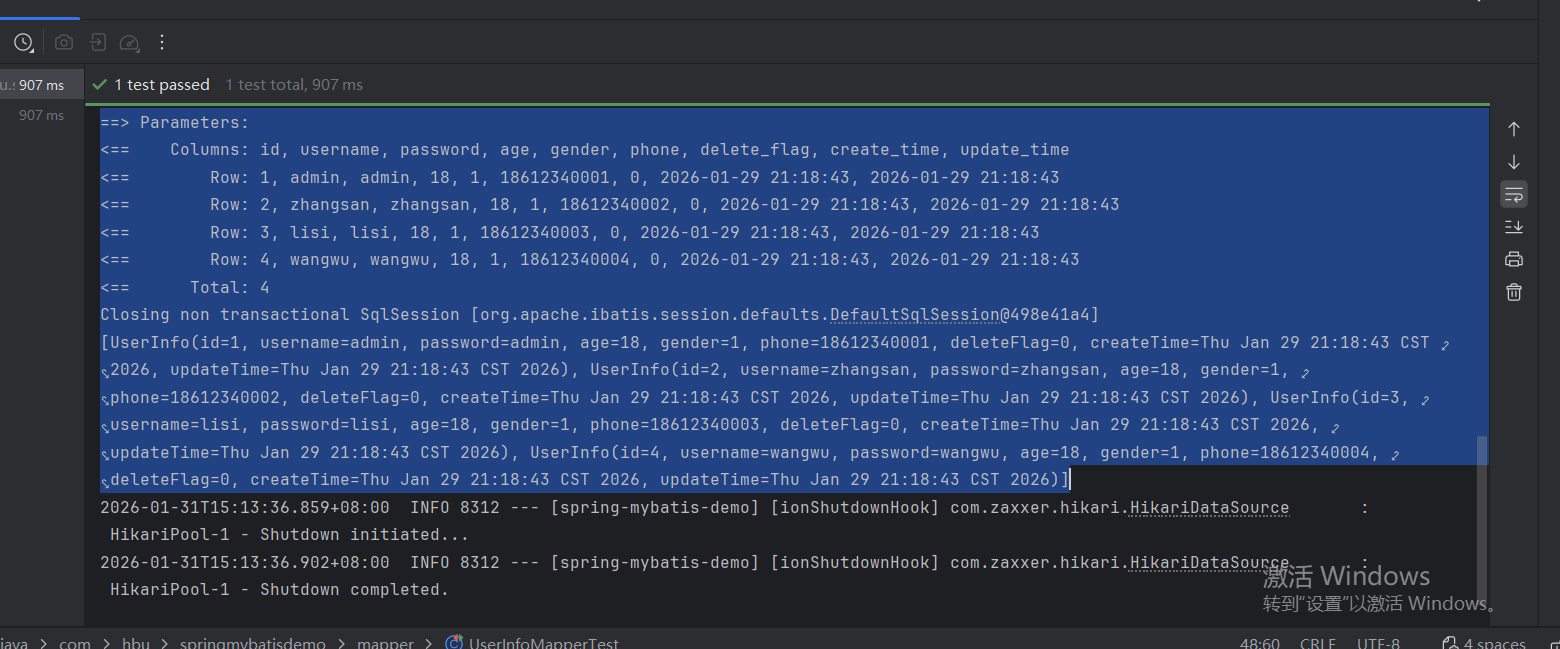
@Results({
            @Result(column = "delete_flag",property = "deleteFlag"),
            @Result(column = "create_time",property = "createTime"),
            @Result(column = "update_time",property = "updateTime")
    })
    @Select("select * from user_info")
    List<UserInfo> selectAll();
这种方法其实写的也挺多的,但是还好,这次写的东西可以在写其他接口时直接用到,只需这样做:
@Results(id = "result",value = {
            @Result(column = "delete_flag",property = "deleteFlag"),
            @Result(column = "create_time",property = "createTime"),
            @Result(column = "update_time",property = "updateTime")
    })
    @Select("select * from user_info")
    List<UserInfo> selectAll();

    @ResultMap(value = "result")
    @Select("select * from user_info where id = ${id}")
    UserInfo selectAllById(Integer id);
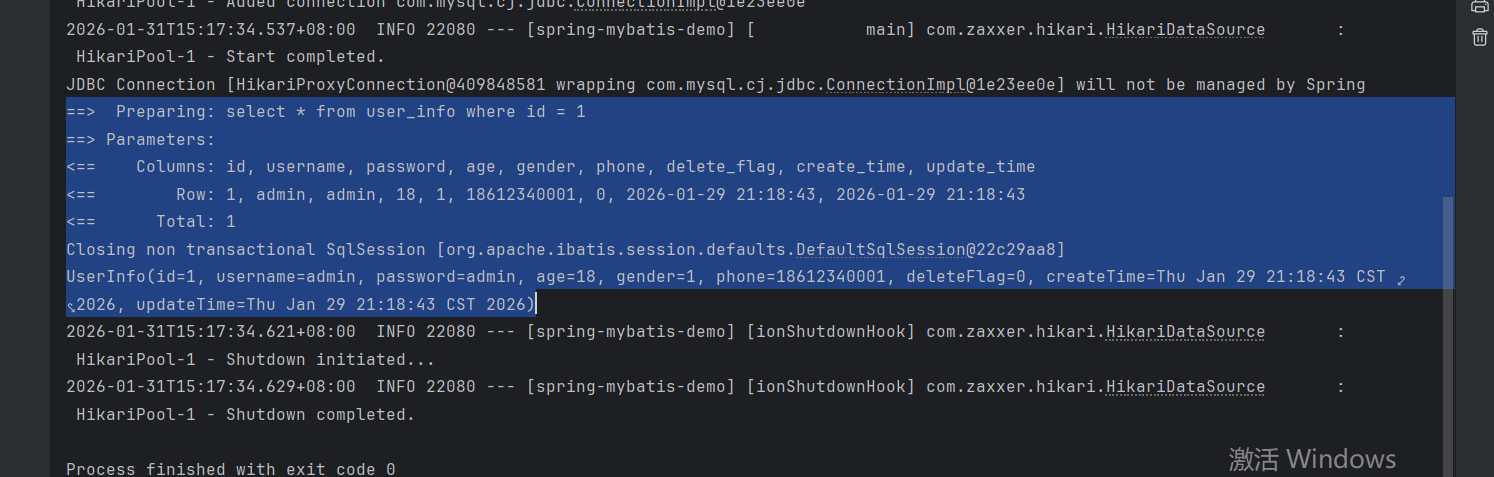
这里也是引入了一个新的注解,可以通过这种方式做到代码复用!
3.开启驼峰命名(使用配置文件)——简单推荐
MyBatis 中通常数据库列使用蛇形命名法进行命名(下划线分割各个单词),而 Java 属性一般遵循驼峰命名法约定。为了在这两种命名方式之间启用自动映射,需要将 mapUnderscoreToCamelCase 设置为 true。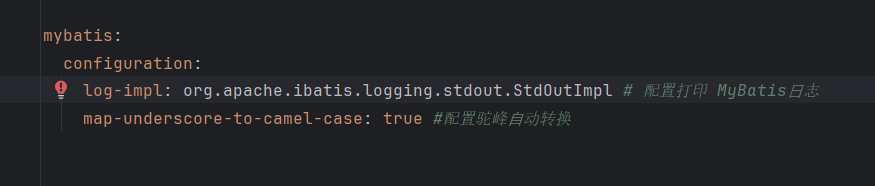
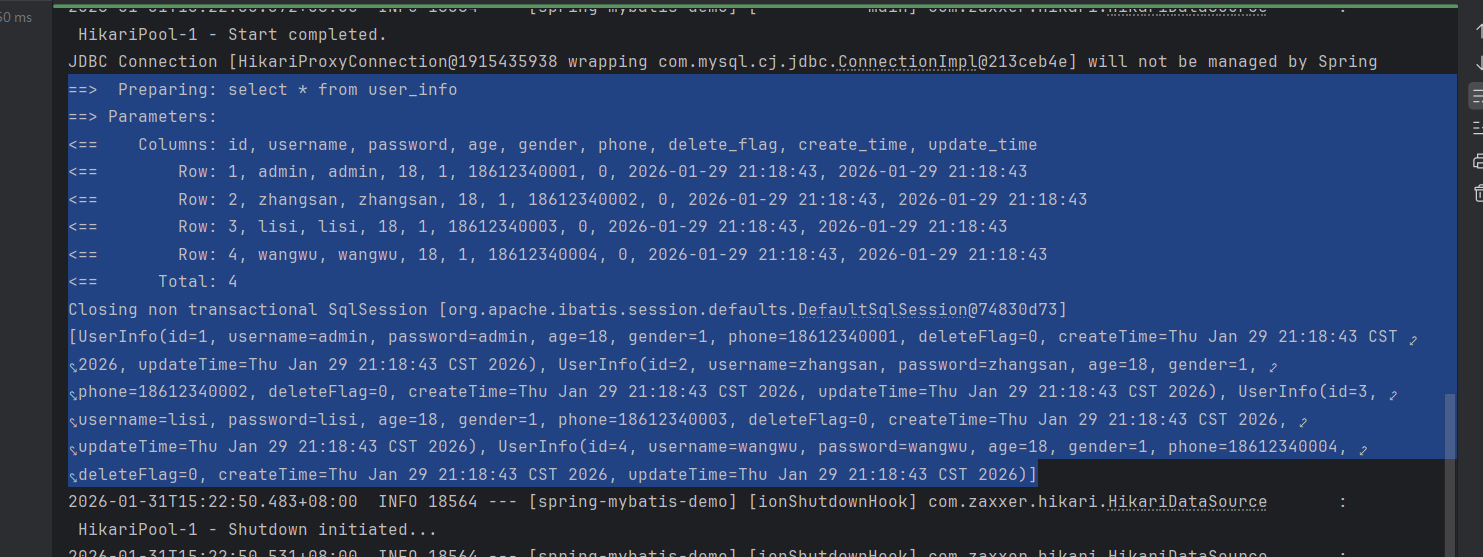
配置好了之后,我们再进行类似的查询,就无需再使用额外的注解啦!
    @Select("select * from user_info")
    List<UserInfo> selectAll();
增(insert)
@Insert("insert into user_info (username, `password`, age) VALUES (#{username}, #{password}, #{age})")
    Integer insertUser(UserInfo userInfo);
@Test
    void insertUser() {
        UserInfo userInfo = new UserInfo();
        userInfo.setUsername("username3");
        userInfo.setPassword("password3");
        userInfo.setAge(4);
        Integer result = userInfoMapper.insertUser(userInfo);
        System.out.println("影响行数:"+ result );
    }

这里就采用Integer接收返回值了,因为此时的返回是影响的行数。
返回主键
Insert 语句默认返回的是受影响的行数。
但有些情况下,数据插入之后,还需要有后续的关联操作,需要获取到新插入数据的 id。
比如订单系统:当我们下完订单之后,需要通知物流系统、库存系统、结算系统等,这时候就需要拿到订单 ID。
如果想要拿到自增 id,需要在 Mapper 接口的方法上添加一个 Options 的注解。
@Options(useGeneratedKeys = true,keyProperty = "id")
    @Insert("insert into user_info (username, `password`, age) VALUES (#{username}, #{password}, #{age})")
    Integer insertUser(UserInfo userInfo);
@Test
    void insertUser() {
        UserInfo userInfo = new UserInfo();
        userInfo.setUsername("username3");
        userInfo.setPassword("password3");
        userInfo.setAge(4);
        Integer result = userInfoMapper.insertUser(userInfo);
        System.out.println("影响行数:"+ result + ", id:"+ userInfo.getId());
    }

删(delete)
@Delete("delete from user_info where id = ${id}")
    Integer deleteUser(Integer id);
@Test
    void deleteUser() {
        userInfoMapper.deleteUser(6);
    }
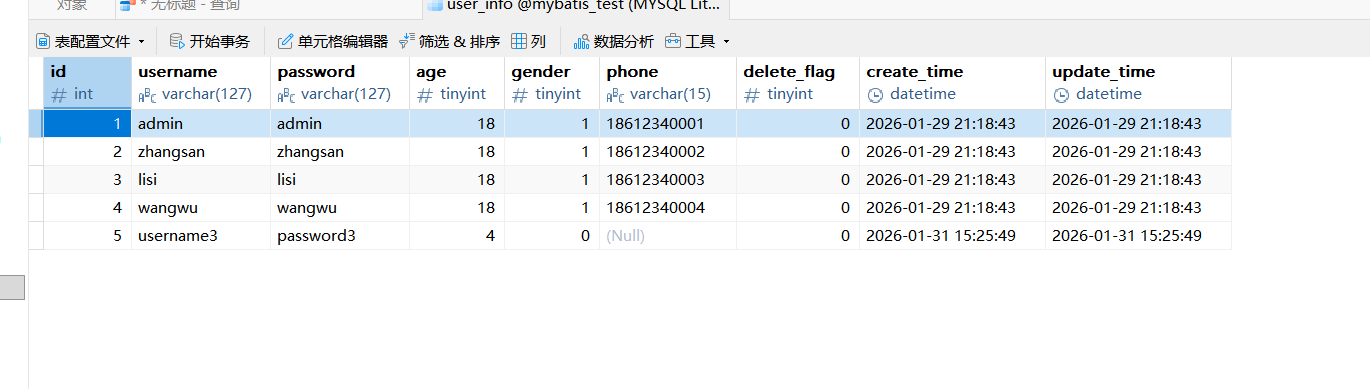
数据库中的数据确实被删除了。
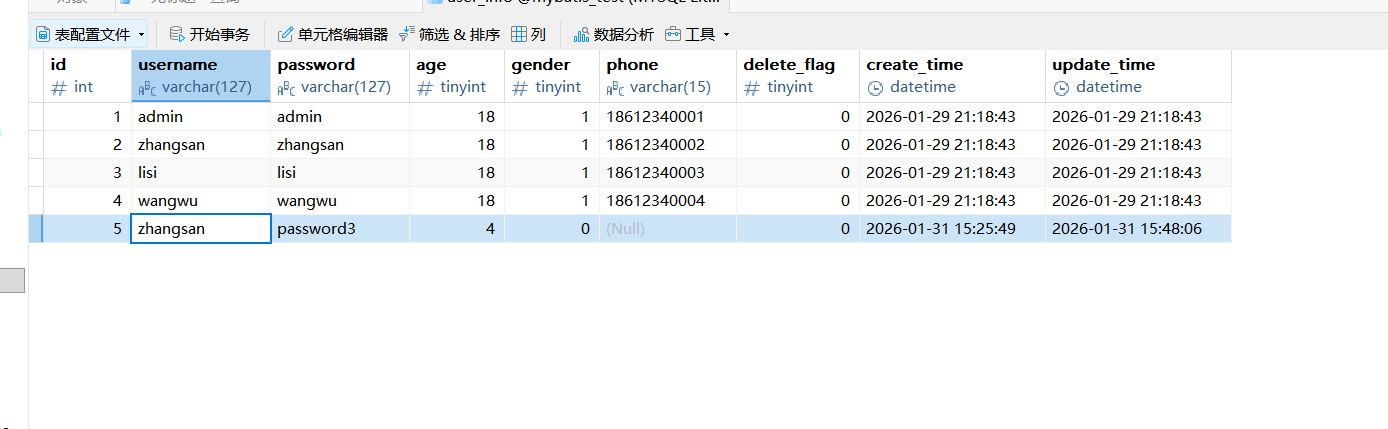
改(update)
@Update("update user_info set username = #{username} where id = #{id}")
    Integer updateUser(String username,Integer id);
@Test
    void updateUser() {
        userInfoMapper.updateUser("zhangsan",5);
    }
Mybatis XML实现接口
Mybatis 的开发有两种方式:
1.注解
2.XML
上面学习了注解的方式,接下来我们学习XML的方式。
使⽤ Mybatis 的注解方式,主要是来完成⼀些简单的增删改查功能。如果需要实现复杂的 SQL 功能,建议使用XML 来配置映射语句,也就是将 SQL 语句写在 XML 配置文件中。
配置连接
mybatis:
  # 配置 mybatis xml 的⽂件路径,在 resources/mapper 创建所有表的 xml ⽂件
  mapper-locations: classpath:mapper/**Mapper.xml
这个文件路径表示我们接下来创建的xml文件在哪个地方能够找到。比如上面这个就表示文件在resources下的mapper文件夹里面的以Mapper.xml结尾的文件都会被扫描。
写持久层代码
持久层代码分两部分
- 方法定义 Interface
- 方法实现: XXX.xml
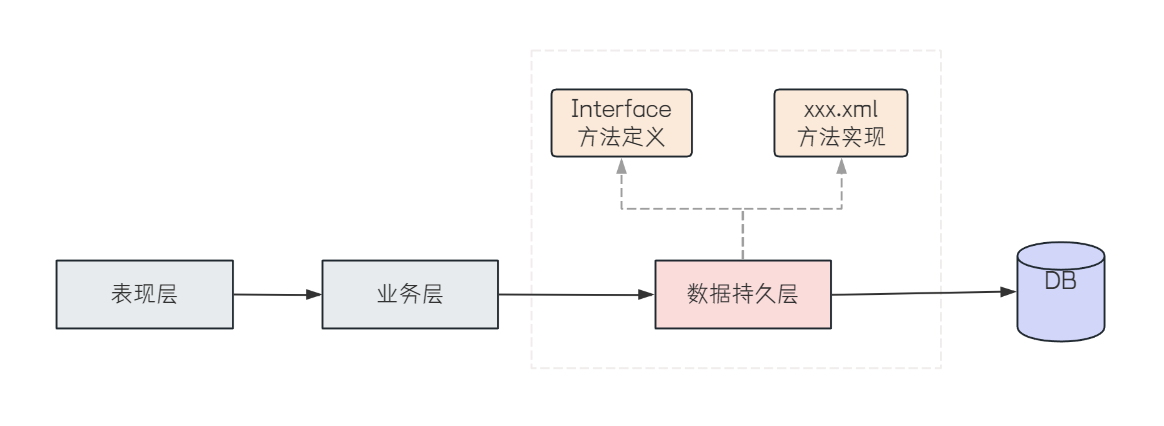
方法定义在mapper接口中,方法实现在.xml文件中。
创建.xml文件
注意这个位置要和配置文件中的规定位置相匹配,以及命名方式。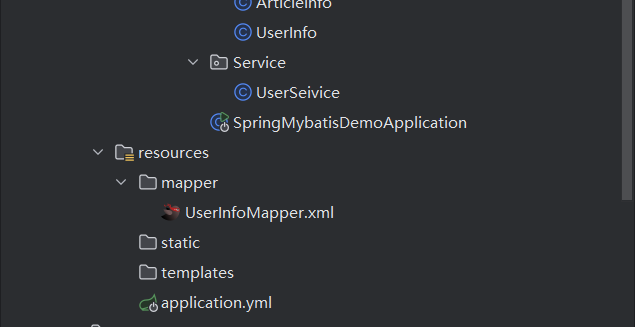
固定格式代码:
<?xml version="1.0" encoding="UTF-8"?>
<!DOCTYPE mapper PUBLIC "-//mybatis.org//DTD Mapper 3.0//EN"
        "http://mybatis.org/dtd/mybatis-3-mapper.dtd">
<mapper namespace="com.hbu.springmybatisdemo.mapper.UserInfoMapperXml">

</mapper>
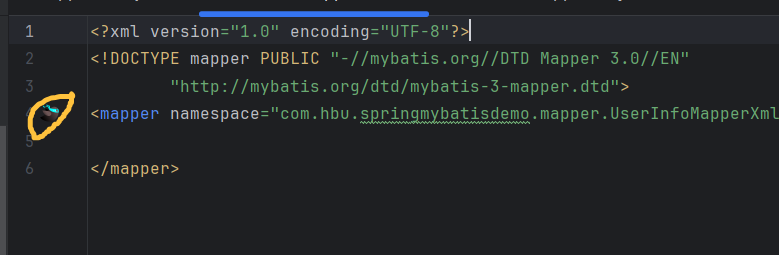
此时这里会出现一个Mybatis的图标,点击图标可以快速在.xml文件和接口之间跳转,是一个很好用的插件。
插件的名称为Mybatisx,大家感兴趣的可以自行下载。
简单代码
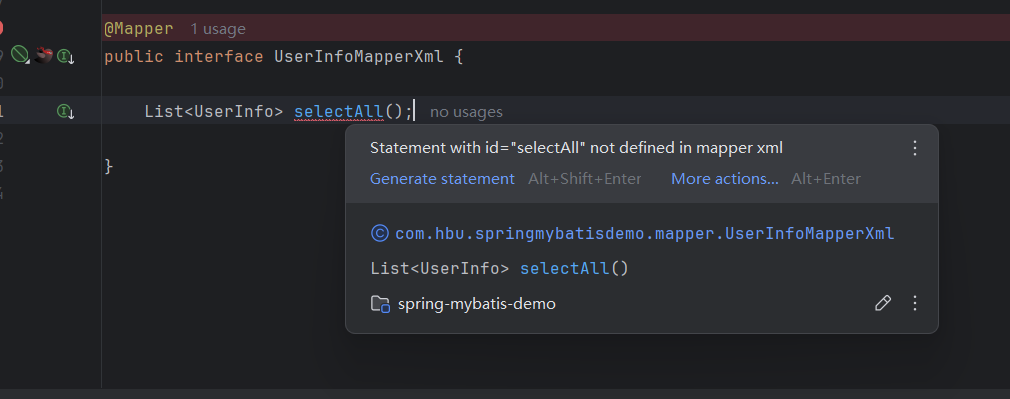
在接口这里,我们只定义方法并不真正的实现它。具体实现方式在xml里面写。
不过嘛,我们可以在定义好了接口之后,直接使用alt+enter让他自动帮我们生成statement: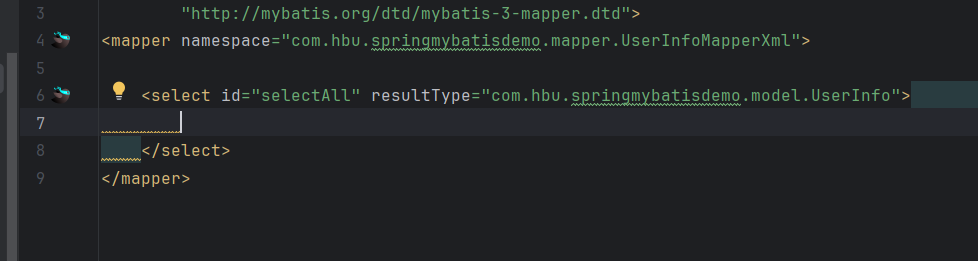
不过当然是有要求的,咱们的命名需要规范才可以,比如要想自动生成查询,方法命名需要Select或者Query开头等等。所以命名规范真的很重要。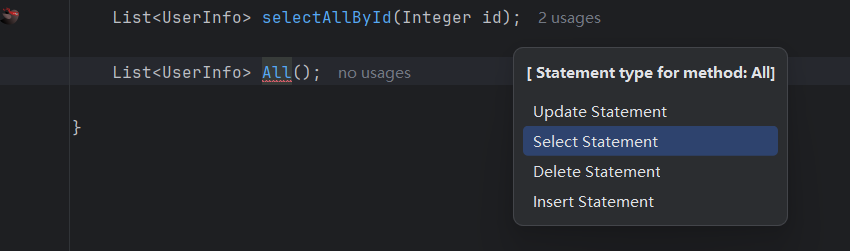
单元测试
测试方法与之前用注解时测试方法一样。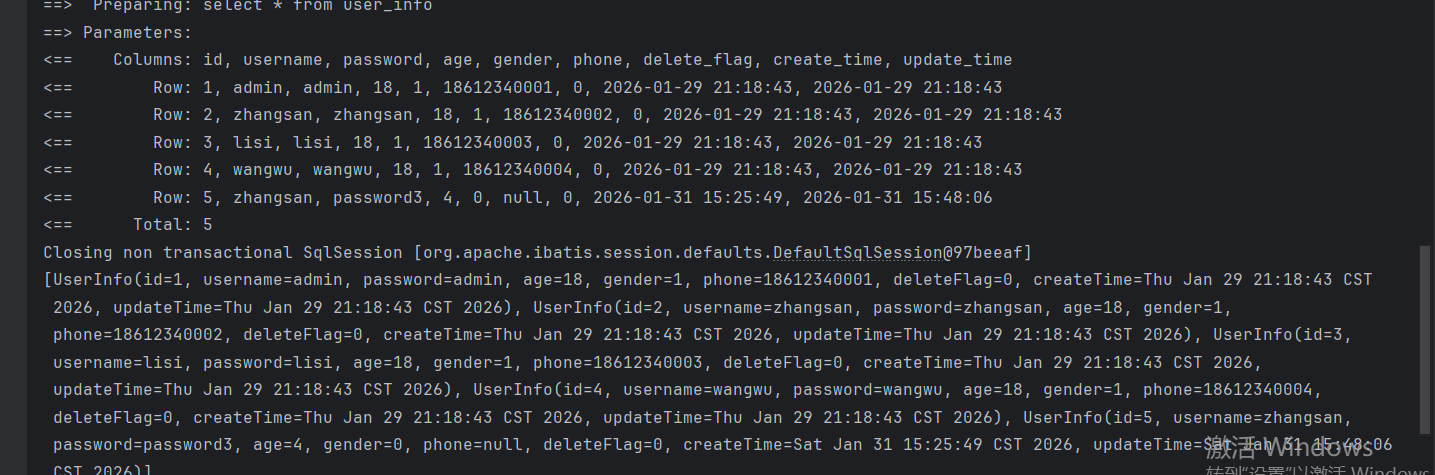
增删改查操作
查(select)
不管是传递参数还是映射关系,xml和注解的方式几乎是一样的:
 List<UserInfo> selectAll();

    List<UserInfo> selectAllById(Integer id);

    List<UserInfo> selectIdByUsernamePassword(UserInfo userInfo);
<select id="selectAll" resultType="com.hbu.springmybatisdemo.model.UserInfo" resultMap="selectMap">
        select * from user_info
    </select>
    <select id="selectAllById" resultType="com.hbu.springmybatisdemo.model.UserInfo">
        select * from user_info where id = #{id}
    </select>
    <select id="selectIdByUsernamePassword" resultType="com.hbu.springmybatisdemo.model.UserInfo">
        select id from user_info where username = #{username} and password = #{password}
    </select>
刚才简单的查了一下,大家可以看到结果中每个属性都是有值的,不过大家不要因此就觉得是xml太过强大直接解决了。其实是因为配置中的那个命名转换还在而已。。。
所以不管哪种实现方式,数据映射问题都在。解决方法其实也是一样的,依旧这三样:
1.起别名
2.结果映射
3.开启驼峰命名
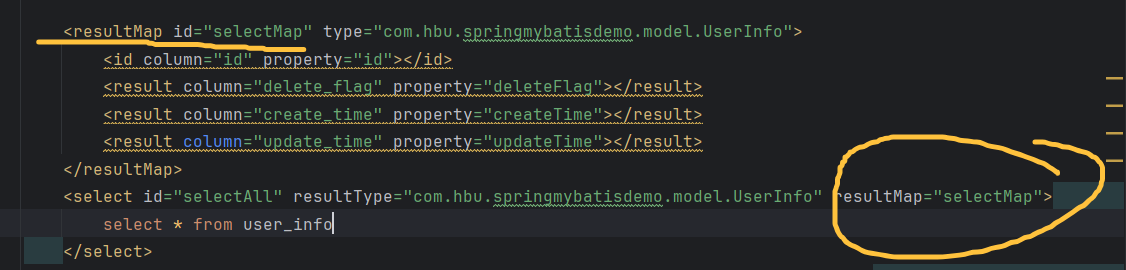
不过13方式是一摸一样,但是第二种方式因为咱们这里没有注解了所以略有不同,因此只展示这一种:
<resultMap id="selectMap" type="com.hbu.springmybatisdemo.model.UserInfo">
        <id column="id" property="id"></id>
        <result column="delete_flag" property="deleteFlag"></result>
        <result column="create_time" property="createTime"></result>
        <result column="update_time" property="updateTime"></result>
    </resultMap>
    <select id="selectAll" resultType="com.hbu.springmybatisdemo.model.UserInfo" resultMap="selectMap">
        select * from user_info
    </select>
增(insert)
Integer insertUSer(UserInfo userInfo);
    <insert id="insertUSer">
        insert into user_info (username,password,age) values(#{username},#{password},#{age})
    </insert>
@Test
    void insertUSer() {
        UserInfo userInfo = new UserInfo();
        userInfo.setUsername("username1");
        userInfo.setPassword("password1");
        userInfo.setAge(18);
        Integer rows = userInfoMapperXml.insertUSer(userInfo);
        System.out.println("影响行数" + rows);
    }
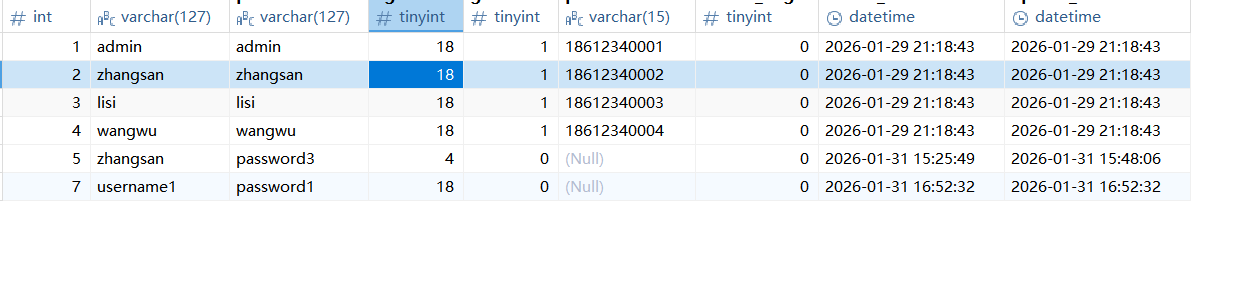
基础的操作还是很简单,这里的问题还是返回自增id的难点,处理方式和注解也是一样的:
    <insert id="insertUSer" useGeneratedKeys="true" keyProperty="id">
        insert into user_info (username,password,age) values(#{username},#{password},#{age})
    </insert>
因为没有注解了,所以设置的时候是在标签里面设置的。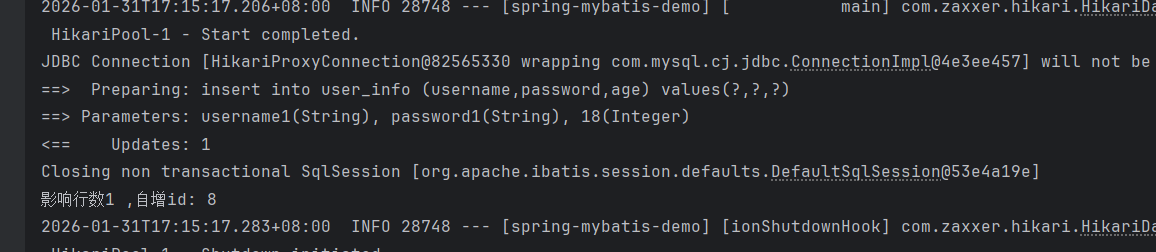
删(delete)
Integer deleteUser(Integer id);
    <delete id="deleteUser">
        delete from user_info where id = #{id}
    </delete>
改(update)
Integer updateUser(String phone,Integer id);
<update id="updateUser">
        update user_info set phone = 1234567 where id = #{id}
    </update>
补充知识
多表查询
先将多表查询的语句使用数据库查询检验一下: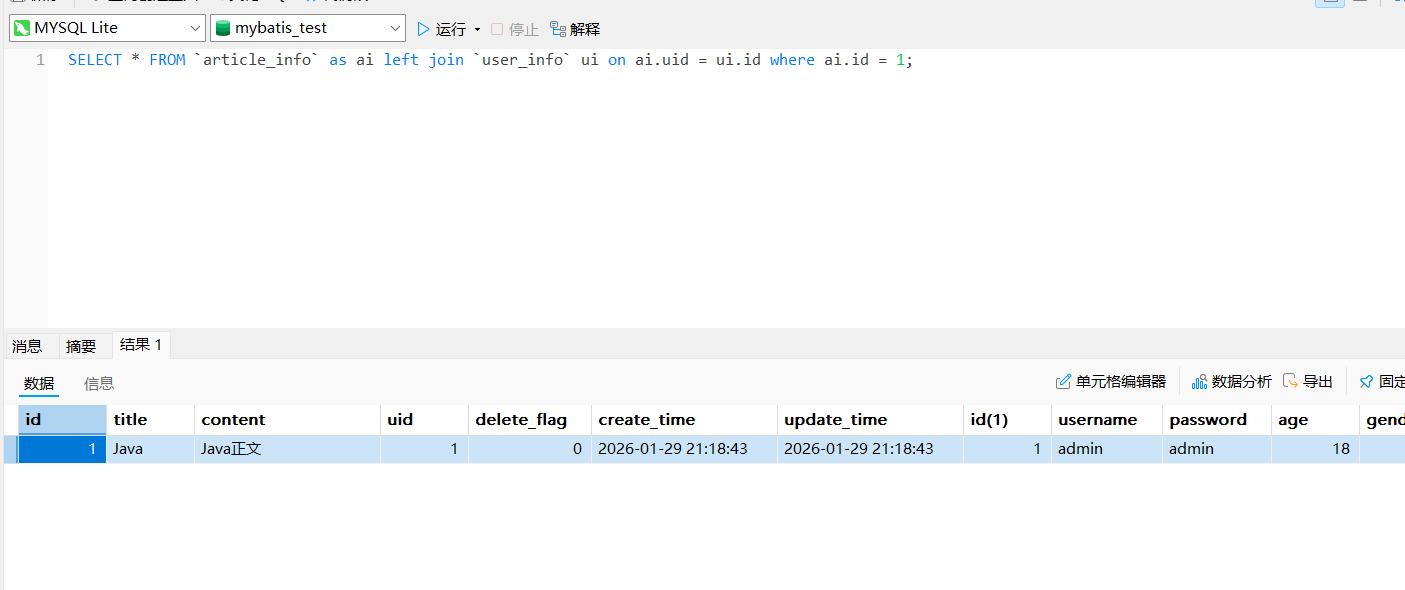
@Mapper
public interface ArticleInfoMapperXml {
    List<ArticleInfo> getInfo(Integer id);
}
    <select id="getInfo" resultType="com.hbu.springmybatisdemo.model.ArticleInfo">
        SELECT * FROM `article_info` as ai
            left join `user_info` ui on ai.uid = ui.id
                 where ai.id = #{id};
    </select>
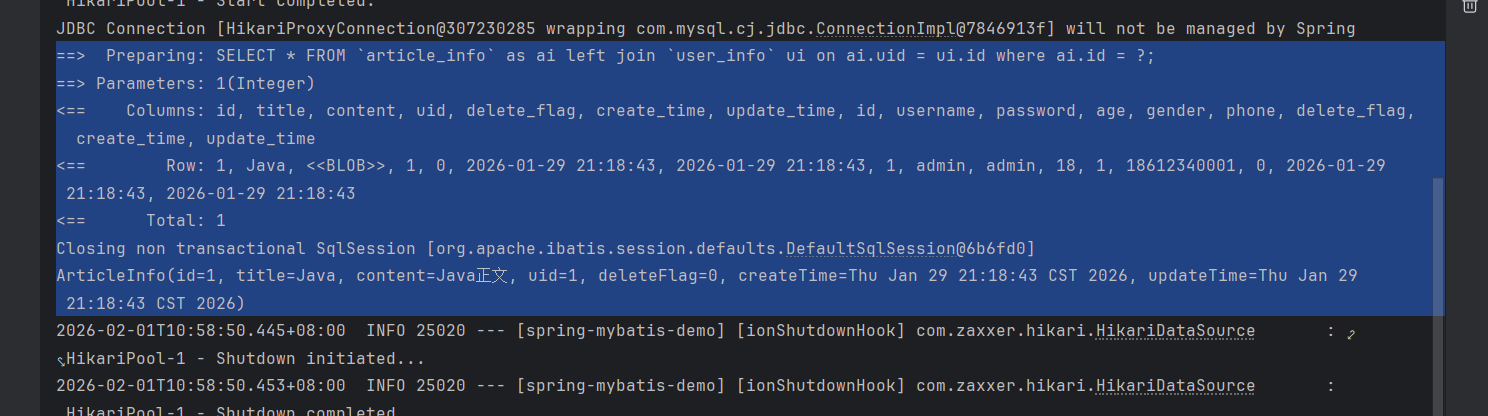
Mybatis日志确实没问题,但是咱们自己的输出里面没有输出user_info表里面的信息,只有article_info表里面的信息。
要想解决这个问题,可以在定义文章类的时候加入用户类的属性:
@Data
public class ArticleInfo {
    private Integer id;
    private String title;
    private String content;
    private Integer uid;
    private Integer deleteFlag;
    private Date createTime;
    private Date updateTime;
    private String username;
    private Integer age;
}
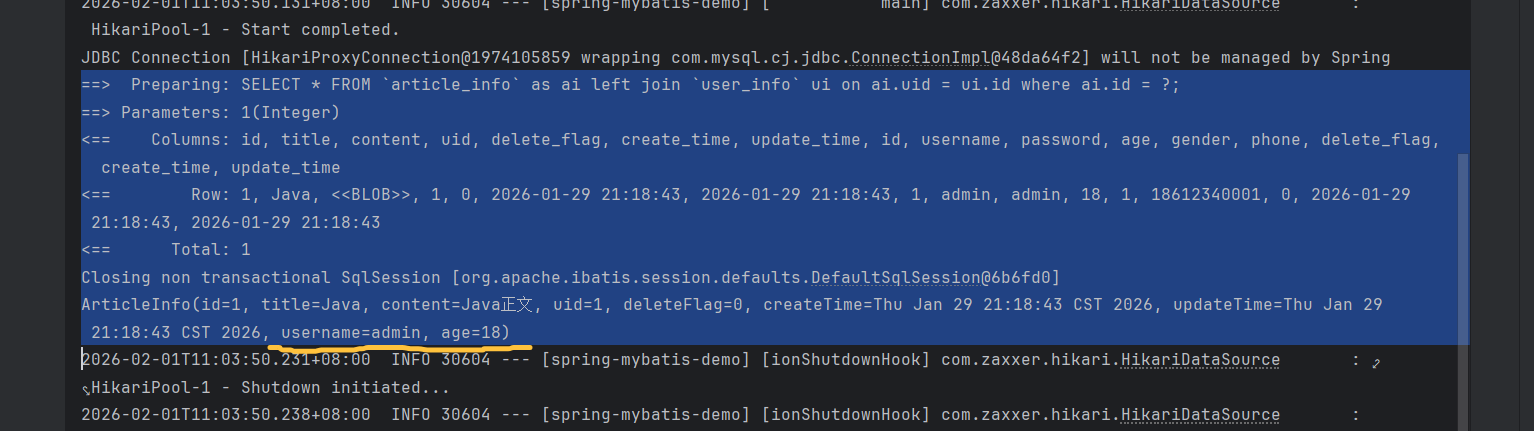
此外还有一些办法可以解决这个问题,但是因为实际开发中尽量避免多表查询,所以这些方法大家自行探索吧。
#{}与${}:经典面试题
#{}与${}的使用
<select id="selectAllById" resultType="com.hbu.springmybatisdemo.model.UserInfo">
        select * from user_info where id = #{id}
    </select>
<select id="selectAllById" resultType="com.hbu.springmybatisdemo.model.UserInfo">
        select * from user_info where id = ${id}
    </select>
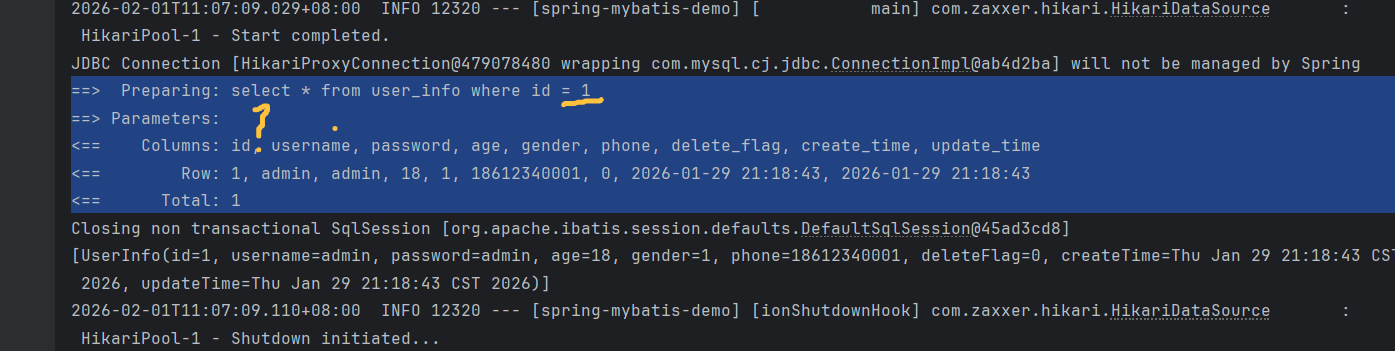
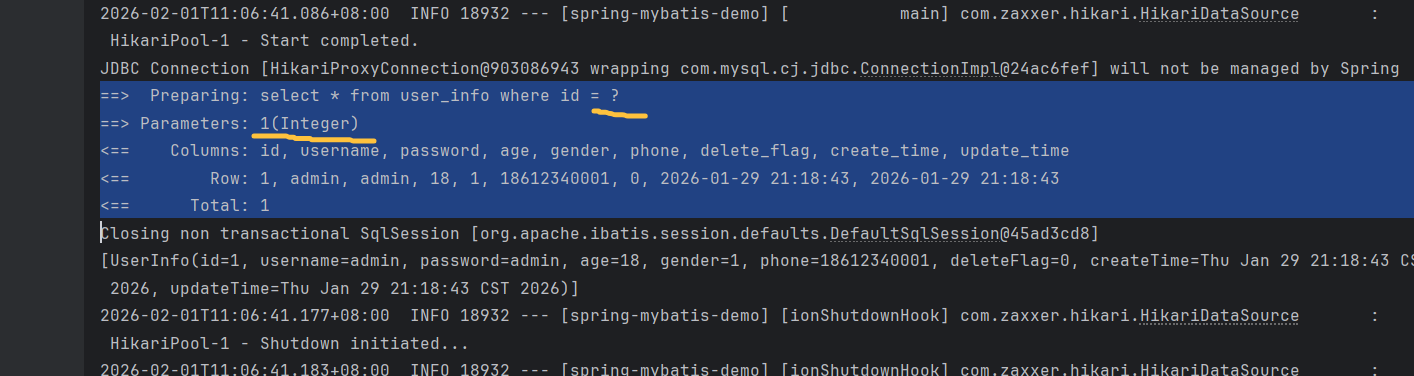
大家观察一下当传入的参数是Integer类型时sql语句有什么不同:
#{}传参,有参数,并且sql语句中的id赋值部分被预留了出来。
¥{}传参,无参数,并且sql语句中的复制部分直接赋值好了。
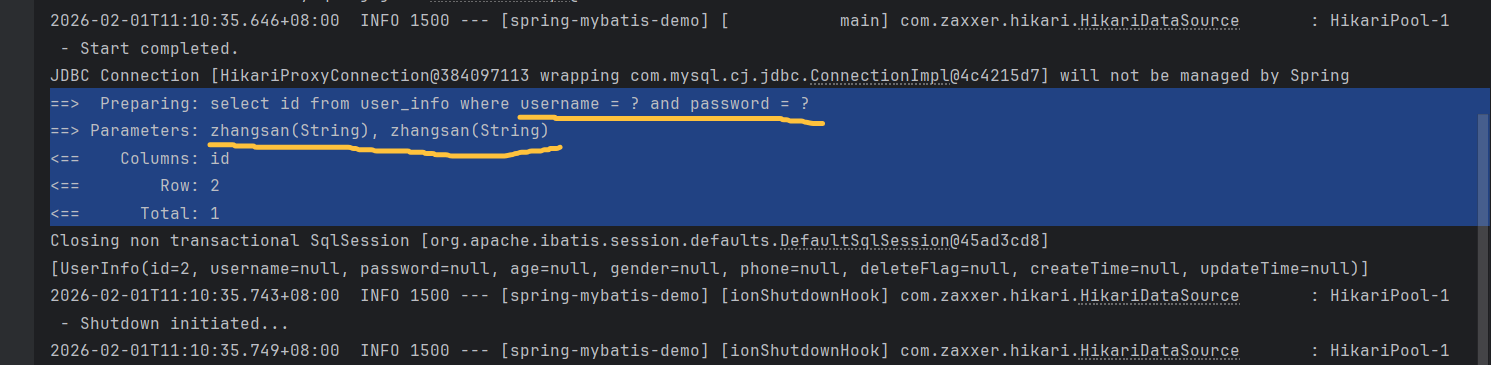
其实Integer类型还是不明显,下面看看String类型传参场景:
<select id="selectIdByUsernamePassword" resultType="com.hbu.springmybatisdemo.model.UserInfo">
        select id from user_info where username = #{username} and password = #{password}
    </select>
<select id="selectIdByUsernamePassword" resultType="com.hbu.springmybatisdemo.model.UserInfo">
        select id from user_info where username = ${username} and password = ${password}
    </select>

改成$符号之后报错了。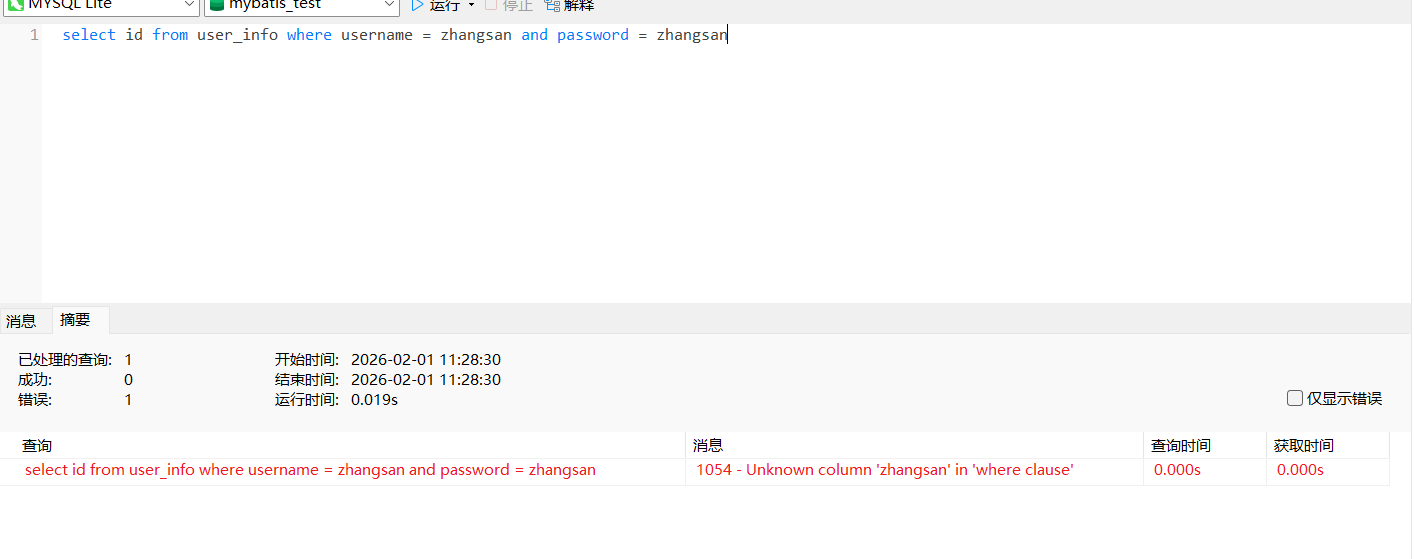
将报错信息中的sql语句使用数据库查询发现确实是错误的:
因为字符串没有加 " "or ‘’。
解密:
#{} 使用的是预编译 SQL,通过?占位的方式,提前对 SQL 进行编译,然后把参数填充到 SQL 语句中。#{} 会根据参数类型,自动拼接引号 ‘’。
${} 是即时SQL,会直接进行字符替换,一起对 SQL 进行编译。如果参数为字符串,需要加上引号 ‘’。
所以如果我们自行加上引号的话,也可以使用${}了:
<select id="selectIdByUsernamePassword" resultType="com.hbu.springmybatisdemo.model.UserInfo">
        select id from user_info where username = "${username}" and password = "${password}"
    </select>

#{}和${}的区别 ——经典面试题
#{} 和 ${} 的区别就是预编译SQL和即时SQL 的区别
1.#{}比${}性能更好
2.使用不同:预编译SQL占位,即时SQL是直接拼接,如果参数是String,需要手动添加引号。
不过跟第三个区别相比,前俩真的不值一提
${}存在SQL注入问题 ★
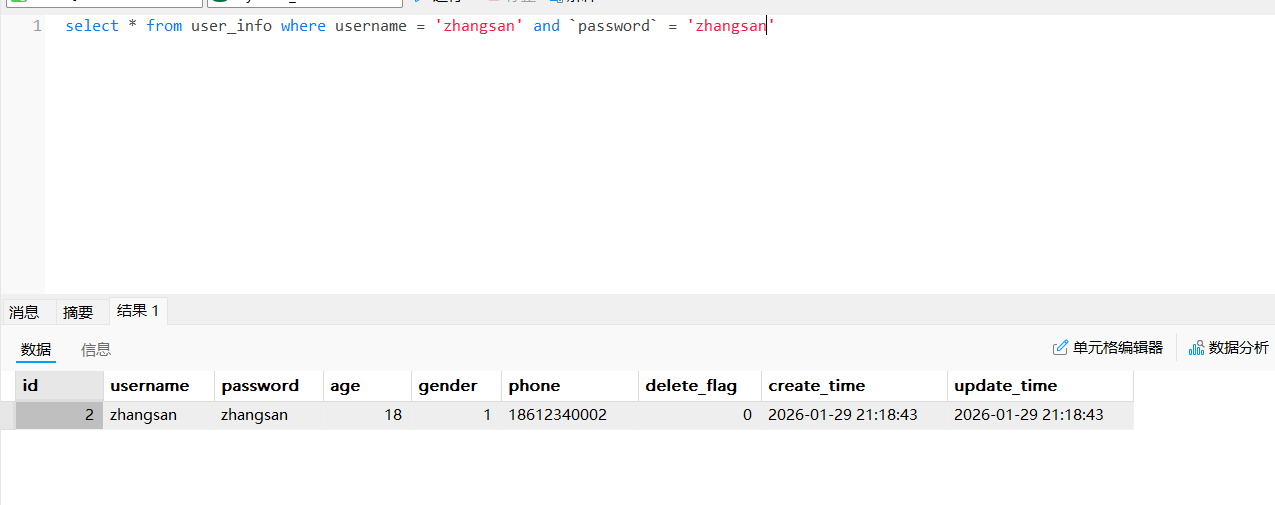
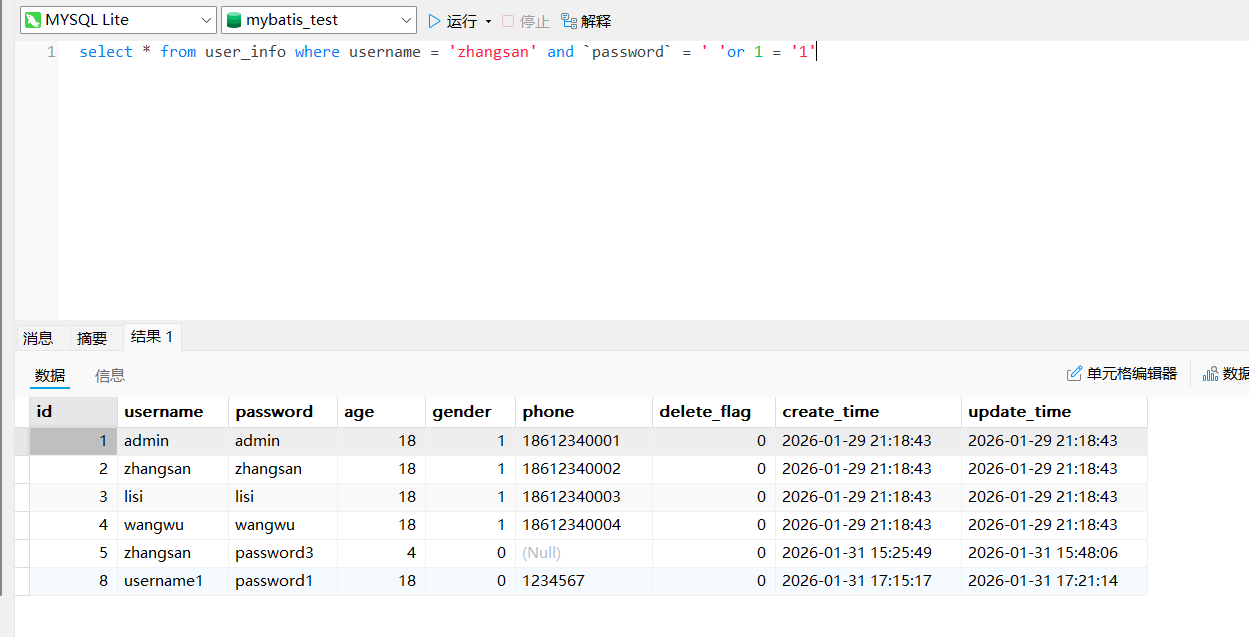
来看一下上面的代码吧:
我们使用${}时,首先肯定要加上引号,此时待传参的部分为password = ’ '。
我们传入的参数是 ’ or 1 = ’ 1
前面的’会和前面的引号组合,后面的引号和原来后面的引号组合,而在SQL中,1 = '1’是正确的,SQL会自动将类型进行转换。此时 1 = '1’永远成立,所以会把表中所有数据返回,造成数据泄露。
这还不算什么,如果在后面加上;drop xxx甚至可以直接把你的表删了,直接攻击你的服务器,所以SQL注入还是危害很大的一个漏洞。
但是!并不是说使用了${}就会产生SQL注入。比如,给Integer类型参数使用的话,如果用java写的后端代码的话,你想传入一个字符串类型的参数,后端Integer id这里直接接收不了产生报错。
所以,能尽量使用#{}就使用#{},使用${}时一定要注意SQL注入的问题!
排序功能
刚说完能尽量使用#{}就使用#{},使用${}时一定要注意SQL注入的问题,相信很多人已经下定决心以后只用#{}了。但是下面就要讲一个#{}完成不了但是 ${}可以完成的事情。
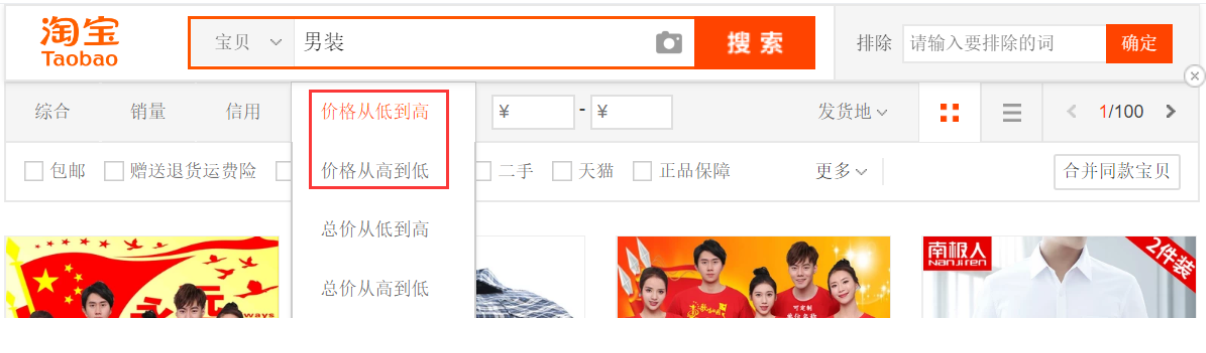
购物平台几乎都有商品排序的功能,这个功能#和$谁能实现呢?
<select id="selectAllInOrder" resultType="com.hbu.springmybatisdemo.model.UserInfo">
        select * from user_info order by id #{order}
    </select>

我们可以看到,desc传过去之后成了’desc’,但是desc是一个关键字,加了引号后成了一个字符串,代码就会出现异常。
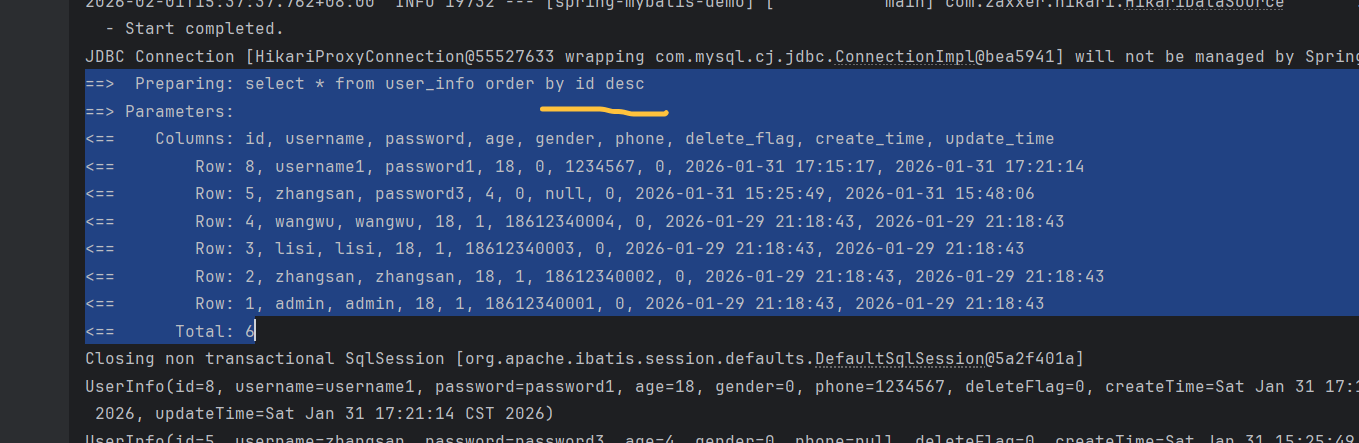
切换到${}之后,传入的参数只是进行字符串拼接,不会自动加引号,此时代码可以正常运行了。
由这个也能推断,当需要传入的参数在MySQL中是一个关键字时,此时传参只能用${}了。。。
至于SQL注入问题,就拿刚才那张淘宝平台的截图来说,要想实现排序功能,用户只能选那几个服务器给出的特定的接口,不具备自主传参的能力,因而可以避免SQL注入问题。
like查询
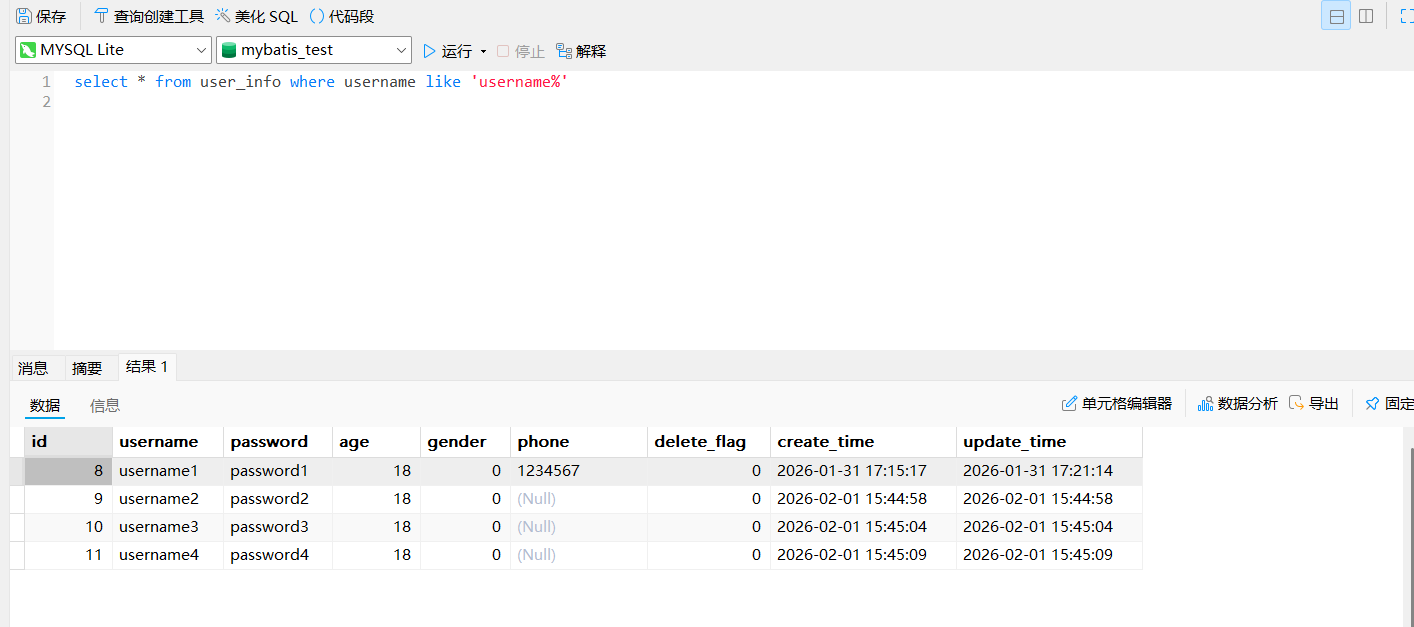
<select id="selectAllByLikes" resultType="com.hbu.springmybatisdemo.model.UserInfo">
        select * from user_info where username like '#{likes}%'
    </select>

这个其实很明显了,没办法传入一个自带’ '的参数,这里#{}肯定是没法解决的。
这也是一个典型的${}好使#{}不好使的场景。
数据库连接池
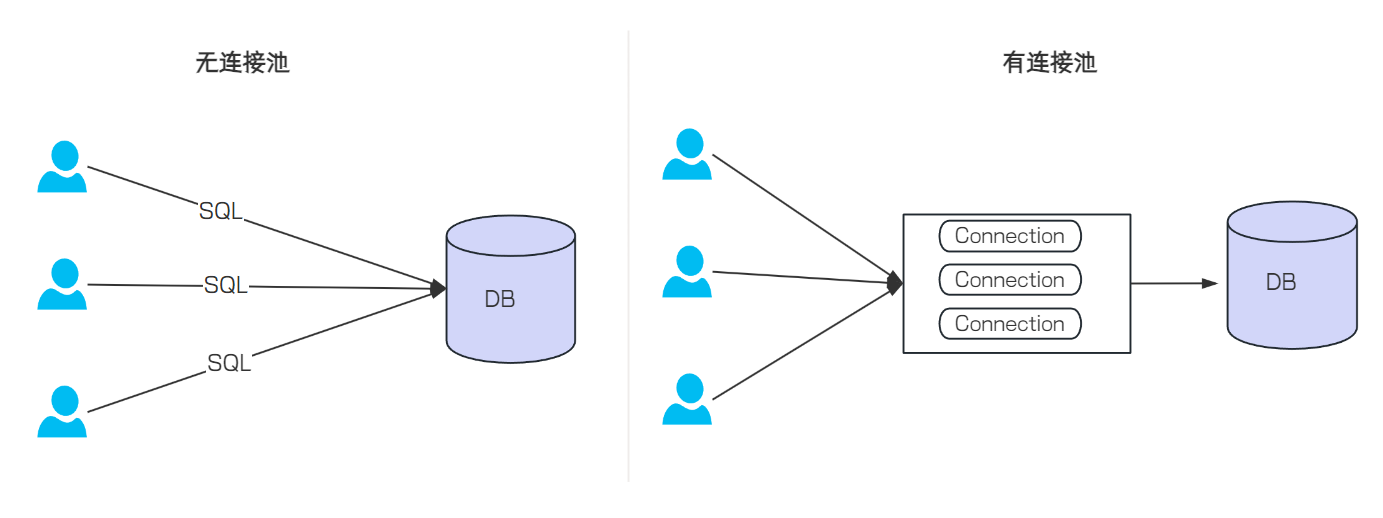
没有使用数据库连接池的情况:每次执行 SQL 语句,要先创建一个新的连接对象,然后执行 SQL 语句,SQL 语句执行完,再关闭连接对象释放资源。这种重复创建连接、销毁连接的操作,比较消耗系统资源。
使用数据库连接池的情况:程序启动时,会在数据库连接池中预先创建一定数量的 Connection 对象,当有客户请求需要操作数据库时,直接从连接池中获取现成的 Connection 对象,执行完 SQL 语句后,再将 Connection 对象归还给连接池,而非直接销毁。
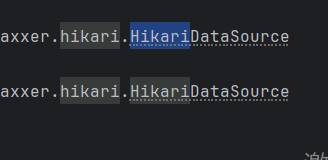
Mybatis中就部署了这样的连接池,上面这个Hikari就是连接池的一种,也是默认的连接池。可以修改连接池,大家自行探索吧。

汇聚全球AI编程工具,助力开发者即刻编程。
更多推荐



 45
45 0
0- 0


 已为社区贡献11条内容

所有评论(0)